


I recently got hold of a Wolfson Audio card and did a bit of trial recording using the command line - see http://www.element14.com/community/community/raspberry-pi/raspberrypi_projects/blog/2014/04/06/wolfson-audio-project.
That all works fine - but what I want to be able to do is use use my Pi as a mini-recorder, which means operating on its won, away from a monitor/screen/internet connection, etc. I decided that, as I have a smart phone with a browser, if I could create a network connection between the Pi and my phone, I could wrote some php pages to control the audio card.
To do this I need to
- Configure the Pi as a wireless Access point
- Be able to connect from my phone to the Pi
- Have some php pages to allow me to record and playback
Setting up a wireless access point
I found some instructions from Adafruit at here
which give detailed steps for configuring a wireless access point. I followed these to the letter - and it didn't work completely  - I could see the network that I had created from my phone, but i couldn't connect to it. I suggest you do this, and then follow the extra steps below. At some point I will take a clean install and repeat this process, so that I can come up with a definitive list of steps to follow !
When I looked at the board, I realised that there were conflicting services running as daemons in the linux installation, which I identified by installing rcconf and viewing the logs at /var/logs/messages and /var/logs/syslog and looking at the messages on boot up.
So I ran rcconf and I removed isc-dhcp-server and installed udhcpd. (rcconf is a run level configuration tool - see https://packages.debian.org/wheezy/rcconf ).
(isc-dhcp-server has been reported to just have problems by others online.)
I configured /etc/udhcpd.conf appropriately (see sample file attached), then ran rcconf and disabled dnsmasq , and made sure udhcpd was enabled.
I also disabled the hotplug line in /etc/network/interfaces and made sure all necessary options were there (see sample file attached). this final configuration proved a bit tricky - everything worked fine until I unplugged the pi from the network. I had had it connected so I could access it 'headless' via putty. I ended up with the following values in interfaces (comments in bold have been added for clarity - do not copy/paste this text but see sample attached !).
auto lo
iface lo inet loopback
Set a static IP address for the lan connection as we are not going to be connected to a network. This will stop the Pi trying to find a DHCP server
auto eth0
iface eth0 inet static
address 192.168.1.81
netmask 255.255.255.0
Set a static address for the wireless connection - this will be the IP address that we use on our phone
auto wlan0
#allow hotplug wlan0
iface wlan0 inet static
address 192.168.42.1
netmask 255.255.255.0
network 192.168.42.0
broadcast 192.168.42.255
gateway 192.168.42.1
Accessing from my phone
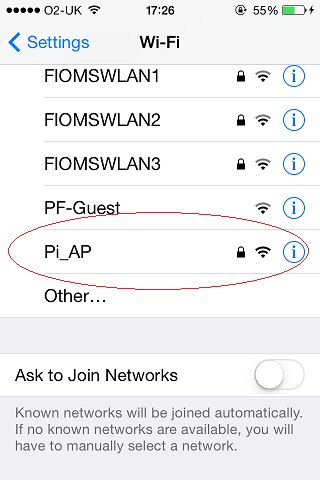
With the pi booted up, I can see the network, as shown below. When I click on the network it opens, I'm prompted for the password, and then the phone connects.

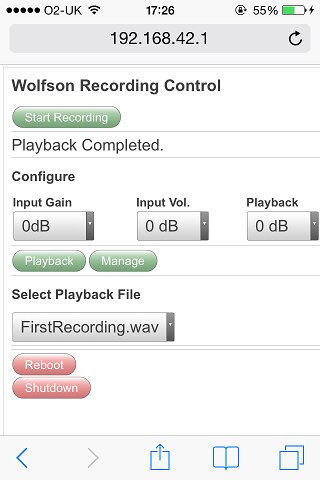
Ive written some PHP pages to control the Wolfson card, which I will go into m,roe detail about in a separate blog. These allow me to set the input gain and volume, and the playback volume, and to start/tops recording and playback. I also added some options to enable me to shutdown and reboot the Pi as its not going to have a keyboard attached!
This is what it looks like - this is very much a first go, and Im planning to make it look a bit less clunky. This isn;t a phone app !! - its a web page that I have loaded from the Pi - see the URL at the top of the page, which is the static IP of the Pi that I assigned in the etc/network/interfaces file
Controlling with a php script
The following is an explaination of how i have implemented one of the functions - i.e. start recording' It covers the main points of the application.
One of the things I want to do is to start a recording by pressing a button on the phone. To do that I want to do the following
- Fire off a background job to start recording to a file
- Change the page to show that the recording is running
I have written a shell script to run the recording, which takes a couple of parameters for gain and volume. I call a script to set the gain and recording volume on the card then use the arecord function to record to a date stamped file.
# Set up the card
/var/www/recording/use_case_scripts/Record_from_DMIC.sh $1 $2

# record to file - create one that is datestamped
OUTPUT_FILE="/var/www/recording/music/record_`date +%Y%m%d_%H_%M_%S`.wav";
arecord -Dhw:0 -r 44100 -c 2 -f S32_LE $OUTPUT_FILE
Within the php page, when I clock the 'record button, this executes some java script to change the display (i.e. put out a /'recording' message') and then calls a separate php page to call the above script. This php contains the following code to do that
/* Get the gain and level parameters, passed through in the request */
$gain = $_GET["gain"];
$inputLevel = $_GET["inputLevel"];
$playbackLevel = $_GET["playbackLevel"];

/* Spawn the recording job - the statement '  > /dev/null &' causes it to run in the background */
exec("sudo /var/www/recording/pe_record.sh $gain $inputLevel  > /dev/null &");

/* return to the main page - returning the current values paramrters so those don't get lost */
header( 'Location: recordingcontrol.php?gain=' . $gain . '&playbackLevel=' . $playbackLevel. '&inputLevel=' . $inputLevel.'&recordingStarted=true') ;
Permissions Considerations (use sudo visudo)
The web pages and their functions run under the default apache user www-data. this user must therefore be given sudo access to some functions. This is done by editing the sudo users file - e.g. use command sudo visudo. You will need to make changes as follows (this is required in order to execute the record shell script, as mentioned above).
www-data ALL=/var/www/recording/pe_record.sh
www-data ALL=NOPASSWD: /var/www/recording/pe_record.sh