

I'll admit it; I'm totally bandwagon surfing here. The world is busy freaking out over the NES Mini, but I was sent one for free and it's honestly not worth the hype.
It's okay, and I like the style of it a lot, but it has some serious shortcomings too. This isn't the place to rattle that particular pixelated sabre, other than to say you can spend the same money on a significantly more capable and infinitely fun miniature retro gaming console that has all the NES games ever made -- not just 30 of them.
For that matter, it'll also work as a SNES, Mega Drive/Genesis, Atari 2600 and about 50 other classic console and computers, all in one neat package, which more than justifies the slightly higher cost.
And there's still time to do it for Christmas if you're looking to hook up friends or family with some classic gaming goodness.
Building your very own NES Mini using a Raspberry Pi is incredibly simple, and I thought I'd take half an hour out of my morning nap time to whip up a quick -- yet thorough -- tutorial on how to do it. And anyone can do it, which is the really good news! In fact it'd make an ideal first project for someone who's new to the Raspberry Pi.
I know we sell this stuff, and there's an obvious click bait angle here, but hand on heart, I wrote this because I think the retro gamers out there are likely to a little disappointed with their NES Mini, while this wee nostalgic beast will feed your gaming demons for a long time to come.
The NESberry Pi
Here's a breakdown of what you'll be building.
Approximate Cost: £70/$90/€85
Rough Build Time: 1-2 hours
Overview:
We take a Raspberry Pi computer, install an image on its SD card that'll turn it into a NES, put it in a case, hook up two controllers, connect it to the TV, install some games, and it's good to go. If you're brand new to all this, you might want to set aside an hour, maybe two, to build your NESberry Pi mini console.
Parts List
A quick note on the Raspberry Pi: Purely in the case of the NESberry Pi console, the only benefit of a Raspberry Pi 3 over a Raspberry Pi 2 is that the Pi3 has built in Wi-Fi and Bluetooth. This means you can copy games to it over the network and use wireless Bluetooth joypads. However, in terms of playing the actual games, you wouldn't be able to see any difference if you happen to have a Pi2 already and want to use that.
- Raspberry Pi 3 : This is brains of your NESberry Pi mini console.
- Raspberry Pi Case : There are lots of Raspberry Pi cases available, but I like this one for the NESberry Pi because I feel the red and white have a nice Famicom motif to them

- Raspberry Pi Power Supply : Go with the official Raspberry Pi 3 power supply, as it puts out just a little more juice that the latest Raspberry Pi wants. It's still a cheap option, even though it's official.
- HDMI Cable : Do yourself a small favour and go with a 2m cable at least. Just gives you more options for locating the NESberry Pi in your living room. I also went with white, to match the case.
- MicroSD Card : You don't necessarily need NOOBs for this, as we'll be overwriting the SD card anyway. A 4GB card is more than enough to hold every NES game ever made, but I'd recommend at least 16GB to future proof your NESberry Pi. Whatever size you go for, make sure your microSD card is Class 10! This means it transfers data to the Raspberry Pi very quickly, which is what we need.
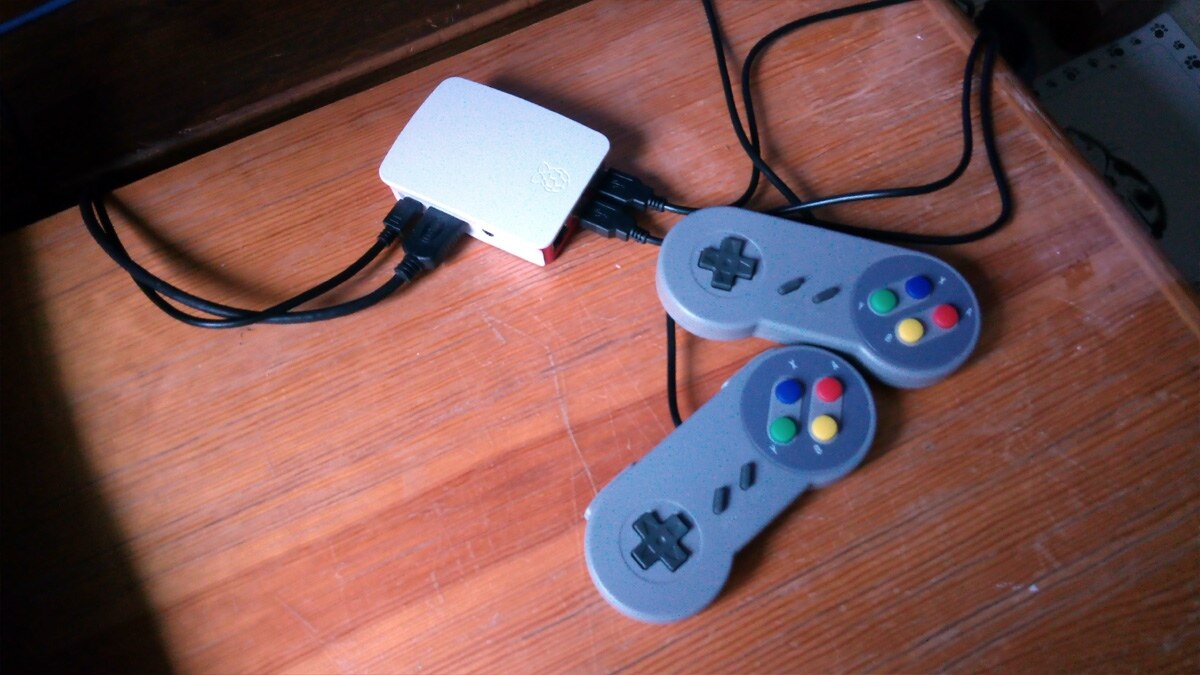
- USB Joypads (CPC's range, or MCM's): Take your pick here, really. This style of SNES-like USB controller is particularly ideal, as it fits the NESberry Pi's retro aesthetic perfectly and is plug 'n' play compatible with the Raspberry Pi. Xbox 360 joypads work equally well, too. As long as it's got a USB plug on the end and will work on a PC, it'll also work on your NESberry Pi.

You'll also need the following, to set it all up:
- A computer.
- A microSD card reader.
- Software to write SD card "image files", such as Win32DiskImager for Windows, or ApplePi Baker for Mac.
- A USB flash drive, formatted as FAT32.
Install RetroPie
RetroPie is what's known as a "front end". It's a simple way to combine lots of emulators into an easy to navigate, good looking list of menus. The "emulators" are software that mimic the old consoles and computers, so it's a bit like having a NES inside your Raspberry Pi (and a SNES, Atari, Mega Drive etc).
I highly recommend RetroPie as it works beautifully with minimum effort, it's free, is very stable, and is very easy to install. All we have to do is put it on your microSD card, and then plug the card into the Raspberry Pi. Let's take a look at that.
- Go to the RetroPie website and download the "Raspberry Pi 2/3" image. This is like downloading all the entire contents for the microSD card, which we'll then copy over.
- Once it's downloaded you'll need to extract the image file using a program like 7-Zip. Once extracted you'll have a .img file, which we can write to the microSD card.
- Insert your microSD card into your computer, launch Win32DiskImager or ApplePi Baker, and write the RetroPie .img file to the microSD card.
Set Up the NESberry Pi Hardware
Put the Raspberry Pi into the case as your first job. You can see the Pi to the right (as it is before it goes in the case), with labels for all its connectors, showing you where the cables and microSD card will go.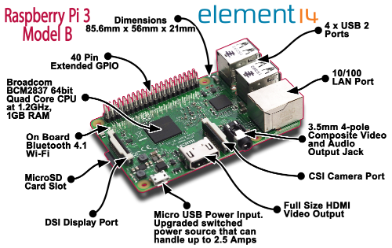
- Connect the HDMI cable between the RPi and your TV, turn the TV on, and set it to the appropriate HDMI channel.
- Connect your USB joypad(s) to any one of the Raspberry Pi's USB ports.
- Plug the Raspberry Pi power supply into the wall, and the other end into the Raspberry Pi. The power connector is a micro USB port next to the HDMI socket.
- Slide the microSD card into the Raspberry Pi from underneath, making sure the thin gold connectors on the SD card are facing upwards. There's a small cut out in the bottom edge of the case, so you can see where the SD card goes.
- Turn the power on, and RetroPie will boot up.
Setting Up RetroPie
When RetroPie first starts up, it'll ask you to configure your USB joypad. Follow the onscreen instructions, pressing the buttons as requested (as per the diagram to the right), and it'll take you into the emulator menus when you're finished. Note that RetroPie automatically hides the consoles when no games are installed, so right now you won't actually see any options for a NES, or other console. Don't worry about that, though.

For the most part RetroPie's default settings will work very nicely, so there's nothing else we need to do in that respect. But here are a few pointers on how to control RetroPie using the joypad.
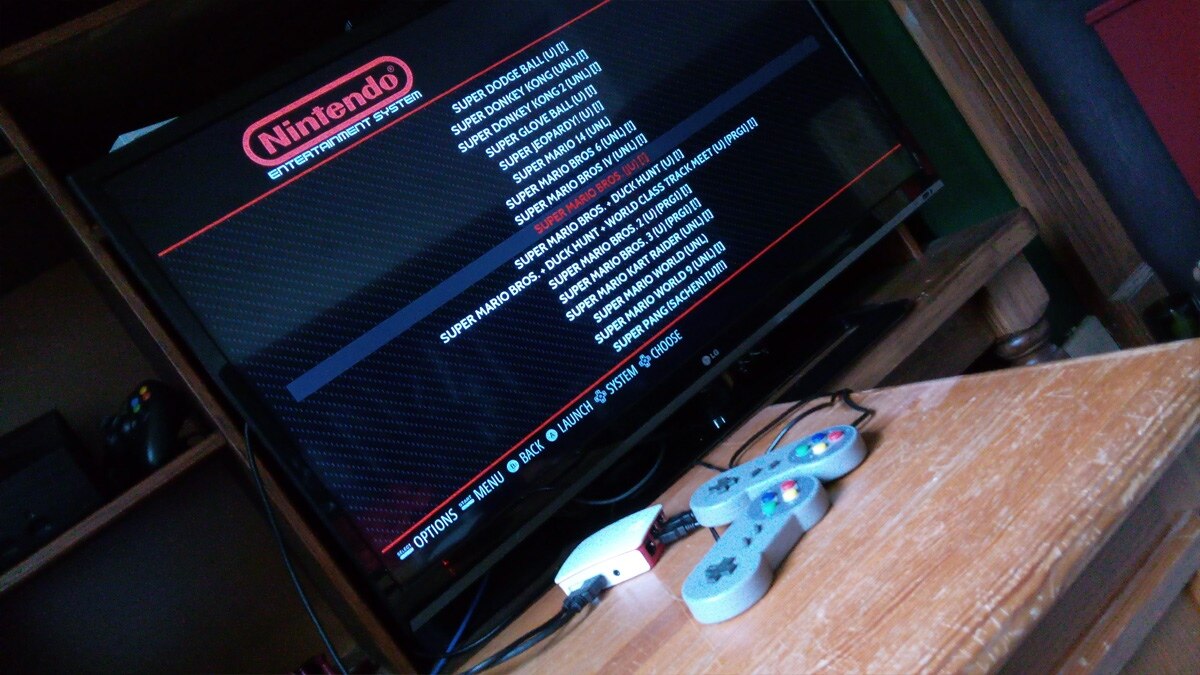
- Loading a Game: Move left and right and press "A" to select a console. A list of games appears. Scroll down to the game you want, and press "A" to load it.
- Exiting a Game: Press "START" and "SELECT" together to quit a game and return to the RetroPie menu.
- Saving a Game: Hold down the "SELECT" button and press the "RIGHT SHOULDER" button to save the game you're currently playing.
- Loading a Game: Load the relevant game, hold down the "SELECT" button, and press "LEFT SHOULDER" to load a previously saved game.
- Reset the Console: To mimic resetting the current console while playing a game, hold down "SELECT" and press "X".
Installing Games
In the retro gaming world, games are called "ROMs". You can think of a ROM file as being the physical cartridge you used to plug into a NES when playing a game. In order for your NESberry Pi to work, we therefore need to load it up with ROMs.
Now, here's where things get a bit grey. Depending on where you are in the world, downloading ROMs can be illegal. It's a difficulty that's been significantly relaxed recently, as the Internet Archive was granted a copyright exception for cataloguing a lot of old games as open-source media. So you can download pretty much every NES game ever made from there if it's legal for you to do so (that's entirely for you to research and decide upon -- we're not responsible for what you do online!).
Once you've got your ROMs, you might need to use 7-Zip again to extract them all to a folder. Each game ROM will most likely be a .nes file.
- Insert the USB flash drive into your computer, and format it as FAT32.
- Create a new folder on the drive called "retropie". The name must be exactly like that, in lower case, and without the quotes.
- With the Raspberry Pi switched on and RetroPie running, insert the USB drive into any of the Raspberry Pi's USB ports, and wait for two minutes. The Raspberry Pi will automatically create a directory structure inside your retropie folder.
- Put the USB drive back into your computer and open the "retropie" folder, followed by the "roms" folder. You'll now see a list of every computer and console that RetroPie can emulate, include one called "nes".
- Copy as many or as few of the downloaded .nes ROM files into the "nes" folder on the flash drive as you like.
- Put the flash drive back into the Raspberry Pi, and it'll automatically copy the ROM files over. Give it five minutes to complete this before removing the USB drive.
- Press "START" on your controller to open the control menu, and reboot the Raspberry Pi. Your games are now available, and your NESberry Pi is finished!
Note that you can copy ROMs for other platforms into their relevant folders on the USB drive, and the Raspberry Pi will automatically install those in the appropriate emulator too. So your NESberry Pi can just as easily be a Mega Pive, a SNESberry Pi, an AtarPi 2600, a ZX Pictrum (got any other terrible Pi puns?) and play many, many other games besides NES ones!
Or you could build it into an awesome PIK3A Retro Gaming Table.
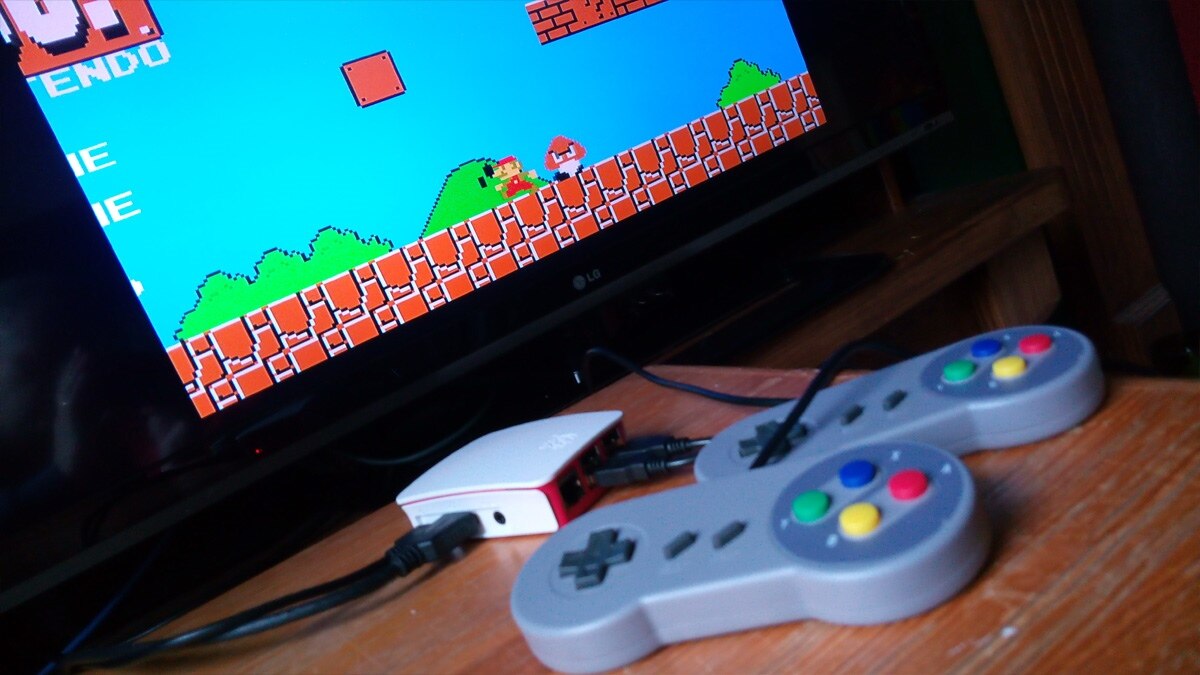
Remember to post photos of your NESberry Pi build here on element14, and we'd love to see people playing it at Christmas if you make one for them! Here's mine:
 |  |  |
Top Comments