

Amazingly, the Raspberry Pi booting from a USB device is a huge point of controversy. A great deal many people believe that you still require the SDCard to be able to do it. This is definitely no longer the case, especially with the Raspberry Pi 3. So even though with the Pi Desktop you're going to be connecting a Solid State Drive via a SATA to USB 2.0 interface, where you're going to lose some speed, overall, it's still an improvement. If for nothing else, the capacity of what you can store on it. The add-on HAT board will take an mSATA SSD up to 1 Terabyte in size, and for that to be faster to boot and access than an SDCard and for some USB 'sticks' or 'drives' then that is a significant improvement in itself, and I know a lot of people out there want a dedicated Pi NAS box after all.
So why isn't this straight forward for a lot of people? Why can't you simply plug in your mSATA SSD, format it and get going? Well, I've identified are a few areas that people are mainly struggling with on this:
- You have to enable the 'USB Boot bit' on the Raspberry Pi 3 first (this is permanent)
- Your SSD has to be imaged in the 'right way'
- Some have the impression that you still need the SDCard in, and that you need to mount the SSD (you can do this, though, you don't strictly have to use the SSD as a boot device)
- The mSATA SSD has to be supported by the add-on HAT (I'm not actually sure of any that aren't and there's no reference list at the moment, this is mostly hypothetical).
- There are/were problems with the PiDesktop debian file supplied by Embest (these are being worked on and there is an official github repo here).
On the SSD being imaged in 'the right way', you can end up encountering problems imaging your SSD card as you likely do with your SDCard, especially with Microsoft Windows. Windows has a terrible interface to the SDCard readers with the various software that's available. This is either because the software can only refer to the device via the 'drive letter' or by the 'hardware device ID'. Unfortunately most software (eg. Win32DiskImager, I'm looking at you) can only handle imaging drives when it has a drive letter. This totally fails if you haven't even partitioned your device yet and assigned it a drive letter, and some people feel forced to format it to FAT32, this can break things even further. You don't need to format or pre-partition your device, merely assign it a drive letter. There're two useful pieces of software I use to handle this, one is the free software 'Active Partition Manager' and the other is the Disk Management Snapin for Management Console.
Let's go through some steps on setting this up. By all means comment on this with your experiences or software you've used that has been successful. What you're about to read is my except from the user manual.

Connecting an mSATA SSD
Inside the Pi Desktop we can access the data stored onto the mSATA SSD in one of two ways. Either via USB from the add-on board and then into the attached Raspberry Pi (where we can also boot from it), or connect it to an external computer via USB without having to open up the Pi Desktop case (though you still need to 'turn on' the Pi Desktop for this to work).
If the mSATA SSD that you have connected is pre-formatted with a partition using a FAT32 file system (FS), then this FS is typically accessible by all known modern operating systems (OS), and easily accessible. Though if it uses a typical Linux FS such as ext2/3/4, this is trickier to access by all OSs.
Note: If you’re connecting the mSATA SSD add-on board to a computer other than the Raspberry Pi inside the Pi Desktop, then you will need the appropriate cable, and you will also have to power the add-on board/Pi Desktop and press the power-on switch. This will also power on the Raspberry Pi if it is still connected.
Imaging and Setting Up Partitions
An easy to use utility for managing the partitions on the drive is ‘gparted’ from the Raspbian (OS) (for example if you booted from the SDCard):
This is a graphical user interface (GUI) tool that can be used to manage the partitions on your drives, connected via USB or otherwise. It can be installed via the apt package manager from the command line interface (CLI) :
> sudo apt-get update
> sudo apt-get install gparted
Then you can either run it from the menu of your Raspbian OS, or from the CLI:
> sudo gparted
From here you can (re)partition your mSATA SSD if it’s running a supported file system. If you are using the CLI, then you will want to issue the following command:
> sudo fdisk /dev/<identifier>
Where <identifier> is the mount point for the mSATA SSD.
Alternatively, you can simply write an image to the mSATA SSD, just as you would write an image to an SDCard. The Raspberry Pi Foundation have instructions on how you write images here:
https://www.raspberrypi.org/documentation/installation/installing-images/
Note: if you write an image to your mSATA SSD then the data used and accessible from the OS will only be of the size of the image written, unless you resize the partitions.
Mounting the mSATA SSD to Access Files
Raspbian
The Raspbian OS is based upon Debian Linux, and as such supports the majority of commands and functions that you would use to mount drives within that OS (these typically involve fstab - https://wiki.debian.org/fstab, and pmount - https://wiki.debian.org/pmount ).
From the GUI
Depending on your version of Raspbian, and how you have it configured, when you boot your Raspberry Pi to the GUI and then connect the attached mSATA SSD, you will be prompted what to do with your “Removable media” that has been inserted, and the drive will be automatically mounted.
It is possible that the GUI will not behave in this way, and instead you will have a transparent icon representing the drive on your desktop, which you can then double-click with the left mouse button and Raspbian will attempt to mount it.
From the CLI
When mounting the drive from the GUI, you will have made the drive accessible from the CLI. Typically this is located within the following folder:
/media
However, sometimes we can’t use the GUI, or merely we don’t want to. To mount the drive we must first know how Linux is referring to it. Linux has the majority of its hardware listed under the ‘/dev’ folder structure, with connected devices typically using the format of ‘/dev/sd<x>’ where <x> is a letter. These can even extend further with ‘/dev/sd<x><y>’ where <y> is the number of the partition(s) on the device.
There are a few commands in which we can determine what the device is of a USB device we connect, first, connect the USB device, and then type the following:
> dmesg
This will tell you basically the contents of a system log which gives you information about the device you have just plugged in. You can also issue the following commands:
> lsusb
Which will tell you about the device identifiers, and also:
> lsblk
This command will tell you the /dev/ mount points.
Note: If you have problems running a command, try typing ‘sudo’ before it.
Now, you will need somewhere to mount the drive to. Let’s make a directory and set the permissions onto it:
> sudo mkdir /media/ssd
> sudo chmod 755 /media/ssd
Once you know the device mount point, you can then issue the following command:
> sudo mount /dev/sd<x><y> /media/ssd
Note: Mounting will only work if the mSATA SSD has a file system and partitions setup (see ‘Imaging and Setting Up Partitions’ in this document.), you will want to mount the relevant partition (which has a number, such as /dev/sdb1) as opposed to the device itself (/dev/sdb).
The Raspberry Pi Foundation’s official magazine, The Mag Pi has a good article on this:
https://www.raspberrypi.org/magpi/connecting-disks-with-the-command-line/
Microsoft Windows
Thanks to an open source project called Ext2Fsd (Ext2 File System Driver) it is now possible to very easily mount linux FS onto Microsoft Windows OS.
You can download and install the software from these websites:
https://sourceforge.net/projects/ext2fsd/
To install the software you will need to have administrative rights on the computer you’re installing it onto, and the ability to install the required system drivers. Afterwards you will likely have to reboot.
After you have connected the mSATA SSD HAT board to your computer, you will see it in Windows device manager as a USB Mass Storage Device and also as a drive:
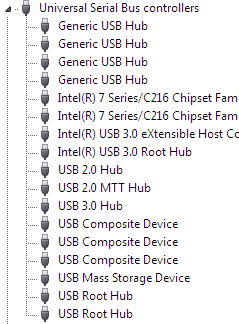
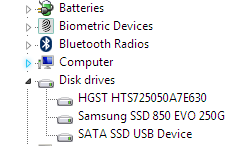
From the start menu, you will want to open the ‘Ext2Fsd’ folder and then ‘Ext2 Volume Manager’:
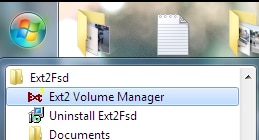
From the software we can then see the partitions of all of the drives listed, including the identified ext FS:

Since in this example, we have already imaged the mSATA SSD with Raspbian, a FAT32x partition is listed (drive E:). it is the EXT4, Linux FS we want below it:
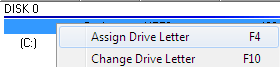
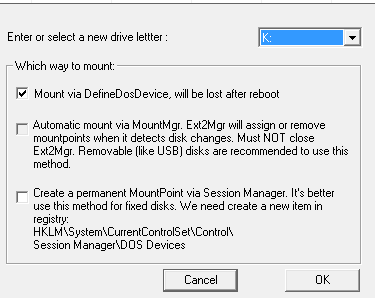
Make sure we want to give it a drive letter so we can access it, there are various mounting options you can choose from.

Windows Explorer then has the new drive listed, which we can then open and view the Linux EXT FS:
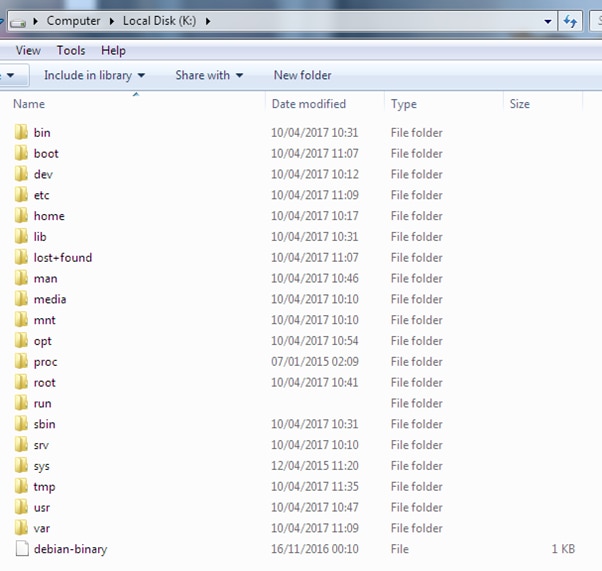
You can now alter the files and unmount them as necessary.
Boot from the mSATA SSD
Configuring your Raspberry Pi to boot from a USB device is a one-way setting. You are configuring a ‘flag’ or a ‘bit’ on your Raspberry Pi chip that you cannot revert.
The Raspberry Pi will always prioritise booting from the SDCard when one is present.
To set this up, you will need an SDCard in your Raspberry Pi that has the Raspbian OS on it. Inside the file located in:
/boot/config.txt
You need to set this option to the value ‘1’ :
program_usb_boot_mode=1
Then power on your Raspberry Pi with the SDCard inserted. That’s all there is to it. Once you’re in Raspbian, you can run the following command from the CLI:
> vcgencmd otp_dump | grep 17:
This should output the following:
17:3020000a
Now all you need to do is ensure your mSATA SSD has an OS on it, that it’s connected via USB and power up your Pi Desktop. If you’re unsure about these steps then you can read the following guide on the Raspberry Pi Foundation site:
https://www.raspberrypi.org/documentation/hardware/raspberrypi/bootmodes/msd.md
You can write the same Raspbian image to your mSATA SSD as you have done to your SDCard. You now no longer need the SDCard to boot your Raspberry Pi once this flag is set.
I've got a Pi Desktop sat on my desk here, if there's any further information you need, or believe I should elaborate on any part of this, then go ahead and ask by adding a comment and I'll do my best.
Top Comments