


First of all, thank again to element 14 to give me the opportunity to roadtest this great kit.
I received the kit on Friday and as I am ill and home alone… lets go to the review…
The kit package looks like a DVD box and contains:
- Ethernet cable
- Mini-USB cable for debug purpose
- Micro-USB (OTG ?) cable for application
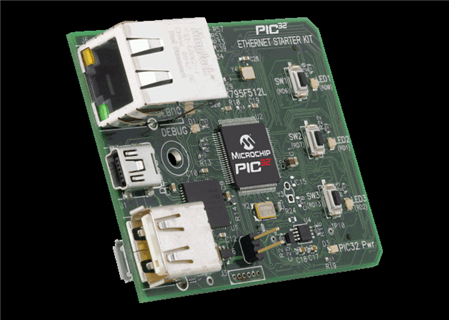
- The PIC32 ethernet starter kit board :
o PIC32MX795F512L (test processor)
o PIC32MX440F512 (embedded debugger)
o Ethernet Phy (external Ethernet phy layer)
o 3 switch + 3 led
o Connectors
§ Ethernet
§ Mini USB (debug/program)
§ Micro USB (device application)
§ USB type A (host application)
- CD-ROM (Microchip starter-kits drivers and tools)
The board is small (credit card size) but got an application connector (high density FX10A-120P/12-SV1(71))
I went also on microchip website to look for new software :
You can see a photo of the board, there are also links to documentation, schematics….
You can find new software for all microchip starter kits :
I preferred to install the newer version rather than the version on the CD…
The install setup everything needed to start with the kit :
- C32 compiler (evaluation)
- MPLAB IDE
- A short video to explain driver installation
After install plug the board with mini USB, the drivers auto installs. On next launch of MPLAB opens a starter_kit project. Just compile and launch (don’t forget to select pic32 starter kit debug tool) … you’ve done the first step on pic32 world : led toggle !!!
The install also created the folder C:\Microchip Starter Kits\PIC32 Starter Kits with the following folders :
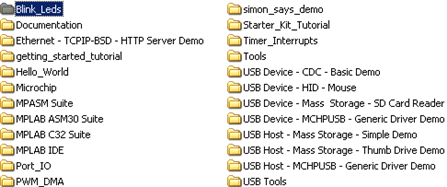
There is a lot of examples, documentations …
I firstly tried Ethernet demo (http server): just compile and run project, connect board with Ethernet cable, configure your computer to address 192.168.2.2, go to your browser and type the default board address 192.168.2.105… and you reach the welcome page of the kit !
Then I played to Sim says for 5 min…
My last test was with the CDC demo… compile and run, connect micro usb connector, and choose the CDC driver inside the project folder. Then open an hyperterminal with COM port (don’t select any baudrate…), when you press top button “Button Pressed –“ displays on terminal window”… when you type a key, terminal displays the key + 1…
Conclusion:
This kit is very great, microchip compiler and IDE are very easy to use. There are many demo projects and the documentation is very complete. With this small board you can easily and quickly test Ethernet, USB host, USB device… and of course the last powerful pic32.
I like very much this board, as I have a lot of projects ideas.
Keep in mind that this is a Starter kit : the expansion connector can’t be easily hacked… you’ll have to build a board with the Hirose connector or to get dedicated expansion board (72$): http://www.microchip.com/stellent/idcplg?IdcService=SS_GET_PAGE&nodeId=2615&dDocName=en535444
Of course, if you need to test further PIC32 USB or CAN and you need more connectivity you can also get an explorer16 with PIC32 PIM(Plug-in Module) and appropriate expansion board but it will be more expensive than the 72$ of the PIC32 Ethernet starter kit.
edit: the DM320002 expansion board is sold 49.48 euros without taxes on http://be.farnell.com/microchip/dm320002/board-i-o-expansion-for-pic32/dp/1621784?crosssellid=1621784&crosssell=true&in_merch=true& ...