RoadTest: Rapiro - Programmable DIY Robot Kit
Author: malakai
Creation date:
Evaluation Type: Independent Products
Did you receive all parts the manufacturer stated would be included in the package?: True
What other parts do you consider comparable to this product?: I have yet to see a comparable kit. That provides a fully functional robotics learning platform that incorporates both the Raspberry Pi and Arduino (Uno) Platform.
What were the biggest problems encountered?: Zero the Servo's by attaching them to the Rapiro Board and applying power. Failure to do so will have the Robot not in the initial stance after assembly. *See Notes following the review.
Detailed Review:
Brief History About Rapiro:
Rapiro started out at a Raspberry Pi Jam in Tokyo and then launched a successful Kickstarter campaign:
It was billed as a cute and affordable robot kit designed to work with a Raspberry Pi. It comes with an Arduino-compatible servo controller.
*Note: This is Not a toy. DIY model robot kit for hobby, and for education in software engineering and robotics area. The users have to assemble the parts, and program the behavior and actions.
With that note and a cost of $450 + $52.62 shipping (no optional components included) this is a fantastic resource for an Individual, School, Maker Club, or any Organization that is seeking to use it as a robotics teaching platform. On April 30th it was announced that you can get Rapiro from Seeed studio! http://www.seeedstudio.com/depot/RAPIRO-DIY-Model-Robot-Kit-p-1818.html which can cut the cost of shipping down to almost nothing depending on how long your willing to wait and where you are located.
Update May 1st, 2014
Notes from the Kickstarter Update:I have uploaded 3D models of RAPIRO on MakerBot Thingiverse.
All plastic parts and four miniature models of RAPIRO.
Enjoy remodeling and 3D printing!
http://www.thingiverse.com/ShotaIshiwatari/designs
Review:
With an understanding of why Rapiro and for that matter the Raspberry Pi exist. I would be hard pressed to review this as just a typical consumer product. But more of an education tool used to teach robotics to an individual or a group of students. Or the ultimate robotic platform for an Arduino / Raspberry Pi enthusiast.
I. Overview of the controller boards:
Both the Arduino and Raspberry Pi boards were created as educational platforms. Both were initially to be used by a group or individual as a means of low cost learning platforms for Electronics and Computer Science.
Early on in the life of the Raspberry Pi it became apparent that a marriage between it and an Arduino style board (At the very least an ATmega micro-controller.) would be a very useful and powerful combination.
Take into account the following. Gert van Loo who is credited for the existence of the Raspberry Pi. Has not only created one add-on board for the Pi, but two. Both have incorporated an ATmega micro-controller. These boards are: The Gertboard & The Gertduiono.
With that in mind. A combination of the Raspberry Pi coupled with an Arduino style board should make for a very resourceful teaching platform. Especially when combined with sensors, LEDs, buttons, motors, servos, and possibly hundreds of other components. (Note: see section B. Basic Connections: below.)
A. So what benefits does Rapiro offer.
On it's own Rapiro with the addition of Five AA Ni-MH batteries along with the following specs of the Controller Board,
Should make for a very powerful teaching resource. Add in a Raspberry Pi, a Camera Module, Speakers, USB Microphone, and a USB Bluetooth adapter, or a USB Wireless Card. And you have the makings of a very sophisticated resource for under $600 that is an all in one robotics teaching platform.
The possibilities at this point are endless. The Pi and Raspbian with all it's repositories such as Text to Speech, Facial Recognition via the Camera module, Speech input through a USB microphone, Control from a PS3 gamepad, Wii Remote, or similar Bluetooth device, or even a smartphone from a built in web server. Easily could deliver an entire curriculum's worth of material. From beginner to advanced students.
B. Basic Connections:
The Rapiro Control Board (JP5) uses 6 pins of the Pi GPIO's Header. These are pins 2,4,6,8,10, & 12.
As seen here:

Pin - 2 & 4 are 5V ( I believe pin 4 is redundant and used only because a 6 pin cable is easier to ship. vs a 4 pin cable and a single 1 pin cable. It could be re-routed as a 5V supply elsewhere.)
Pin - 6 GND
Pin - 8 UART_TXD
Pin - 10 UART_RXD
Pin - 12 PCM_CLK
This leaves 14 GPIO pins available on the Pi. Not including 3.3V and Ground pins.
In addition the Rapiro Board has an available 12C connection located below the red circled pins. (Which are reserved for the optional Distance Sensor. This to could be changed freeing up another connection if that sensor isn't being used.)

All this leaves the possibility of adding various sensors or alternate add-on boards that could be tied to the available pins. Either on the Pi or the Controller Board. Which in turn would create even more ways to use Rapiro.
Note: The EYE-LED connection by the micro USB, that tie to the RGB LED behind Rapiro's eyes.
JP11 just above the circled pins is reserved for AVR programming . As outlined in the RAPRIO Board - Arduino spec (PDF).
C. Summary of Controlls
With the outline above Rapiro offers an extremely basic setup for an early introduction in robotics with just a USB Cable, Arduino IDE Software loaded on a Desktop or Laptop, and 5 AA Batteries. You have a very simple to use Arduino style platform to teach basic movements and commands that can be pre-installed on the ATmega. That when powered up could perform a set routine as an introductory lesson for anyone.
Such as move forward, wave arm, blink eyes, and return to it's original position.
With the addition of a Raspberry Pi. You would then be able to move on to intermediate lesson in Computer Programming. By setting up a user interface via Scratch, Python, C, or many other languages of choice. To allow an interactive app or joystick to control the Rapiro remotely.
Next you would move on to an advanced lesson with the addition of a distance sensor, camera, microphone, or various other sensors. You would then have a very rich full featured project for any individual or class to complete.
And with that I rated Specifications were sufficient to design with a 10.
II. Putting it all togehter:
I wish to give many thanks to Frederick Vandenbosch's wonderful write up: Rapiro: Putting it together and getting it to work. His initial outline from the initial release of Rapiro following the Kickstarter is still the basis for getting up and running with Rapiro very quickly.
A. Building Rapiro:
Note: The following steps are extremely important for a successful build. As taken from the Official Rapiro Assembly Manual
If the charging of batteries is incomplete, servos do not work correctly with noise. You should fully charge the battery before you turn on the power. You cannot use Alkaline or Manganese battery.
Please note some AC Adapter may not satisfy its rated value.
 Tools required to follow along with this manual
 Important
The crucial step with Rapiro is to remember the servo's are not synced with the Rapiro Controller board. And must be attached and powered up to get the sample sketch to put them to a default position.
As seen in the Assembly Manual step # 53
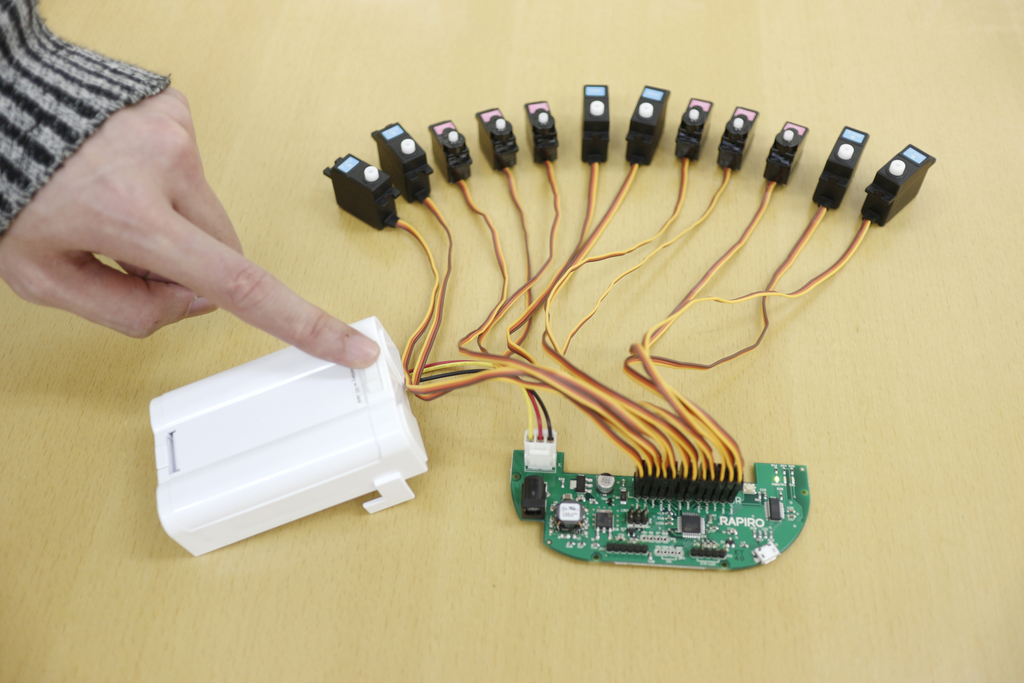 | Please turn on the switch to make Initial adjustment of servo angles. All servo axes are rotated to initial angles. IMPORTANT: Please use fully charged five Ni-MH batteries. If the charging of batteries is incomplete, servos does not work correctly with noise. |
To further adjust the servos after assembling Rapiro. Follow steps # 206 - 209 in the Assembly Manual.
 | If the arms or legs are inclined a bit when you turn on the switch, |
 | Enter the correction value of the angle to the array of int trim[MAXSN] |
 | Change the correction value of the servos that are inclined, then upload the sample sketch to the RAPIRO board. Select “Arduino Uno” from tool menu when you upload the sketch. |
 | Repeat the changing the array of int trim[MAXSN], and the uploading its sketch, until the posture is fixed. |
Initially there was a slight language barrier and some difficulties from the Rapiro Team to deliver the information to it's backers. That coupled with the inertia and demand both within the Kickstarter campaign and those that had missed out. Once a kit was delivered there were some questions left unanswered. But With the help of users like Frederick Vandenbosch and many on the Rapiro Forums this has grown into the documentation we have today. Rapiro has gradually grown into quite a community. Since it was marketed towards educators and picked up by many advanced individuals. Only those who bought a kit without a good grasp on electronics and the dual platforms had struggles. Sourcing the optional parts. Cleaning up the sample sketch. And understanding the power requirements needed to run Rapiro correctly.
With this in mind I gave Support materials were available a 10
III. Moving past the build.
Now that you've gotten Rapiro assembled and reviewed the resources outlined above.
A. Your ready to power it up.
Upon initially powering up Rapiro it will move to a default stance. Be prepared in case you haven't gotten it all zero'd out. If so follow this section.
Here's a look at the sample sketch outlined in (Rapiro: Putting it together and getting it to work)
The Arduino sketch for Rapiro can be modified and uploaded using the Arduino IDE and the micro USB connection.
It's very useful to update the sketch to:
modify the initial position of the servos to properly align feet, arms, etc ... in case they weren't during installation
program new moves
...
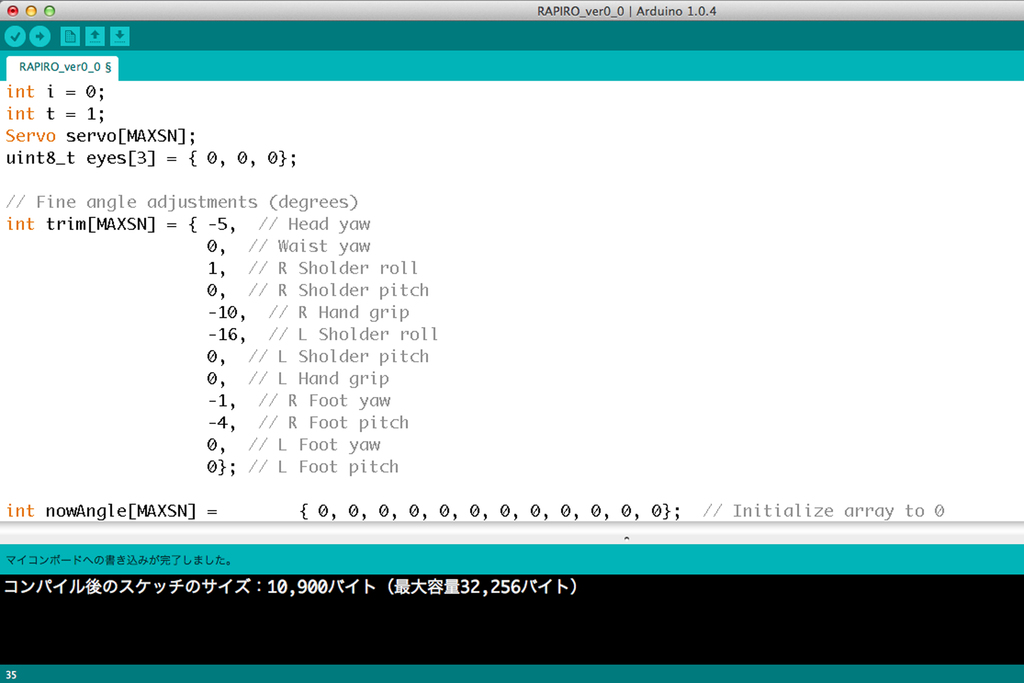
In my case for example, both feet weren't exactly sitting flat on the table and the waist was not propery aligned. So instead of taking everything apart to correct this, I modified the starting position of the feet's and waist's servos and uploaded the updated sketch.
// Fine angle adjustments (degrees)
int trim[MAXSN] = { 0,  // Head yaw
                    -5,  // Waist yaw
                    0,  // R Sholder roll
                    0,  // R Sholder pitch
                    0,  // R Hand grip
                    0,  // L Sholder roll
                    0,  // L Sholder pitch
                    0,  // L Hand grip
                    0,  // R Foot yaw
                    10,  // R Foot pitch
                    0,  // L Foot yaw
                    5}; // L Foot pitch
Full source available here RAPIRO_ver0_0.ino.
Now that you've tweaked your servos. Lets test them out with some movements.
For ease just attach the USB cable to a Computer and open the Arduino IDE:
Choose your Port and be sure to set it to the "Arduino UNO" platform.
Also set the baud rate to 57600bps of the serial terminal.

The following commands are available.
| command | action | eye color |
|---|---|---|
| #M0 | Stop | Blue |
| #M1 | Move Forward | Blue |
| #M2 | Move Back | Blue |
| #M3 | Turn right | Blue |
| #M4 | Turn left | Blue |
| #M5 | Wave both hands | Green |
| #M6 | Wave right hands | Yellow |
| #M7 | Grip both hands | Blue |
| #M8 | Wave left hand | Red |
| #M9 | Stretch out right hand | Blue |
I found no problem with the Demo software that the above tutorial couldn't smooth out by a simple adjustment of a servo. Furthermore adding the Raspberry Pi was easy and the sample commands provided the same results.
*Note I did not account for setup of the Raspberry Pi in this section. As there are many resources available to accomplish this. And really fall outside of the Demo Kit. Even though a Pi was included in the Road Test kit. The Demo Software and connections for the Pi are very straight forward and simple to follow.
With that I gave both the Demo Software was of good quality & Demo was easy to use 10's
IV. Overall Functionallity
Looking into other options for an all in one Robotics Kit for the Pi there really are very few choices readily available. Outside of remote controlled cars. Or hacking a used toy.
I feel very comfortable with it's price point of $500 delivered. It's construction and attention to detail are fantastic. The Rapiro Team have done well in honoring the pledges on Kickstarter and Switch-Science. To bring a kit like this from a Prototype to full production in less than a year. I think this is amazing. Construction of the plastic body is thick, parts fit well, and have a smooth finish. Stickers are provided for labeling the servos. Everything is made from quality parts, durable structures, and it is very aesthetically pleasing.
The only improvement could be found in the servos chosen. More expensive, more durable servos do exist with a lot tighter tolerance and smoother function. However, all other products that I typically have seen in this category come with the similar servos as what is supplied with Rapiro. So I didn't take any marks out for this. They are a good starter pack and do function with some trial and error with the sample code provided.
I do not know if more expensive servos would be better suited if even placed at key locations such as the legs. The Large servos are listed as ES3103 made by EMAX. See HERE for specs and related servos.
Keeping in mind that as an educational kit. It is important to keep the price of distribution down for any newly released product. And discounts typically apply to very large quantities. Which I do not believe Rapiro has sold more than a thousand units at this point. So as the Rapiro community grows, the price point at which any of these parts. If proven to provide more or better functionality could be negotiated to keep the kit at or around the same price point it's currently being marketed at. Also as I am not an expert on servos and have yet to test any of the more expensive models I don't feel I should knock down any points due to this.
The servos supplied are more than adequate enough to perform the necessary movements needed. Much room for improvement could possibly be made to the demo code as well. Keep in mind it is only a sampling of what the Controller Board can do. Rapiro is meant for you to code and not just build on what's included in the demo code.
And with that I gave both Product Performed to Expectations & The price to performance ratio was good 10's
A. What's not included with the kit.
Batteries or a DC Power Supply is not included and must be purchased. The ability to chose your favorite retailer based on your region is simple and should pose no real issue. You may already have the Ni-MH batteries for various devices you already own.
Or
Optional components are sold separately. Sample components are listed here with part numbers:
Total Score 60/60
I really think it is more than enough for it's intended audience. And for it's price rivals anything remotely similar on the market today. Especially considering it's running on open source software.
V. Raspberry Pi Inegration
There are so many ways to integrate existing projects into Rapiro. Some of which could be combined.
Here are some examples:
Jasper is an open source platform for developing always-on, voice-controlled applications.
How to Build a Raspberry Pi Twitter Bot
This project uses Python; a simple programming language ideal for DIY projects. We’ll begin by installing Twython on the Pi – a Python module for interfacing with Twitter; setting up a Twitter “application” to get an API key; then go onto make the Pi tweet stuff on our behalf. It’s going to be so much fun!
This little Raspberry Pi based project is a gift for my wife’s grandmother for her 90th birthday. Being visually impaired, she is hard to entertain but loves to listen to audiobooks.
This simple hack turns your Raspberry Pi into a powerful FM transmitter! It has enough range to cover your home, DIY drive-in movie, a high school ball game.
Rapiro facial recognition with OpenCV and Raspberry Pi
You are really only limited by your imagination. Security Guard, Watch Dog, Alarm Clock, Radio, so many things to try out.
Rapiro in a nutshell:
RAPIRO comes with a total of 12 servo motors, one for its neck, one in the waist, four for the two feet, and the final six for its two arms. The torques of the six servos in the neck, waist and two feet, are 2.5kgf-cm(35ozf-in). The torques of six servos in the two arms are 1.5kgf-cm(21ozf-in). Both operating speeds are 0.12 sec/60°. Both maximum angles are 180°

RAPIRO’s eyes can be lit up brightly by RGB LEDs.

Arduino is consisted of AVR microcontroller board with C++ like development environment (Arduino IDE). It’s a simple and easy to use open source hardware which has many compatible boards and software libraries available all around the globe. The RAPIRO board is Arduino compatible and can be reprogrammed with Arduino IDE. RAPIRO is recommended for not only those who have a programming experience but also for beginners.

The Raspberry Pi is a credit card-sized PC which has ARM processor mounted and can run Linux. Those who want a higher level of control can mount a Raspberry Pi (sold separately) inside RAPIRO for more possibilities! The Raspberry Pi can be programmed with a wide variety of languages being used on ARM Linux. Depending on your programming, your RAPIRO could give you message notifications with wifi enabled or could protect your home as a security robot using a camera module!


