RoadTest: Sensirion Environmental Sensor Shield - Industrial Sensing
Author: koudelad
Creation date:
Evaluation Type: Development Boards & Tools
Did you receive all parts the manufacturer stated would be included in the package?: True
What other parts do you consider comparable to this product?: TVOC sensors like CSS811, NDIR CO2 sensors (Amphenol, SenseAir, GasSensing).
What were the biggest problems encountered?: Self-heating of the TVOC sensor and/or underlaying Arduino.
Detailed Review:
Hello!
I am really glad that I was selected as one of the testers. Thank you element14 and Sensirion. This is my first RoadTest ever, so let me tell you why I applied.
My name is David and I work as an IT and process analyst in a bank. Electronics is just my hobby, but I am looking for ways to get into electronics professionally.
I have personal experience with Sensirion's temperature and humidity sensors, SHT21 and SHT31. I use their reference designs at home and I have to say that after trying about 10 sensors from different manufacturers, Sensirion's are the best. They are very well calibrated, perfectly stable and reliable after 2 years. I even use them to calibrate other temperature/humidity sensors.
I also have experience with a VOC sensor, CCS811, my quick review is located here: Thunderboard Sense board experience
If you want to know more about volatile organic compounds (VOC), Wikipedia features an article: https://en.wikipedia.org/wiki/Volatile_organic_compound
VOC sensors are sometimes presented as CO2 (equivalent) sensors, but I have also looked deeper into this area in one older post: Long story short: The correlation between TVOC level and CO2 levels comes from experiments. The VOC sensor is suitable for two types of detection. 1) Environment occupied (and air polluted) only by breathing and nothing else. 2) Detection of anything unusual in environment (start of some chemical process, cooking, ...) - either human occupied, or not.
That is why I was curious about SGP30 sensor, whether it is a useful sensor, providing VOC and CO2 equivalent levels directly in the hardware.
My proposal was to do the following tests:
1) compare the temperature/humidity calibration of SHTC1 and the SHT21/SHT31. This is an important information when sensors from different manufacturing batches are used in the same product.
2) try to compare and identify the correlation between VOC and CO2 levels. (I did this in the mentioned CCS811 review.)
3) compare the outputs of SGP30 and CCS811 regarding VOC and CO2 levels.
Note: I will be performing all this in an ordinary home environment, not a controlled laboratory environment. Also, my space is limited, so I don’t have a cyclorama and a professional digital camera, so the photo quality sometimes suffers.
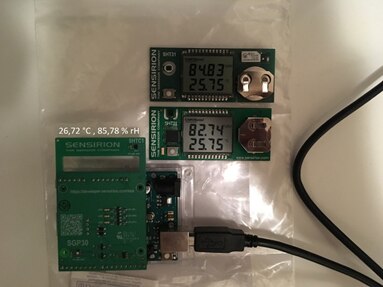
I am pretty sure that some (if not all) of my fellow RoadTesters will do some prettier unboxing pictures or videos, but here are a few pictures to see what arrives as a Sensirion Environmental Sensor Shield.
The shield features an SHTC1 humidity (and temperature sensor), an SGP30 total VOC and CO2eq sensor, 3 LEDs with driving transistors and a 1,8 V voltage regulator that allows the shield to be run from 5 or 3,3 V host board. The last feature might seem as a detail, but I want to say WOW! How many times I needed voltage translation between sensors and development boards…
The silkscreen on the PCB labels all the components and also makes the identification of the 4-pin connector easy.
I am a bit surprised by the PCB section with an SHTC1 sensor, which is separated by a huge air gap from the rest of the PCB. It is obviously made to lower the heating effect of the host board as much as possible. However, it might be difficult to embed an Arduino with this shield into some boxes. When I first saw the air gap, I had a wild idea to fit some kind of an LCD into it and easily make a compact environment monitoring device 


A simple to use coin cell thermometer and humidity meter, featuring an SHT21 sensor. I got it on one trade show and runs on the original battery for 3 years (even with the faster refresh interval – about 3 seconds; there is also a low power mode with refresh rate about 30 seconds). I couldn’t find it anywhere to purchase.


Similar to the previous design, but with an SHT31 sensor, a Bluetooth module and a mobile application. This design can still be bought for ca. $30. Runs on a coin cell battery for about 2 years (I only turn the Bluetooth on when some logging via the mobile application is needed.)


I bought this board to try out the CCS811 https://ams.com/ccs811 sensor. There are many more sensors, a Bluetooth module and a mobile application, but my experience with the board is not very good. https://www.element14.com/community/people/koudelad/blog/2017/09/14/thunderboard-sense-board-experience


SHT21 datasheet: https://www.sensirion.com/fileadmin/user_upload/customers/sensirion/Dokumente/0_Datasheets/Humidity/Sensirion_Humidity_Sensors_SHT21_Datasheet.pdf
SHT31 Smart Gadget: https://www.sensirion.com/en/environmental-sensors/humidity-sensors/development-kit/
Sensirion Environmental Sensor Shield (ESS): https://developer.sensirion.com/platforms/environmental-sensor-shield/
SHTC1 datasheet: https://www.sensirion.com/fileadmin/user_upload/customers/sensirion/Dokumente/0_Datasheets/Humidity/Sensirion_Humidity_Sensors_SHTC1_Datasheet.pdf
SGP30 datasheet: https://www.sensirion.com/fileadmin/user_upload/customers/sensirion/Dokumente/0_Datasheets/Gas/Sensirion_Gas_Sensors_SGP30_Datasheet.pdf
Thunderboard Sense board: https://www.silabs.com/products/development-tools/thunderboard/thunderboard-sense-kit
CCS811 Gas Sensor: https://ams.com/ccs811
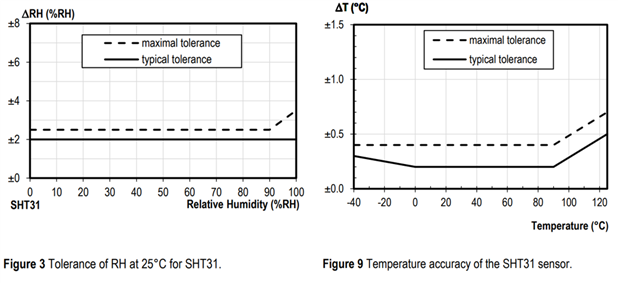
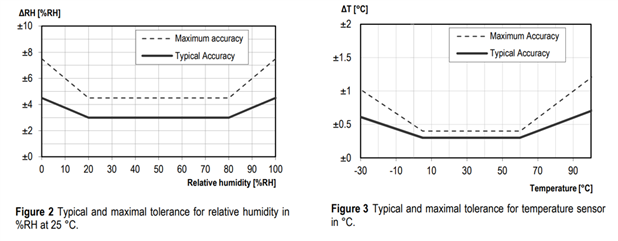
Here are the temperature and humidity sensors tolerances in a form of graph, extracted from each datasheet.
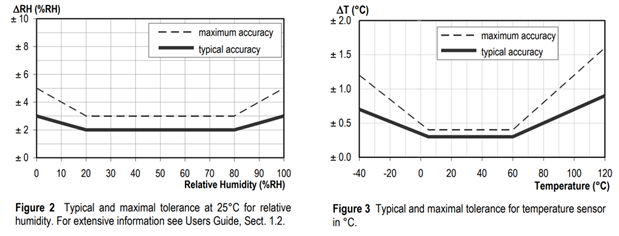
Note: SHT21 and SHT31 cost approximately the same. SHTC1 costs about a half. (500 pieces quantities.)
Note 2: I haven't pasted any comparable graphs for VOC sensors, as there are none available for CCS811.
I have never used an Arduino before, so the first thing to try is obvious. Will the ESS work out-of-the-box with Arduino? Are there any special requirements?
The small instruction card I found inside the packaging and the shield’s PCB silkscreen forward the user to https://developer.sensirion.com/platforms/environmental-sensor-shield/ , where a few introduction words and Source Code and Getting Started Sections can be found. Both the tutorial and the source code are placed on Github in a readme file.
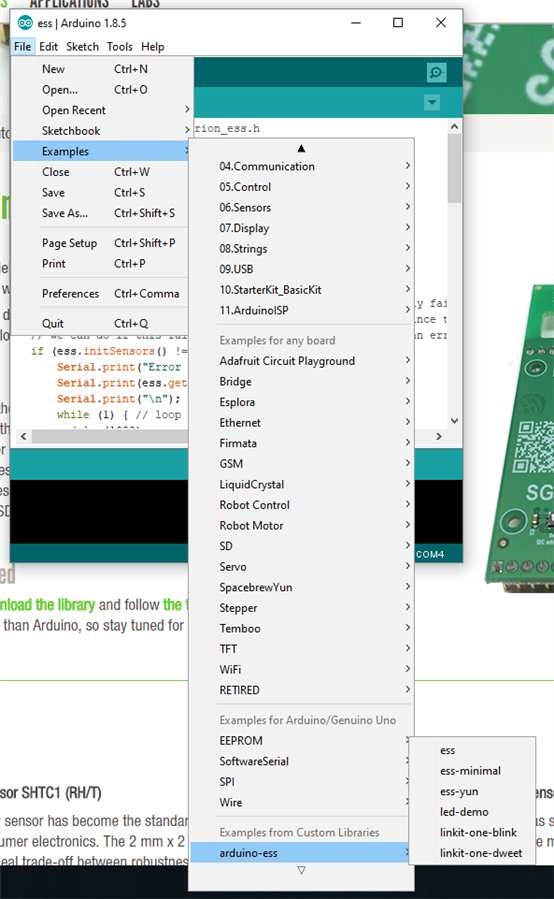
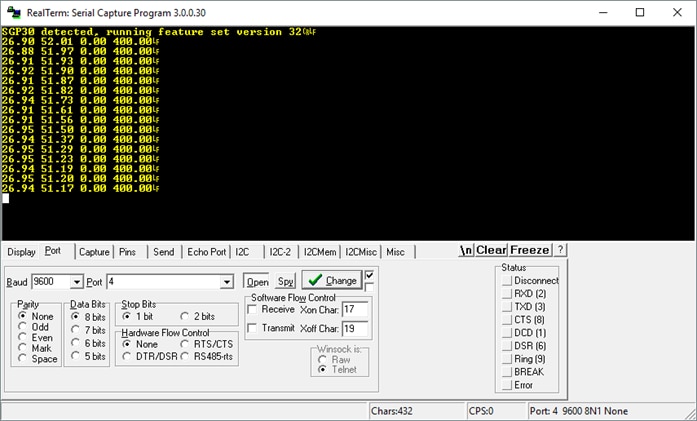
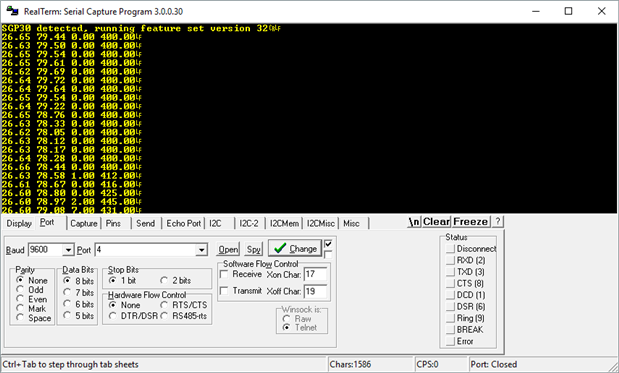
The Getting started procedure was quite simple, installing the latest Arduino IDE, downloading the library from Github and adding it to the Arduino IDE. Voila, six new examples within the IDE to choose from. Some examples are for internet connected boards, but since I only have Arduino Uno, I tried the “ess” and “led-demo” examples. The “ess” example measures temperature and humidity by the SHTC1 and VOC and CO2eq levels by the SGP30 sensor. All the measured data is sent every second using the serial port (via USB) to the connected PC.
I used this method to perform all the following tests. My choice for a terminal software was realterm https://sourceforge.net/projects/realterm/ , which allows (among many other functions) recording the traffic going over the serial port to a plain text file. In order to process the data further, I edited the recorded files, added a Windows line end (CR+LF), replaced spaces for semicolons (this can be done in the Arduino code easily) and replaced a dot for a comma as a number separator (my PC has a non US regional setting). The file can be then easily opened in Excel for plotting graphs and calculating other necessary values.
The “led-demo” example tests the LEDs present on the shield using PWM (analogWrite function) and running lights effect.
Provided examples (“ess” and “led-demo”) are easy to perform and working flawlessly.
For test #1, my idea was to put all three sensors - SHT21, SHT31 and SHTC1 - close to each other into conditions that can be found at home and compare the results with the sensors’ tolerances. The SHT21 and SHT31 are calibrated so precisely that it is not unusual to see just 0,01 °C of 0,1 % rH difference on the displays. If the air is not moving, they stay stable for minutes. If the air around them moves, they react in seconds.
However, before doing test #1, I was curious, whether the SHTC1 is also that stable.
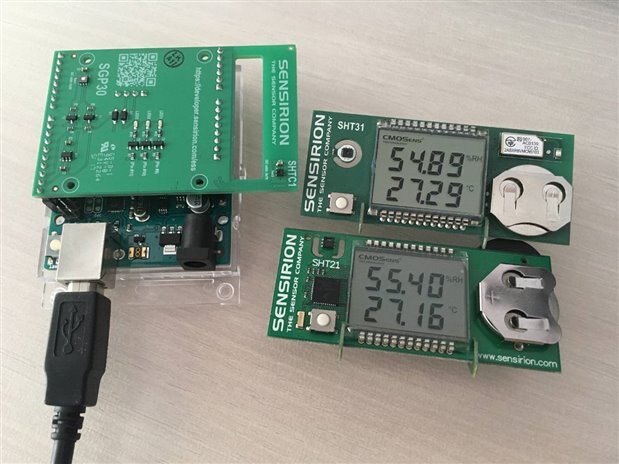
I placed all the three designs next to each other, set continuous measurement on the ESS and took two samples from the SHT21 and SHT31 reference designs (they barely changed the value for +/- 0,1 °C and 0,4 % rH – that was the inevitable air movement of me being in the same room). However, the SHTC1 values changed “a lot” more.
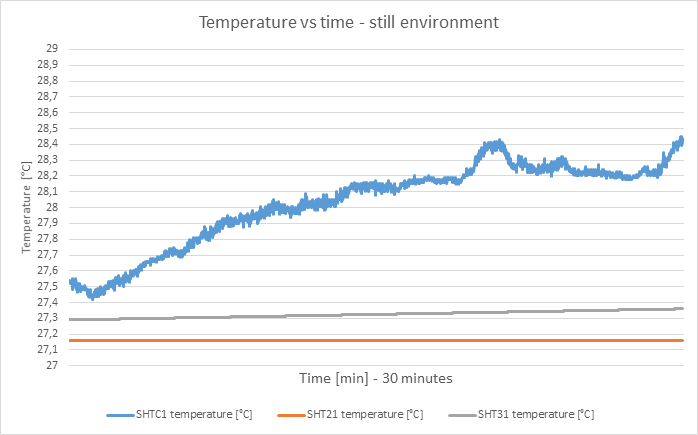
I suspect two things – the underlaying Arduino Uno (powered by USB) generated some heat and made the ESS warmer. And/or, the SGP30 made the board warmer. If I find enough time in the following weeks, I will try to test a describe this hypothesis in a separate blog post. SGP30 can dissipate about 84 mW, due to the embedded heating element. No wonder the SHT21 and SHT31 reference designs show so stable values… they both operate under 1 mW in active mode and a few uW in sleep mode.
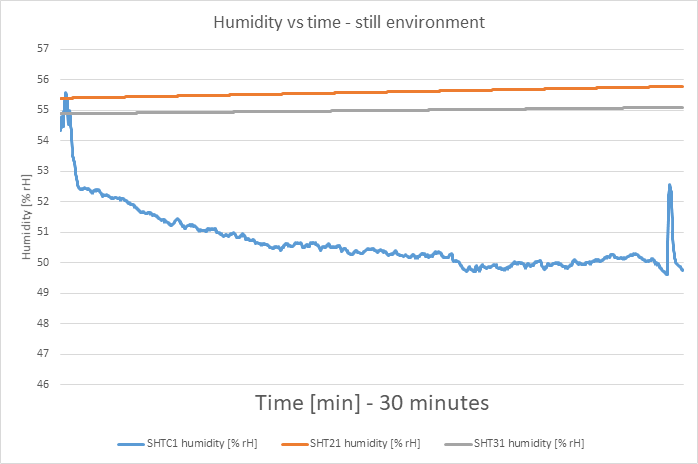
Measuring temperature precisely is not easy. Many components in electronic devices dissipate power and this influences the sensors – in our case a temperature and a humidity sensor. The temperature rise was about 0,7 to 1 Centigrade and the humidity decrease was about 5 % of relative humidity.
One way to eliminate this effect is to measure the data with as low power as possible (sensor, CPU, power regulator, etc.).
In the following tests I will try to power the ESS from the Arduino for as short period of time as possible to avoid the demonstrated effect.
By the way, the previously mentioned ThunderBoard Sense Board suffers from the same effect, but in larger scale. This would suggest that the TVOC sensors and their heating elements are the root cause: Thunderboard Sense board experience
All three Sensirion reference designs have been put as close as possible in two places – my work desk (common temperature and humidity) and a bathroom after having a shower (common temperature, but very high humidity expected). The goal was to find out, whether all the sensors provide output values within their tolerance.

The above example shows a good calibration and tolerance match between all the sensors. SHTC1 is cheaper, but a reliable alternative to SHT21/SHT31 in ambient conditions. As described in the previous test, I suspect the temperature to be a few tens of a Centigrade higher, due to the self-heating of the shield. I didn’t perform a test with temperatures below 0 °C or above 60 °C as I am careful in order not to damage the device by condensing water or excessive heat.
I would like to mention one more thing. Even though the typical tolerance for temperature measurement is 0,3 °C at 20 °C, the resolution is provided with two decimal places. When moving or breathing within ca. 1 meter of the sensors, there is a noticeable change of the temperature – tens or hundreds of a Centigrade. Also, If I leave the sensors on the table and put my hand as close a 20 cm, the sensors will react. And the noise at the lowest resolution is so low I can’t say the sensor was influenced by an ambient air movement or not.
Relative humidity appears to be a bit noisier (or the air humidity is more variable than temperature), here is another example of measuring 21 values, the period is 1 second. Have a look at the change in the fractions of the first (temperature in °C) and second (humidity in % rH) column.
In this test, I wanted to find out, what is the correlation between TVOC and CO2 equivalent levels of the SGP30 sensor and CCS811. I previously tested CCS811 sensor and wrote my findings here: Thunderboard Sense board experience
I placed the ESS with Adruino and the ThunderBoard Sense board on my desk (just a few centimeters away from each other) and run a 12-hour test on Sunday, 9 AM to 9 PM. At first, no one was in the room, the windows were opened 9 AM till 1 PM. Between 1 PM and 6 PM, the windows were closed and the room was occupied by one person. After 6 PM, the windows were opened again and closed at 7 PM with no one in the room.
The Thunderboard Sense board has the ability to stream the measured data into Silicon Labs cloud and view it in the form of graphs. There is also a possibility of downloading the values as a csv file, however, it fails for a few months now (a known bug to Silicon Labs), so I will just present the graphs.
CCS811 CO2 equivalent levels [ppm] and TVOC levels [ppb] vs time

It probably won’t surprise you that the correlation between TVOC levels and CO2 equivalent levels I could get from a few older measurements was 0,999 . The graphs are practically identical. In this case, the CO2 level equals something like 400 ppm + x * TVOC level.
SGP30
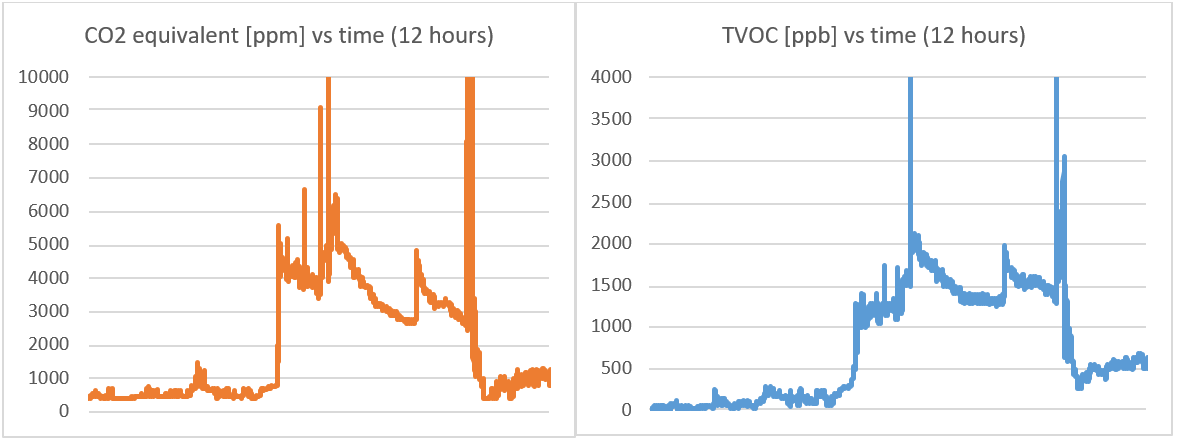
The correlation here is only 0,904, but what is more surprising from this measurement, even though the graphs seem to be quite similar (which means the sensors are responsive to similar or the same VOCs), the levels are quite different!
CCS CO2 equivalent level was about 2000 ppm from 1 PM to 6 PM, and TVOC level at about 300 ppb, SGP30 says 4000 ppm and 1500 ppb respectively. Twice as high CO2 level and 5 times higher TVOC level. Interesting.
The following day, I tested only SGP30 in a closed room, while ironing the clothes. For one hour, the windows were closed, for another hour, windows were opened.
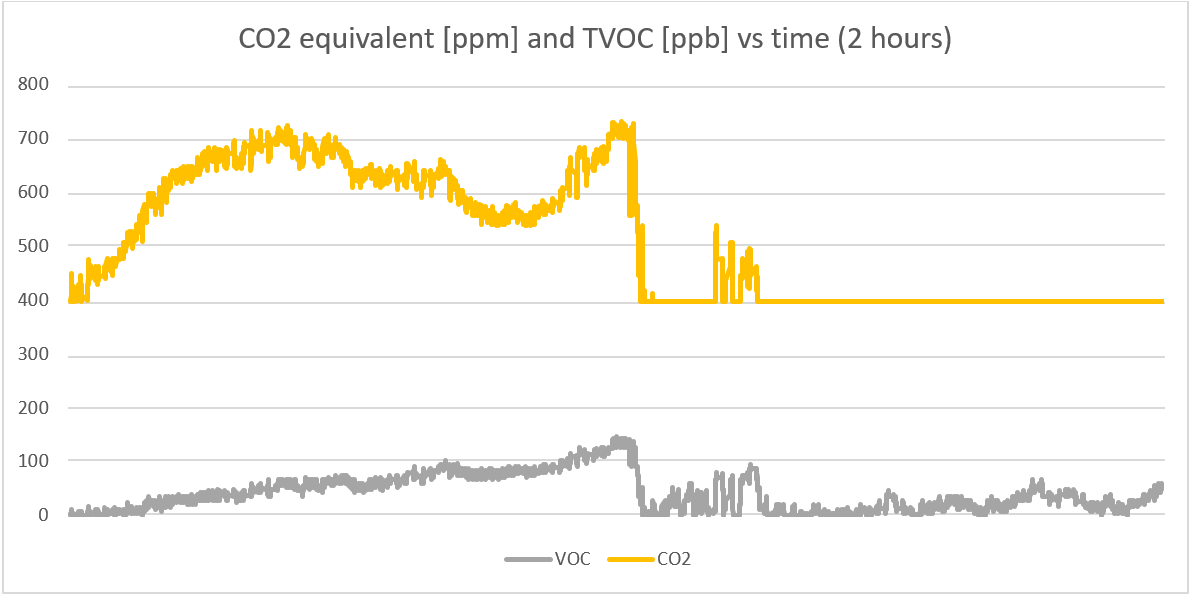
The correlation is here only 0,685, however this is because after opening the windows, the sensor considered CO2 equivalent level as the default lowest value – 400 ppm.
Note: 400 ppm of CO2 is considered "clean air" for all sensors I had in my hands.
The SGP30 does definitely output CO2 equivalent values with correlation to the TVOC values different than CCS811. I am not sure, whether this is purely inner math of the sensor or because of a different sensing element. However, since both the CO2 equivalent levels and TVOC levels of the compared sensors output such different values (twice as much and five times more), the truth for CO2 levels could be probably only found using an independent NDIR CO2 sensor. I have an Amphenol sensor at home, but due to a lack of time, test with all the sensors will be subject to some future trials.
It is very obvious that TVOC sensors can help detect an air quality. The only time I was feeling comfortable in the room was when the values of TVOC were below 500 ppb (in SGP30 scale). Opening the window (especially if there is a breeze outside) can be detected almost instantly.
Note: SGP30 datasheet mentions formulas for humidity compensation of the TVOC values. This is not implemented in the current Arduino library yet.
The Sensirion Environmental Sensor Shield is an easy to use board. The main advantage is that it brings professional sensors (barely solderable by a typical maker) to amateurs. The shield can be quickly connected not only to Arduino, but also to another development boards or a logic analyzer. Variable voltage source 3,3 – 5 V is definitely a plus, because low power development boards no longer use 5 V supplies. All this makes the sensor evaluation very easy.
The biggest disadvantage I found is the self-heating of the board, because of the TVOC sensor (consuming nearly 50 mA) and also the host board, if not designed as low power. This is not Sensirion’s fault, it is simply the electro chemical technology behind this type of a sensor. Sensors from other vendors have the same behaviour.
I am glad there are working software examples on Github. (This is not obvious for all other vendors making Arduino shields!) I found two minor software issues during my RoadTest, but Johannes winkj fixed them promptly. If this kind of support is provided even after the RoadTest, then well done. The hardware is as good as the software and support provided. There are also some TODOs in the library provided, so I am looking forward for all the features to be implemented and expanding the possibilities of the sensors even further.
In the future, I would like to permanently monitor my home with the TVOC sensor and later compare the CO2 equivalent output value to a true NDIR CO2 sensor.


Top Comments
Nice road test report.
There is clearly a need to look at sensor isolation and placement if you want accurate results.
DAB
Very nice roadtest review. I like how you compared the results against a product that you were familiar with from prior experience. Head to head type of comparisons really do help to see things like self…
David, you have done a very good job comparing these sensors. It is very clear and readable. I am looking forward to reading more test reviews from you in the future. Cheers, P.