RoadTest: Grove Inventor Kit + BBC micro:bit
Author: mcb1
Creation date:
Evaluation Type: Development Boards & Tools
Did you receive all parts the manufacturer stated would be included in the package?: True
What other parts do you consider comparable to this product?: 'Grove" style bricks are available from some other suppliers. I've used some from other suppliers and their prices make them very affordable (which is how it should be).
What were the biggest problems encountered?: The documentation covers a use, but as a learning item, some other references might be useful.
Detailed Review:
I have been fortunate to provide learning opportunities to pupils at various schools across Christchurch.
Futureintech ran programs to "increase the uptake of science at a Tertiary education level" .... that is Polytechnic or University.
They recognised that in order to achieve this it was necessary to introduce these experiences at a young age.
As part of our "Introduction to Arduino" I've used 'Grove' style bricks.
They eliminate any wiring problems and make it very easy to replicate examples from simple instructions.
So I was keen to see what this kit offered, and how easy it was to use.
I also wanted to extend this offering by adding some other devices.
I note that here in NZ you have to buy 30 units, and while the price is good, having to buy 30 isn't.
Obviously this is aimed at a classroom situation.
I was very pleased to see the whimsical style of packaging used. This gives it a 'playful' feel which would attract younger people to open it up and explore.


The individual packing was great, but I would have preferred if they could be resealed.
This would keep them from becoming loose items in a large box.
I cut a slot in the rear and slipped the items back in after use.
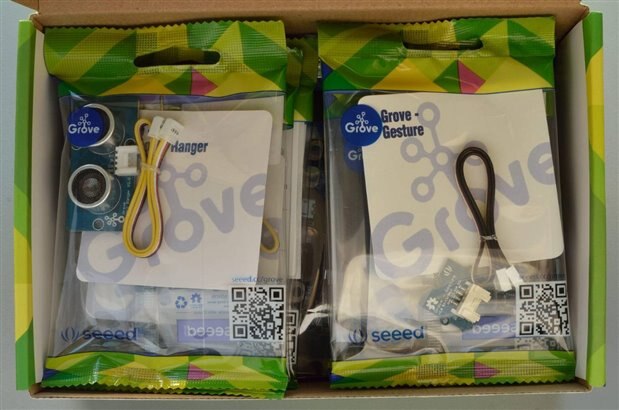

The labelling was a nice feature where it explained what it was and what it could do, but the inclusion of a picture would be even better.
You need to open the book to match the picture to the item.
Once you are familiar with them, then there isn't an issue, but it is intended as a learning kit, so newbies need to be included.
For whatever reason the Light Sensor gets plain paper rather than card.

I also had some trouble with the name "Ultrasonic Ranger" with no other common term.
This means searching on the www (Wonderful world of What) for how it works is a little difficult.

Sure you find exactly that item, but what if you wanted some additional information on some other uses for a HC04, Ping Sensor or Ultra sonic sensor then you have to know what it is or the equivalent term used.
They don't talk about the dead zone.
This is where close readings can't be used because the transmitter is still 'ringing'.
The inquizative minds will be thinking a few millimeters is a valid range, when because of the 'dead zone' it isn't.
The LED module has the LED removed which allows for replacement or swapping to another colour.

While this is a great idea, there is nothing to warn about inserting it the right way around.
The board has silk screening, but without something to warn the user, it is very difficult.

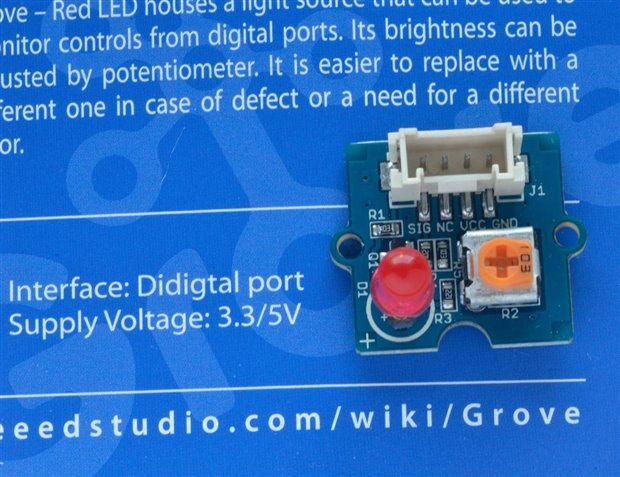
I'm also not sure about the new style of port that is available to connect the LED to.
The comment about the potentiometer needs clarification. What is a potentiometer?
The included potentiometer is called a "Rotary Angle Sensor" (see above pictures), so that thing called R2 on the board can't be the same thing.
Also if you've fitted your LED the wrong way around, twiddling this little control isn't going to do anything. 
When we run our Introduction to Arduino, we use the onboard LED, and then get them to plug in a LED brick to D13.
This demonstrates the LED works, and then we get the students to shift it to another Pin.
This demonstrates the proving process and how to check why it isn't working.
The manual is written in a friendly way which explains the parts required, and the sketch or blocks needed to make it work.
They have a comment about how it works and sometimes make suggestions for altering the code.
My biggest gripe is that you always need the Micro:bit and shield so why not make them number 1 and 2 on the Parts Required.
The number label for the parts and instructions are the same shape, colour and size, and could be easily confused.
Personally I'd use a different colour and shape for the parts numbers, to differentiate them.
There is a warning about power at the front of the manual, and to use the USB port, but there is nothing anywhere else.
The 30 LED strip will definately require power.
My calculations are that 9w at 5v is 1.8 Amps, which exceeds most USB ports.
Strangely there is no mention regarding power on that page.
(see notes under Rainbow on The Desk)
I'm also concerned about the suggestion that the strip is waterproof so it can be used outdoors.
Sure the strip is, BUT the microbit isn't, and most new users will not ask.
Because this is aimed at a novice or newcomer, I've marked it down because of these observations.
I was hoping to 'borrow' a student keen to start in the world of micro-controllers and electronics.
Sadly that wasn't able to happen due to other commitments for both of us.
So I pretended that I knew nothing about using one of these, and acted as if it was my first time.
I opened up the kit and on Page 3 the title is How to program Grove on micro:bit
It said I needed to add the Grove PXT packages to your makecode environment.
The steps were included ..... BUT at this point no-one has shown where the makecode environment is. 
If you reference the small and somewhat uninviting (compared with the nice inviting version in the Grove kit) brochure inside the micro:bit box, it points you to www.microbitworld.me .... which redirects you to https://microbit.org/ and you choose Lets Code from the top menu and on the Java block again choose Lets Code.
Personally it would be easier to just go to https://makecode.microbit.org/ as the examples are code blocks .... and there isn't a sign in process.
SO now I have a web page showing the Micro-bit on the left and some other items.

I can choose the 'wheel' on the upper right and select Add Package or scroll down the bits in the middle as the instruction hints at.
The instruction seems good, but you need to scroll down the page to find the Add Package, so perhaps consider changing to use the upper right, or the page has room for some additional information to make it easier.
The package added and I turned the page to Control The Light
I know the blocks are coloured and they have written the word input block and pin block, but it's in plain and lowercase and doesn't match the selection.
A bit more highlighting of what you're looking for will help newbies.
The first problem is that a new code seemed to have the two extra blocks.

and there was no instruction to leave, remove, insert between or what.
While this is part of the makecode environment, this is a user guide for the kit, and it removes confusion, or issues with using it.
I recreated the example, hit download and was faced with the micro:bit not there to upload. (It should show up as a drive labelled MICROBIT)
It was plugged in and the lights were going (default code they come with) so what was going on.

It seems that the very nicely labelled Micro USB connector that is on the shield is just for power.
Nothing in the instructions tells you to use the connector on the rear of the micro:bit to connect with your computer.
Once you do plug into the micro:bit there is a installig sound and then MICROBIT shows up as a drive.

So again, some frustration if you were a newbie and had picked up the kit.
If you only had the micro:bit of course you'd be plugging into the micro usb on it.
However we have this nicely labelled connector facing outwards, so why wouldn't you use it?
Working through the next couple of projects ....
Sunshine micro:bit
LED Bar Control
were without issues, and apart from familiarity with finding some of the blocks, went as expected.
Music Player
This is very easy to setup and the volume is thankfully already reduced. 
There is no mention of the pot which presumably is volume.
The guide gives a suggestion to play something when A+B are pressed, but they didn't hint at the other melodies available.

Personally a little more hinting about adding a third block for A+B might be more helpful to a newbie.
There seems to be an assumption that the user understands coding, but they might just be good at following instructions ...
Gesture Control
This is a very clever little device that plugs into the I2C port.
The instruction shows some basic hand movement to match the code blocks, but there is no other useful help.
I had a lot of trouble with the clockwise and finally in desperation I went to the Seed Studio site for the device.
https://www.seeedstudio.com/Grove-Gesture-PAJ7620U-p-2463.html
It shows the various hand movements relative to the senor.
I added a few more code blocks for Up, Down, Forward, Backward which all worked very well.
However the Wave action still eluded me.
I see these are quite low cost (USD$9.90), and depending how well they operate thru various surfaces, could be a very useful addition to a project.
Smart Guard
This uses the Ultrasonic Ranger which I discussed earlier.
I've used the tick and cross icon as they are easier to see.
The code blocks behave a little different on the if, then, else block.

It seems the True block can't be removed.
You have to move the Values (Logic) block over the True

(which then becomes highlighted)
and then you add Ultrasonic Sensor block in place of the 0 value.

It eventually looks like this
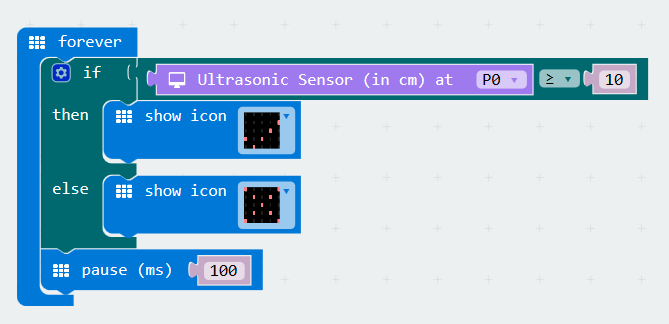
Not exactly intuitive, and the instructions do it in the correct order, but a little more explanation saves frustration and disappointment when it doesn't work.
As I eluded to earlier, there is no additional information regarding the functions of the Ultrasonic Ranger.
Shake Counter
This uses the onboard accelerometers on the micro:bit, and displays it on the 4 digit display.

You can change the variable name (count) and the show number use also changes, which is nice.
Again some more basic explanation about the code would help build an important learning.
If I was a betting man, I's say the On Start is setting up the hardware.
Ultrasonic Meter
This one builds on the earlier Smart Guard and adds the 4 digit display to read out the distance.
The figure is in cm (which becomes obvious if you look at the block) and works very well.
I'm not 100% sure why they needed to shift the existing 4 digit display to another port.
So it tried that, and it works just fine.
You have the hardware configured so adding some more and the appropriate code, builds the user knowledge that they can add things.
By shifting the existing hardware, you're breaking that learning.
Rainbow on The Desk
This one was something I was dubious about.
A string of 30 neopixels running from the USB port of a Laptop was unlikely to work due to the current limitations.

Surprisingly it did work ... sort of.
The neopixels aren't at full brightness, and when you turned the 'Rotary Angle Sensor' it changed the colours but not very well (not all pixels change)
I changed the microUSB cord from the rear of the micro:bit to the nicely labelled Micro USB on the Grove Shield, and suddenly the brightness leapt up and the colour shifting was much better. (more pixels and wider colour range)
This is still using the Laptop power, but not being sourced through the micro:bit.
Flicking back to the front of the instruction book, I observed this comment in the description for the Grove -WS2812 Waterproof LED Strip- 30 LEDs 1 meter.
"It is also waterproof so you are free to use it outdoor without worrying about the rain"
Technically ... yes the actual LED's are, but the bit driving it isn't, so you'd need to extend the wires, or provide protection.
The front page also talks about power.
"Note
Some projects with more than 1 Grove modules demands relatively more current, in order to make those Grove s function better, we recommend using the USB port on Grove Shield for micro:bit to power the circuit."
The only project that uses power is the Rainbow on The Desk and it's due to the neopixels, so the note/warning isn't correct.
I'm not a fan of plugging and unplugging connectors. The Micro USB is a tight, small connector, and both sockets are smd style.
It wouldn't take a lot for someone to be less than gentle and break it, especially in a classroom situation.
I would be adding a short micro-USB fixed to the board and the micro:bit and then use a USB extension to connect to the computer.
Guardians of The Secrets in Your Bag
Guardians of The Secrets in Your Room
Both of these projects use the speaker and Red LED and thankfully they keep them on the same ports.
The difference is Your Bag uses the Light Sensor, while the Your Room uses the Ultrasonic Ranger.
I didn't try these as the coding has been covered before, and this review is about the kit, not the software.
Magic Musician
This combines Gesture, Speaker, Alligator/Crocodile clips with 3 Bananas (the eating kind)
It is another project that builds on the previous use, but this one adds the clips and the bananas.
Since I didn't have any bananas on hand, I glossed over this one.
8. For banana control, use one of your hand to touch the banana that is connected to GND, use another hand to touch the banana on P1 or P2, you will hear different music.
I'm amused over the direct translation that has crept in .... most users have only two hands. ..
Ignoring the hands bit, once again a small amount of explanation might help newbies understand just how this works.
They will be thinking it's stray electricity that is causing the input to detect their hand, when in fact is is the resistance pulling the input low that causes it.
The kit itself is very well presented, and the examples are adequate to duplicate the projects.
It does require some familiarity, so IMO either state that at the beginning, or add a bit more in the text.
element14 seems to be targeting these at a classroom level (NZ website is based on multiples of 30), and with my observations of the staff involved, the additional information pupils would be seeking (or can be given) isn't there.
A pdf or similar to accompany these would go a long way to making them a first choice.
Everyone in marketing will tell you about 'up-selling' so this could be an ideal opportunity to provide this with the additional documentation.
From my observation, making the customer do his own searching usually doesn't result in a sale for you.
In my application I said I would add some other Grove/brick style modules.
I'll do that as a supplement to this review.
My initial thoughts are Relay, second Pushbutton, and multiple LED's.
Following instructions and being able to 'code' aren't the same thing.
We found that pupils were excellent in following the instructions (well some weren't) but a bit of hinting and nudging was required when you went from one input to two.
So help point them in the right direction so they at least know which path to take.
The DS18B20 temperature sensor would be nice, but my quick search failed to find a code block.
The temperature block is the internal temperature of the micro:bit, but a resistance type sensor would work on the analogue port, and these are readily available.
There are microphone bricks, and with the bar graph example this would make an ideal variation.
We've done this sort of thing before, where we used the Rotary Angle sensor and then swapped in the Light Sensor to show a 'real world' use.
There are multiple other Grove/Brick modules but these aren't really suited to newbies.
The micro:bit can certainly handle it, but it's got too many other useful features to turn it into some simple sensor.
At some point there has to be a distinction between reviewing the micro:bit and it's capabilities, and this kit.
The kit has some really neat modules, but as a begineers kit, some modules might be best left for a second version.
Thanks for the opportunity to test and review this.
I have a couple of potential users to pass it onto, so rest assurred it won't sit around gathering dust.
Cheers
Mark


Top Comments
Very thorough, well laid out review. Hopefully the manufacturer picks up on your comments.
Kind regards
A well thought out review. I like your position that the seller needs to give details for the true newbie, since this is an educational package. Frustration at the beginning could prevent learning. Sure…
Good honest review.
Well done.
DAB