RoadTest: Pi3 IBM IoT Learn Kit
Author: shabaz
Creation date:
Evaluation Type: Evaluation Boards
Did you receive all parts the manufacturer stated would be included in the package?: True
What other parts do you consider comparable to this product?: null
What were the biggest problems encountered?: Very short fixed length power cable, verging on unusable without an extension lead. Also I had to examine the device driver source on the raspberrypi github, examine C source code on someone else's github page as well as the Pi's announcement for the Sense HAT and magazine (Magpi) article and forum comments to find the Sense HAT schematic and additional details however I did find the information eventually.
Detailed Review:
The Pi 3 IBM IoT Learner KitPi 3 IBM IoT Learner Kit is a combination of some popular products in particular the Pi 3 with its power suppy and memory card, and a board with LEDs and sensors, called the Sense HAT. The hardware is paired with a training course using IBM’s Internet of Things (IoT) platform. I was very happy to try it out! I used it to build a natural language (conversation) controlled lamp.
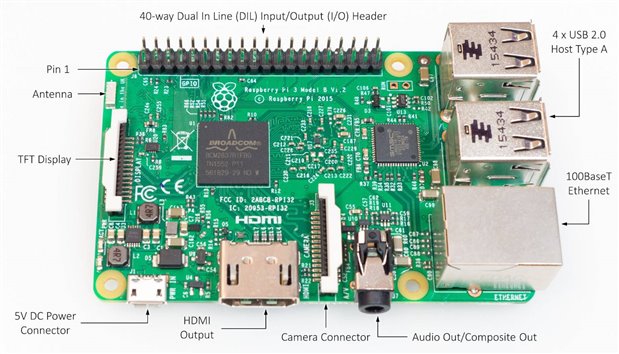
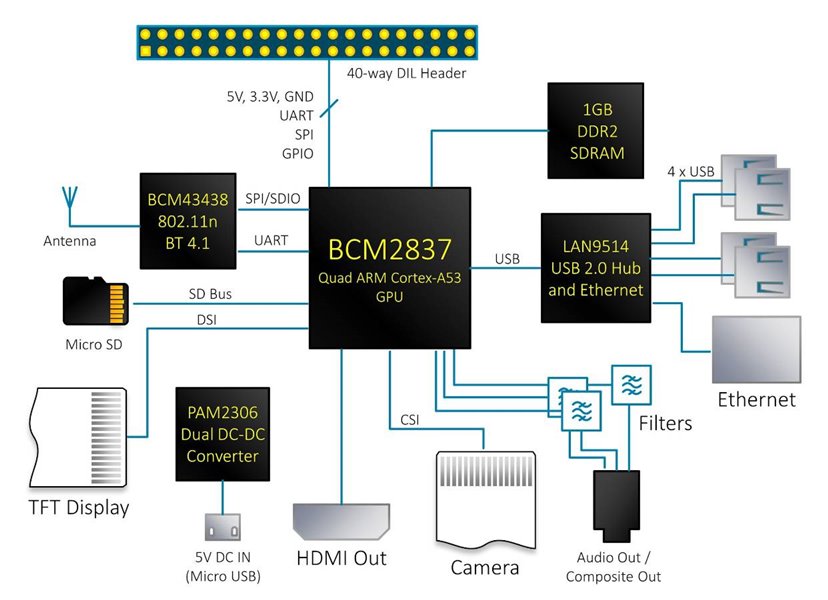
Much has been written about the Pi range of computers, an exec. summary would be that it is currently the latest iteration of what is intended to be a low cost educational-use computer. Connected up to some basic accessories it can run a full desktop version of Linux. With the Pi 3 there are a few improvements and a few differences that are important to be aware of. The headline improvements would be the better processor and on-board 2.4GHz 802.11n (WiFi) and Bluetooth 4.1 (with Bluetooth Smart) capability. The Pi 2 already had a reasonable processor so the real reason to upgrade for many could be the wireless capability. The diagram here is a high-level view of how the Pi 3 internally looks.
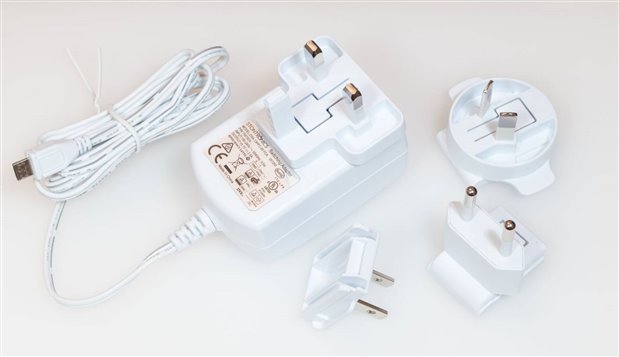
The current consumption needs can be very high (around 1.4A with nothing connected and everything going full whack – not a realistic scenario generally, but achievable) so the new Pi should be used with a fairly capable power supply. The official one is from a reputable manufacturer (Stontronics) but it has a very short fixed cable (just under 1.5m length). It comes with interchangeable mains plug ends to suit different countries.
To use the Pi is fairly straightforward if the instructions are followed provided one has a HDMI monitor and USB keyboard and/or mouse for initial set-up. Afterwards all these things can be disconnected and the Pi can be accessed over the network (using SSH client software like PuTTY).
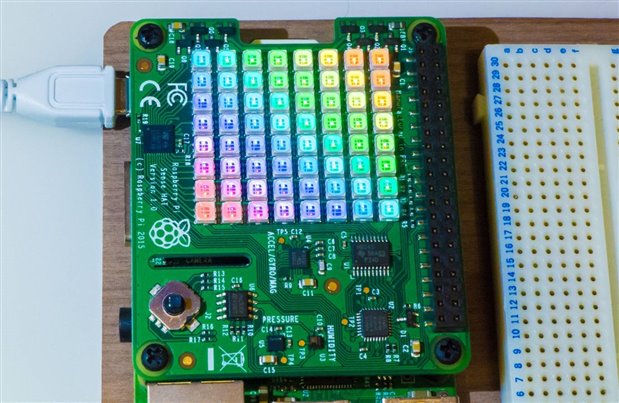
There is also a very interesting add-on board for the Pi called the ‘Sense HAT’ (the add-on boards for the Pi are known as HATs). It features sensors from ST Microelectronics, a little joystick and a colourful set of surprisingly bright LEDs. It comes with black plastic screws and spacers to mount it on top of the Pi.
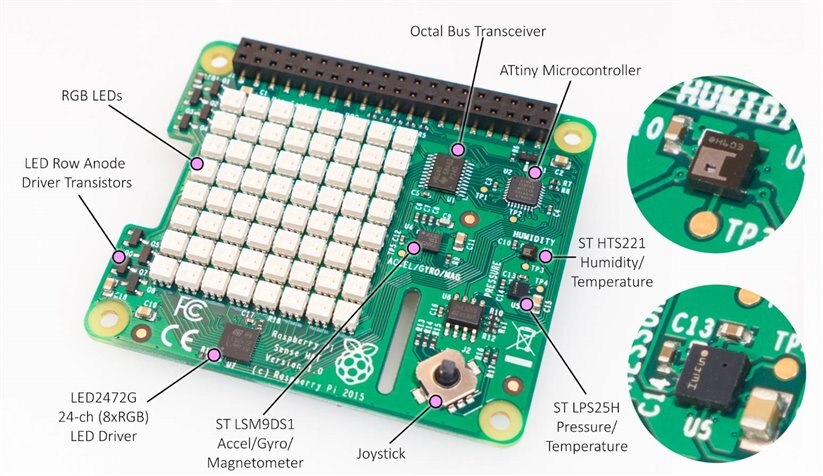
There is an on-board microcontroller (ATtiny88) programmed to be an I2C slave and primarily used for controlling the LEDs as well as scanning the joystick. The Sense HAT schematic is here (PDF).
To use the Sense HAT there are options for several programming languages including Python and C.
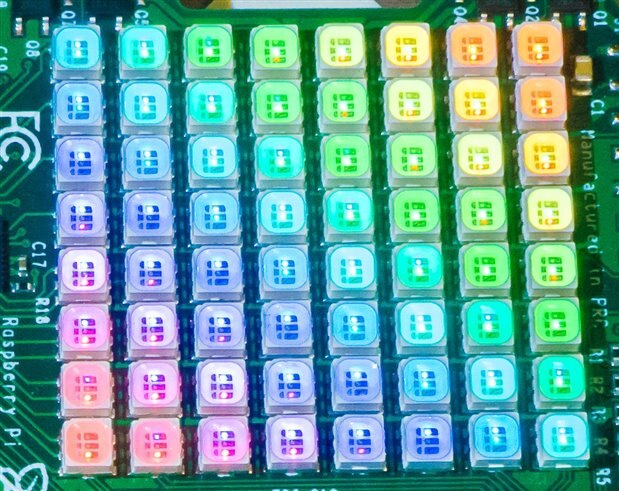
Nothing needs installing to use the Python library, it is already there by default in the Raspberry Pi software images. Some simple example code is already in the file system, for example this will show a brief demo of the LEDs:
cd /usr/src/sense-hat/examples/python-sense-hat
sudo python colour_cycle.py
The Pi IoT Kit includes a case by Multicomp. I didn’t have that, so I tried the ‘official’ case but was not a good choice. It doesn’t allow the Pi 3 and the Sense HAT to fit. It might be possible to hack the case but it would involve a couple of mods including cutting or sanding off retention clips.

There seem to be several variants of the enclosure in the wild (mine was part code TZT 241 AAA-01 which is a Pi 3 version due to status LEDs being repositioned on the Pi 3 because of the location of the wireless antenna). Also it is not possible to use jumper wires without removing the entire top of the case which makes it impractical for typical use. Another negative was that once the entire top half is removed there is the possibility that someone will lift the Pi out of the base since there are no screws holding it down. Doing that can result in a snapped micro SD card!
The Pi case that is part of the kitPi case that is part of the kit looks way more practical.
In the end I gave up trying to hack the official case and used a wood block that I used to use with an older Pi 2.
I’d already briefly used IBM's Watson IoT platform with mbed and a NXP/Freescale board, this time round I decided to sit through the online Coursera training course to see what it was like. It is free to do (although there are an excessive amount of reminders in the Coursera system that payment is an option). The course is video-based but there are transcripts. I didn’t sit through the entire course but did check out every video at least briefly.
The course is ideal for those already briefly familiar with how to use the Pi with some basic knowledge of any programming languages preferably including JavaScript or Python. There will be a need to google for the occasional term or syntax in order to get through some of the course (i.e. the ability to self-study/self-research), but this isn’t unexpected, it is better this way!
It is a four-week course (nothing to stop one from doing it at any pace, I watched through the entire course in a few days) presented by Brian Innes and Yianna Kantos from IBM. The first two weeks cover an introduction to IoT and Bluemix which is IBM’s cloud Infrastructure-as-a-Service (IaaS) and Platform-as-a-Service (PaaS) platform, and how to write an application that can run on Bluemix using a programming environment called Node-RED. Much like Amazon Web Services (AWS), Bluemix has a very rich suite of services that can be used to implement any desired solution.
Week 3 covers setting up the Pi, writing and running applications on the Pi (again using Node-RED but this time on the Pi and not on Bluemix). Week 3 also describes IBM Watson which is the IoT platform portion of services that can run on Bluemix. The Watson services are targeted to simplify extracting valuable information from sensor nodes and other data sources.

By the end of week 3 it is possible to send data between end nodes and Watson, using a Node-RED application running on the gateway (the Pi 3 in this case) and a Node-RED application running on the Bluemix platform. The end node happens to be the Sense HAT for this exercise. So, within three weeks it is possible to establish a complete end-to-end solution for hardware communication to the cloud, ready to make use of the data analytics APIs.
Week 4 provides some knowledge on other ways to code including using Python. For some resource-constrained devices that may not have an official IBM IoT API there is the option to use the MQTT protocol natively. This allows the use of third party MQTT libraries (such as Eclipse Paho) to build IoT nodes. IBM’s IoT platform is built on MQTT which is a standards-based protocol based around a ‘publish’ and ‘subscribe’ paradigm where data is published to a location called the MQTT broker. The data is published against a topic name such as ‘home/room1/temperature’, and any device that has registered to receive information against that topic name will then receive a copy of it. In IBM’s solution the broker resides in the cloud. The protocol allows for interesting things like wildcards in subscriptions, and the ability to confirm transmission and to optionally ensure that a message is received only once (to prevent accidental increments or toggling for certain devices for instance) and the ability to optionally store-and-forward messages to devices that are powered up and subscribe to a topic after a message has already been published. Week 4 concludes with a look at how to deploy any application to Bluemix and some of the general principles to keep in mind when working with PaaS offerings.
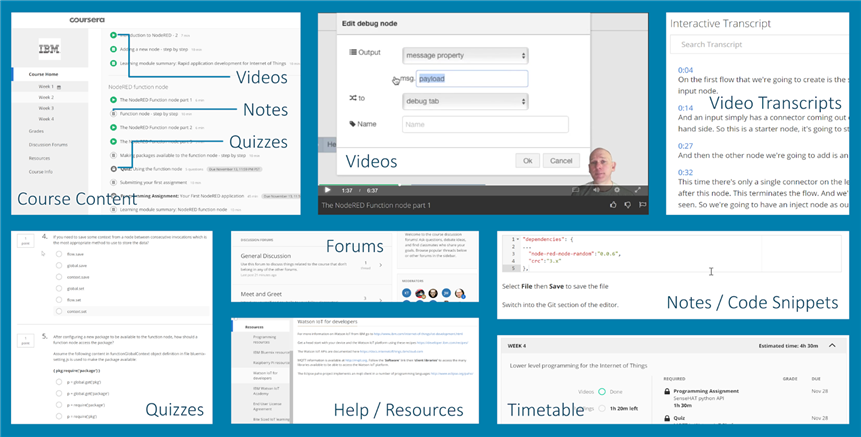
I’d not used Coursera before but it was straightforward and worked well. The majority of the course consists of videos with some quizzes and practical sessions. There are ‘interactive transcripts’ of the videos where the text will highlight a bit like karaoke to keep up. Clicking anywhere in the text will make the video jump to that position in time. There are forums too in case one gets stuck.
The presenters are knowledgeable in their field and did a great job throughout the course. Regarding the video recordings a minor niggle is that IBM ought to buy the presenters higher quality mics : ) The first week was particularly noisy (and some mains hum) but it improved immensely for weeks 2-4 but could be improved further. It is only a minor issue and more noticeable with headphones than with the PC speaker. I couldn’t fault the content and delivery, I thought it was excellent. The video player allows the play speed to be adjusted (and it remembers the setting) and a speed of x1.25 worked well, in case you’re in a hurry.
JavaScript (unrelated to Java; consider it as a completely different language) is one of the languages which allows browser pages to have programmable behaviour. Usually JavaScript code resides on a web server and is sent to peoples web browsers when they access web pages. The web browser (Firefox, Chrome, etc) will then execute the JavaScript code; typical actions could be to accept user input, process events or perform animations and so on. JavaScript is therefore often known as a client-side language since it runs within the web browser environment.
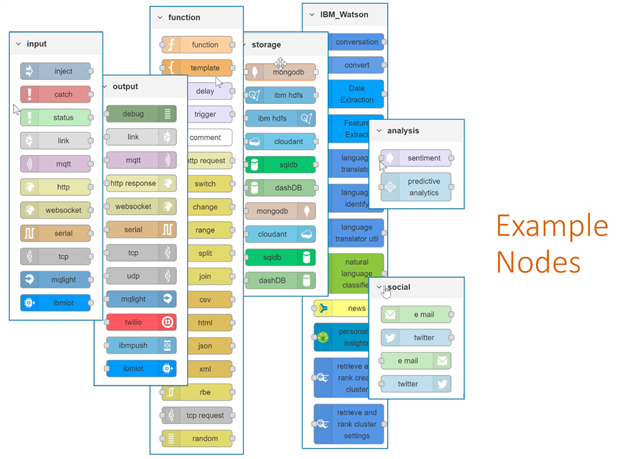
Certain frameworks allow JavaScript code to run elsewhere too; it is therefore possible to have JavaScript running on servers provided there is some framework or platform to handle it. One popular platform is called Node.js and it is available to run on Linux machines amongst others. There is also a graphical programming solution called Node-RED; it allows graphical blocks or nodes (such as input and output nodes) to be connected to one another graphically. At its heart it runs JavaScript code so it is possible to create custom blocks or nodes with JavaScript code inside them.
Node-RED is available for the Pi (or any other Linux machine) but is also available as a PaaS offering on IBM Bluemix. It is therefore possible to create a complete end-to-end IoT solution using Node-RED running in the cloud and Node-RED running on the Pi too.
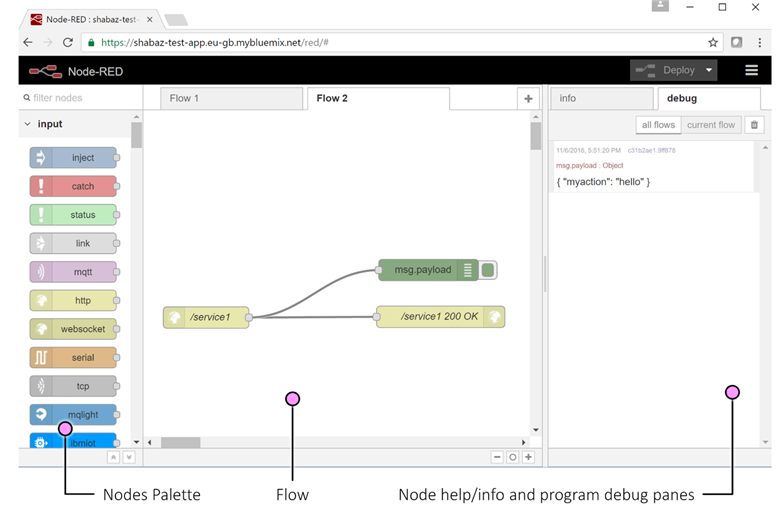
The screenshot above shows a simple example which when run waits for HTTP requests and responds to the request. The green node in this example just dumps the extracted payload of the HTTP request into the debug pane. There are a wealth of interesting nodes to use; additional ones can be installed from npmjs.com or custom ones can be created, for Node-RED running in Bluemix or on the Pi.
I decided to see what functionality was available within Watson and briefly explored the text to speech service (it can create a .wav file based on input text). This could be used to provide audio interactivity in an IoT solution.
To try out Watson I decided to build a simple end-to-end solution using Node-RED. This entailed creating a flow to run on the IBM IoT platform, and one to run on the Pi.
There are input and output IBM IoT nodes which function as logical connectors between the Node-RED application running in the IBM IoT platform and the Node-RED application running on the Pi. All low-level communication is handled securely in the background using MQTT. Using these connectors it is possible to (say) send events and sensor data from devices into IBM IoT or send commands from IBM IoT into devices.
It was decided to use a very cool Watson offering called the Conversation service to build the example application. The Conversation service provides functionality very similar to the help assistant that online retailer websites have, where a virtual assistant appears in a chatbox. For the example application this service would be used to control the Sense HAT’s LEDs from a web browser using natural language. The idea could later be taken further to have more complex control of devices in a home. As an example it would be easier to express ‘record the TV show on channel 1 tomorrow at 8pm for an hour’ rather than “device=TV, channel=1, operation=record, date=01Jan time=20.00 duration=60”.
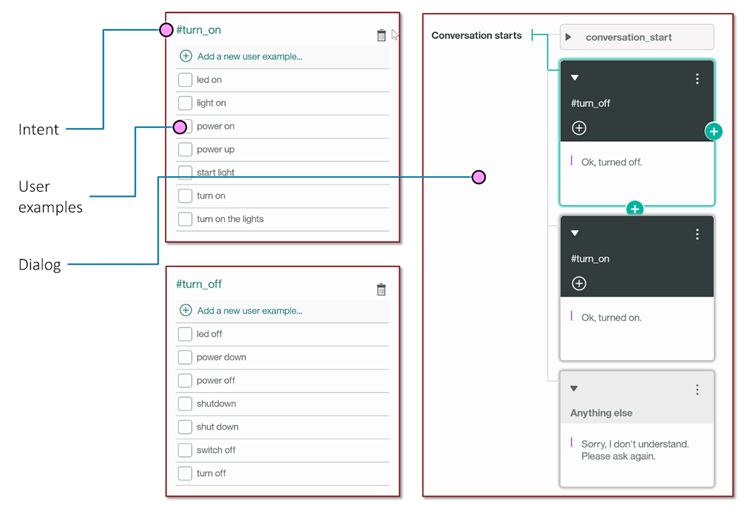
The conversation service can be trained with example phrases. For a simple light switch application example phrases could be “turn light on” and “switch the light off”. Once half a dozen phrases or so have been taught to the conversation service the next step is to create a dialog. The light switch example is of course brief, it merely makes a determination if the user intent is to turn the light on or off and then replies back with an message confirming which action taken.
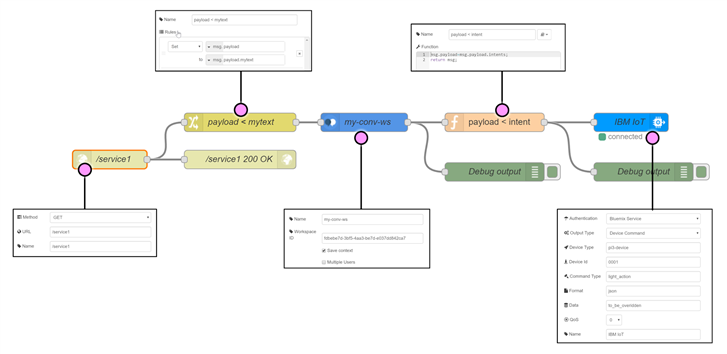
The conversation service is then added to a flow; it is the blue middle node called my-conv-ws in the example diagram here (click to zoom to see the detail for each node more clearly).
For user input a HTML request is used. If the user types a message in the HTML request such as “turn on the light” then the full request in the browser address bar would be the following (in practice a web page form could be used or some other method of getting the user input such as speech-to-text):
http://my-test-app.eu-gb.mybluemix.net/service1?mytext=”turn on the light”
Upon receiving the HTTP request the my-conv-ws conversation service will seek the intent (and return the confirmation message that was designed into the dialog) and then will eventually send it to the blue ibmiot node shown on the right side, which will connect via MQTT and the Internet to the remote device (the Pi in this case). The green nodes are debug output to help develop and troubleshoot the service. The remainder nodes were used to perform data manipulation. As can be seen, the reality is that just one actual line of code needed to be typed – visible in the top-rightmost box (the ‘return msg’ line doesn’t count, that was already there).
In summary just one line of code allowed the entire cloud portion of this solution to be built.
Node-RED can be started up on the Pi by opening up a command shell and typing
node-red-start
and then it is possible to use a web browser to access the Node-RED editor on port 1880 by default.
The Pi side of the application too starts with an IoT connector node and then a couple of nodes are used to extract the intent from the command that arrives from the IBM IoT service. The intent also has a confidence level between zero and one. I decided to only perform the action if the confidence level was above 0.5 (50%). For a more critical application the value could be changed to (say) 90%.
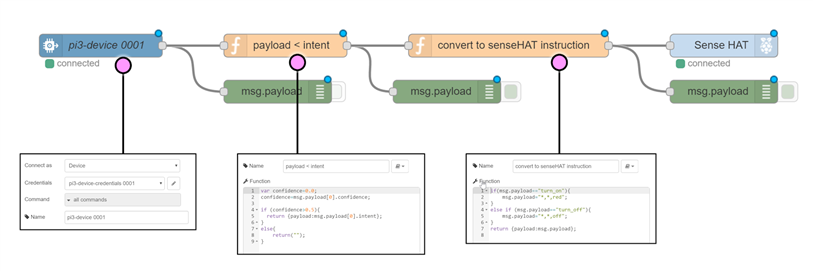
As can be seen, again there is very little code. The code could be further simplified to single-digit lines of code.
One question could be how could such a system provide very close to 100% confidence of the user intent? One neat way could be to just extend the conversation dialog to perhaps subsequently ask the user “this is a critical task you’re performing, are you sure you wish to turn the device off?”.
The application worked when tested with sending messages such as “turn the lamp on” or “please turn off the light”. The SenseHAT’s LEDs switched on or off as expected. In summary with very little code an entire application was created that provided web browser control of a device using natural language.
The Pi3 IBM IoT Learn Kit provides a useful set of items for those interested in learning how to create IoT solutions. Everything short of a HDMI cable and USB keyboard and USB mouse are supplied (and these items are not needed after initial setup). It is the ideal kit for this course.
I thought the IBM IoT course was extremely good and well worth the time to go through it. It was easy to get lost in IBM Bluemix, the IoT platform and Watson services but it wasn’t too difficult to figure out eventually. It is testament to how feature-rich the IBM offerings are that a complete solution can be created in less than 10 lines of code end-to-end.
The Watson services are interesting to examine and it is plain to see that there are some very powerful features available for use. The Conversation service for instance could be used to provide a natural language method of interaction with devices.