RoadTest: Digilent OpenLogger Kit
Author: tfagrell
Creation date:
Evaluation Type: Test Equipment
Did you receive all parts the manufacturer stated would be included in the package?: True
What other parts do you consider comparable to this product?: Dataq Instruments USB Data Acquisition Starter Kits are the most similar offerings in the commercial realm. The prices are competitive when considering the number of channels and expandability offered by linking other devices.
What were the biggest problems encountered?: Software, although well developed and reliable, does not have the most intuitive interface.
Detailed Review:
Introduction
The Digilent Openlogger MZ is a portable data acquisition system capable of running in a standalone configuration with no computer attached. The full specifications can be found on their website here "Specifications" .
Here are the basics:
For this Road Test Review I approached from the perspective of someone that uses data acquisition systems every day. I wanted to benchmark the Openlogger against a commercially available data acquisition system, specifically in a vehicle test application. In this case my setup was very simple, the two most common sensors used for vehicle brake testing (a high resolution GPS for vehicle speed and a decelerometer to measure vehicle deceleration). I instrumented my personal vehicle for this testing.
Test Setup
Digilent Openlogger MZ
Analog Channel 1 - Decelerometer
Analog Channel 2 - Race Technology Speedbox High Resolution GPS connected via analog output
Sampling Rate - 100Hz
Commercially Available Data Acquisition
Analog Channel 1 - Decelerometer
Pulse Channel 1 - Race Technology Speedbox High Resolution GPS connected via pulse output
Sampling Rate - 100Hz
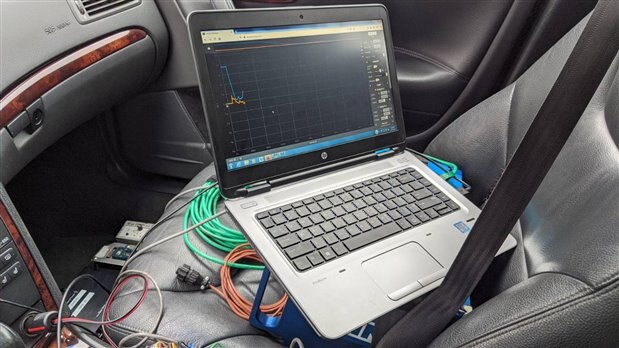
Figure 1 - Instrumentation Setup
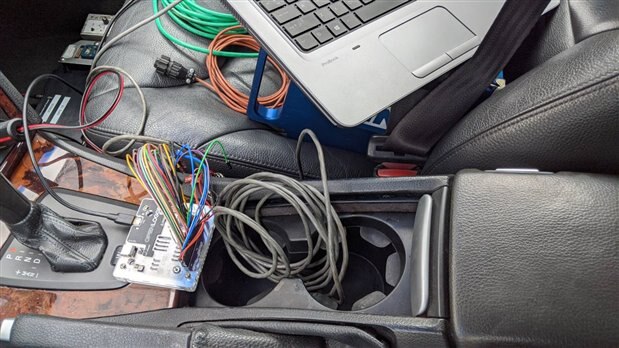
Figure 2 - Instrumentation Setup
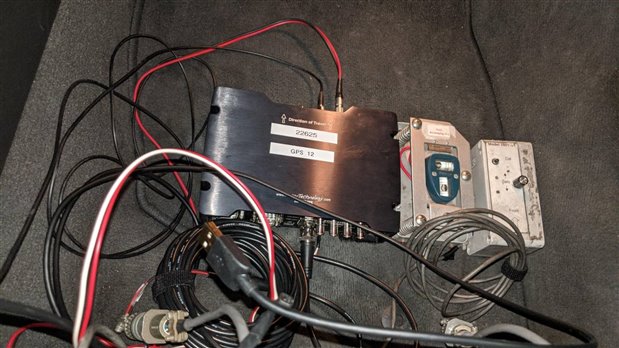
Figure 3 - Connected Sensors
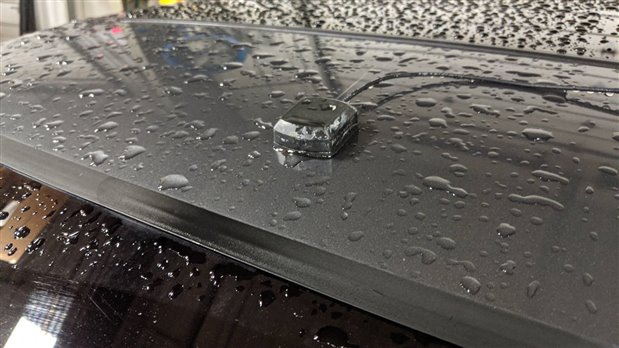
Figure 4 - Roof Mounted GPS Antenna
Test Plan
The following stops were conducted with both data acquisition systems running in parallel. The one issue I have with the Openlogger was that there was no option to trigger logging by a source other than the button on the Waveform Live screen. There is an option to start logging upon startup but for my application this was not needed. Adding an option to commence logging by an external switch (perhaps to a digital I/O channel) would be beneficial.
1 Constant decel stop from 50 mph on asphalt (constant decel was targeted with no ABS, stop is done from steady state speed to zero)
1 Constant decel stop from 40 mph on asphalt (constant decel was targeted with no ABS, stop is done from steady state speed to zero)
2 Transition stops at 20 mph from concrete to gravel (stop was a "panic" stop commencing on concrete while transitioning to gravel, this gives us some ABS activation, you will see an acceleration then a hard stop)
Results
The results from the stops are shown below. "OL" indicates the Openlogger data and "VM" indicates the commercial data acquisition system.
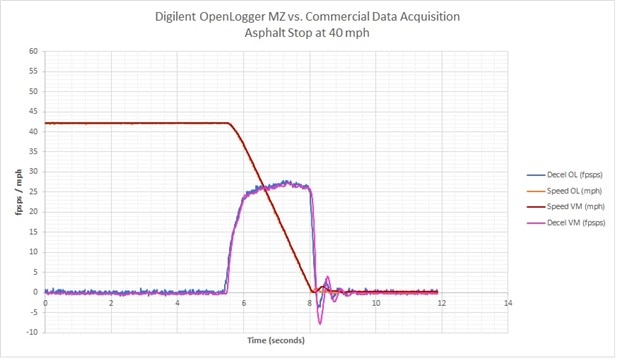
Figure 5 - 40 mph Stop
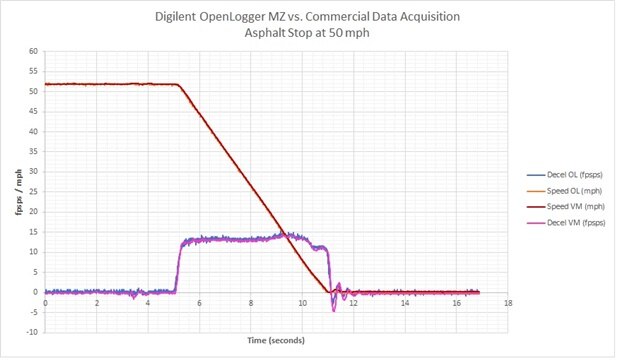
Figure 6 - 50 mph Stop
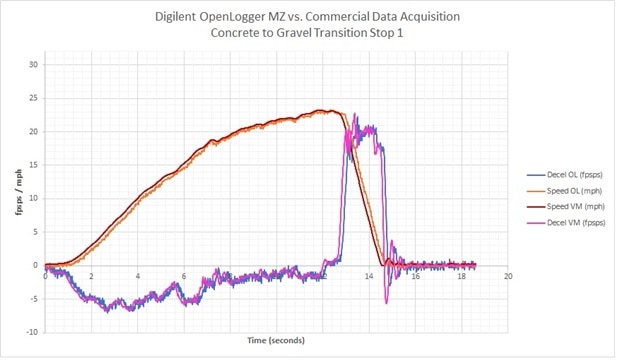
Figure 7 - Transition Stop 1
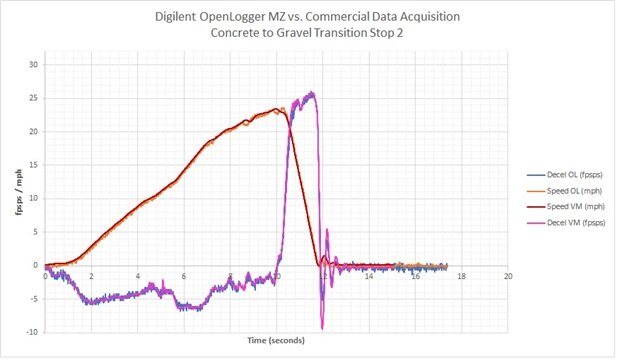
Figure 8 - Transition Stop 2
Conclusions
The purpose of my review was to evaluate the data logging capability and accuracy of the Openlogger MX in comparison to a commercially available (and much more expensive) data acquisition system. I did not explore every capability this DAQ had to offer. My review covers the analog logging capability, most sensors will be outputting an analog signal anyway so I think this covers many users intent when purchasing this unit. To say the least I am impressed with this system. As you can clearly see from the graphs above, the data collected from each system is almost indistinguishable from each other. Any offset can be attributed to a small calibration error and the fact that two different decelerometers were used side by side. Statistically the differences are insignificant. All in all the Openlogger can hold its own against other, higher end loggers. For the price this is a great data logger, for under $200 this is a definite win.
Pros and Cons Quick List
Pros
-Many different sampling rates all the way up to 50kHz (although most of us have no need to sample past 1kHz)
-Screw terminal adapter is easy to use
-Flywires are also easy to use, following the pinout from the online documentation
-Realtime view as data is being logged, great for instant feedback
-Exporting data to CSV from Waveforms Live is easy once you set up the graph configuration
-Onboard 5V pins for power supply
-Calibration can be done to convert your voltages to any unit
Cons
-Although I understand why there is no 10V pin, so many sensors use 10V excitation, this would be very nice to see
-Software is not very intuitive, not hard but takes some getting used to
-Setting the sensitivity calibration is done by manually by entering a formula and offset. An integrated option to do a simple two-point linear calibration would aid in setting up sensors


