RoadTest: Raspberry Pi Click Board Sensor Kit
Author: dimiterk
Creation date:
Evaluation Type: Development Boards & Tools
Did you receive all parts the manufacturer stated would be included in the package?: True
What other parts do you consider comparable to this product?: There are a number of Raspberry Pi sensor boards that offers similar functionality. From the Seed studio RPI ecosystem to custom boards.
What were the biggest problems encountered?: 1. No code examples at all. 2. Closed source libraries for 3'rd party compilers. No Python code. 3. Breakout boards are quite clunky/big for the tiny sensors they host. 4. Temperature sensor gets hot due to close proximity to RPI PCB. 5. Click sensors are not price competitive.
Detailed Review:
We are going to review the Raspberry Pi Click Board Sensor Kit. The set is comprised of an RPI, a Mikroelektronika Click board and two clicks boards.
The first click board is an LSM2D IMU (Inertial Measurement Unit) which is configured to use the SPI bus for communication. This is a 9DOF sensor.
The second click board uses the BME680 humidity/temp/pressure and gas sensor which makes use of the I2C bus.
Part of the review is centered on using the BME 680 to build a dashboard app. More on this later.
The roadtest hardware is shown below. The RPI used is version 3. No SD card came with it so I had to customize an OS for this application/review.


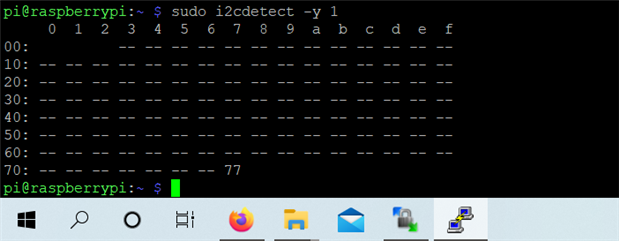
Once I installed the parts, I tested the sensors by probing the I2C bus.
Then I went looking around for a BME680 library. This is the point where the adventures started. Let's just say that Mikroelektronika code libraries are either hard to find or unusable.
The enviroclick board uses a BME680. This IC is manufactured by Bosch which also offers a closed source library that allows sensor fusion.


The schematic of the click board are shown below. Nothing fancy. Two click holders, 1 ADC and a switch that routes the pins to the ADC or to be used as GPIO.
The issue is that to use it for an analog signal for which there is no click board you have to design your own signal conditioning board.

Project
For this review , the idea was to build a real time dashboard for the sensors. I used the BM680 sensors which allows one to measure : temperature, humidity, pressure, and gas level.
The I2C sensor shows up on address 0x77.
We need a Python library for the BME680 sensor so we will use the Pimoroni BLE library.
install this by issuing :
sudo pip install bme680
To test the sensor simply run the BME680 example app.

We will build a website with Python , Flask framework, Javascript and the HTML5 Bootstrap framework. The webserver is set up to react to real time changes from the sensor data through the use of AJAX calls.
This turns the website into a dynamic app that can be used as a dashboard for monitoring environmental variables such as :
a) temperature
b) humidity
c) pressure
d) volatile gas
First we create a folder:
mkdir E14dashboard
cd E14dashboard
Next inside this folder two other folders are created for the HTML and javascript files.
The Flask Framework searches for HTML files in a folder called templates. So we need to create a templates folder and put all the HTML files in there.
mkdir static
mkdir templates
A Python Flask webserver was then setup.
The HTML web page will be created from a template that holds the static content of the page. The dynamic version of the page is created by leveraging the javascript AJAX calls.
The HTML dashboard is coded using the Bootstrap framework. JQuery Javascript library was used for AJAX calls while the FLOT library was used for plotting the data. The javascript files are located under the /static folder.
<!DOCTYPE html>
<html lang="en">
    <head>
    <meta charset="UTF-8">
        <title>{{ Title }}</title>
        <link rel="stylesheet" href="https://maxcdn.bootstrapcdn.com/bootstrap/3.3.4/css/bootstrap.min.css">
        <link rel="stylesheet" href="https://maxcdn.bootstrapcdn.com/bootstrap/3.3.4/css/bootstrap-theme.min.css">
        <script src="https://ajax.googleapis.com/ajax/libs/jquery/1.11.2/jquery.min.js"></script>
        <script src="https://maxcdn.bootstrapcdn.com/bootstrap/3.3.4/js/bootstrap.min.js"></script>
        <script src="https://maxcdn.bootstrapcdn.com/bootstrap/3.3.4/js/jquery.flot.resize.js"></script>
        <script language="javascript" type="text/javascript" src="../static/jquery.js"></script>
        <!--[if lte IE 8]><script language="javascript" type="text/javascript" src="/js/flot/excanvas.min.js"></script><![endif]-->
        <script type="text/javascript" src="../static/jquery.flot.js"></script>
        <script type="text/javascript" src="../static/jquery.flot.time.js"></script>
        <script type="text/javascript" src="../static/jquery.flot.axislabels.js"></script>


        <style type="text/css">
            body{
                padding-top: 70px;
            }

        </style>
    </head>

    <body>
        <div>
            <div>
                <!-- <h1>Gas sensor Live data stream</h1> -->
                <!-- <div id="flot-placeholder1" style="width:550px;height:300px; margin:10 auto"> </div> -->

            <!-- interactive chart -->
              <div>
                <div>
                  <i></i>
                  <h3>Gas sensor data</h3>
                  <div>
                    Real time
                    <div id="realtime" data-toggle="btn-toggle">
                      <button type="button" data-toggle="on">On</button>
                      <button type="button" data-toggle="off">Off</button>
                    </div>
                  </div>
                </div>
                <div>
                  <div id="flot-placeholder1" style="height: 300px;"></div>
                </div><!-- /.box-body-->
              </div><!-- /.box -->


            <div>
                <div>
                    <h2>Temperature</h2>
                    <p> {{ temperature|safe }} degrees Celcius.</p>

                </div>
                <div>
                    <h2>Humidity</h2>
                    <p> {{humidity|safe}} %RH.</p>

                </div>
                <div>
                    <h2>Barometric Pressure</h2>
                    <p> {{pressure|safe }} Pa.</p>

                </div>

            </div>
            <hr>
            <div>
                <div>
                    <footer>
                        <p>© Copyright 2020 DHQ</p>
                    </footer>
                </div>
            </div>
        </div>

    <script type="text/javascript" src="../static/sensors.js"></script>
    </body>
</html>
The update interval of the dashboard was set to 1second.
function GetGasLevel()
{
    $.getJSON( '/getGas', function( json )
    {
      console.log( "JSON Data: " + json.Gaslevel );

         var y ;
         var temp;

         if(data.length >= totalPoints)
         {
            data.shift();
            y = json.Gaslevel;
         }else{
            y = json.Gaslevel;
         }

         temp = [now += updateInterval, y];
         data.push(temp);

     });
}
The Python Flask is a microwebeserver framework. It makes use of the Jinja2 templating system. In effect this allows building websites where anything in double curly braces within the HTML template is interpreted as a variable that connects with Python script via the render_template function. To share data between the HTML and the Python script a dictionary of variables is created and passed into the template. On “return”, this will return the index.html template to the web browser using the variables in the template Data dictionary.
To augment this with real time capabilities one has to use a library that supports AJAX (javascript asynchronous calls) like JQuery.
The result is shown below:

#!/usr/bin/python
import time
import math
import datetime
from flask import jsonify
from flask import Flask, render_template
import RPi.GPIO as GPIO
import bme680
from ctypes import *

app = Flask(__name__)

try:
    sensor = bme680.BME680(bme680.I2C_ADDR_PRIMARY)
except IOError:
    sensor = bme680.BME680(bme680.I2C_ADDR_SECONDARY)

print('Calibration data:')
for name in dir(sensor.calibration_data):

    if not name.startswith('_'):
        value = getattr(sensor.calibration_data, name)

        if isinstance(value, int):
            print('{}: {}'.format(name, value))

# These oversampling settings can be tweaked to
# change the balance between accuracy and noise in
# the data.

sensor.set_humidity_oversample(bme680.OS_2X)
sensor.set_pressure_oversample(bme680.OS_4X)
sensor.set_temperature_oversample(bme680.OS_8X)
sensor.set_filter(bme680.FILTER_SIZE_3)
sensor.set_gas_status(bme680.ENABLE_GAS_MEAS)

print('\n\nInitial reading:')
for name in dir(sensor.data):
    value = getattr(sensor.data, name)

    if not name.startswith('_'):
        print('{}: {}'.format(name, value))

sensor.set_gas_heater_temperature(320)
sensor.set_gas_heater_duration(150)
sensor.select_gas_heater_profile(0)


@app.route('/light')
def readAmbientLight():
    sensor.get_sensor_data()

    templateData = {
        'title' : 'Gas Level ',
        'Luxlevel' : sensor.data.gas_resistance
        }
    return render_template('light.html', **templateData)

@app.route('/')
def readMPL():
    sensor.get_sensor_data()
    time.sleep(0.5)
    time.sleep(0.5)
    temperature = sensor.data.temperature
    time.sleep(0.5)
    time.sleep(0.5)
    baroPressure =  sensor.data.pressure        #Take a pressure reading

    templateData = {
        'Title' : 'Environmental Dashboard ',
        'temperature' : temperature,
        'humidity' : sensor.data.humidity,
        'pressure' : baroPressure
        }
    return render_template('Dashboard.html', **templateData)

@app.route('/GetGas')
def ReadSensor():
    sensor.get_sensor_data()
    gasdata = sensor.data.gas_resistance
    print(sensor.data.gas_resistance)
    return jsonify(LuxVAL = gasdata/10000)

@app.route('/GetTemperature')
def ReadTemperature():
    sensor = bme680.BME680(bme680.I2C_ADDR_PRIMARY)
    sensor.get_sensor_data()

    time.sleep(1)
    temperature = sensor.data.temperature
    print "temp %f" % temperature

    return jsonify(Temp = temperature)

@app.route('/GetHumidity')
def ReadAltimeter():
    sensor.get_sensor_data()
    time.sleep(1)
    altitude =  sensor.data.humidity

    return jsonify(humidity = altitude)

@app.route('/GetPressure')
def ReadBarometer():
    sensor.get_sensor_data()
    time.sleep(1)
    baroPressure =  sensor.data.pressure        #Take a pressure reading

    return jsonify(Barometer = baroPressure)

if __name__ == "__main__":
   app.run(host='0.0.0.0', port=5050, debug=True)
This concludes the project for the RPI Click Board Sensor Kit .
Verdict
The Good!
The Bad
The Ugly


Top Comments
Yes, you're right, the Bosch link in your review is obsolete. If you need more information about the chip, you can use this following link instead:
https://www.bosch-sensortec.com/products/environmental…
The link from Mikroelektronika website is dead.
Bosch firmware is over here:
https://www.bosch-sensortec.com/software-tools/software/bsec/
It's not free however.
By free I mean open source.
The zip file contains a lite and full version library, but the sensor fusion library is provided pre-compiled for a couple of different architectures.
It's provided as a closed…