I was watching the Electromaker show on their YouTube channel last week and Ian mentioned the Electromaker Educator Blog "Embeetle IDE: The Best IDE for Coding RISC-V Microcontrollers?" where Robin Mitchell describes using the Embeetle IDE to program low cost CH32V RISC-V MCUs.
I wanted to try out the CH32V parts when they were introduced last year, but it was yet another low cost Chinese part with yet another development platform to learn (MounRiver Studio IDE). I've heard some good things about Embeetle, so the blog inspired me to give it a try with the CH32V. The CH32V is a series of RISC-V MCUs made by WCH (NanjingQinhengMicroelectronics). The parts and evaluation boards are available at AliExpress for under $5 including shipping. Of course, I don't have the patience to wait 3 weeks for a shipment from China so I bought a CH32V003 Development Kit on Amazon for quite a bit more.

This particular development board requires a debugger/programmer to flash the MCU, so I bought the kit that included the WCH-LinkE programmer. Guess since it also came with 5 individual ICs that I may have to do a PCB in the future .
This is a low end IC, but it has enough memory, IO, and peripherals for simple projects.


Embeetle IDE
The good news and bad news about the Embeetle IDE is that projects are all self-contained, i.e. all the necessary files, configurations, and dependencies are bundled within the project directories. That should improve the portability of projects. To that end, I decided that I would put the IDE and all the projects on a 16GB USB stick so that I can test how portable this really is.
The IDE itself isn't that large to download ~300MB for a zip file. It expands to a bit over 4GB when extracted and updated.


When the Embeetle IDE is started, the Homepage allows you to create or import new projects or open existing projects:

There are currently 4 WCH boards supported representing 4 of their MCU types:

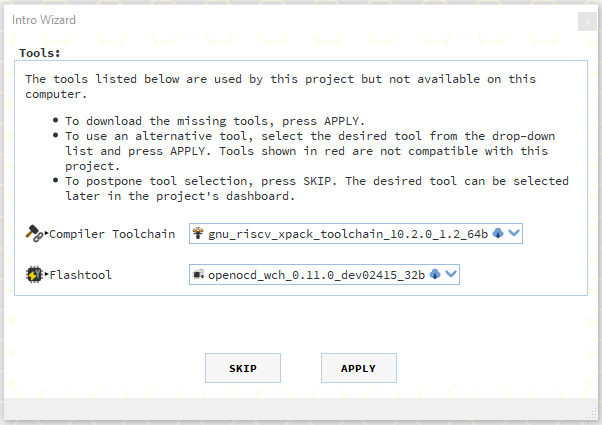
I created a project for my board that I called ch32v003-test. That created a template with the requisite "blinky" code. It identified that I was missing some of the required riscv toolchain elements and downloaded them for me:


/********************************** (C) COPYRIGHT *******************************
 * File Name          : main.c
 * Author             : WCH
 * Version            : V1.0.0
 * Date               : 2022/08/08
 * Description        : Main program body.
*********************************************************************************
* Copyright (c) 2021 Nanjing Qinheng Microelectronics Co., Ltd.
* Attention: This software (modified or not) and binary are used for
* microcontroller manufactured by Nanjing Qinheng Microelectronics.
*******************************************************************************/

/*
 *@Note
 GPIO routine:
 PD0 push-pull output.

*/

#include "debug.h"

/* Global define */

/* Global Variable */

/*********************************************************************
 * @fn      GPIO_Toggle_INIT
 *
 * @brief   Initializes GPIOA.0
 *
 * @return  none
 */
void GPIO_Toggle_INIT(void)
{
    GPIO_InitTypeDef GPIO_InitStructure = {0};

    RCC_APB2PeriphClockCmd(RCC_APB2Periph_GPIOD, ENABLE);
    GPIO_InitStructure.GPIO_Pin = GPIO_Pin_0;
    GPIO_InitStructure.GPIO_Mode = GPIO_Mode_Out_PP;
    GPIO_InitStructure.GPIO_Speed = GPIO_Speed_50MHz;
    GPIO_Init(GPIOD, &GPIO_InitStructure);
}

/*********************************************************************
 * @fn      main
 *
 * @brief   Main program.
 *
 * @return  none
 */
int main(void)
{
    u8 i = 0;

    NVIC_PriorityGroupConfig(NVIC_PriorityGroup_2);
    Delay_Init();
    USART_Printf_Init(115200);
    printf("SystemClk:%d\r\n", SystemCoreClock);

    printf("GPIO Toggle TEST\r\n");
    GPIO_Toggle_INIT();

    while(1)
    {
        Delay_Ms(250);
        GPIO_WriteBit(GPIOD, GPIO_Pin_0, (i == 0) ? (i = Bit_SET) : (i = Bit_RESET));
    }
}
Then you just need to build the project, hook up the the board and programmer and flash the code. That's where I was impressed by the IDE documentation.
I could drill down to wch/boards/ch32v003f4p6-evt-r0-1v1 and find a detailed hardware description of the board and even see a connection diagram for the debugger/programmer link.

Here's my test setup:

And the blinking LED:
The Embeetle IDE supports the core peripheral functions UART, I2C, SPI, and ADC for this part. I found some sample code that was used with the MounRiverStudio IDE and I modified the I2C example to see if my setup would work with an SSD1306 OLED display and that was successful:

I'll need to think up a good project and try adding some sensors.
The Embeetle IDE has worked well so far. I need to learn a bit more and also test its portability. I want to try it with a few of the NXP and STmicro boards that it supports and of course, the RPi Pico. Unfortunately, it does not currently support the majority of boards that I use.

-

DAB
-
Cancel
-
Vote Up
0
Vote Down
-
-
Sign in to reply
-
More
-
Cancel
Comment-

DAB
-
Cancel
-
Vote Up
0
Vote Down
-
-
Sign in to reply
-
More
-
Cancel
Children