


Precision. Motor. Control.
Enter those three words into your favorite search engine and you'll be happy to see hundreds of promising results. Most claim to demonstrate some combination of low-cost hardware platform, ease-of-use, and precision. Why? It’s the Holy Grail for electric drives.
I recently had the opportunity to test drive the Logic4Motion entry into this category. Their approach stands out for a few reasons. The short list is below, but keep reading to see these in action as I bring up Hello Motor! on the L4M kit.
- Deterministic (and fast) control loops
- Field Oriented Control (FOC) accelerated by programmable logic
- C-to-gates design entry requires (almost) no HDL coding experience

From the image you can see three distinct boards. The two yellow Logic4Motion boards create an isolated bridge and power stage. The black controller board comes from Avnet – a tiny workhorse called MiniZed.
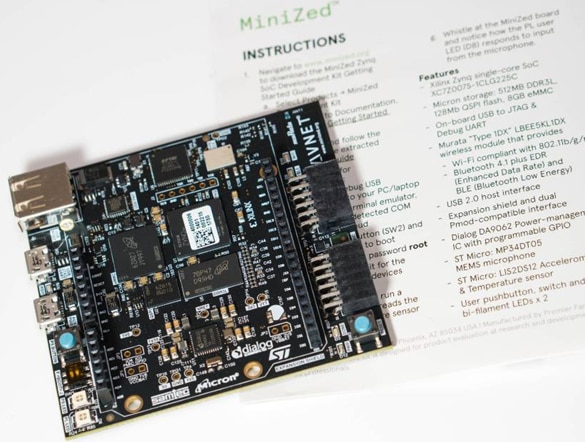
Less than $100 and based on the Xilinx Zynq-7000 SoC, MiniZed is an ideal choice for low-cost and high performance. You buy MiniZed separately.
The L4M kit includes the bridge and power cards in a rather compact form factor, plus a NEMA 3-phase PMSM (permanent magnet synchronous machine) motor with rotary encoder.
Hardware Assembly
Very easy. Everything is keyed, making assembly intuitive and quick. The fact that the assembled footprint is small was very much appreciated on my crowded lab bench.
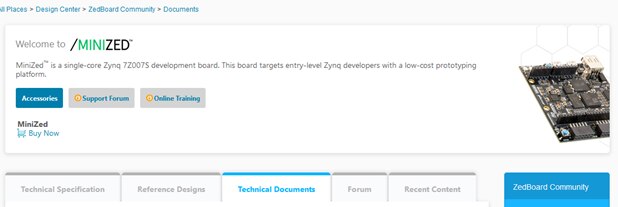
Programming MiniZed
The first step towards spinning motors with this kit is straightforward and painless. I found instructions for programming a boot file into MinZed on the e14 page. To get there, start on the e14 main page and use the top ribbon pulldown Find Products > Zedboard Community to find MiniZed. Here’s a quick link.

I downloaded and followed the instructions in Programming the QSPI Flash Using XSCT for a flash-only boot configuration of MiniZed. Instead of the Avnet boot.bin file, I chose the one provided by L4M.
For those new to MiniZed there’s a fine overview of featured here on e14 in the “Path to Programmable” Design Challenge. Not a bad place to start if you’re new to designing with the Xilinx Zynq-7000 SoC. But save that for another time. You won’t need that that training to get started with the L4M kit.
Back to programming MiniZed …
Beware! The Xilinx Software Command Line Tool (XSCT) -- I’m working with v2019.1 -- requires a valid first-stage-bootloader (FSBL) file when programming the QSPI flash onboard MiniZed. I borrowed the Avnet zynq_fsbl.elf file included in the download above.
Enter the following command in XSCT
exec program_flash -f boot.bin -fsbl zynq_fsbl.elf -flash_type qspi_single
Programming was successful. The green PS-LED blinked after reboot, and the L4M application connected. All good so far!
A few words of guidance here to avoid some confusion.
First - Be patient. It takes a few minutes to complete flash programming and XSCT will not provide any updates along the way.
Second - the L4M boot image does not support a command line emulator like TeraTerm, however the L4M application is able to successful connect and communicate via RS232 serial protocol.
Finally – be sure you’re MiniZed is set to Flash boot, labeled ‘F’ on the tiny dip switch (see below).
Software Installation
As long as you have Microsoft .NET 4.5 on your machine, no installation is required. The L4M GUI runs standalone without adding entries to your Start menu or registry. Just double-click L4M_win.exe and you’re up and running. Kudos L4M!
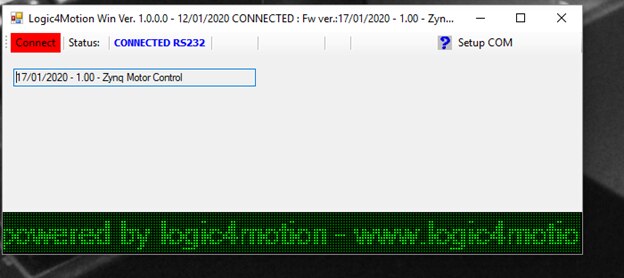
Connecting to MiniZed
The COM setup utility is simple, but pay attention. The baud rate is atypical. By now we’re all probably used to 115200, but the IP here expects 38400. Leave the others settings at their default and click Ok.

The normal routine at this point would be to open a serial terminal emulator like TeraTerm to verify the connection was established. Resist that temptation. Just press Connect in the status window. Once connected via RS232 the main control window appears.
(The bottom billboard advertisement gives the impression that you’re viewing a major sporting event.)
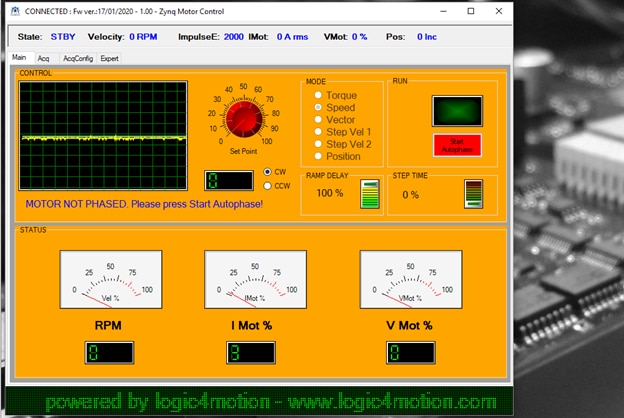
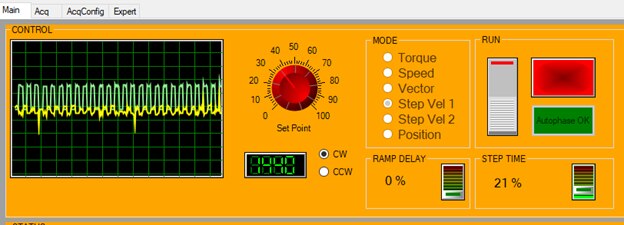
Motor Control
The first step, as prompted by the UI, is to align the rotor and calibrate the phases. This happens automatically after pressing the Autophase button. After that you’re ready to start spinning the motor.
Aside from standard velocity set point control, there are a number of other modes that make this application stand out. Two velocity step profiles are convenient to observe basic control loop performance. Also included is a torque control mode. Many applications require precise and constant torque across varying load dynamics.
Step Vel1 provides a period velocity step stimulus. The ramp and step sliders allow you to customize the stimulus and observe the response in the Acq tab.
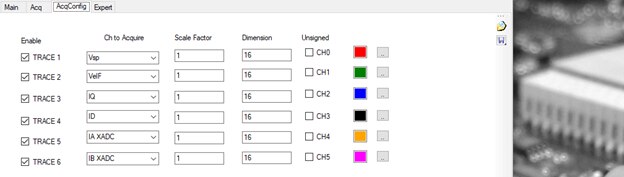
The AcqConfig tab allows you to choose 6 parameters to record and report back to the UI for visualization and analysis.
Back on the Acq tab, there is no real-time streaming of data from board to PC. Remember we’re connected via RS232 with limited bandwidth. However you can capture and upload a buffer of data at any time by pressing the record button. This is more than sufficient for observing periodic load and response data.
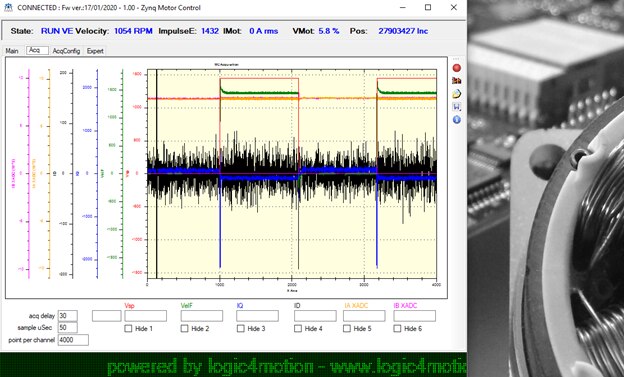
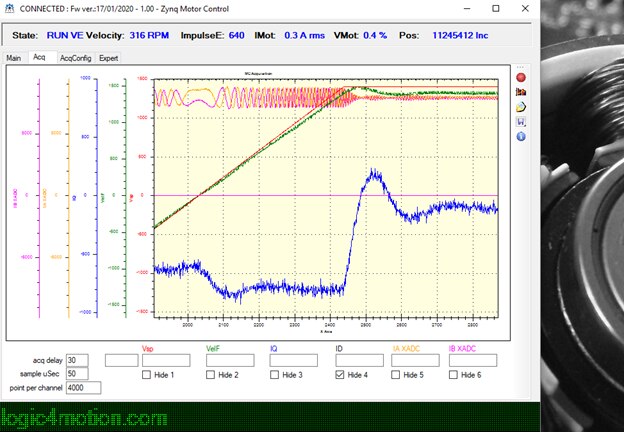
Below I used the UI zoom functions and chose to hide the drive and two phase currents to focus only on the velocity control loop response and the torque current (Iq), which we want to be very close to zero for optimal drive.

The Expert tab reports the K parameters for all control loops, plus the underlying critical settings for the field oriented control (FOC) algorithm. Most of the fields appear to be tunable, but having tuned motor algorithms in the past, I chose not to drop random numbers into the fields. That’s often a good way to destroy your motor, drive board, or both!
Step Vel 2 mode ramps the rotor in back and forth between CW and CCW directions. Also a convenient feature for evaluating the quality of the control loops.
Data Export
If you want to export data and analyze it in your tool of choice, the application makes it very easy and uses a straightforward text format. I wrote a few lines of MATLAB to extract and plot the sample vectors. See below.


MATLAB code to plot exported data
function data = read_adf()
    % Read L4M data file named 'l4m_acq_file.adf'

    fID = fopen('l4m_acq_file.adf', 'r');
    tline = '';
    ch = 0;
    dvec = [];

    while ~isnumeric(tline)
        tline = fgets(fID);

        if contains(tline, 'Unsigned')
            ch = ch + 1;
            while ~isnumeric(tline) && ~contains(tline, '***')
                vals = sscanf(tline, '%i;');
                dvec = [dvec vals'];%#ok
                tline = fgets(fID);
            end
            data{ch} = dvec; %#ok
            dvec = []; % clear channel buffer
        end
    end

    fprintf('\nRead %u channels, %u samples/chan.\n', ch, length(data{1}))

    % Clean up
    fclose(fID);

    % Plot the data
    hold on
    plot(data{1}, 'r--')
    plot(data{2}, 'g')
    plot(data{3}, 'c')
    legend('Vsp', 'Vmeas', 'Iq')
    title('L4M Acquired Data')
    hold off
end
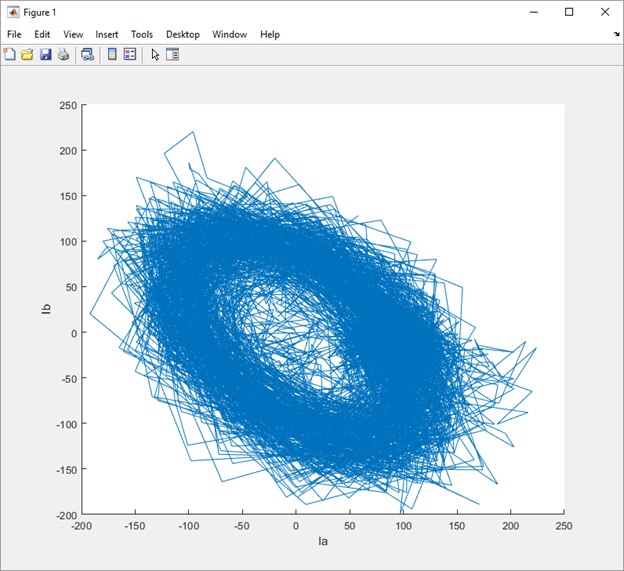
One way of observing optimal drive of a 3-phase motor is to observe the sinusoidal currents flowing into the stator on the unit circle. Again easy to do in MATLAB. The Ia and Ib currents are measured directly by the Zynq SoC multi-channel integrated XADC, while Ic is calculated as Ia + Ib + Ic = 0. In other words the sum of the currents is zero, so if we measure two, we get the third for free.
Adding Load
Of course not motor control trial is done until you’ve tried adding a load. I had a small inertia wheel in my office, so I attached it and ran a few more tests. This is where you find out if the drive stage was designed to handle Back EMF (BEMF) and negative currents.
Notice the clamp! Look at the picture of my setup below. You need to have the base secured when creating large moments around the rotor. These motors have significant torque and will hop off the bench if not secured.

I was impressed to see how this small board and the IP handled a CW to CCW change with small ramp delays. Here you can observe the Ia and Ib waveforms as the rotor crosses over from CW to CCW direction, and the regulated torque current (blue).
Improvements
The L4M kit packs a lot into a small area. This should convince anyone skeptical of creating a compact, high-performance drive using SoCs that it’s absolutely a reality in Xilinx’ cost-optimized line of Zynq-7000 SoCs. L4M have been providing high-performance solutions using these devices for years and this kit demonstrates a mastery in the field.
If I were to offer any suggestions for improvements they would be…
- Ethernet connection for faster (and possibly real-time) data acquisition. Acquiring 4000 samples across six channels takes about 35 seconds.
- Quadrature and Space Vector visualization during Torque control.
- Entry fields for parameters like Velocity and Torque set points. Also Ramp Delay and Step Time. The sliders are convenient, but I often want to enter precise values and have some control over when they take effect.
Next Steps
The next step would be to experiment with the Xilinx Vivado HLS (High-Level Synthesis) project that this design is built upon. After that, I would explore the resulting programmable logic design that is automatically created by the HLS tools. A little peak behind the curtain in Vivado goes a long way when evaluating the system design.
This L4M IP clearly demonstrates the right balance of using programmable logic to accelerate time-critical tasks like current and position loops, while leaving enterprise communication to the PC and parameter update to the processing subsystem where it can be managed efficiently.
One question remains -- the MiniZed’s Zynq 7007S device has limited amounts of programmable logic (PL), so efficient conversion from C-to-gates is critical. The question is – bandwidth. How many PL resources are leftover for custom logic? Does this single core Zynq 7007S have remaining bandwidth to add a layer of precision motion control profiles?
Not a bad idea for a future blog!
