element14 Community
element14 Community
    Register Log In
  • Site
  • Search
  • Log In Register
  • About Us
  • Community Hub
    Community Hub
    • What's New on element14
    • Feedback and Support
    • Benefits of Membership
    • Personal Blogs
    • Members Area
    • Achievement Levels
  • Learn
    Learn
    • Ask an Expert
    • eBooks
    • element14 presents
    • Learning Center
    • Tech Spotlight
    • STEM Academy
    • Webinars, Training and Events
    • Learning Groups
  • Technologies
    Technologies
    • 3D Printing
    • FPGA
    • Industrial Automation
    • Internet of Things
    • Power & Energy
    • Sensors
    • Technology Groups
  • Challenges & Projects
    Challenges & Projects
    • Design Challenges
    • element14 presents Projects
    • Project14
    • Arduino Projects
    • Raspberry Pi Projects
    • Project Groups
  • Products
    Products
    • Arduino
    • Avnet Boards Community
    • Dev Tools
    • Manufacturers
    • Multicomp Pro
    • Product Groups
    • Raspberry Pi
    • RoadTests & Reviews
  • Store
    Store
    • Visit Your Store
    • Choose another store...
      • Europe
      •  Austria (German)
      •  Belgium (Dutch, French)
      •  Bulgaria (Bulgarian)
      •  Czech Republic (Czech)
      •  Denmark (Danish)
      •  Estonia (Estonian)
      •  Finland (Finnish)
      •  France (French)
      •  Germany (German)
      •  Hungary (Hungarian)
      •  Ireland
      •  Israel
      •  Italy (Italian)
      •  Latvia (Latvian)
      •  
      •  Lithuania (Lithuanian)
      •  Netherlands (Dutch)
      •  Norway (Norwegian)
      •  Poland (Polish)
      •  Portugal (Portuguese)
      •  Romania (Romanian)
      •  Russia (Russian)
      •  Slovakia (Slovak)
      •  Slovenia (Slovenian)
      •  Spain (Spanish)
      •  Sweden (Swedish)
      •  Switzerland(German, French)
      •  Turkey (Turkish)
      •  United Kingdom
      • Asia Pacific
      •  Australia
      •  China
      •  Hong Kong
      •  India
      •  Korea (Korean)
      •  Malaysia
      •  New Zealand
      •  Philippines
      •  Singapore
      •  Taiwan
      •  Thailand (Thai)
      • Americas
      •  Brazil (Portuguese)
      •  Canada
      •  Mexico (Spanish)
      •  United States
      Can't find the country/region you're looking for? Visit our export site or find a local distributor.
  • Translate
  • Profile
  • Settings
Motors and Drives
  • Technologies
  • More
Motors and Drives
Blog Trinamic Stepper Motor Controller TMC2300 - Evaluation Kit and IDE Functionality, basic functionality
  • Blog
  • Forum
  • Documents
  • Events
  • Polls
  • Files
  • Members
  • Mentions
  • Sub-Groups
  • Tags
  • More
  • Cancel
  • New
Join Motors and Drives to participate - click to join for free!
  • Share
  • More
  • Cancel
Group Actions
  • Group RSS
  • More
  • Cancel
Engagement
  • Author Author: Jan Cumps
  • Date Created: 7 Feb 2020 2:01 PM Date Created
  • Views 998 views
  • Likes 7 likes
  • Comments 2 comments
  • trinamic
  • tmc2300
  • stepper
  • tmc2300-eval-kit
Related
Recommended

Trinamic Stepper Motor Controller TMC2300 - Evaluation Kit and IDE Functionality, basic functionality

Jan Cumps
Jan Cumps
7 Feb 2020

I'm road testing Trinamic TMC2300 EVAL KIT (2-PH Stepper Motor). It's their latest design that targets battery powered devices.

In this post: use the kit and software to evaluate the driver.

image

This series of posts reviews the IDE functionality with the device operating in UART STEP/DIR mode (the advanced mode). I'm starting with an overview of the IDE, then the basis functionality such as enable, set current, set acceleration, move motor.


Main Functions of the IDE


You can control motor speed, acceleration, direction, motor and standby current.

There's functionality to activate and deactivate the driver.

You can start and stop the motor, using the defined settings. Either until it reaches a defined speed or a given position.

In both cases it uses the current and acceleration settings.

You can control the Trinamic specific motor control algorithms CoolStep (current use efficiency) and StallGuard (detect and act on the motor stalling).


image

click image for large size view


You can view the motor running in a velocity and position graph.

Some screens show actual runtime values (some theoretical because there's no feedback signal for all of these in the TMC2300 kit).

And there's low level functionality, like setting individual pins of the driver, writing your own datagrams directly and read the results, access driver registers.

At all times you can see the commands being sent from the IDE to the driver in a logging window.


The landungsbrücke part of the evaluation kit is the translator between the IDE and the TMC2300 driver board. You can think of it as the debugger in a microcontroller setup.


operation modes

The TMC2300 driver has  2 modes. The legacy Standalone stepper STEP/DIR mode and the UART STEP/DIR mode with Full Diagnostics and Control.

In legacy mode, you set the motor current via sense resistors and use external step and dir signals to control the motor.


The second mode, where you use UART commands to configure and control the motor, is the one that makes the Trinamic solution stand out, with functionality to smoothen steps, optimise current and react on a stalling motor.


image


Enabling the Driver and other GPIO Manipulation


To enable the driver, you have to set both VIO and EN pins high.

You use the Chip Click window for that. When you click the VIO pin, the EN is automatically synced.


image

Once you enable the VIO, the driver is in action and will use a current (see below how much) to keep the motor in position.


The window allows you to set the other output pins too. You can even use DIR and STEP to make the motor move a notch at the click of the mouse.


Control Current for Stepping and Pausing


The Current Setting window lets you define the current used while stepping and pausing the motor.

As soon as you enable the driver, it will use the Standby current to hold the motor in place.

When you use step commands (via the other windows) it 'll use the Motor current when exciting the coils.


imageimage


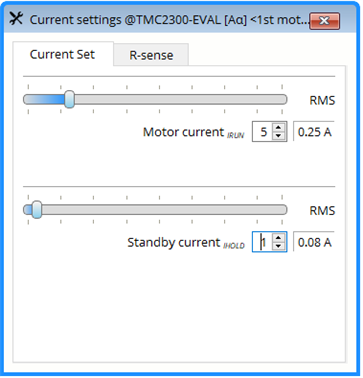
The current is dependent on the sense resistor mounted in the circuit. By default, the IDE uses the same value as mounted on the evaluation kit.

With the current set and the driver enabled, you can use the IDE to set and validate motor movement:


Set and Monitor Velocity Mode


The Velocity mode window allows you to control the motor in a continuous mode. You define a target velocity (desired steps per second) and the ramp up/down speed.

When you then click the left or right button, the motor will use the ramp setting to reach the desired speed.

If you use the diode-style buttons, the motor will run as long as you press that, using the ramp to accelerate. When you release it, it uses the same ramp to decelerate until stop.

image


The Velocity graph shows what's happening. Don't take the Actuals in these window literal, because there's no feedback control. It's theoretical, not measured.


Set and Monitor Position Mode


The Position mode window allows you to control the relative or absolute position. It uses the acceleration setting defined in the target control.

image

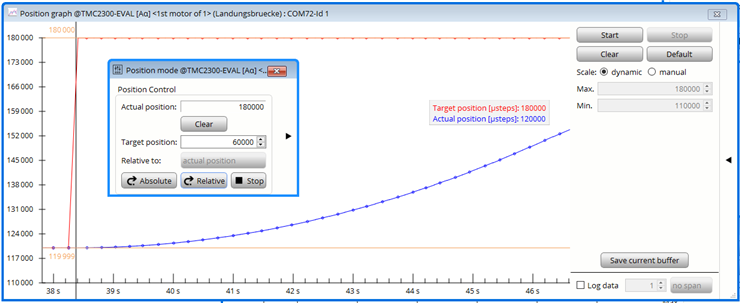
I've seen that it runs faster than the target speed, so not sure yet how to control the speed when using position mode ...


related blog
UART Interface
Evaluation Kit and IDE Functionality, basic functionality
C++ Custom Firmware Pt 1: Datagram Classes
C++ Custom Firmware Pt 2: Wire Up, Test and Comms Analysis
C++ Custom Firmware Pt 3: Try to Replicate Evaluation Kit Conversation
Trinamic TMC2300 EVAL KIT (2-PH Stepper Motor) - Review
  • Sign in to reply

Top Comments

  • Jan Cumps
    Jan Cumps over 5 years ago +1
    Somewhat more advanced: using the TMCL/PC (Trinamic motor control language, pc host version). It allows to script test commands: This opens a connection to the evaluation kit over USB, then Spins the motor…
  • Jan Cumps
    Jan Cumps over 5 years ago

    Somewhat more advanced: using the TMCL/PC (Trinamic motor control language, pc host version).

    It allows to script test commands:


    image

    This opens a connection to the evaluation kit over USB,

    then Spins the motor left at 7000 ppm, for 1.5 s.

    then stop and wait for 1 s

    then the same right

    then loop


    Result:


    image

    • Cancel
    • Vote Up +1 Vote Down
    • Sign in to reply
    • More
    • Cancel
  • DAB
    DAB over 5 years ago

    Nice update Jan.


    DAB

    • Cancel
    • Vote Up 0 Vote Down
    • Sign in to reply
    • More
    • Cancel
element14 Community

element14 is the first online community specifically for engineers. Connect with your peers and get expert answers to your questions.

  • Members
  • Learn
  • Technologies
  • Challenges & Projects
  • Products
  • Store
  • About Us
  • Feedback & Support
  • FAQs
  • Terms of Use
  • Privacy Policy
  • Legal and Copyright Notices
  • Sitemap
  • Cookies

An Avnet Company © 2025 Premier Farnell Limited. All Rights Reserved.

Premier Farnell Ltd, registered in England and Wales (no 00876412), registered office: Farnell House, Forge Lane, Leeds LS12 2NE.

ICP 备案号 10220084.

Follow element14

  • X
  • Facebook
  • linkedin
  • YouTube