


Several years ago I was asked to make a battery charge gauge for a simple 9v battery. I did just that with a simple LM3914N-1, National Semiconductor’s Dot/Bar Display Driver. During the time I spend designing the indicator, I noticed that the battery was un-usable after it dropped below 7.3v for the application. And the system drained that battery pretty fast too. Overall, the power lasted roughly 30 minutes of continual use. But, there was plenty of charge left in the battery, but it was at 7.3v. How could I get it?
Right about that time I discovered Super-capacitors and Ultra-Capacitors. I considered replacing the 9v battery with a bank of Caps (Super-capacitors in this case), but the actual Joule density of the caps didn't match that of the original. Though I did propose a Cap bank alternative the size of a small shoebox with the charge density of the 9v cell, I only received worried looks and furrowed brows in response.
So, I did what any right minded designer would do at that point, combine the two technologies. I found that the battery was over taxed during current draw leading to immediate voltage drop at the source. My first, and simplest solution, was placing the Cap in parallel with the battery. What I noticed was an immediate reduction in the voltage drop on the power source, as a whole, even during peak current draw.
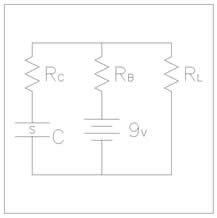
Simple version of the design (see above).
I also found that the capacitor also reduces the source impedance compared to the battery alone.
What was the immediate benefit? Extended useable battery life. I was able to tap the one 9v cell for approximately 50 minutes during ideal tests. Though, I was surprised, and happy, with what I experienced using the Cap, the battery did dip below 7.3v eventually; still unsatisfied, my pursuit of optimal energy usage did not end here.
Wait for part two, to see how I squeezed even more Joules out this 9v turnip.
Cabe