


Table of Contents
Introduction
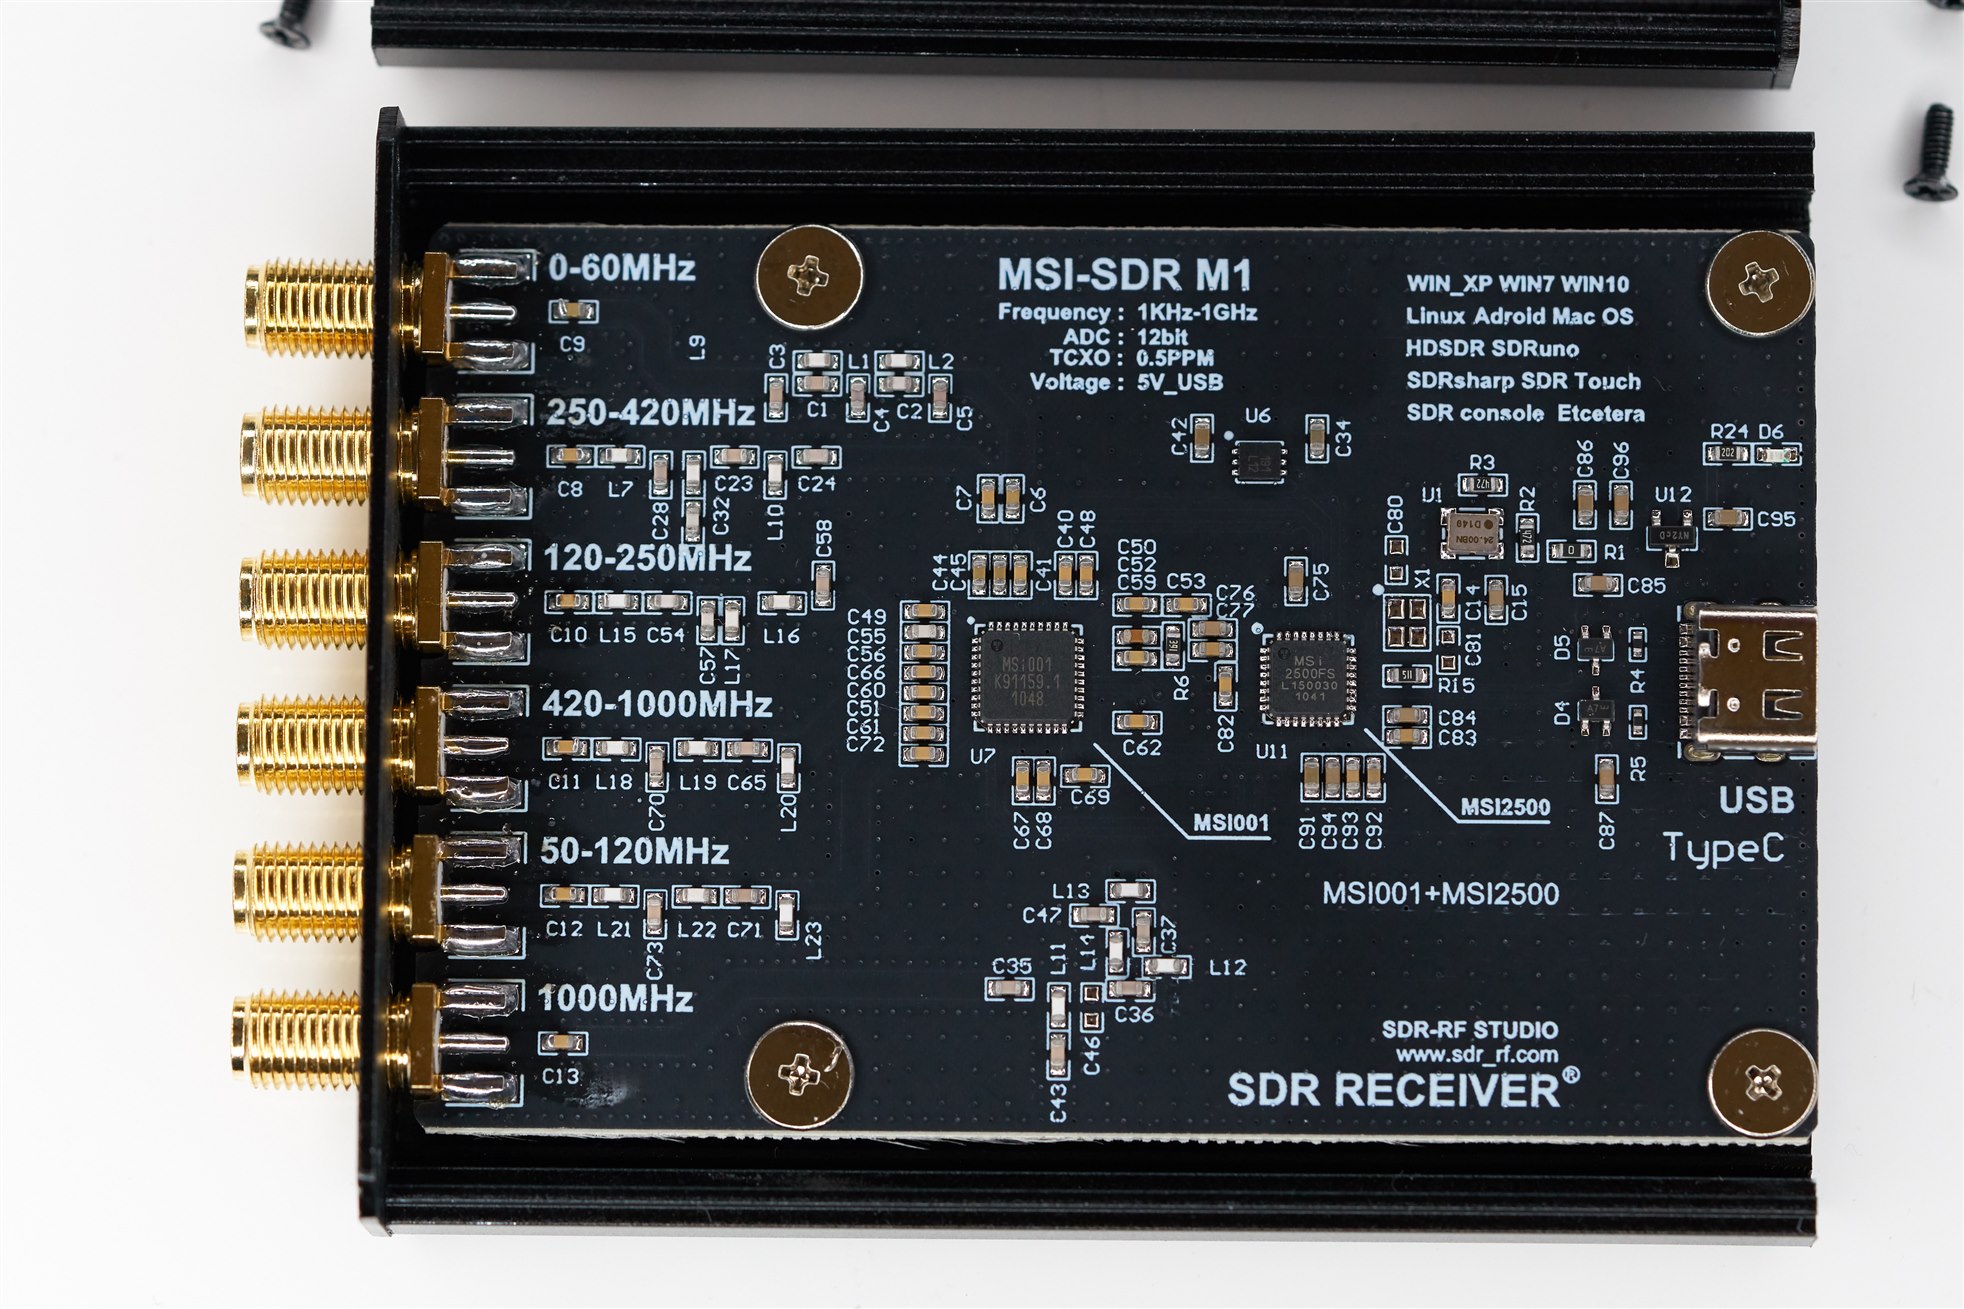
The MSI-SDR M1 is a very low-cost Software Defined Radio (SDR) that appears to be an open hardware design from China. It is available as a pre-built circuit board or within an enclosure. There are several variations of it; I purchased the one in the photo for about $30. I don't recommend it (see below for the reasons).

The reason for the half-dozen SMA connectors is that the SDR apparently operates from 1 kHz to 1GHz, and the inputs are band-pass filtered for different frequency segments. The other end of the SDR has just a USB-C connector, to pass the digitized I/Q signals to the PC.
This blog post covers some getting-started experiments with the device; it’s not a complete guide, but just enough to get going and experiment some more.
Is the Device any Good?
As mentioned earlier, the short answer is simply no.
Long answer: Based on the impressions of it after a few days, it is not recommended for general receiver use as a black box. It wouldn’t be very good for that because there is no ready-to-go software, and even if there was, the receiver needs work on the RF input side. If that was done, the device may be good for use as a broadcast receiver.
For ham radio users, please also bear in mind that the chipset used was never designed for use on amateur radio frequencies. It will be sub-optimal because the integrated circuit on the board only contains amplifiers for specific frequency bands that do not include all the popular amateur bands; for instance, 2-meter and 70cm coverage will be operating outside of the datasheet specification for the chip, although there might be workarounds since a commercial ham radio product called RSP1 uses the same chipset. If you are dead set on using this chipset as a ham radio, then you should directly consider the RSP1 product and not the MSI-SDR.
For sure, the MSI-SDR can somewhat “work” but only because SDR technology is quite forgiving of sub-optimal front-ends, to an extent, and certainly not because the front end is any good for those bands because it won’t be.
On the other hand, if you are the kind of person who likes getting your hands dirty building code, examining source code, and troubleshooting hardware and software, including messing around with surface-mount components and learning about RF testing, then read on because you might love this device.
For that sort of person, with some effort, there is quite a lot of opportunity to use the device for low-cost test purposes and for learning purposes. Much of the device is simple on paper (there is complexity, too), so it's great for learning, and there is the chance to probe the intermediate frequency (IF) I/Q outputs, although that might need some intricate soldering. If you're looking for a far better platform for learning purposes, the ADALM-PLUTO could be a better choice, since there is training material for it. For HF and VHF use, the ADALM-PLUTO will require an external up-converter.
Background
There’s a commercial SDR product called RSP1, and internally, it uses a Mirics chipset consisting of MSI001 and MSI2500 chips. The MSI-SDR happens to use the same chipset, but unfortunately, the RSP1 manufacturer does not allow their PC driver nor their PC software (called SDRuno) to be used with the cheap MSI-SDR boards, which I think is very short-sighted because it doesn’t encourage users to try out the software and eventually upgrade their hardware to the commercial version.
In any case, I decided to try a purely open-source approach; no commercial driver or software was needed. But first, it is worth examining what’s inside!
System Overview
The internals are shown below (click to enlarge).
The block diagram shows how the MSI-SDR works. (Note: there may be errors in the block diagram! For instance, I am unsure if the six RF inputs are connected as shown). Almost the entire functionality is contained within two chips.

From the left side, the six RF inputs are band-pass filtered using discrete passive components on the PCB, and then the MSI001 chip takes over. It switches in one of the six channels, which is amplified and then mixed down to an intermediate frequency using a quadrature arrangement, i.e., using local oscillator signals that are 90 degrees out-of-phase.
For the low-frequency inputs, there is another conversion, shown in pink.
The main mixer outputs are labeled I and Q, and they are digitized by the MSI2500 chip and passed to the PC to demodulate in software. The MSI2500 chip configures the MSI001 over a serial interface.
The configuration primarily includes setting up the frequency synthesizer inside the MSI001, selecting the input path, and gain control. There are only seven registers (of length up to 20 bits each) inside the MSI001, so it’s not a complicated chip to set up, although some maths is needed to work out the synthesizer settings and so on.
At the PC end, various maths operations can be done to the I and Q streams to recover the baseband signal that was originally transmitted. For instance, if the original signal happened to be AM modulated, then the I and Q signals can be simply summed (in practice more operations may be done to improve performance).
Building the Software on Windows
I used software called libmirisdr-4, and although it works, it might not be the best option. It would also be worth checking out software called gr-soapy.
I have only tried Windows 11; the steps involved will differ for Linux and Mac.
I created a folder for development called C:\development\miri_sdr
In that folder, using PowerShell, type the following:
git clone https://github.com/f4exb/libmirisdr-4
From https://github.com/libusb/libusb/releases I downloaded libusb-1.0.26-binaries.7z and then using 7-zip software, I extracted the folder inside there and placed it in C:\development\miri_sdr
I now had two folders in C:\development\miri_sdr; libmirisdr-4, and libusb-1.0.26-binaries
In the C:\development\miri_sdr\libmirisdr-4\cmake\Modules folder, I backed up the FindLibUSB.cmake file and replaced it with this modified FindLibUSB.cmake file.
Next, I installed MSYS2.
Once installed, you’ll see a load of programs, beginning with MSYS. You’ll want to run the one called MSYS MINGW32. A command prompt will appear.
In that MSYS2 command prompt, type:
pacman -Su cmakepacman -Su gccpacman -Su ninjacd /c/development/miri_sdr/libmirisdr-4mkdir buildcd buildcmake -G Ninja ..ninja
After a while, the software will be built, in a sub-folder called src, inside the build folder that you created.
Driver
A driver is needed! I went to https://github.com/mcuee/libusbk/releases/tag/V3.1.0.0 and downloaded a file called libusbK-3.1.0.0-setup.exe and installed it. It installs a libusbK development kit.
Plug the MSI-SDR into your PC, and run the libusbK-inf-wizard.exe program (mine was installed at C:\libusbK-dev-kit). In the window that appears, there will be three Kernel Driver Packages listed. Click on the one labeled libisbK and click Next. Click on Show All Devices. Look down the list, and you should see one with Vendor ID 0x1df7 and Product ID 0x2500. Select that one and click Next. Continue until the software saves a driver folder to your PC! Don’t install it yet. Close the libusbK-inf-wizard software.
Now go into the driver folder that was created, and right-click on InstallDriver.exe, and click on Run as Administrator. You need to do this because the driver is unsigned, and Windows 11 won’t allow the installation of an unsigned driver without administrator permission. There’s no way around that, so if you don’t feel comfortable with this, then you won’t be able to proceed, unfortunately.
A First Test
Install VLC Media Player on your PC.
Next, in the MSYS MINGW32 command prompt, type the following two lines:
cd /c/development/miri_sdr/libmirisdr-4/build/src
./miri_fm.exe -f 101600000 -M wbfm -g 10 | "/c/Program Files/VideoLAN/VLC/vlc.exe" --demux=rawaud --rawaud-channels 1 --rawaud-samplerate 32000 –
The value 101600000 indicates a frequency of 101.6MHz. You can replace that with an FM broadcast frequency for a station in your area.
When that command is run, VLC is automatically launched.
If an antenna (e.g., the short telescopic antenna supplied with the MSI-SDR) is connected to the 50-120MHz port, you should immediately hear the FM station or at least a load of noise if the radio reception is not sufficient for the MSI-SDR.
Summary
The MSI-SDR is an interesting device; it needs a lot of effort to get going with it, I’ve only touched on the initial aspects of that in this blog post, and there’s no guarantee it will be very usable at the end. Still, if your happiness is in the journey, you might have a lot of fun with the device.
I particularly liked that the chipset configuration won’t take too long to understand, which means that it could be quite interesting to delve into the software. Also, it will be fun to apply signals at the RF inputs, and examine the I/Q outputs either digitally or as analog signals. It will also be interesting to actually measure the inputs, perhaps with a VNA, and see if the discrete filter design can be improved. This is all a good learning experience, if you’re a glass-is-half full engineer, or a complete nightmare if you really just want to use the radio as a black box!
Thanks for reading!
-

DAB
-
Cancel
-
Vote Up
0
Vote Down
-
-
Sign in to reply
-
More
-
Cancel
-

AlanVK2ZIW
in reply to DAB
-
Cancel
-
Vote Up
0
Vote Down
-
-
Sign in to reply
-
More
-
Cancel
-

shabaz
in reply to AlanVK2ZIW
-
Cancel
-
Vote Up
0
Vote Down
-
-
Sign in to reply
-
More
-
Cancel
Comment-

shabaz
in reply to AlanVK2ZIW
-
Cancel
-
Vote Up
0
Vote Down
-
-
Sign in to reply
-
More
-
Cancel
Children