


| Previous Blog |
|---|
| Project R.A.G. - Blog #2 - Strapped In For Launch - Connectors |
Blog #3 - Lift Off
1. Introduction
Hi! This will be my third blog for the 1 Meter of Pi Design Challenge. This blog is called Lift Off because we will finally start with the Raspberry Pi as well as with the Starter kit that all of the challengers received. This will be a shorter blog where I will go over what was included in the starter kit and what I'll be using and how from that kit. Besides that I'll also go over the main unit for this project, which will house the Raspberry as well as my PDU system consisting out of 2 relay boards. Let's first begin with the components from the Starter Kit.
2. What's in the Starter Kit?
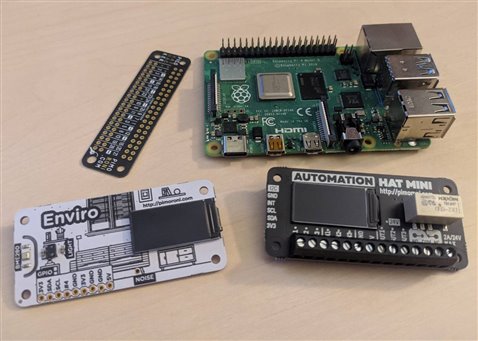
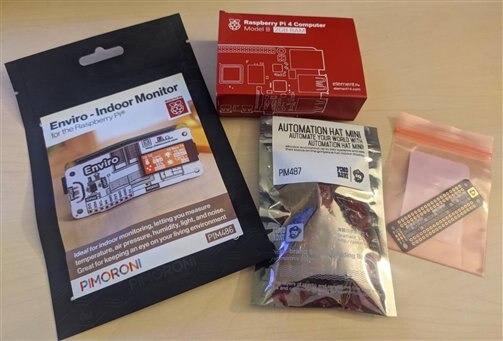
The contents of the kit can be also found on the Design Challenge page, the kit can be found here, I'll just go through all of the components really quick and leave relevant links from them. The kit contains 4 really cool items and I would like to thank the judges again for selecting me as one of the challengers, let's go through the items now.
| {tabbedtable} Tab Label | Tab Content |
|---|---|
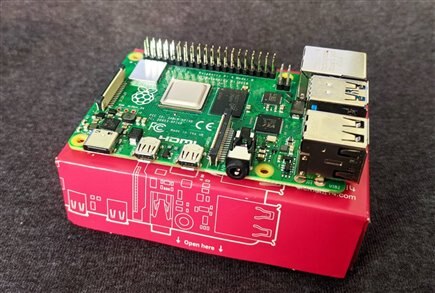
Raspberry Pi 4 2GB | The main component of the starter kit is the Raspberry Pi 4 2GB model. One of the conditions for this competition is the integrate the Raspberry Pi 4 into our projects. This board is amazing, it comes for outputs for 2 4K monitors over mini HDMI, and USB type C charging. Just like it's predecessor the Raspberry Pi 3 it has built in Wi-Fi as well as Bluetooth, which is great news meaning we don't have to use any dongles for those as was the case for the Raspberry Pi 2. Here is a picture of this board with some relevant links for it.
And here are some relevant links regarding the Pi 4: |
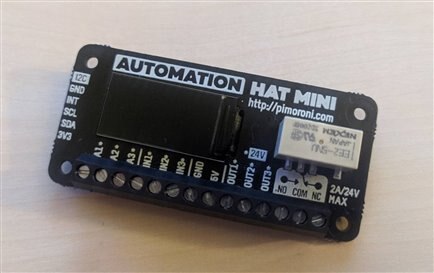
Pimoroni Automation Hat | This is one of the 2 Mini hats provided in the kit, this one is called the Automation Hat. This hat features a small LCD, a 24V relay, an ADC and 3 24V buffered inputs for the Raspberry. It's a neat little package packing a lot of cool stuff, this hat in it self can be used for a whole project, for example, if we're looking to just water a plant when the soil humidity get's low, this hat would take care of everything. Here is the picture of the hat and relevant links for it.
And here are some relevant links for the Automation Hat, where you can buy it as well as the Python library for it: |
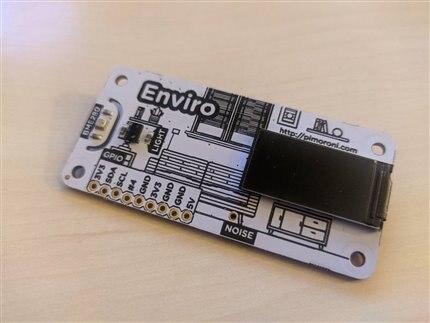
Pimoroni Enviro Hat | This is the second hat included in the kit, the Pimoroni Enviro Hat. Unlike the automation hat, this one, as the name suggests, is used for monitoring the environment through multiple sensors, and also has the cool little LCD for showing the data that we are currently reading. It can measure:
It's really a lot of stuff packed into a small, easy to use little package and just like the automation hat it comes with a Python library for easy use which you can find linked down below.
You can find the relevant links on where to buy this and as well as the library here: |
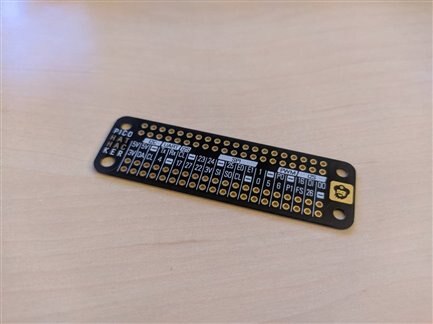
Pimoroni PICO Hat Hacker | This is the last item from the Starter Kit is the PICO hat hacker, and this one really cool little board. It enables us to use all of the pins on the Raspberry even though we have a hat installed on top. Because the header pins on these hats are shorter than usual, we can solder this board directly to the Raspberry Pi Pins, and still be able to use the hat and have all of them accessible. Another thing I haven't mentioned is that both hats have their pinout on their pages on the pimoroni website, which means we can easily see which pins are free and which ones are not.
Relevant links to where you can get this board and to see how it can be used can be found here: |
3. What am I gonna use from the Starter Kit?
For this competition I will use 3 out of 4 items from this Starter Kit, those being the Raspberry Pi 4, the Enviro Hat Mini and the PICO Hat Hacker. Though it can maybe be integrated somewhere as I am using relays, I need many more than one relay, so I won't be using the Automation Hat Mini. That aside, let's see how I'll utilize the other parts of the kit. Starting off with the Raspberry. This will be the main brain of the whole project. Here is a power distribution schematic that shows the concept of the system.
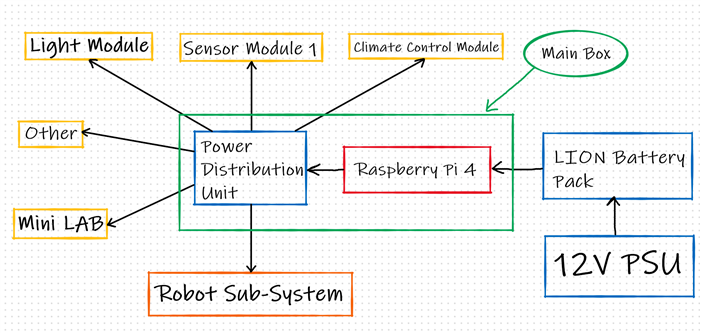
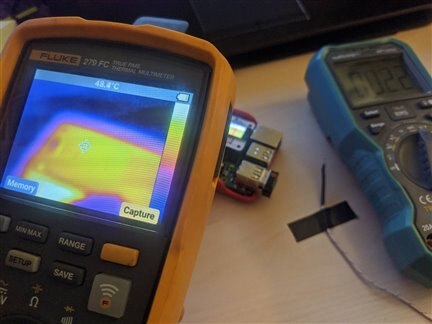
Outlined in green is the main box for the project, which will contain the Raspberry and the PDU, but more on that later, I just wanted to outline, that it will be a modular system where the Raspberry will be in the center communicating with each of the modules and sending/receiving data from them. With Raspberry out of the way, let's look at the Enviro Hat Mini. As I've described before, it has a lot of cool sensor on it which can be really useful in this project. I plan on measuring temperature, humidity, pressure and light using this board. There is however a small problem, the Raspberry Pi 4 gets pretty hot when it's just running a small python example script as you can see here:
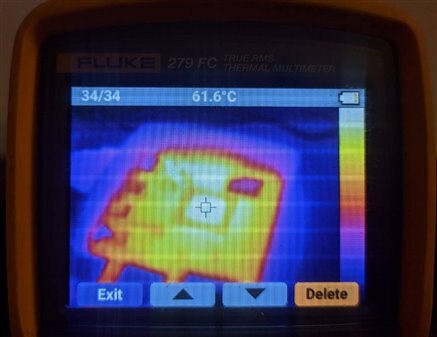
The chip of the Pi 4 is at over 60 degrees, so I had concerns what would happen when putting a PCB directly over it. Going through the examples that are provided, there is one for just measuring the temperature, and there is one that is supposed to compensate the measured temperature, based on the temperature of the chip, but unfortunately, that didn't work for me that well either. Here is a small comparison.
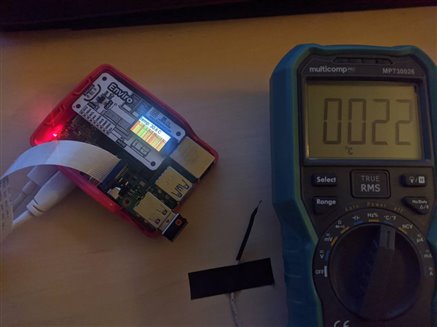
The Enviro Hat Mini is showing over 30 degrees, while my multimeter is showing around 22. The hat blocks of the cool air from the CPU and in the process is all the time above that hot chip, so of course, it will get hot as well. To investigate further, I took a look at the temperature of the PCB of the HAT itself. I found that the PCB alone is at around 30-40 degrees Celsius.
To make sure that I'm getting the right data, I'll of course do the logical thing and separate these two from one another. As I've already said, the Pi will be a part of the main box with the relays, and on the outside of this box, I'll mount this hat. I'll just make an extension cable for the necessary pins. Which gets me nicely into the last part of the kit that I plan on using for this project, and that being the PICO Hat Hacker. My plan for that PCB is to solder pin header on one side that can go to the Raspberry and solder the other side to 2 perfboards, which I'll the connect all of to various connectors and screw terminals. In this way, I can have dedicated connectors for what I know I'll need inside the main box as well as have easy expansion if I want to add anything else. With that, I've covered all parts of the starter kit, but this last topic gets me nicely into one of the things I was working on, the main box.
4. Main unit and PDU idea
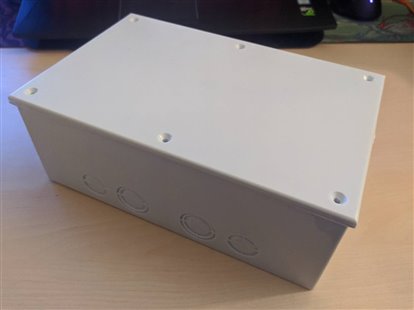
This will be the main unit for this whole project. I envision a box with a Raspberry, relays and a lot of 3D printer connectors, to put it simply. I'll be running a dual power supply system for this project since I need both 12V and 5V. I could have gone with maybe a boost or a buck converter, but since both the 5V part and the 12V part will have various motors, they will draw a lot of current. So I decided to stick with what I had on hand, and which was the easiest to do. That said, since I plan on making a battery pack as well, that pack would only power up the Raspberry and the 12V system, since that system is more important than the 5V system which is essentially the robot which would eat up the batteries rather quickly if used with them.
To house everything, I found a nice sized electronics box in a local store, it's 23.5x15x9cm. The main thing that attracted me to it is that it can fit 2 rows on my 3D printed connectors on the side, so I can put a lot of them there. There will be power and data for all of the different modules.
I planned on putting an 8 channel relay module inside, but looking at the interior of the box as well as the size of the 8 channel relay module, it became evident that it won't fit inside nicely. So instead of that, I opted to go for 2 4 channel relay modules, but stacked up on one another. I designed and printed a small bracket to hold them one above the other, but in such a way that you can access all of the screw terminals.
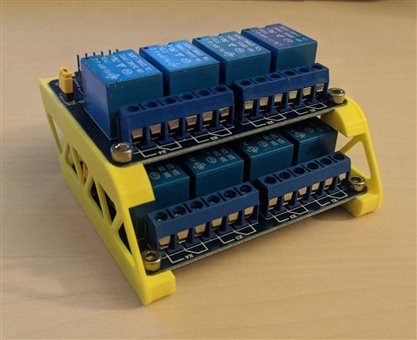
I love how this design turned out, though it needs a small rework. I worked off of dimensions that I found in a datasheet online of a 4 channel relay board for Arduino which looked, on first glance, exactly like mine, but it turns out that the holes don't match by a few mm. Of course I did all of that without double checking the measurements on the modules that I had... So I'll make a small revision do address that issue so that it fits my boards as well, and I'll upload both versions then to my GitHub with all of the other 3D models.
5. Fun news from the ISS
Every time I start writing a blog for this competition I like to go and check if there are any news about the Radishes, and I'm glad to say there are! I would love to keep this segment going through all of my blogs if there are constant news about Plant Habitat and similar programs being carried out on the ISS or by NASA and other space agencies. In the last blog I wrote that they finally harvested the radishes that were growing on the ISS, this week they harvested the ones that were growing on Earth. While at first glance, that doesn't sound that impressive, the thing they are doing is they have a control group down here, where they are giving the radishes the exactly same conditions as on the ISS and monitoring ones against the other. This can give great insight on how microgravity can affect plant growth. The article talking about this can be found on the Twitter post below!
6. What's next?
While I haven't posted in a while, I've been doing a lot of things in the background. The 2 upcoming blogs will cover the Quick Release mechanism, which is now finished and tested, and I'm honestly really happy with how it turned out. I also worked out what I'll be doing for switching the logic between the different tool heads. As for the other blog, that one will cover the Sensor & Light module, which will be used to monitor the environment as well as control the lighting for this project. For the lighting I will go with RGB LED strips, but I'll cover everything then. Here is a small sneak peek of how the sensor and light module will look.

7. Summary
This was a short little blog where I wanted to cover the Starter Kit I received for this competition and how I planned on using it. Another thing I have been working on a lot is the moving mechanism for the robot, I've designed and printed a lot of brackets, wheels, belt holders, I'm just now waiting on the 20x20 aluminum extrusions that I plan on using as rails. Besides that I've also been doing some light software work, trying out and setting up stuff on the Raspberry. After the 2 blogs that I talked about, I will finally be posting the mechanical build for this project. All of the relevant links for this competition, link to the next and previous blog as well as my GitHub where I'm uploading all of the models can be found underneath. Thanks for reading the blog, hope you liked it and found it interesting!
Milos
Relevant links for the competition:
Link to my GitHub where you can find all of the files used for this project (code, 3D models,...):
Link to my Project Collection:
| Previous Blog | Next Blog |
|---|---|
| Project R.A.G. - Blog #2 - Strapped In For Launch - Connectors | Project R.A.G. - Blog #4 - Quick Tool Change Mechanism For The Robot Arm |
Top Comments
-

DAB
-
Cancel
-
Vote Up
+1
Vote Down
-
-
Sign in to reply
-
More
-
Cancel
-

milosrasic98
in reply to DAB
-
Cancel
-
Vote Up
0
Vote Down
-
-
Sign in to reply
-
More
-
Cancel
Comment-

milosrasic98
in reply to DAB
-
Cancel
-
Vote Up
0
Vote Down
-
-
Sign in to reply
-
More
-
Cancel
Children