element14 Community
element14 Community
    Register Log In
  • Site
  • Search
  • Log In Register
  • About Us
  • Community Hub
    Community Hub
    • What's New on element14
    • Feedback and Support
    • Benefits of Membership
    • Personal Blogs
    • Members Area
    • Achievement Levels
  • Learn
    Learn
    • Ask an Expert
    • eBooks
    • element14 presents
    • Learning Center
    • Tech Spotlight
    • STEM Academy
    • Webinars, Training and Events
    • Learning Groups
  • Technologies
    Technologies
    • 3D Printing
    • FPGA
    • Industrial Automation
    • Internet of Things
    • Power & Energy
    • Sensors
    • Technology Groups
  • Challenges & Projects
    Challenges & Projects
    • Design Challenges
    • element14 presents Projects
    • Project14
    • Arduino Projects
    • Raspberry Pi Projects
    • Project Groups
  • Products
    Products
    • Arduino
    • Avnet Boards Community
    • Dev Tools
    • Manufacturers
    • Multicomp Pro
    • Product Groups
    • Raspberry Pi
    • RoadTests & Reviews
  • Store
    Store
    • Visit Your Store
    • Choose another store...
      • Europe
      •  Austria (German)
      •  Belgium (Dutch, French)
      •  Bulgaria (Bulgarian)
      •  Czech Republic (Czech)
      •  Denmark (Danish)
      •  Estonia (Estonian)
      •  Finland (Finnish)
      •  France (French)
      •  Germany (German)
      •  Hungary (Hungarian)
      •  Ireland
      •  Israel
      •  Italy (Italian)
      •  Latvia (Latvian)
      •  
      •  Lithuania (Lithuanian)
      •  Netherlands (Dutch)
      •  Norway (Norwegian)
      •  Poland (Polish)
      •  Portugal (Portuguese)
      •  Romania (Romanian)
      •  Russia (Russian)
      •  Slovakia (Slovak)
      •  Slovenia (Slovenian)
      •  Spain (Spanish)
      •  Sweden (Swedish)
      •  Switzerland(German, French)
      •  Turkey (Turkish)
      •  United Kingdom
      • Asia Pacific
      •  Australia
      •  China
      •  Hong Kong
      •  India
      •  Korea (Korean)
      •  Malaysia
      •  New Zealand
      •  Philippines
      •  Singapore
      •  Taiwan
      •  Thailand (Thai)
      • Americas
      •  Brazil (Portuguese)
      •  Canada
      •  Mexico (Spanish)
      •  United States
      Can't find the country/region you're looking for? Visit our export site or find a local distributor.
  • Translate
  • Profile
  • Settings
At The Core Design Challenge
  • Challenges & Projects
  • Design Challenges
  • At The Core Design Challenge
  • More
  • Cancel
At The Core Design Challenge
Blog Neonatal Incubator Monitoring System - Modus Toolbox (Dual-core Application) #2
  • Blog
  • Forum
  • Documents
  • Leaderboard
  • Polls
  • Files
  • Members
  • Mentions
  • Sub-Groups
  • Tags
  • More
  • Cancel
  • New
Join At The Core Design Challenge to participate - click to join for free!
  • Share
  • More
  • Cancel
Group Actions
  • Group RSS
  • More
  • Cancel
Engagement
  • Author Author: rahulkhanna
  • Date Created: 1 May 2023 9:06 PM Date Created
  • Views 626 views
  • Likes 6 likes
  • Comments 2 comments
  • infineon
  • PSoCTm︎ 62 MCU
  • element14
  • PSoC 62S4 pioneer kit
  • modustoolbox
  • More At The Core Design Challenge
Related
Recommended

Neonatal Incubator Monitoring System - Modus Toolbox (Dual-core Application) #2

rahulkhanna
rahulkhanna
1 May 2023
Neonatal Incubator Monitoring System - Modus Toolbox (Dual-core Application) #2

Welcome to blog 2 of Neonatal Incubator Monitoring System. In this blog, we will learn how to set up Modus Toolbox 3 for a dual-core application on the PSoC 62S4 pioneer kit and write a simple example that uses both cores to toggle an LED.

Modus Toolbox 3 is an Integrated Development Environment (IDE) that provides a comprehensive suite of tools for developing and debugging applications on Cypress PSoC devices.

image

Install the Modus Toolbox 3 from the following link and install. 

Setting up Modus Toolbox 3

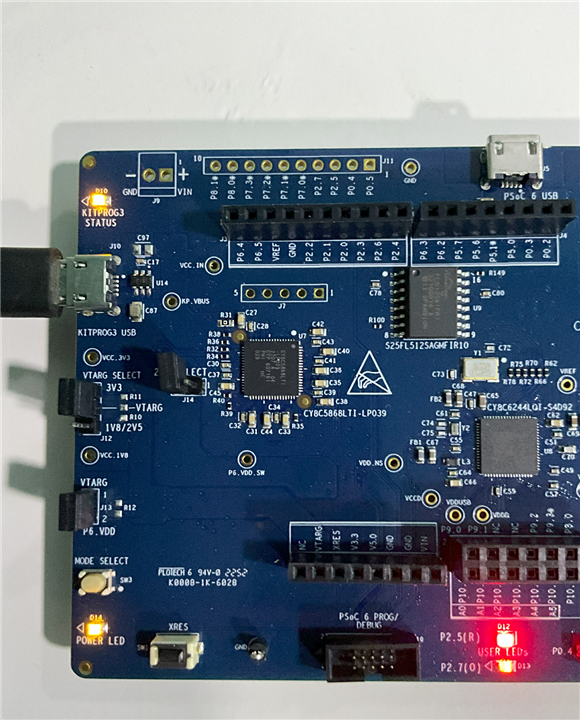
  1. Connect your PSoC 62S4 pioneer kit to your computer using a USB cable.
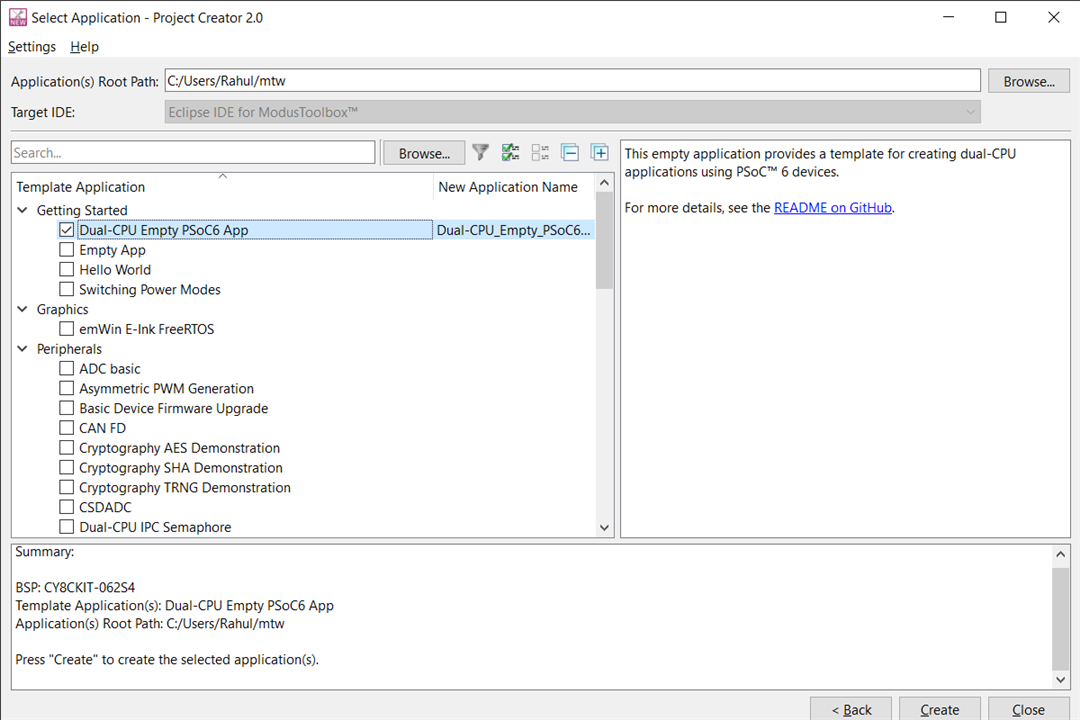
  2. Open Modus Toolbox 3 and click on "File" in the menu bar, then select "New" > "ModusToolbox Application".
  3. In the "Select Project Type" dialog box, choose "PSoC 6" and click "Next".
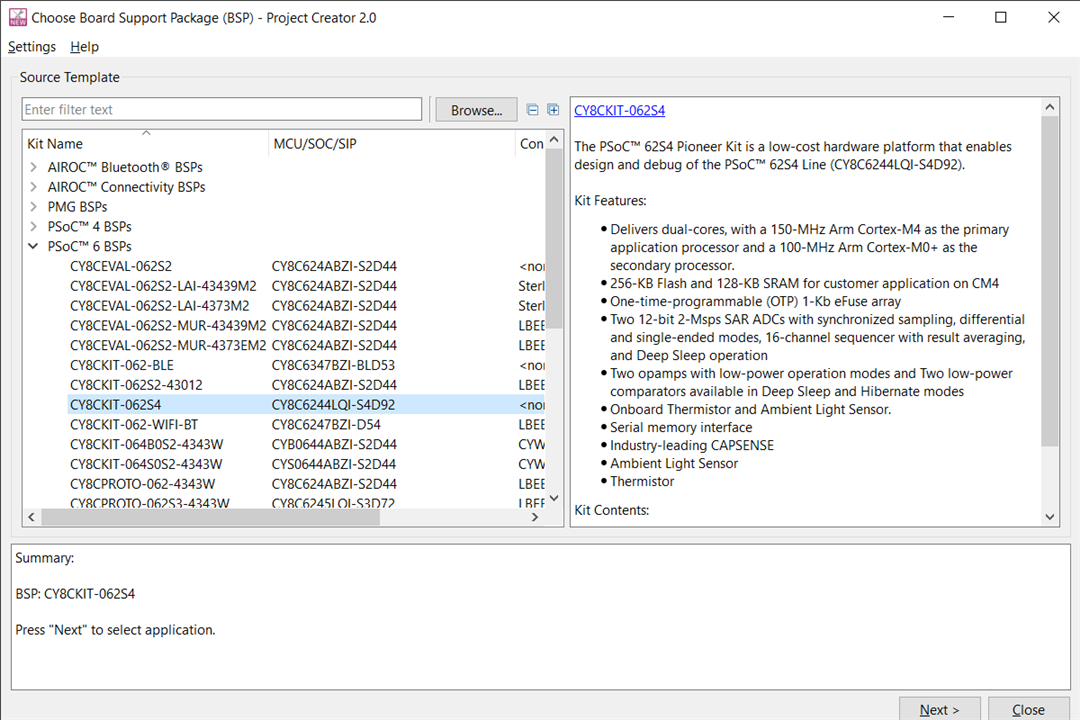
  4. In the "Select Board" dialog box, choose your PSoC 62S4 board and click "Next".
  5. In the "Configure Application" dialog box, choose "Dual Core Application" and click "Next".
  6. Follow the remaining prompts to configure your project settings, such as choosing the programming/debugging tool and selecting the peripherals you want to use.
{gallery}My Gallery Title

image

imageimage

Writing a simple dual-core application example

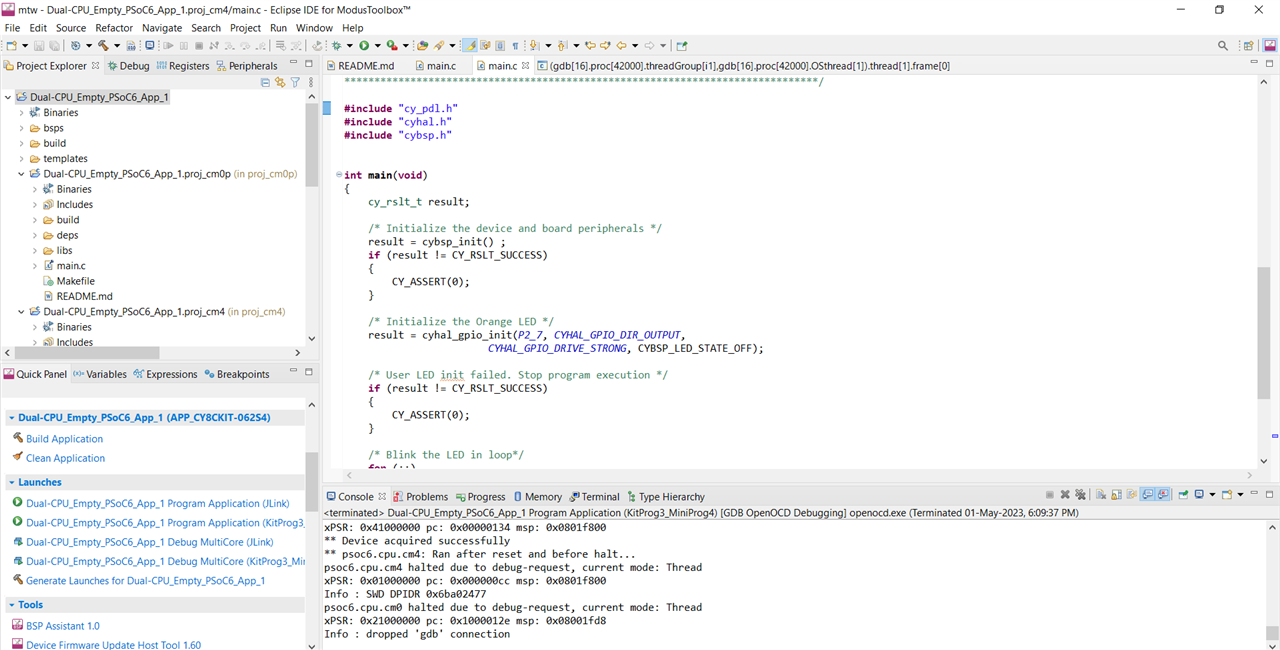
Once you have created your project, you can write a simple example for the dual-core application. Here is an example of how to use both cores to toggle an LED:

CM0:

#include "cy_pdl.h"
#include "cycfg.h"
#include "cyhal.h"
#include "cybsp.h"

int main(void)
{
    cy_rslt_t result;

    /* Initialize the device and board peripherals */
    result = cybsp_init() ;
    if (result != CY_RSLT_SUCCESS)
    {
        CY_ASSERT(0);
    }

    /* Initialize the RED LED */
        result = cyhal_gpio_init(P2_5, CYHAL_GPIO_DIR_OUTPUT,
                            CYHAL_GPIO_DRIVE_STRONG, CYBSP_LED_STATE_OFF);

        if (result != CY_RSLT_SUCCESS)
            {
                CY_ASSERT(0);
            }

    /* Enable CM4. CY_CORTEX_M4_APPL_ADDR must be updated if CM4 memory layout is changed. */
    Cy_SysEnableCM4(CY_CORTEX_M4_APPL_ADDR);

    for (;;)
    {
    	cyhal_gpio_write(P2_5, true);
    	cyhal_system_delay_ms(1000);
    	cyhal_gpio_write(P2_5, false);
    	cyhal_system_delay_ms(1000);
    }
}

CM4:

#include "cy_pdl.h"
#include "cyhal.h"
#include "cybsp.h"


int main(void)
{
    cy_rslt_t result;

    /* Initialize the device and board peripherals */
    result = cybsp_init() ;
    if (result != CY_RSLT_SUCCESS)
    {
        CY_ASSERT(0);
    }

    /* Initialize the Orange LED */
    result = cyhal_gpio_init(P2_7, CYHAL_GPIO_DIR_OUTPUT,
                        CYHAL_GPIO_DRIVE_STRONG, CYBSP_LED_STATE_OFF);

    /* User LED init failed. Stop program execution */
    if (result != CY_RSLT_SUCCESS)
    {
    	CY_ASSERT(0);
	}

    /* Blink the LED in loop*/
    for (;;)
       {

           cyhal_gpio_write(P2_7, true);
           cyhal_system_delay_ms(250);
           cyhal_gpio_write(P2_7, false);
           cyhal_system_delay_ms(250);

       }
}

You don't have permission to edit metadata of this video.
Edit media
x
image
Upload Preview
image

In this example, both cores of the PSoC 62S4 microcontroller are utilized to blink the onboard LEDs, P2.5 and P2.7. The Orange LED connected to P2.7, which is programmed on the CM4 core, blinks every 250ms, while the Red LED connected to P2.5, programmed on the CM0 core, blinks every 1000ms.

With Modus Toolbox 3 and the PSoC 62S4 Pioneer Kit, we have successfully set up a dual-core application. In our next blog post, we will discuss the different sensors required to build a baby monitor and how to interface them with this hardware. Thank you for reading, and please stay tuned for more updates.

  • Sign in to reply
  • rahulkhanna
    rahulkhanna over 2 years ago in reply to DAB

    Thanks DAB 

    • Cancel
    • Vote Up 0 Vote Down
    • Sign in to reply
    • More
    • Cancel
  • DAB
    DAB over 2 years ago

    Good start.

    • Cancel
    • Vote Up 0 Vote Down
    • Sign in to reply
    • More
    • Cancel
element14 Community

element14 is the first online community specifically for engineers. Connect with your peers and get expert answers to your questions.

  • Members
  • Learn
  • Technologies
  • Challenges & Projects
  • Products
  • Store
  • About Us
  • Feedback & Support
  • FAQs
  • Terms of Use
  • Privacy Policy
  • Legal and Copyright Notices
  • Sitemap
  • Cookies

An Avnet Company © 2025 Premier Farnell Limited. All Rights Reserved.

Premier Farnell Ltd, registered in England and Wales (no 00876412), registered office: Farnell House, Forge Lane, Leeds LS12 2NE.

ICP 备案号 10220084.

Follow element14

  • X
  • Facebook
  • linkedin
  • YouTube