element14 Community
element14 Community
    Register Log In
  • Site
  • Search
  • Log In Register
  • Community Hub
    Community Hub
    • What's New on element14
    • Feedback and Support
    • Benefits of Membership
    • Personal Blogs
    • Members Area
    • Achievement Levels
  • Learn
    Learn
    • Ask an Expert
    • eBooks
    • element14 presents
    • Learning Center
    • Tech Spotlight
    • STEM Academy
    • Webinars, Training and Events
    • Learning Groups
  • Technologies
    Technologies
    • 3D Printing
    • FPGA
    • Industrial Automation
    • Internet of Things
    • Power & Energy
    • Sensors
    • Technology Groups
  • Challenges & Projects
    Challenges & Projects
    • Design Challenges
    • element14 presents Projects
    • Project14
    • Arduino Projects
    • Raspberry Pi Projects
    • Project Groups
  • Products
    Products
    • Arduino
    • Avnet Boards Community
    • Dev Tools
    • Manufacturers
    • Multicomp Pro
    • Product Groups
    • Raspberry Pi
    • RoadTests & Reviews
  • Store
    Store
    • Visit Your Store
    • Choose another store...
      • Europe
      •  Austria (German)
      •  Belgium (Dutch, French)
      •  Bulgaria (Bulgarian)
      •  Czech Republic (Czech)
      •  Denmark (Danish)
      •  Estonia (Estonian)
      •  Finland (Finnish)
      •  France (French)
      •  Germany (German)
      •  Hungary (Hungarian)
      •  Ireland
      •  Israel
      •  Italy (Italian)
      •  Latvia (Latvian)
      •  
      •  Lithuania (Lithuanian)
      •  Netherlands (Dutch)
      •  Norway (Norwegian)
      •  Poland (Polish)
      •  Portugal (Portuguese)
      •  Romania (Romanian)
      •  Russia (Russian)
      •  Slovakia (Slovak)
      •  Slovenia (Slovenian)
      •  Spain (Spanish)
      •  Sweden (Swedish)
      •  Switzerland(German, French)
      •  Turkey (Turkish)
      •  United Kingdom
      • Asia Pacific
      •  Australia
      •  China
      •  Hong Kong
      •  India
      •  Korea (Korean)
      •  Malaysia
      •  New Zealand
      •  Philippines
      •  Singapore
      •  Taiwan
      •  Thailand (Thai)
      • Americas
      •  Brazil (Portuguese)
      •  Canada
      •  Mexico (Spanish)
      •  United States
      Can't find the country/region you're looking for? Visit our export site or find a local distributor.
  • Translate
  • Profile
  • Settings
Bluetooth Unleashed Design Challenge
  • Challenges & Projects
  • Design Challenges
  • Bluetooth Unleashed Design Challenge
  • More
  • Cancel
Bluetooth Unleashed Design Challenge
Blog Bluetooth Unleashed - Wireless Temperature Probe
  • Blog
  • Forum
  • Documents
  • Polls
  • Files
  • Events
  • Mentions
  • Sub-Groups
  • Tags
  • More
  • Cancel
  • New
  • Share
  • More
  • Cancel
Group Actions
  • Group RSS
  • More
  • Cancel
Engagement
  • Author Author: shabaz
  • Date Created: 25 Jul 2018 5:22 AM Date Created
  • Views 2629 views
  • Likes 10 likes
  • Comments 15 comments
  • temperature measurement
  • bluetooth
  • cc2640r2
  • ti launchpad
  • bluetooth le
  • bluetooth_unleashed
  • bt_smart_doorbell
  • design_challenges
  • thermocouple
  • max31855j
  • bluetooth 5.0
  • raspberry_pi
  • rpi 3b+
  • bbb
  • texas_instruments
  • cc2640r2f
  • rpi 3b
  • bluetooth_le
  • max31855
Related
Recommended

Bluetooth Unleashed - Wireless Temperature Probe

shabaz
shabaz
25 Jul 2018

For all the parts to this project, click here! Smart Doorbell System


Introduction

This short blog post discusses a wireless temperature probe! It re-uses hardware and software that was designed earlier, for a Smart Doorbell system. All the hardware and software is documented, click on the link above for deep-diving into it.


I was originally about to add some functionality to measure outdoor temperature, but then got bored when I realized it did not involve soldering - there is an internal temperature sensor inside the CC2640R2F CC2640R2F chip : )


So, this project evolved to use an external temperature sensor – a thermocouple, which makes it ideal for all sorts of lab or industrial use-cases. Thermocouples are not always the right solution, but there is the advantage that they can operate over a wide range of temperatures, beyond 1000 degrees C.

image


The advantage in using Bluetooth Low Energy (BLE) for this project is is that the system could be connected up and monitored from a safe location, using either the Pi or (say) a mobile phone.


This 90-second video shows it in action: (having trouble embedding it)

https://youtu.be/WdXkmSTfriU

You don't have permission to edit metadata of this video.
Edit media
x
image
Upload Preview
image


How Does It Work?

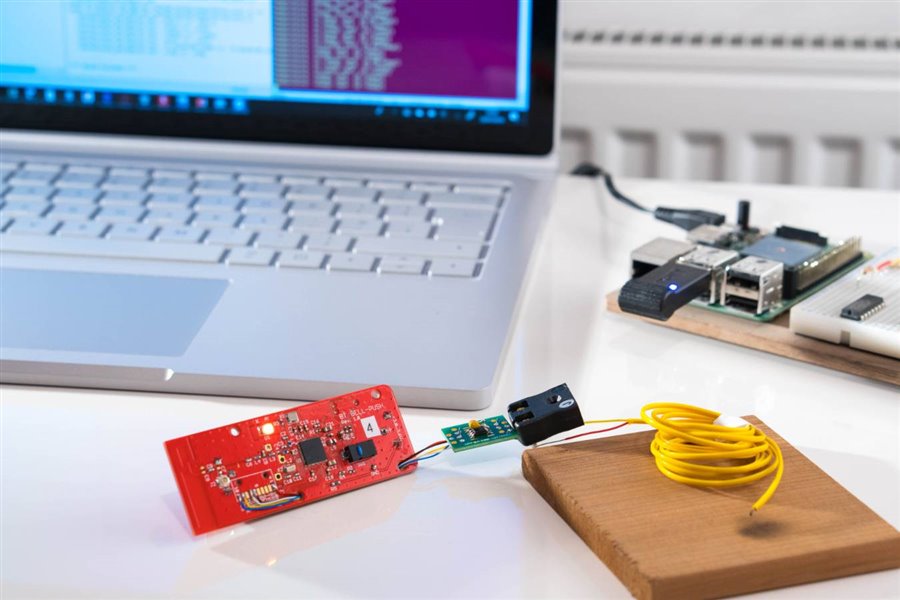
The project re-uses the Bell Push Module hardware, which is basically a small battery-powered circuit board. There isn’t a lot to assemble, hence why this blog post is short. The Bell Push Module has an expansion port, and a Maxim thermocouple interface chip was soldered to it, along with a decoupling capacitor, and a thermocouple socket. That’s it, the hardware is very straightforward!


In terms of the software, the code was modified to make the Bell Push Module look like a BLE ‘Peripheral’. It can connect to the Pi, using code that was written in the blog post Smart Doorbell System - Part 9 - Working with BLE - What it is, and How to Use It! , but modified slightly. All the software for this project is attached to this blog post.


When run, the microcontroller repeatedly reads the thermocouple measurement from the thermocouple interface chip, and from the internal temperature sensor inside the chip too. The chip measures the voltage from the thermocouple and from this and the internal sensor information, the probe sensed temperature can be worked out. The Maxim chip states an accuracy of +-2 degrees C but it would also depend on the actual thermocouple being used. The thermocouple can be used over a huge temperature range, depending on the construction and materials used for it. The resolution is 0.25 degrees C, and the measurement rate can be up to 10 times a second (I only tested at 1 measurement per second).


The Pi connects to the Bell Push Module using BLE, and then retrieves the measurements every second. This could be speeded up if desired – I didn’t test at any higher speeds.


The information is just dumped to the screen but it could be redirected to a file, or plotted for instance.


Building It

Please refer to the earlier blog posts for the CAD files and circuit diagrams. If it is desired to use off-the-shelf hardware, then the TI CC2640R2 LaunchPad boardTI CC2640R2 LaunchPad board can be used. The thermocouple interface chip can be attached using jumper cables. The chip on its own is very low-cost but it is also available pre-soldered onto a breakout board. This isn’t worth it in this case – the chip is quite large and easy to solder.

image


The MAX31855 MAX31855 integrated circuit comes in several varieties; you need one that matches the thermocouple. So, for a Type J thermocouple, a MAX31855J chip is needed and so on.


Using It

The instructions in the earlier blog post can be followed, to make the Pi into a BLE Central device. Then, copy and paste the code below into a file, called (say) therm.js :


#!/usr/local/bin/node
// therm.js
// rev 1.0 July 2018 Shabaz
//


var noble=require('noble');
var util = require('util');
var events = require('events');


var THERM_SERVICE_UUID = 'fff0';
var THERM_CHARACTERISTIC_UUID = 'fff5';


var therm_characteristic=null;


noble.on('stateChange', function(state){
  if (state==='poweredOn'){
    console.log('scanning..');
    noble.startScanning([THERM_SERVICE_UUID], false);
  }
  else {
    noble.stopScanning();
  }
})


noble.on('discover', function(peripheral){
  noble.stopScanning();
  console.log('found: ', peripheral.advertisement);
  peripheral.connect(function(err){
    peripheral.discoverServices([THERM_SERVICE_UUID], function(err, services){


      services.forEach(function(service){
        console.log('found service: ', service.uuid);
        service.discoverCharacteristics([], function(err, characteristics){
          characteristics.forEach(function(characteristic) {
            console.log('found characteristic:', characteristic.uuid);
            if (THERM_CHARACTERISTIC_UUID == characteristic.uuid){
              therm_characteristic = characteristic;
              setInterval(handleThermSystem, 1000);
            }
            else {
            //console.log('Error, some characteristics were missing');
           }
          })
        }) // end service.discoverCharacteristics
      }) // end services.forEach
    }) // end peripheral.discoverServices
  }) // end peripheral.connect
}) // end noble.on


function handleThermSystem() {
  therm_characteristic.read(function(error, data) {
    fault=0;
    faultparams=0;
    if (data.length>=4) {
      byte0=data[3]; // least significant bits D7..0
      byte1=data[2]; // D15..8
      byte2=data[1]; // D23..16
      byte3=data[0]; // most significant bits D31..24
      if (byte2 & 0x01) {
        fault=1;
        faultparams=byte0 & 0x07;
        console.log("Thermocouple fault #"+faultparams);
      } else {
        refval=(byte0>>4)+(16*(byte1 & 0x7f));
        if (byte1 & 0x80) refval=0-refval;
        reftemp=0.0625*refval;
        thermval=(byte2>>2)+(64*(byte3 & 0x7f));
        if (byte3 & 0x80) thermval=0-thermval;
        thermtemp=0.25*thermval;


        console.log("Temperature: "+thermtemp+"degC (Ref: "+reftemp+"degC)");
      }
    }
  });
}


To run it, as root user (or prepend the commands with sudo) type:

chmod 755 therm.js
./therm.js


When run, the output will say scanning.. (it is looking out for BLE advertisements). Power up the Bell Push Module and the Pi will connect to it, and will begin dumping the temperature to the screen every second!

image

It seems to work in the limited tests so far! I tried the thermocouple with a hot air tool.

image


Summary

It is really easy to make remote measurement gadgets with the CC2640R2F chip, and connect to the Pi or BeagleBone for display/monitoring or logging purposes.

I intend to make another PCB design, with two thermocouple interfaces, and perhaps an LCD too (although that is unnecessary), all based on this same design. Battery life should be excellent; I believe around one month of continuous logging and capture to a Pi is achievable with that AA-sized battery, and of course longer if the logging rate is decreased from 1 measurement per second to (say) 1 measurement every ten seconds.


All the code needed to get this going is attached to this blog post. It is proof-of-concept level, but I will refine it once I have a PCB layout with the thermocouple interfaces on-board.


Thanks for reading!

Attachments:
thermocouple_peripheral.zip
  • Sign in to reply

Top Comments

  • shabaz
    shabaz over 6 years ago in reply to ntewinkel +5
    Hi Nico! I've not tested range yet, I'm waiting on some hardware for that (a calibration tool) to match the antenna. Also, I still need to explore the transmit power settings on the chip. I did experiment…
  • mcb1
    mcb1 over 6 years ago +4
    NIce work. You could utilise ntewinkel web interface for his remote water temperature Remote (Water) Temperature Monitoring Cheers Mark
  • shabaz
    shabaz over 6 years ago in reply to mcb1 +4
    That was a good link, cool project there.., useful information and nice graphing!
  • shabaz
    shabaz over 6 years ago in reply to aspork42

    Hi James,


    Thanks!

    • Cancel
    • Vote Up +1 Vote Down
    • Sign in to reply
    • More
    • Cancel
  • aspork42
    aspork42 over 6 years ago

    Awesome re-use!

    • Cancel
    • Vote Up +2 Vote Down
    • Sign in to reply
    • More
    • Cancel
  • shabaz
    shabaz over 6 years ago in reply to DAB

    Hi DAB,


    Thanks! That's a good question, basically each chip has a unique ID (called the device address, a bit like a MAC address) burned-in, so even if multiple identical boards are powered up, the Pi will see them all as uniquely different advertisements because of the unique device addresses.

    Then, the Pi can connect to each one in turn, and then query each device to see what characteristics the device has, to decide whether it is a temperature sensor, or something else. Then the Pi could read the temperature from all sensors that support that characteristic, or any other other desired sensor. So multiple identical sensors are possible to be read. Also, even at the advertisement stage, without connecting, it is possible for the Pi to see what the devices are, because lots of information can be carried just in the advertisement (for example, the name of the device is also advertised along with the unique device address; so it could know that all advertisements with (say) the text "Sense1000" refers to a product that should be connected to. That way applications can be designed to connect to only one-vendor devices if desired. Also, blacklists/whitelists of device addresses could be possible, e.g. the Pi could query a cloud service belonging to a manufacturer, to check the device address to decide if the app should connect to a supported peripheral or not (this is not related to security, that has different procedures for device authentication. But to just identify if a device has a particular feature, then the characteristics are read. There are pre-defined characteristics that devices can support for compatibility with other third party products, or they can be user-defined).

    • Cancel
    • Vote Up +4 Vote Down
    • Sign in to reply
    • More
    • Cancel
  • DAB
    DAB over 6 years ago

    Very good project to show how to connect sensors remotely over Bluetooth.


    I am curious, how easy is it to manage multiple sensors with the same type of boards?


    DAB

    • Cancel
    • Vote Up +4 Vote Down
    • Sign in to reply
    • More
    • Cancel
  • shabaz
    shabaz over 6 years ago in reply to ntewinkel

    Hi Nico!


    I've not tested range yet, I'm waiting on some hardware for that (a calibration tool) to match the antenna. Also, I still need to explore the transmit power settings on the chip. I did experiment with switching between BLE 4.x and 5.0, and that worked, but I still need to test range improvements. There will still be issues in normal practical use, the older BLE was only good for tens of metres in practice (or more outdoors). WiFi can be better for range, but usually the transmit power is higher. Right now with the uncoded mode (i.e. BLE 4.x) I'm seeing typical performance indoors, where I can walk perhaps up to 20 meters away outside, and it works, but depends on positioning. I would not have expected more with BLE 4.x.

    I've not noticed anything unusual with the Pi 3B WiFi (I have the 3B, not the 3B+) when used standalone. If there is any metal heatsink on the Pi, it could affect performance, so the ceramic ones could be better to use (or not use a heatsink). Also, USB connected drives (like SSD etc) can cause a lot of interference. I had issues with WiFi failing when I connected a mSATA to USB adaptor with drive. Some improvement occurred with ferrites and positioning the adaptor differently.

    • Cancel
    • Vote Up +5 Vote Down
    • Sign in to reply
    • More
    • Cancel
>
element14 Community

element14 is the first online community specifically for engineers. Connect with your peers and get expert answers to your questions.

  • Members
  • Learn
  • Technologies
  • Challenges & Projects
  • Products
  • Store
  • About Us
  • Feedback & Support
  • FAQs
  • Terms of Use
  • Privacy Policy
  • Legal and Copyright Notices
  • Sitemap
  • Cookies

An Avnet Company © 2025 Premier Farnell Limited. All Rights Reserved.

Premier Farnell Ltd, registered in England and Wales (no 00876412), registered office: Farnell House, Forge Lane, Leeds LS12 2NE.

ICP 备案号 10220084.

Follow element14

  • X
  • Facebook
  • linkedin
  • YouTube