element14 Community
element14 Community
    Register Log In
  • Site
  • Search
  • Log In Register
  • Community Hub
    Community Hub
    • What's New on element14
    • Feedback and Support
    • Benefits of Membership
    • Personal Blogs
    • Members Area
    • Achievement Levels
  • Learn
    Learn
    • Ask an Expert
    • eBooks
    • element14 presents
    • Learning Center
    • Tech Spotlight
    • STEM Academy
    • Webinars, Training and Events
    • Learning Groups
  • Technologies
    Technologies
    • 3D Printing
    • FPGA
    • Industrial Automation
    • Internet of Things
    • Power & Energy
    • Sensors
    • Technology Groups
  • Challenges & Projects
    Challenges & Projects
    • Design Challenges
    • element14 presents Projects
    • Project14
    • Arduino Projects
    • Raspberry Pi Projects
    • Project Groups
  • Products
    Products
    • Arduino
    • Avnet & Tria Boards Community
    • Dev Tools
    • Manufacturers
    • Multicomp Pro
    • Product Groups
    • Raspberry Pi
    • RoadTests & Reviews
  • About Us
  • Store
    Store
    • Visit Your Store
    • Choose another store...
      • Europe
      •  Austria (German)
      •  Belgium (Dutch, French)
      •  Bulgaria (Bulgarian)
      •  Czech Republic (Czech)
      •  Denmark (Danish)
      •  Estonia (Estonian)
      •  Finland (Finnish)
      •  France (French)
      •  Germany (German)
      •  Hungary (Hungarian)
      •  Ireland
      •  Israel
      •  Italy (Italian)
      •  Latvia (Latvian)
      •  
      •  Lithuania (Lithuanian)
      •  Netherlands (Dutch)
      •  Norway (Norwegian)
      •  Poland (Polish)
      •  Portugal (Portuguese)
      •  Romania (Romanian)
      •  Russia (Russian)
      •  Slovakia (Slovak)
      •  Slovenia (Slovenian)
      •  Spain (Spanish)
      •  Sweden (Swedish)
      •  Switzerland(German, French)
      •  Turkey (Turkish)
      •  United Kingdom
      • Asia Pacific
      •  Australia
      •  China
      •  Hong Kong
      •  India
      • Japan
      •  Korea (Korean)
      •  Malaysia
      •  New Zealand
      •  Philippines
      •  Singapore
      •  Taiwan
      •  Thailand (Thai)
      • Vietnam
      • Americas
      •  Brazil (Portuguese)
      •  Canada
      •  Mexico (Spanish)
      •  United States
      Can't find the country/region you're looking for? Visit our export site or find a local distributor.
  • Translate
  • Profile
  • Settings
Bluetooth Unleashed Design Challenge
  • Challenges & Projects
  • Design Challenges
  • Bluetooth Unleashed Design Challenge
  • More
  • Cancel
Bluetooth Unleashed Design Challenge
Blog Neonatal Jaundice Phototherapy - Part 1.b: Detail Project Plan - Hardware Overview
  • Blog
  • Forum
  • Documents
  • Polls
  • Files
  • Events
  • Mentions
  • Sub-Groups
  • Tags
  • More
  • Cancel
  • New
  • Share
  • More
  • Cancel
Group Actions
  • Group RSS
  • More
  • Cancel
Engagement
  • Author Author: sunnyiut
  • Date Created: 27 May 2018 8:34 PM Date Created
  • Views 1748 views
  • Likes 8 likes
  • Comments 6 comments
  • phototherapy
  • neonatal jaundice
  • bluetooth unleashed
  • bluetooth unleashed design challenge
Related
Recommended

Neonatal Jaundice Phototherapy - Part 1.b: Detail Project Plan - Hardware Overview

sunnyiut
sunnyiut
27 May 2018

Title: Neonatal Jaundice Phototherapy

By:    sunnyiut


Design Challenge: Bluetooth Unleashed

Blog number: 02


Blog List
01 : Introduction02: Project Plan

This is my second blog post in the Bluetooth Unleashed and I'll present my project plan. It's basically a Hardware Overview which includes the basic modules i'll be using in this project and how these modules will be placed and interconnected.


Modules:image


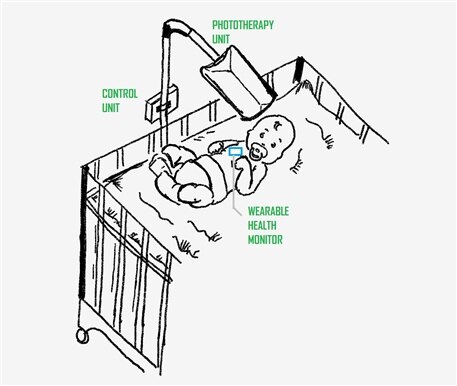
  1. Phototherapy unit [Blue LED light source with driver circuitry]
  2. Interfacing and control unit to control the LED light intensity
  3. Wearable health monitor which will collect and send health parameters to the control unit


The first two modules will be mounted on the baby cradle.

The third one [wearable health monitor] will be placed on the baby's body.

The communication between module 2 and 3 will be based on BLE.


There will be other modules like Power Supply and Battery Backup.

There will be eye mask to protect the baby's eyes from phtototherapy lights.

Image result for eye pad phototherapy


Module 1 & 2 - Phototherapy Unit and Control Unit:
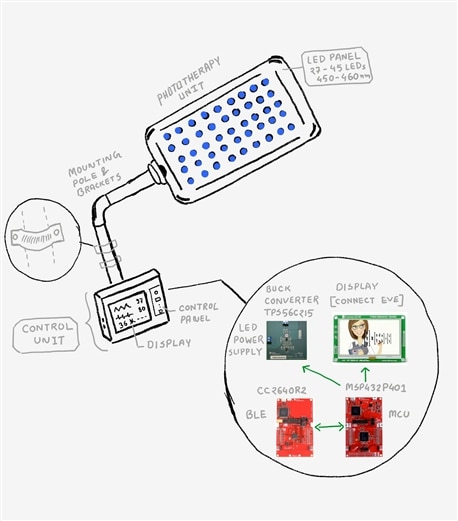
 

image

Phototherapy Unit -

The Phototherapy Unit includes a LED panel consists of 27-45 LEDs. This is the base of the treatment - BLUE LED.


Design criteria:


  • Max Intensity - > 30 μW/cm2/nm
  • Min Intensity - > 12 μW/cm2/nm
  • LED Wavelength - 458 nm [i am using ~460nm]
  • Center point indication


ASMT-QBB3-NBD0EASMT-QBB3-NBD0E

image


This is the LED I have selected to use in my project.

It's a high brightness 460nm Blue LED


luminous flux - 11500 with max If = 150mA

It has a forward voltage of 3.5v with 500mW power dissipation.


The Phototherapy Unit will also have necessary mounting pole and brackets to place the device on the baby cradle.


Interfacing and Control Unit -

The Interfacing and Control Unit will be based on MSP432P401 MCU. It will control the LED panel with the help of a DC-DC converter module, display the health parameter of the baby and interface with the wearable health monitor module using BLE.


TPS56C215EVM-762TPS56C215EVM-762

image

To power up the driving circuit of the LEDs. It's a synchronous step down converter.

I already have this module with me.


It has current drive upto 12A with fast switching 1.2MHz.

It contains DCAP2 technology, which will be helpful to vary the LOAD [LED intensity] very fast.

The output voltage is set to 1.2v, but it can be varied externally.


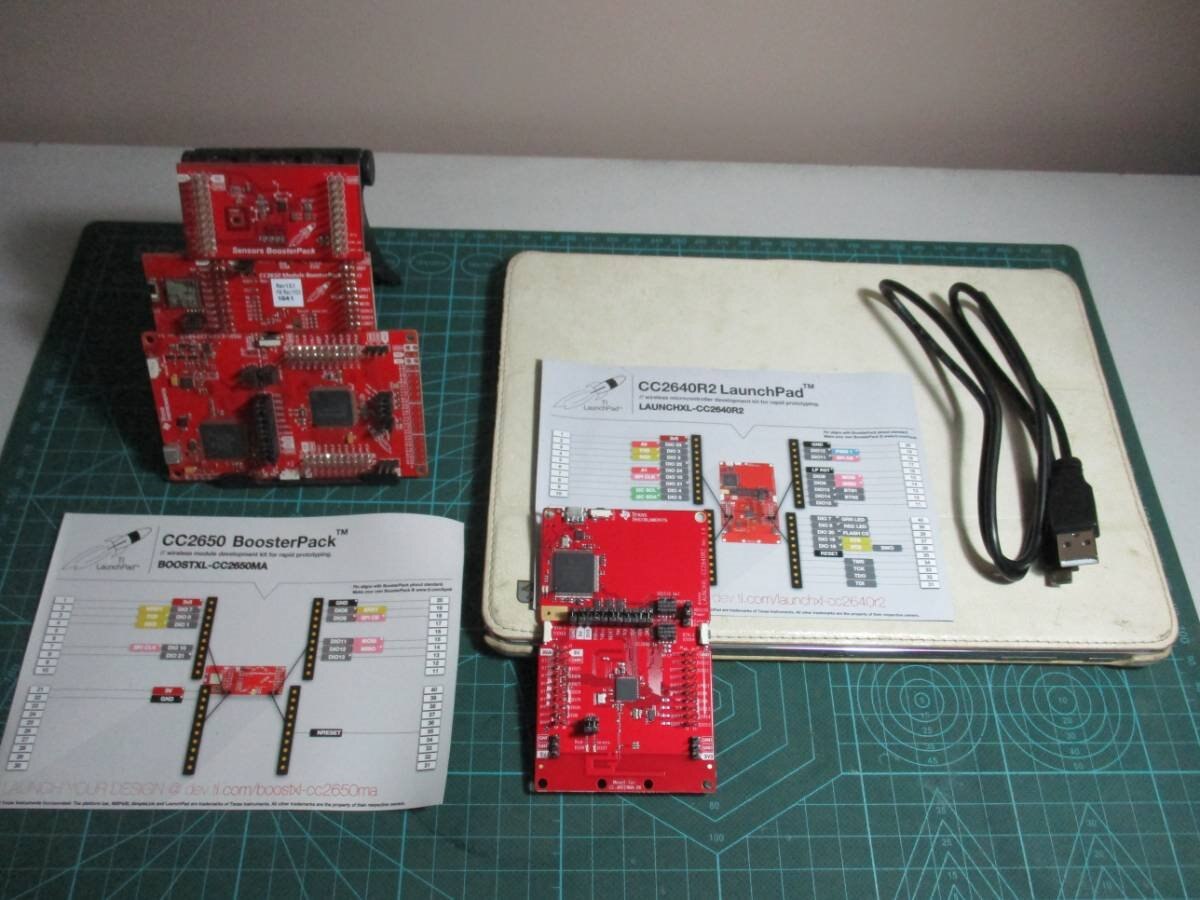
Texas Instruments - CC2640R2 LaunchPad

the hero......

image


It will be used to collect data using BLE from the wearable health monitoring device.

It will send the physiological and environmental data to the MSP432 MCU and generate notifications if necessary.


Connect EVE

image

FT-800 graphic controller board will be used as display module.


Module 3 - Wearable Health Monitor:
image
The wearable health monitor will be mounted on the baby's chest with a velcro strap.
Objective of this unit is to -
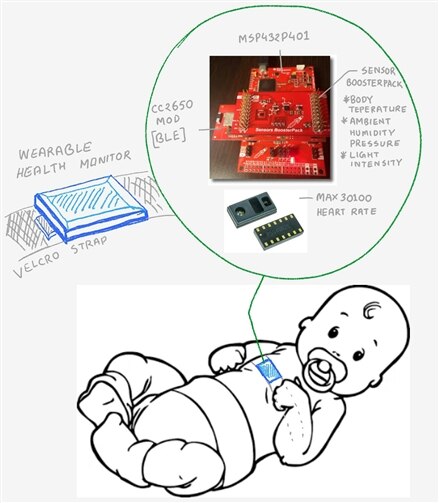
  • monitor the basic health parameters of the baby


    • Heart rate
    • Body temperatur


  • monitor the ambient environment of the treatment area


    • ambient temperature
    • humidity
    • light intensity


The interface and control unit will control the LED panel intensity based on the light intensity sensor.


MAX30100

Image result for max30100 heart rate sensorMAX30100 heart rate sensor will be used to get baby's heart rate through PPG [photoplethysmograph]

However, the challenge will be 'signal to noise ratio' as photoplethysmography method is generally applied on finger tip or wrist joint or ear lobe. For babies we can go for the Foot. But mounting it on chest will provide very low signal with high DC offset [due to skin and tissue] and ambient noise [50/60 Hz].

For adult we don't have a chance. But for babies I can give it a try as because -

The LEDs have a max driving current of 50mA [I don't know the luminescence] and ADC resolution is 16 bit. Hope it will be good enough to reconstruct the signal.


Sensors Booster Pack

image

The Sensors Booster Pack will be used to collect environmental data -

  • ambient light and temperature
  • humidity
  • the infrared temperature sensor can be used to measure baby's body temperature


MSP432P401R

  Related image
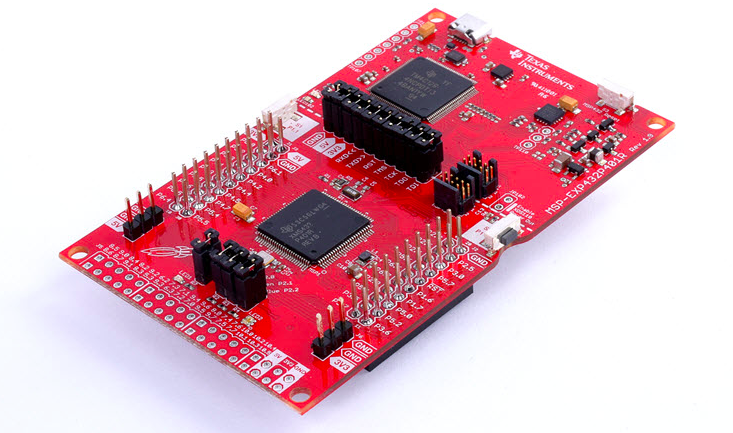
The MSP-EXP432P401R LaunchPad will

  • collect the environmental information from the 'Sensors Booster Pack'
  • collect heart rate from MAX30100
  • send it to control unit through BLE


BOOSTXLCC2650MA

Related image


BLE module to send data


That's the end of this blog post.

I have already received the Hero Kit - CC2640R2 Launchpad. I am waiting for the LEDs I have ordered from the 150$ shopping cart.

However, I am ready to move on with the bluetooth communication part. It will be interesting and challenging to me as I am new to Simplelink Wireless MCUs.

image

So, my next blog post will be on my 'out of the box' experience of the CC2640R2 launchpad.

I'll try out some demo/sample programs.

And after that I'll move on to CC2650 module.

  • Sign in to reply

Top Comments

  • aspork42
    aspork42 over 7 years ago +4
    Awesome - I can see your plan really taking shape into physical components. What type of battery/battery life are you aiming for on the baby unit? And looks like you’ll have some PCBs to make as well!…
  • genebren
    genebren over 7 years ago +3
    This is a really great update to your Design Challenge project. It seems as if things are really beginning to take shape. So will the MAX30100 be looking through the strap in order to sense the heart rate…
  • sunnyiut
    sunnyiut over 7 years ago in reply to aspork42 +2
    Thanks James, I am planning to use 3.7v Li-ion battery not more than 1200mAh. All the modules are low power device including the MSP432 MCU. The most power hungry component will be the max30100 LED. My…
  • sunnyiut
    sunnyiut over 7 years ago in reply to 14rhb

    hello Rod,

    thank you for your valuable suggestion. image


    Exactly, this option will be there for sure.

    Generally a single session continues for about 45 mins and then gives a break for 15 mins for baby feeding , changing diapers and rearranging the bed or eye mask.

    However, the timing is monitored manually. In this case I'll add a timer which will track the time and notify when the session time is over. The timing limit can be changed by an authentic person.

    For any emergency or observation during the session, I'll introduce a Pause/Resume button as you suggested, thank you.

    • Cancel
    • Vote Up +1 Vote Down
    • Sign in to reply
    • More
    • Cancel
  • 14rhb
    14rhb over 7 years ago

    You could add a short time-out on the UV unit (e.g. 5-10 minutes) that needs resetting by the medical staff pushing a simple continue button? That might be good practice as they can physically check what the unit is indicating appears correct, ensure the sensor is still where it is meant to be and that the baby's eye protection is in place.


    Rod

    • Cancel
    • Vote Up +2 Vote Down
    • Sign in to reply
    • More
    • Cancel
  • sunnyiut
    sunnyiut over 7 years ago in reply to genebren

    Thank you Gene, I'll place the Max30100 in a way so that it gently touches the bare skin. So, there will be a small vent / cut to open up the space to place the sensor on the strap.

    • Cancel
    • Vote Up +1 Vote Down
    • Sign in to reply
    • More
    • Cancel
  • sunnyiut
    sunnyiut over 7 years ago in reply to aspork42

    Thanks James, I am planning to use 3.7v Li-ion battery not more than 1200mAh. All the modules are low power device including the MSP432 MCU. The most power hungry component will be the max30100 LED. My primary goal is to go for at-least 6hrs continuous backup.

    Yep, I'll need to go for the custom PCB at the end. However, I have to figure out whether all the modules are working according to the plan at first. image

    • Cancel
    • Vote Up +2 Vote Down
    • Sign in to reply
    • More
    • Cancel
  • genebren
    genebren over 7 years ago

    This is a really great update to your Design Challenge project.  It seems as if things are really beginning to take shape. So will the MAX30100 be looking through the strap in order to sense the heart rate?

    Good look on your continuing progress on this project.  I will be looking forward to you continued updates.


    Gene

    • Cancel
    • Vote Up +3 Vote Down
    • Sign in to reply
    • More
    • Cancel
>
element14 Community

element14 is the first online community specifically for engineers. Connect with your peers and get expert answers to your questions.

  • Members
  • Learn
  • Technologies
  • Challenges & Projects
  • Products
  • Store
  • About Us
  • Feedback & Support
  • FAQs
  • Terms of Use
  • Privacy Policy
  • Legal and Copyright Notices
  • Sitemap
  • Cookies

An Avnet Company © 2026 Premier Farnell Limited. All Rights Reserved.

Premier Farnell Ltd, registered in England and Wales (no 00876412), registered office: Farnell House, Forge Lane, Leeds LS12 2NE.

ICP 备案号 10220084.

Follow element14

  • X
  • Facebook
  • linkedin
  • YouTube