element14 Community
element14 Community
    Register Log In
  • Site
  • Search
  • Log In Register
  • About Us
  • Community Hub
    Community Hub
    • What's New on element14
    • Feedback and Support
    • Benefits of Membership
    • Personal Blogs
    • Members Area
    • Achievement Levels
  • Learn
    Learn
    • Ask an Expert
    • eBooks
    • element14 presents
    • Learning Center
    • Tech Spotlight
    • STEM Academy
    • Webinars, Training and Events
    • Learning Groups
  • Technologies
    Technologies
    • 3D Printing
    • FPGA
    • Industrial Automation
    • Internet of Things
    • Power & Energy
    • Sensors
    • Technology Groups
  • Challenges & Projects
    Challenges & Projects
    • Design Challenges
    • element14 presents Projects
    • Project14
    • Arduino Projects
    • Raspberry Pi Projects
    • Project Groups
  • Products
    Products
    • Arduino
    • Avnet Boards Community
    • Dev Tools
    • Manufacturers
    • Multicomp Pro
    • Product Groups
    • Raspberry Pi
    • RoadTests & Reviews
  • Store
    Store
    • Visit Your Store
    • Choose another store...
      • Europe
      •  Austria (German)
      •  Belgium (Dutch, French)
      •  Bulgaria (Bulgarian)
      •  Czech Republic (Czech)
      •  Denmark (Danish)
      •  Estonia (Estonian)
      •  Finland (Finnish)
      •  France (French)
      •  Germany (German)
      •  Hungary (Hungarian)
      •  Ireland
      •  Israel
      •  Italy (Italian)
      •  Latvia (Latvian)
      •  
      •  Lithuania (Lithuanian)
      •  Netherlands (Dutch)
      •  Norway (Norwegian)
      •  Poland (Polish)
      •  Portugal (Portuguese)
      •  Romania (Romanian)
      •  Russia (Russian)
      •  Slovakia (Slovak)
      •  Slovenia (Slovenian)
      •  Spain (Spanish)
      •  Sweden (Swedish)
      •  Switzerland(German, French)
      •  Turkey (Turkish)
      •  United Kingdom
      • Asia Pacific
      •  Australia
      •  China
      •  Hong Kong
      •  India
      •  Korea (Korean)
      •  Malaysia
      •  New Zealand
      •  Philippines
      •  Singapore
      •  Taiwan
      •  Thailand (Thai)
      • Americas
      •  Brazil (Portuguese)
      •  Canada
      •  Mexico (Spanish)
      •  United States
      Can't find the country/region you're looking for? Visit our export site or find a local distributor.
  • Translate
  • Profile
  • Settings
Bluetooth Unleashed Design Challenge
  • Challenges & Projects
  • Design Challenges
  • Bluetooth Unleashed Design Challenge
  • More
  • Cancel
Bluetooth Unleashed Design Challenge
Blog Smart Doorbell System - Part 10 - Complete Project Video
  • Blog
  • Forum
  • Documents
  • Polls
  • Files
  • Events
  • Mentions
  • Sub-Groups
  • Tags
  • More
  • Cancel
  • New
  • Share
  • More
  • Cancel
Group Actions
  • Group RSS
  • More
  • Cancel
Engagement
  • Author Author: shabaz
  • Date Created: 20 Jul 2018 10:58 PM Date Created
  • Views 6244 views
  • Likes 17 likes
  • Comments 28 comments
  • bluetooth
  • cc2640r2
  • ti launchpad
  • bluetooth le
  • bluetooth_unleashed
  • winners
  • bt_smart_doorbell
  • design_challenges
  • bluetooth 5.0
  • raspberry_pi
  • rpi 3b+
  • bbb
  • texas_instruments
  • cc2640r2f
  • rpi 3b
  • bluetooth_le
Related
Recommended

Smart Doorbell System - Part 10 - Complete Project Video

shabaz
shabaz
20 Jul 2018

For all the parts to this project, click here! Smart Doorbell System


Introduction

The Smart Doorbell System is a Bluetooth Low Energy (BLE) project to build a better doorbell! However, it could also have other uses - to open and close gates, to act as an emergency attendant button or to control or monitor all sorts of things. It can also be connected up to a Pi or BeagleBone, for extending reach and capabilities even further. For example, the Pi could log and timestamp activity, or activate a camera, or tunnel the information to another Pi or BeagleBone, and then pass the information onward over BLE to the far end, providing all the benefits of BLE combined with the compute horsepower and cloud connecting capability of the Pi.


All software and schematics and PCB files and bill-of-materials (BoM) are available.


For more information, click on the link above to explore all the blog posts, or (easier) watch the twenty-minute video below.


You don't have permission to edit metadata of this video.
Edit media
x
image
Upload Preview
image


What Was Built?

Two modules were constructed; the bell push module, and the chime module. The can communicate directly to each other, or they can connect to a Linux system for extra features such as tunnelling alerts over the Internet, or for logging events or taking photos of who is at the door. With some effort the same system could be used for patient care, or for alerting people in a warehouse / shop floor.

image


The Bell Push Module runs from an AA sized battery and should run for four years (I intend to make code changes to improve that further - currently it consumes 45uA but around 20uA should be feasible). It uses a Texas Instruments chip, the CC2640R2FCC2640R2F. When connecting to the wireless Chime Module, it consumes around 12-13mA average, briefly until the communication is complete. More accurate tests still need to be done, but these values were promising.

image


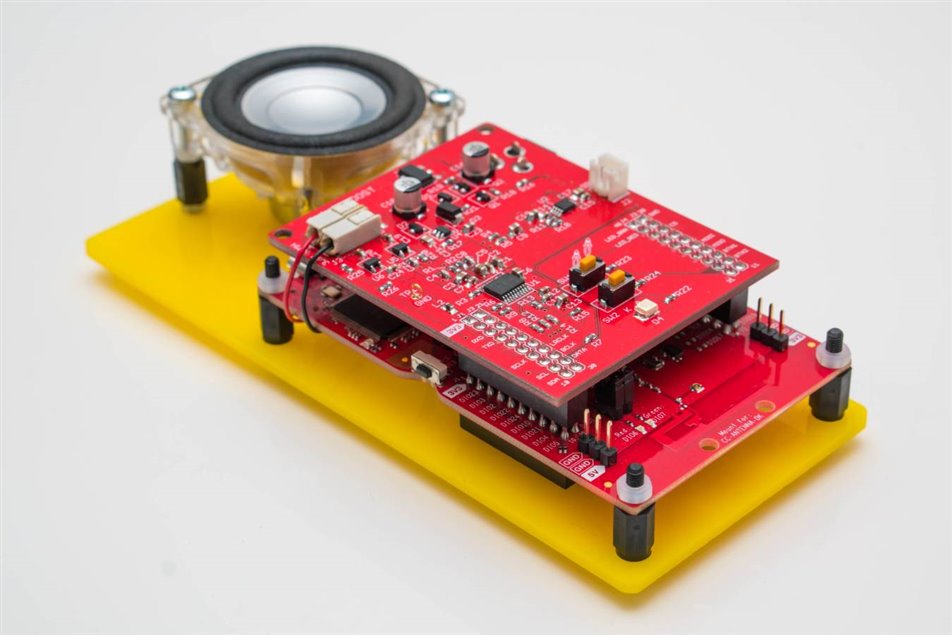
The Chime Module was constructed from a custom PCB plugged on top of a ready-made Texas Instruments microcontroller board called the CC2640R2 LaunchPadCC2640R2 LaunchPad. The custom PCB contains digital audio capability and dual supply capability (external DC, or the attached rechargeable battery which gets charged up automatically). The Chime Module can be used plugged-in to the DC supply, or it can be detached and taken outdoors (e.g. into the garden). When used on battery power, the current consumption is about 8mA, which allows for several days of outdoor use with the 600mA battery that was used. The battery will charge itself so there should be no maintenance required.

image


Next Steps

Although the system functions, the code is very proof-of-concept and I'd like to take the time to improve it and add more features. I've already tested communications with the Pi (so that the Bell Push module connects to the Pi, and another Pi connects to the Chime Module) and the code functions nicely (see blog post 9 for the source code). So, with little effort, it should be possible to use this system over any distance.

Thanks for following the project!

  • Sign in to reply

Top Comments

  • mcb1
    mcb1 over 7 years ago +5
    Well done. It's a lot of work, and I'm betting your're glad it over. A simple suggestion is to look at wireless charging. I used something very similar in the Beyond_the_phone challenge Wireless Challenge…
  • shabaz
    shabaz over 7 years ago in reply to Problemchild +4
    I think we need to develop an app, let's call it ChimeOS say, that allows users to configure on their Pi the doorbell strategy for the home, and let it accept the commands from the bell push, and then…
  • Problemchild
    Problemchild over 7 years ago in reply to mcb1 +3
    Hey Mark wouldn't the wireless charging require the charge pad to be behind the button unit which would becool but you would need to make sure the distance between the unit and the bell was very small…
Parents
  • shabaz
    shabaz over 6 years ago

    For a revision 2 PCB for the bell push, these are the enclosures I'm considering. Any alternate options welcome!

    A 3D printed custom version would provide a lot of flexibility, but that can be a revision 3. For now, I wanted to use an off-the-shelf enclosure.


    The problem is that most small bell or alarm push boxes are designed for the small old-school A23 sized 12V battery. But this project requires around 3V, and I'd like to use large non-rechargeable cells for longer life, and they would be ideally be a single non-rechargeable Lithium AA sized 3V battery, or two 1.5V AA or two 1.5V AAA batteries. So, space is needed for a holder or clips for the single or double AA, or double AAA.

    Around 7mm depth is needed for the PCB (less is possible, but the microswitch needs a few more millimeters for the lever that will need to be implemented. The current PCB is about 77x28mm, and only a few millimetres thickness apart from the microswitch. The PCB could be reduced from 77mm to maybe 60mm if required, by expanding to 35mm width maybe.


    These are the current two candidates:

    Option 1:

    I think it looks quite ugly (I'd rather a more classical shape)  but it may be good enough to fit a couple of AAA batteries.

    image

    This is the other side of it, and I think it could be possible to fashion a plate to connect to the rear to attach to a wall, even if that was with foam tape to the plate screwed on the wall. The battery will last long enough that foam tape wouldn't need replacing often:

    image

    The enclosure would need spray-painting to blend in, i.e. spray it white or something.


    Option 2:

    This too looks ugly, but maybe less ugly. It is near-similar size but 10mm wider than Option 1. The cutout ellipse is great for an LED.

    image

    This enclosure would need spray-painting too, although it does come in a more acceptable color than black:

    image

    Option B enclosure is slightly unusual, in that it is 3-part, and so I believe has less room inside than Option 1, despite overall being 10mm wider:

    image


    Both options are not small, they are 120x45x22 and 120x55x22 outside dimensions, and I still need to order them to examine closely. I think the size is still reasonable for a smart bell push though. And leaves some flexibility for adding more features like a display or buzzer.

    Both options cost about $5 each.

    • Cancel
    • Vote Up 0 Vote Down
    • Sign in to reply
    • More
    • Cancel
Comment
  • shabaz
    shabaz over 6 years ago

    For a revision 2 PCB for the bell push, these are the enclosures I'm considering. Any alternate options welcome!

    A 3D printed custom version would provide a lot of flexibility, but that can be a revision 3. For now, I wanted to use an off-the-shelf enclosure.


    The problem is that most small bell or alarm push boxes are designed for the small old-school A23 sized 12V battery. But this project requires around 3V, and I'd like to use large non-rechargeable cells for longer life, and they would be ideally be a single non-rechargeable Lithium AA sized 3V battery, or two 1.5V AA or two 1.5V AAA batteries. So, space is needed for a holder or clips for the single or double AA, or double AAA.

    Around 7mm depth is needed for the PCB (less is possible, but the microswitch needs a few more millimeters for the lever that will need to be implemented. The current PCB is about 77x28mm, and only a few millimetres thickness apart from the microswitch. The PCB could be reduced from 77mm to maybe 60mm if required, by expanding to 35mm width maybe.


    These are the current two candidates:

    Option 1:

    I think it looks quite ugly (I'd rather a more classical shape)  but it may be good enough to fit a couple of AAA batteries.

    image

    This is the other side of it, and I think it could be possible to fashion a plate to connect to the rear to attach to a wall, even if that was with foam tape to the plate screwed on the wall. The battery will last long enough that foam tape wouldn't need replacing often:

    image

    The enclosure would need spray-painting to blend in, i.e. spray it white or something.


    Option 2:

    This too looks ugly, but maybe less ugly. It is near-similar size but 10mm wider than Option 1. The cutout ellipse is great for an LED.

    image

    This enclosure would need spray-painting too, although it does come in a more acceptable color than black:

    image

    Option B enclosure is slightly unusual, in that it is 3-part, and so I believe has less room inside than Option 1, despite overall being 10mm wider:

    image


    Both options are not small, they are 120x45x22 and 120x55x22 outside dimensions, and I still need to order them to examine closely. I think the size is still reasonable for a smart bell push though. And leaves some flexibility for adding more features like a display or buzzer.

    Both options cost about $5 each.

    • Cancel
    • Vote Up 0 Vote Down
    • Sign in to reply
    • More
    • Cancel
Children
No Data
element14 Community

element14 is the first online community specifically for engineers. Connect with your peers and get expert answers to your questions.

  • Members
  • Learn
  • Technologies
  • Challenges & Projects
  • Products
  • Store
  • About Us
  • Feedback & Support
  • FAQs
  • Terms of Use
  • Privacy Policy
  • Legal and Copyright Notices
  • Sitemap
  • Cookies

An Avnet Company © 2025 Premier Farnell Limited. All Rights Reserved.

Premier Farnell Ltd, registered in England and Wales (no 00876412), registered office: Farnell House, Forge Lane, Leeds LS12 2NE.

ICP 备案号 10220084.

Follow element14

  • X
  • Facebook
  • linkedin
  • YouTube