


This was not a planned blog post, but I bricked the Arduino Nano and may be my experience could be useful to anyone else who may have the same kind of problem in the future
What happened
While testing low-power modes, I created an application that put to sleep the Arduino Nano's Cortex M0 CPU every second... which means I had no enough time to download a different application from the Arduino IDE...
What I did
The only option you have when nothing else works is a low-level interface like JTAG or the even simpler SWD. The latter is the default in-circuit programming interface for ARM devices so it is supported by all the ARM processors.
I had in my lab an STLink/V2 programmer, which is supposed to support both SWD and JTAG interfaces but for some reason I was unable to connect to the board
Luckily I found one amazing open source project called OpenOCD which can work on different debuggers and microcontrollers, having configuration files of almost all available ARM Cortex SoC and the best part is that it has support for Raspberry PI GPIO bit-bang programmer profile. This means we can use Raspberry Pi GPIOs to behave as a programmer pins and connect it to our microcontroller to flash bootloaders.
Prepare the hardware
You need to connect only two wires: SWD (pin 2) and SWCLK (pin3)
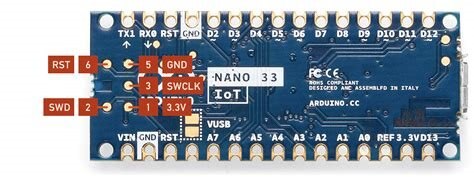
I connected SWCLK to GPIO 25 of the Raspberry Pi and SWD to GPIO 24 (see picture below). Blu wire is connected to SWD, the yellow wire to SWCLK. The red wire is the reset, but looks like it is not strictly required
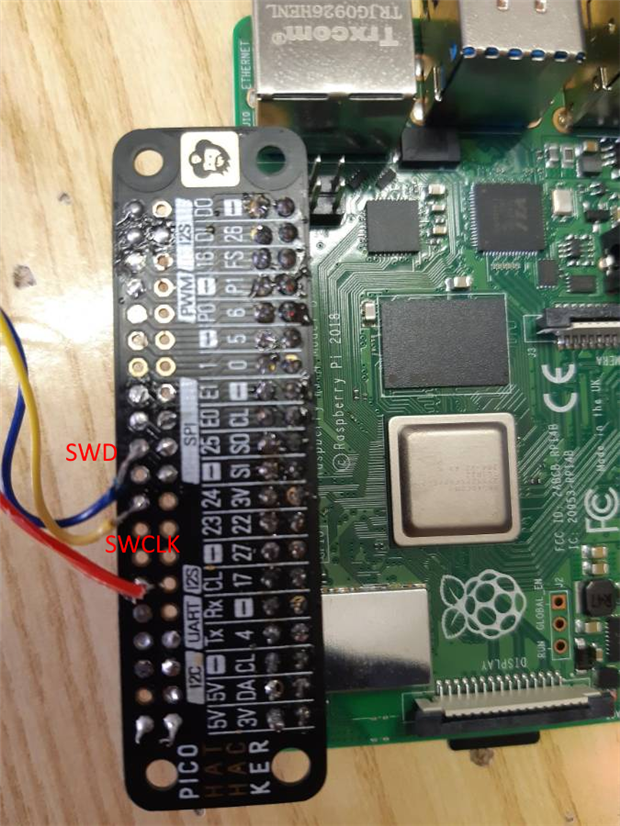
I powered up the Arduino board using a USB cable connected to Raspberry Pi so that extra ground wiring is not required
Install openOCD
sudo apt-get install autoconf libtool libusb-devgit clone --recursive git://git.code.sf.net/p/openocd/code openocd-code- cd openocd-code
Build openOCD
- ./bootstrap
- ./configure --enable-bcm2835gpio
- make
- sudo make install
Prepare a config file
- cd ~
- mkdir openocd-config
- cd openocd-config
- nano openocd.cfg
- Paste the following content
interface bcm2835gpio

# Raspi1 peripheral_base address
# bcm2835gpio_peripheral_base 0x20000000
# Raspi2 and Raspi3 peripheral_base address
bcm2835gpio_peripheral_base 0x3F000000

# Raspi1 BCM2835: (700Mhz)
# bcm2835gpio_speed_coeffs 113714 28
# Raspi2 BCM2836 (900Mhz):
# bcm2835gpio_speed_coeffs 146203 36
# Raspi3 BCM2837 (1200Mhz):
bcm2835gpio_speed_coeffs 194938 48

# SWD GPIO set: swclk swdio
bcm2835gpio_swd_nums 25 24

transport select swd

set CHIPNAME at91samd21
source [find target/at91samdXX.cfg]

# Uncomment & lower speed to address errors
# adapter_khz 1000

init
targets
reset halt
- save and close
Download bootloader file
The bootloader file for Arduino Nano 33 IoT can be download from https://github.com/arduino/ArduinoCore-samd/blob/master/bootloaders/nano_33_iot/samd21_sam_ba_arduino_nano_33_iot.bin
Copy the file in the folder you created (~/openocd-config) and name it bl.bin
Launch openOCD
In a shell window, run the command
cd ~/openocd-config
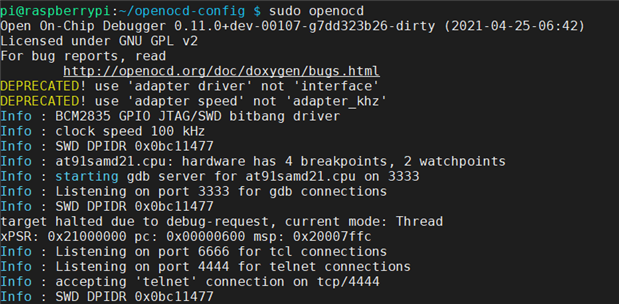
sudo openocd
Install and launch Telnet
- install Telnet (this tool is not available by default on Raspberry Pi)
apt-get install telnet
- launch telnet
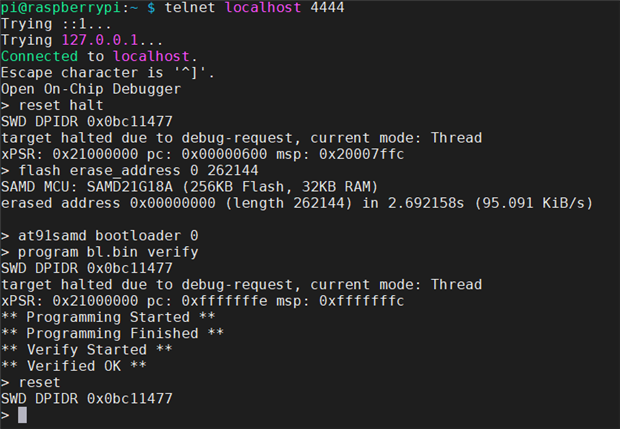
telnet localhost 4444
Erase flash and install bootloader
- from the telnet prompt, enter the following commands
reset halt
flash erase 0 262144
at91samd bootloader 0
program bl.bin verify
reset
run
Hope this help!
Top Comments