element14 Community
element14 Community
    Register Log In
  • Site
  • Search
  • Log In Register
  • Community Hub
    Community Hub
    • What's New on element14
    • Feedback and Support
    • Benefits of Membership
    • Personal Blogs
    • Members Area
    • Achievement Levels
  • Learn
    Learn
    • Ask an Expert
    • eBooks
    • element14 presents
    • Learning Center
    • Tech Spotlight
    • STEM Academy
    • Webinars, Training and Events
    • Learning Groups
  • Technologies
    Technologies
    • 3D Printing
    • FPGA
    • Industrial Automation
    • Internet of Things
    • Power & Energy
    • Sensors
    • Technology Groups
  • Challenges & Projects
    Challenges & Projects
    • Design Challenges
    • element14 presents Projects
    • Project14
    • Arduino Projects
    • Raspberry Pi Projects
    • Project Groups
  • Products
    Products
    • Arduino
    • Avnet & Tria Boards Community
    • Dev Tools
    • Manufacturers
    • Multicomp Pro
    • Product Groups
    • Raspberry Pi
    • RoadTests & Reviews
  • About Us
  • Store
    Store
    • Visit Your Store
    • Choose another store...
      • Europe
      •  Austria (German)
      •  Belgium (Dutch, French)
      •  Bulgaria (Bulgarian)
      •  Czech Republic (Czech)
      •  Denmark (Danish)
      •  Estonia (Estonian)
      •  Finland (Finnish)
      •  France (French)
      •  Germany (German)
      •  Hungary (Hungarian)
      •  Ireland
      •  Israel
      •  Italy (Italian)
      •  Latvia (Latvian)
      •  
      •  Lithuania (Lithuanian)
      •  Netherlands (Dutch)
      •  Norway (Norwegian)
      •  Poland (Polish)
      •  Portugal (Portuguese)
      •  Romania (Romanian)
      •  Russia (Russian)
      •  Slovakia (Slovak)
      •  Slovenia (Slovenian)
      •  Spain (Spanish)
      •  Sweden (Swedish)
      •  Switzerland(German, French)
      •  Turkey (Turkish)
      •  United Kingdom
      • Asia Pacific
      •  Australia
      •  China
      •  Hong Kong
      •  India
      •  Korea (Korean)
      •  Malaysia
      •  New Zealand
      •  Philippines
      •  Singapore
      •  Taiwan
      •  Thailand (Thai)
      • Americas
      •  Brazil (Portuguese)
      •  Canada
      •  Mexico (Spanish)
      •  United States
      Can't find the country/region you're looking for? Visit our export site or find a local distributor.
  • Translate
  • Profile
  • Settings
Design For A Cause 2021
  • Challenges & Projects
  • Design Challenges
  • Design For A Cause 2021
  • More
  • Cancel
Design For A Cause 2021
Blog Design for a Cause 2021 - Blog #2: BuzzBeat v2.0!
  • Blog
  • Forum
  • Documents
  • Polls
  • Files
  • Mentions
  • Sub-Groups
  • Tags
  • More
  • Cancel
  • New
  • Share
  • More
  • Cancel
Group Actions
  • Group RSS
  • More
  • Cancel
Engagement
  • Author Author: thebluephoenix
  • Date Created: 12 Apr 2021 1:19 PM Date Created
  • Views 475 views
  • Likes 6 likes
  • Comments 0 comments
Related
Recommended

Design for a Cause 2021 - Blog #2: BuzzBeat v2.0!

thebluephoenix
thebluephoenix
12 Apr 2021

Hello!

Its been 3 weeks since my last blog, 2 reasons contributed to the delay mainly -

- I got infected with the Coronavirus

- My challenger's kit got delayed by a couple of weeks


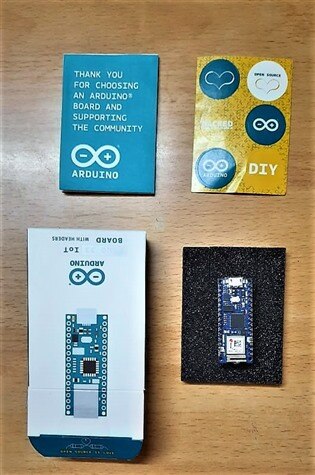
Anyway, I am fine and well now ready for the next challenge. I have also received the Arduino Nano 33 IOT kit and it looks great I am telling you -

image

image

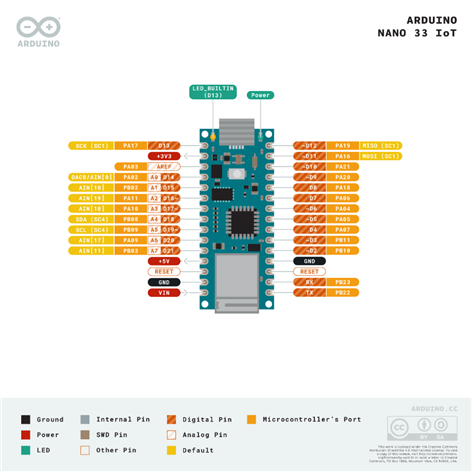
This board has a lot of features and packs a lot of power -

  • The board's main processor is a low-power ArmRegistered CortexRegistered-M0 32-bit SAMD21.
  • WiFi 2.4G and BluetoothRegistered connectivity is provided by the U-Blox NINA-W102 low-power chipset.
  • The WiFi / BT module antenna is made in the form of a metal fitting, protected from anti-vibration by a drop of thermal glue.
  • MicrochipRegistered ATECC608A crypto chip ensures secure communication
  • 6 axis IMU LSM6DS3


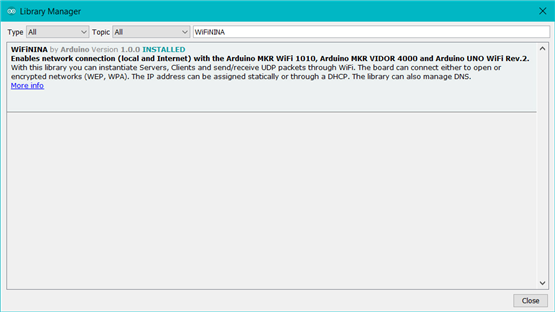
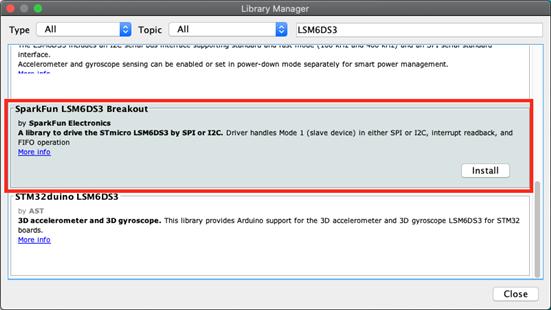
The Arduino libraries required to run this board's onboard peripherals are -

  • Arduino SAMD boards
  • Arduino_LSM6DS3 or sparkfun LSM6DS3 Breakout (for advanced usage)
  • Arduino WifiNINA

imageimage

image

image

There are a few things about this board that need to be known before using this board, they are mentioned here.

In this blog, we will try to interface the MAX30102 sensor and the onboard LSM6DS3 with the Arduino Nano 33 IOT and use it's wifi to send the data the captured data to the Arduino IOT cloud.


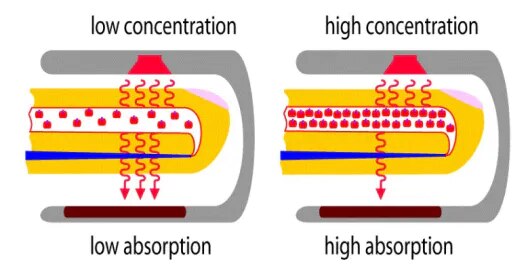
The MAX30102 is also a Microchip based sensor module, that is an upgrade to the MAX30100 sensor used to measure the pulse and blood oxygen levels of a person. It uses a concept called PhotoPlethysmography to measure vital stats. We will try measuring an additional parameter - HRV or Heart rate variability. I have used both the sensors before and according to me, the MAX30100 library performed better in SPO2 measurement but missed out on heartbeats, while the MAX30102 library performed better in HR measurement and sucked at SPO2 measurement, giving me readings like 20, 40, and even 120. The problem with the MAX30100 was that it was not fast enough to capture more than 30-40 beats per minute. Hence it showed no change even after exercising. The problem with MAX30102 was that the formula and method used to calculate SPO2 levels is erroneous. There are many ways and room for improvement here, especially since the MAX30102 should perform much better than the MAX30100 if you compare the hardware capabilities of the 2 sensors. The MAX30102 has a green LED as well which can help in increasing the measurement accuracy. Here is an instructable that applies mean centering and baseline leveling to improve the MAX30102 performance.

image

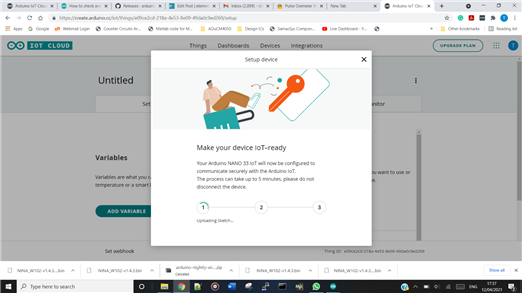
The second problem was with the Arduino IOT cloud. For some reason, I just could not make it past step 3 of configuration. Then I updated the Wifi firmware to the latest version and Voila! it worked!! (Though I am not sure it was updating the wifi firmware that caused things to work out). Excluding the not working part, the process of the configuration itself is quite simple and automated. You will have to download the Arduino Create Agent first, though.

imageimage

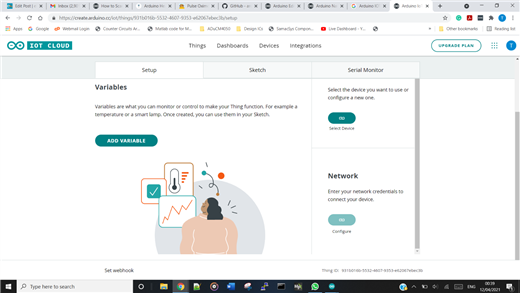
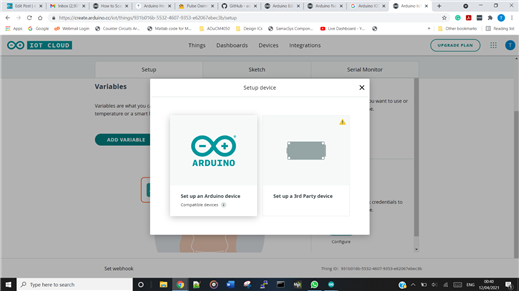
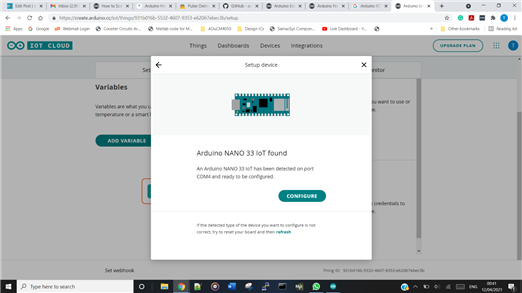
The wizard automatically detects the arduino nano 33 IOT and the configuration is automated as well.

imageimage

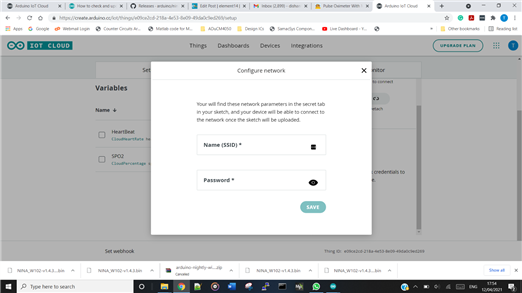
Once done, you can add a few variables like Heart Beat and SPO2 and then configure the network with your wifi credentials.

imageimage

Then you can proceed to add the remaining sketch. All steps are explained in detail here. However, I couldn't get anything on the Serial monitor directly and I feel it will still take some time to interface the first sensor with the cloud. I will continue in the next blog, this much content seems enough for a single blog and we don't want to make things unnecessarily lengthy :-)


  • Sign in to reply
element14 Community

element14 is the first online community specifically for engineers. Connect with your peers and get expert answers to your questions.

  • Members
  • Learn
  • Technologies
  • Challenges & Projects
  • Products
  • Store
  • About Us
  • Feedback & Support
  • FAQs
  • Terms of Use
  • Privacy Policy
  • Legal and Copyright Notices
  • Sitemap
  • Cookies

An Avnet Company © 2025 Premier Farnell Limited. All Rights Reserved.

Premier Farnell Ltd, registered in England and Wales (no 00876412), registered office: Farnell House, Forge Lane, Leeds LS12 2NE.

ICP 备案号 10220084.

Follow element14

  • X
  • Facebook
  • linkedin
  • YouTube