element14 Community
element14 Community
    Register Log In
  • Site
  • Search
  • Log In Register
  • Community Hub
    Community Hub
    • What's New on element14
    • Feedback and Support
    • Benefits of Membership
    • Personal Blogs
    • Members Area
    • Achievement Levels
  • Learn
    Learn
    • Ask an Expert
    • eBooks
    • element14 presents
    • Learning Center
    • Tech Spotlight
    • STEM Academy
    • Webinars, Training and Events
    • Learning Groups
  • Technologies
    Technologies
    • 3D Printing
    • FPGA
    • Industrial Automation
    • Internet of Things
    • Power & Energy
    • Sensors
    • Technology Groups
  • Challenges & Projects
    Challenges & Projects
    • Design Challenges
    • element14 presents Projects
    • Project14
    • Arduino Projects
    • Raspberry Pi Projects
    • Project Groups
  • Products
    Products
    • Arduino
    • Avnet & Tria Boards Community
    • Dev Tools
    • Manufacturers
    • Multicomp Pro
    • Product Groups
    • Raspberry Pi
    • RoadTests & Reviews
  • About Us
    About the element14 Community
  • Store
    Store
    • Visit Your Store
    • Choose another store...
      • Europe
      •  Austria (German)
      •  Belgium (Dutch, French)
      •  Bulgaria (Bulgarian)
      •  Czech Republic (Czech)
      •  Denmark (Danish)
      •  Estonia (Estonian)
      •  Finland (Finnish)
      •  France (French)
      •  Germany (German)
      •  Hungary (Hungarian)
      •  Ireland
      •  Israel
      •  Italy (Italian)
      •  Latvia (Latvian)
      •  
      •  Lithuania (Lithuanian)
      •  Netherlands (Dutch)
      •  Norway (Norwegian)
      •  Poland (Polish)
      •  Portugal (Portuguese)
      •  Romania (Romanian)
      •  Russia (Russian)
      •  Slovakia (Slovak)
      •  Slovenia (Slovenian)
      •  Spain (Spanish)
      •  Sweden (Swedish)
      •  Switzerland(German, French)
      •  Turkey (Turkish)
      •  United Kingdom
      • Asia Pacific
      •  Australia
      •  China
      •  Hong Kong
      •  India
      •  Japan
      •  Korea (Korean)
      •  Malaysia
      •  New Zealand
      •  Philippines
      •  Singapore
      •  Taiwan
      •  Thailand (Thai)
      •  Vietnam
      • Americas
      •  Brazil (Portuguese)
      •  Canada
      •  Mexico (Spanish)
      •  United States
      Can't find the country/region you're looking for? Visit our export site or find a local distributor.
  • Translate
  • Profile
  • Settings
Design For A Cause 2021
  • Challenges & Projects
  • Design Challenges
  • Design For A Cause 2021
  • More
  • Cancel
Design For A Cause 2021
Blog Design for a Cause 2021 - Robotic Hand Introduction (Blog #1)
  • Blog
  • Forum
  • Documents
  • Polls
  • Files
  • Mentions
  • Sub-Groups
  • Tags
  • More
  • Cancel
  • New
  • Share
  • More
  • Cancel
Group Actions
  • Group RSS
  • More
  • Cancel
Engagement
  • Author Author: dwinhold
  • Date Created: 6 Mar 2021 4:08 PM Date Created
  • Views 666 views
  • Likes 11 likes
  • Comments 7 comments
  • dwinhold
  • design_for_a_cause_2021
  • robotic hand
Related
Recommended

Design for a Cause 2021 - Robotic Hand Introduction (Blog #1)

dwinhold
dwinhold
6 Mar 2021

Welcome to my first blog - Robotic Hand Introduction


My proposal for "Design for a Cause" is to make a muscle controlled robotic hand. I know this isn't an original idea, but my goal is to make it affordable. I will be using the Arduino Nano 33 IOT Board along with a sensor board I will be making. I will 3d print the robotic parts along with using servos to create an inexpensive muscle controlled robotic hand. When complete, hopefully it will make this robotic hand affordable to anyone in need.


Concept:


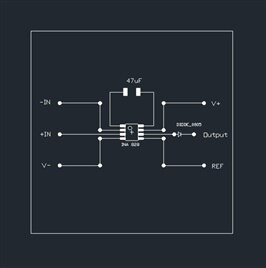
Muscles generate electrical signals. Although small, it can be monitored with the correct hardware.  After a lot of research and information gathering, I feel I can create a sensor board that can register those electrical signals. These are called Electromyography Sensor (EMG) or simplified, electrical muscle recorder. The TI INA828 integrated circuit will do just that, read the electrical signals of the muscle.


I will be using 5 main pieces of hardware to create this sensor:


  • Instrumentation Amplifier – Texas Instruments INA828 IC
  • Diode – TS4148RYG
  • Capacitor – 47uF
  • Surface electrodes that will attach to your skin close to the muscles.
  • 6 - 8 Servos


The sensor requires 3 electrodes, a negative, positive and ground. The positive and negative are placed adjacent to each other, over the muscle you want to monitor, separated by a 1cm gap. The ground electrode is placed over a bony area with minimal to no muscle.


The signals from the sensor go into the Arduino Nano 33 IOT Board. With parameters calculated, the Arduino will activate the correct servo to move each finger individually (Hopefully).


This project is important to me, being in the woodworking industry many people loose their hand (I was very close to losing mine). For myself, I had a table saw accident in which my hand hit the saw blade and cut it in half. I consider myself lucky that it wasn't worse. It still took a 5 hour surgery and 1 year of physio for me to be able to write again.


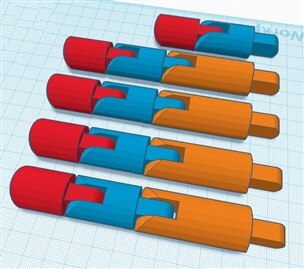
Below is the 3d printer picture of the fingers I designed

image


Below is a picture of the PCB I will be making for the sensor (This may change as I learn more about the INA828 IC)

image


Working theory:

When this is all together, the Arduino NANO 33 IOT will receive the signal from my sensor. I will program the Arduino to know which muscle sent the signal, it then can tell which servo it needs to rotate for the correct finger to move.


Thank you for reading!!


Dale Winhold

  • Sign in to reply

Top Comments

  • dwinhold
    dwinhold over 5 years ago in reply to dubbie +3
    Hi dubbie , I have made a wooden finger prototype to make sure my idea would work. I basically made the jointed wooden finger with strings and elastics to act like the tendons which will be controlled…
  • javagoza
    javagoza over 5 years ago +3
    Dale, very interesting, I'm looking forward to seeing that hand in action. From what I understand you are trying to control a three-fingered hand. Is that? Many problems to solve, a re you going to train…
  • dwinhold
    dwinhold over 5 years ago in reply to javagoza +3
    Hi Enrique, I am actually going to make a full hand with all fingers. I will have the machine learn which signal is for which finger with a starting calibration run. Noise reducing will have to be integrated…
  • dubbie
    dubbie over 5 years ago in reply to dwinhold

    Dale,


    That's great. I might even have a go at printing my own once you have published this information - I've often thought of doing something like a robot hand.


    Dubbie

    • Cancel
    • Vote Up +2 Vote Down
    • Sign in to reply
    • More
    • Cancel
  • dwinhold
    dwinhold over 5 years ago in reply to javagoza

    Hi Enrique, I am actually going to make a full hand with all fingers. I will have the machine learn which signal is for which finger with a starting calibration run. Noise reducing will have to be integrated in the project as well.


    Dale

    • Cancel
    • Vote Up +3 Vote Down
    • Sign in to reply
    • More
    • Cancel
  • javagoza
    javagoza over 5 years ago

    Dale, very interesting, I'm looking forward to seeing that hand in action.

    From what I understand you are trying to control a three-fingered hand. Is that?

    Many problems to solve, are you going to train a machine learning model to classify the signals captured by your sensor?

    Have you thought about how to reduce noise to have a better signal quality?


    It is a really challenging project! Congratulations!

    • Cancel
    • Vote Up +3 Vote Down
    • Sign in to reply
    • More
    • Cancel
  • dwinhold
    dwinhold over 5 years ago in reply to dubbie

    Hi dubbie,


    I have made a wooden finger prototype to make sure my idea would work. I basically made the jointed wooden finger with strings and elastics to act like the tendons which will be controlled by the servos. I will be uploading a video of how it works shortly. I didn’t want to start printing out the parts to find out it didn’t work. I will also upload the 3D printing files for others to use.


    Dale W

    • Cancel
    • Vote Up +3 Vote Down
    • Sign in to reply
    • More
    • Cancel
  • dubbie
    dubbie over 5 years ago

    Dale,


    Nice 3D printed fingers. Some more details would be interesting.


    Dubbie

    • Cancel
    • Vote Up +1 Vote Down
    • Sign in to reply
    • More
    • Cancel
>
element14 Community

element14 is the first online community specifically for engineers. Connect with your peers and get expert answers to your questions.

  • Members
  • Learn
  • Technologies
  • Challenges & Projects
  • Products
  • Store
  • About Us
  • Feedback & Support
  • FAQs
  • Terms of Use
  • Privacy Policy
  • Legal and Copyright Notices
  • Sitemap
  • Cookies

An Avnet Company © 2026 Premier Farnell Limited. All Rights Reserved.

Premier Farnell Ltd, registered in England and Wales (no 00876412), registered office: Farnell House, Forge Lane, Leeds LS12 2NE.

ICP 备案号 10220084.

Follow element14

  • X
  • Facebook
  • linkedin
  • YouTube