


Security use of Arduino ECCX08
1 What is ArduinoECCX08
Even not going to use it in my project, one of the greatest innovation in Nano 33 IoT shall not go unnoticed. The ArduinoECCX08 with enhanced security play important roles in IoT project.
ArduinoECCX08 library defines how to use Mocrochip - ATMEL ECCX08 easily.
The Microchip ATECC608B integrates ECDH (Elliptic Curve Diffie Hellman) security protocol an ultra-secure method to provide key agreement for encryption/decryption, along with ECDSA (Elliptic Curve Digital Signature Algorithm) sign-verify authentication for the Internet of Things (IoT) market including home automation, industrial networking, medical, as well as accessories and consumables authentication and more. In addition, the ATECC608B offer an integrated AES hardware accelerator strengthening hardware based security for LoRaWAN applications and enable secure boot capabilities for very small microcontrollers.
This chip includes one MCU core and Security EEPROM,robust engouh for hardware dismantal and crack. Good for
- IoT network endpoint key management & exchange
- Encryption for small messages and PII data
- Secure Boot and Protected Download
- Ecosystem Control, Anti-cloning
2 How it works
When connecting to AWS IoT Core using MQTT, devices are required to use X.509 certificates with TLS for authentication, as AWS IoT Core does not support authentication via username and password like many other MQTT broker services provide support for. Microchip ATECC608A crypto element can be used to securely generate and store a 256-bit ECC (Elliptic Curve Cryptography) key. 256-bit ECC keys have an equivalent strength to 3072-bit RSA keys (more information can be found here).
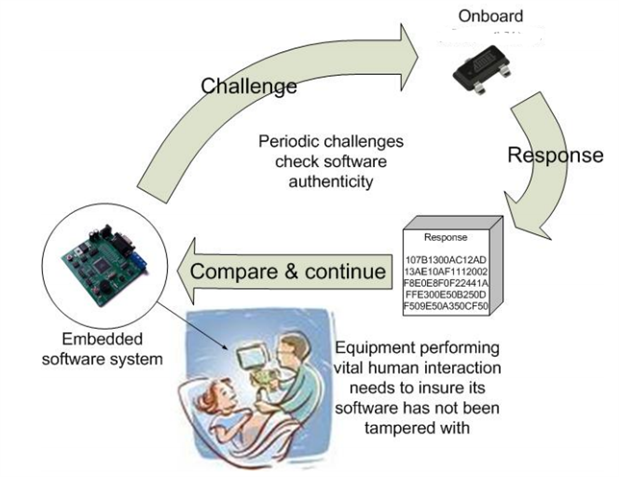
Figure below shows anti-clone as example, Challenge-Response Cycle is how the ECC608A works. Refer to http://ww1.microchip.com/downloads/en/Appnotes/doc8663.pdf for other similar applications.
The following Arduino libray shall be imported first.
- ArduinoBearSSL
- ArduinoECCX08
- ArduinoMqttClient
Access the ATECC608A need lock it first. Unlike ATECC508A , the slot can be writed once only. I2C with changable address shall be used for commond and data transfer. Sample sketch shows the logic and shall be made clearly.
This locking process is permanent and irreversible, but is needed to use the the crypto element - the configuration the sketch sets allows to use 5 private key slots with any cloud provider (or server) and a CSR can be regenerated any time for each of the other four slots. When the board is shipped from the factory, the crypto element is in an unconfigured and unlocked state.
3 Sketch
Start from the simple Random number generation.
#include <ArduinoECCX08.h>


void setup() {
  Serial.begin(9600);
  while (!Serial);


  if (!ECCX08.begin()) {
    Serial.println("Failed to communicate with ECC508/ECC608!");
    while (1);
  }


  if (!ECCX08.locked()) {
    Serial.println("The ECC508/ECC608 is not locked!");
    while (1);
  }
}


void loop() {
  Serial.print("Random number = ");
  Serial.println(ECCX08.random(65535));


  delay(1000);
}
Then Certificate Signing Request
#include <ArduinoECCX08.h>
#include <utility/ECCX08CSR.h>
#include <utility/ECCX08DefaultTLSConfig.h>
void setup() {
Serial.begin(9600);
while (!Serial);
if (!ECCX08.begin()) {
Serial.println("No ECCX08 present!");
while (1);
}
String serialNumber = ECCX08.serialNumber();
Serial.print("ECCX08 Serial Number = ");
Serial.println(serialNumber);
Serial.println();
if (!ECCX08.locked()) {
String lock = promptAndReadLine("The ECCX08 on your board is not locked, would you like to PERMANENTLY configure and lock it now? (y/N)", "N");
lock.toLowerCase();
if (!lock.startsWith("y")) {
Serial.println("Unfortunately you can't proceed without locking it :(");
while (1);
}
if (!ECCX08.writeConfiguration(ECCX08_DEFAULT_TLS_CONFIG)) {
Serial.println("Writing ECCX08 configuration failed!");
while (1);
}
if (!ECCX08.lock()) {
Serial.println("Locking ECCX08 configuration failed!");
while (1);
}
Serial.println("ECCX08 locked successfully");
Serial.println();
}
Serial.println("Hi there, in order to generate a new CSR for your board, we'll need the following information ...");
Serial.println();
String country = promptAndReadLine("Country Name (2 letter code)", "");
String stateOrProvince = promptAndReadLine("State or Province Name (full name)", "");
String locality = promptAndReadLine("Locality Name (eg, city)", "");
String organization = promptAndReadLine("Organization Name (eg, company)", "");
String organizationalUnit = promptAndReadLine("Organizational Unit Name (eg, section)", "");
String common = promptAndReadLine("Common Name (e.g. server FQDN or YOUR name)", serialNumber.c_str());
String slot = promptAndReadLine("What slot would you like to use? (0 - 4)", "0");
String generateNewKey = promptAndReadLine("Would you like to generate a new private key? (Y/n)", "Y");
Serial.println();
generateNewKey.toLowerCase();
if (!ECCX08CSR.begin(slot.toInt(), generateNewKey.startsWith("y"))) {
Serial.println("Error starting CSR generation!");
while (1);
}
ECCX08CSR.setCountryName(country);
ECCX08CSR.setStateProvinceName(stateOrProvince);
ECCX08CSR.setLocalityName(locality);
ECCX08CSR.setOrganizationName(organization);
ECCX08CSR.setOrganizationalUnitName(organizationalUnit);
ECCX08CSR.setCommonName(common);
String csr = ECCX08CSR.end();
if (!csr) {
Serial.println("Error generating CSR!");
while (1);
}
Serial.println("Here's your CSR, enjoy!");
Serial.println();
Serial.println(csr);
}
void loop() {
// do nothing
}
String promptAndReadLine(const char* prompt, const char* defaultValue) {
Serial.print(prompt);
Serial.print(" [");
Serial.print(defaultValue);
Serial.print("]: ");
String s = readLine();
if (s.length() == 0) {
s = defaultValue;
}
Serial.println(s);
return s;
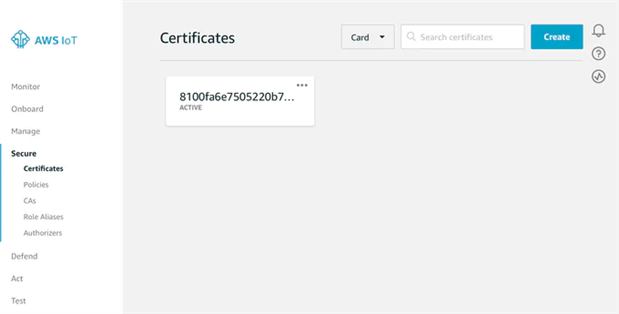
}The CSR generated by this sketch is set in slot 0 of ECC608A, the value shall be copied to txt file and upload to AWS

make it valid in AWS IoT Core
Basic knowldge on cipher and decipher is required before download this binary file into Nano 33 IoT. The extra effort is needed in complex - dangerous cyberNet. Even Tesla was hacked in a Hack Show remotely without touch anypart of the Car, starting the engine just outside the cabine. The bug is fixed, and hacker team swips off so-called 1-million bonus. But who knows what is next bug.
4 Application in AWS IoT
This is one example on AWS IoT wifi with secret data below, CSR sall be same as what uploaded to AWS IoT core,
// Fill in  your WiFi networks SSID and password
#define SECRET_SSID ""
#define SECRET_PASS ""


// Fill in the hostname of your AWS IoT broker
#define SECRET_BROKER "xxxxxxxxxxxxxx.iot.xx-xxxx-x.amazonaws.com"


// Fill in the boards public certificate
const char SECRET_CERTIFICATE[] = R"(
-----BEGIN CERTIFICATE-----


-----END CERTIFICATE-----
)";
Here is the sketch, sslClient.setEccSlot(0, certificate) set the CSR for AWS IoT to run.
#include <ArduinoBearSSL.h>
#include <ArduinoECCX08.h>
#include <ArduinoMqttClient.h>
#include <WiFiNINA.h> // change to #include <WiFi101.h> for MKR1000


#include "arduino_secrets.h"


/////// Enter your sensitive data in arduino_secrets.h
const char ssid[]        = SECRET_SSID;
const char pass[]        = SECRET_PASS;
const char broker[]      = SECRET_BROKER;
const char* certificate  = SECRET_CERTIFICATE;


WiFiClient    wifiClient;            // Used for the TCP socket connection
BearSSLClient sslClient(wifiClient); // Used for SSL/TLS connection, integrates with ECC508
MqttClient    mqttClient(sslClient);


unsigned long lastMillis = 0;


void setup() {
  Serial.begin(115200);
  while (!Serial);


  if (!ECCX08.begin()) {
    Serial.println("No ECCX08 present!");
    while (1);
  }


  // Set a callback to get the current time
  // used to validate the servers certificate
  ArduinoBearSSL.onGetTime(getTime);


  // Set the ECCX08 slot to use for the private key
  // and the accompanying public certificate for it
  sslClient.setEccSlot(0, certificate);


  // Optional, set the client id used for MQTT,
  // each device that is connected to the broker
  // must have a unique client id. The MQTTClient will generate
  // a client id for you based on the millis() value if not set
  //
  // mqttClient.setId("clientId");


  // Set the message callback, this function is
  // called when the MQTTClient receives a message
  mqttClient.onMessage(onMessageReceived);
}


void loop() {
  if (WiFi.status() != WL_CONNECTED) {
    connectWiFi();
  }


  if (!mqttClient.connected()) {
    // MQTT client is disconnected, connect
    connectMQTT();
  }


  // poll for new MQTT messages and send keep alives
  mqttClient.poll();


  // publish a message roughly every 5 seconds.
  if (millis() - lastMillis > 5000) {
    lastMillis = millis();


    publishMessage();
  }
}


unsigned long getTime() {
  // get the current time from the WiFi module
  return WiFi.getTime();
}


void connectWiFi() {
  Serial.print("Attempting to connect to SSID: ");
  Serial.print(ssid);
  Serial.print(" ");


  while (WiFi.begin(ssid, pass) != WL_CONNECTED) {
    // failed, retry
    Serial.print(".");
    delay(5000);
  }
  Serial.println();


  Serial.println("You're connected to the network");
  Serial.println();
}


void connectMQTT() {
  Serial.print("Attempting to MQTT broker: ");
  Serial.print(broker);
  Serial.println(" ");


  while (!mqttClient.connect(broker, 8883)) {
    // failed, retry
    Serial.print(".");
    delay(5000);
  }
  Serial.println();


  Serial.println("You're connected to the MQTT broker");
  Serial.println();


  // subscribe to a topic
  mqttClient.subscribe("arduino/incoming");
}


void publishMessage() {
  Serial.println("Publishing message");


  // send message, the Print interface can be used to set the message contents
  mqttClient.beginMessage("arduino/outgoing");
  mqttClient.print("hello ");
  mqttClient.print(millis());
  mqttClient.endMessage();
}


void onMessageReceived(int messageSize) {
  // we received a message, print out the topic and contents
  Serial.print("Received a message with topic '");
  Serial.print(mqttClient.messageTopic());
  Serial.print("', length ");
  Serial.print(messageSize);
  Serial.println(" bytes:");


  // use the Stream interface to print the contents
  while (mqttClient.available()) {
    Serial.print((char)mqttClient.read());
  }
  Serial.println();


  Serial.println();
}
5 Summary
The security are especially important in billions of IoT node in the future. Reliable security solution is Out of question a must-choice later. Great news from arduino is that Nano 33 IoT is ready for the future.