element14 Community
element14 Community
    Register Log In
  • Site
  • Search
  • Log In Register
  • Community Hub
    Community Hub
    • What's New on element14
    • Feedback and Support
    • Benefits of Membership
    • Personal Blogs
    • Members Area
    • Achievement Levels
  • Learn
    Learn
    • Ask an Expert
    • eBooks
    • element14 presents
    • Learning Center
    • Tech Spotlight
    • STEM Academy
    • Webinars, Training and Events
    • Learning Groups
  • Technologies
    Technologies
    • 3D Printing
    • FPGA
    • Industrial Automation
    • Internet of Things
    • Power & Energy
    • Sensors
    • Technology Groups
  • Challenges & Projects
    Challenges & Projects
    • Design Challenges
    • element14 presents Projects
    • Project14
    • Arduino Projects
    • Raspberry Pi Projects
    • Project Groups
  • Products
    Products
    • Arduino
    • Avnet & Tria Boards Community
    • Dev Tools
    • Manufacturers
    • Multicomp Pro
    • Product Groups
    • Raspberry Pi
    • RoadTests & Reviews
  • About Us
  • Store
    Store
    • Visit Your Store
    • Choose another store...
      • Europe
      •  Austria (German)
      •  Belgium (Dutch, French)
      •  Bulgaria (Bulgarian)
      •  Czech Republic (Czech)
      •  Denmark (Danish)
      •  Estonia (Estonian)
      •  Finland (Finnish)
      •  France (French)
      •  Germany (German)
      •  Hungary (Hungarian)
      •  Ireland
      •  Israel
      •  Italy (Italian)
      •  Latvia (Latvian)
      •  
      •  Lithuania (Lithuanian)
      •  Netherlands (Dutch)
      •  Norway (Norwegian)
      •  Poland (Polish)
      •  Portugal (Portuguese)
      •  Romania (Romanian)
      •  Russia (Russian)
      •  Slovakia (Slovak)
      •  Slovenia (Slovenian)
      •  Spain (Spanish)
      •  Sweden (Swedish)
      •  Switzerland(German, French)
      •  Turkey (Turkish)
      •  United Kingdom
      • Asia Pacific
      •  Australia
      •  China
      •  Hong Kong
      •  India
      • Japan
      •  Korea (Korean)
      •  Malaysia
      •  New Zealand
      •  Philippines
      •  Singapore
      •  Taiwan
      •  Thailand (Thai)
      • Vietnam
      • Americas
      •  Brazil (Portuguese)
      •  Canada
      •  Mexico (Spanish)
      •  United States
      Can't find the country/region you're looking for? Visit our export site or find a local distributor.
  • Translate
  • Profile
  • Settings
Design For A Cause 2021
  • Challenges & Projects
  • Design Challenges
  • Design For A Cause 2021
  • More
  • Cancel
Design For A Cause 2021
Blog Desktop Merry-go-round #3 Use Wifi to  control on-board led.
  • Blog
  • Forum
  • Documents
  • Polls
  • Files
  • Mentions
  • Sub-Groups
  • Tags
  • More
  • Cancel
  • New
  • Share
  • More
  • Cancel
Group Actions
  • Group RSS
  • More
  • Cancel
Engagement
  • Author Author: fyaocn
  • Date Created: 24 May 2021 8:21 AM Date Created
  • Views 438 views
  • Likes 3 likes
  • Comments 0 comments
Related
Recommended

Desktop Merry-go-round #3 Use Wifi to  control on-board led.

fyaocn
fyaocn
24 May 2021

        • 1 Introduction
        • 2 The http server
        • 3 Control LED
        • 4 Running on Board
        • 5 Summary

1 Introduction

There have been several remote control choice for Nano 33 IoT, like MQTT, AWS IoT things. But the quick choice is using wifi library to make it work.

Make simple http server running on board. Control or read data from Nano 33 IoT would be much easier.

2 The http server

Http server is complex. But simple http server only parse raw strings, detect what in this connection from HTML head as "Content-type:text/html". The body of html would be sent to http client and resolved accordingly. Use brower like Edge or Chrome as quick connect solution.

For large file like voice or image, UDP transmission can work within 256 byte fairly well. I have tried with voice sampling, but the time-splice could not be controlled precisely, the voice is distorted. I have to put away this idea for the moment.

Voice control from mobile phone, then send the control command directly.


3 Control LED

The onboard control use "digitalwrite"

Send commmand with HTTP GET command , that is not enscripted. So, use this choice only in safe network.


4 Running on Board

Here is main part of  the code, auxiliary component can be controlled within the

void printGoAround(int merryOn) {
  
  digitalWrite(motorPin, merryOn);             
  digitalWrite(vocalPin, merryOn);        
  digitalWrite(blinkingPin, merryOn);        
}

to control motor and Beeper for musice and led for background light,

void setup() {
  Serial.begin(9600);      // initialize serial communication
  pinMode(13, OUTPUT);      // set the LED pin mode
  pinMode(motorPin, OUTPUT);      // set the motorPin pin mode
  pinMode(vocalPin, OUTPUT);      // set the vocalPin pin mode
  pinMode(blinkingPin, OUTPUT);      // set the blinkingPin pin mode


  // check for the WiFi module:
  if (WiFi.status() == WL_NO_MODULE) {
    Serial.println("Communication with WiFi module failed!");
    // don't continue
    while (true);
  }


  String fv = WiFi.firmwareVersion();
  if (fv < WIFI_FIRMWARE_LATEST_VERSION) {
    Serial.println("Please upgrade the firmware");
  }


  // attempt to connect to WiFi network:
  while (status != WL_CONNECTED) {
    Serial.print("Attempting to connect to Network named: ");
    Serial.println(ssid);                   // print the network name (SSID);


    // Connect to WPA/WPA2 network. Change this line if using open or WEP network:
    status = WiFi.begin(ssid, pass);
    // wait 10 seconds for connection:
    delay(10000);
  }
  server.begin();                           // start the web server on port 80
  printWifiStatus();                        // you're connected now, so print out the status
}


void loop() {
  WiFiClient client = server.available();   // listen for incoming clients


  if (client) {                             // if you get a client,
    Serial.println("new client");           // print a message out the serial port
    String currentLine = "";                // make a String to hold incoming data from the client
    while (client.connected()) {            // loop while the client's connected
      if (client.available()) {             // if there's bytes to read from the client,
        char c = client.read();             // read a byte, then
        Serial.write(c);                    // print it out the serial monitor
        if (c == '\n') {                    // if the byte is a newline character


          // if the current line is blank, you got two newline characters in a row.
          // that's the end of the client HTTP request, so send a response:
          if (currentLine.length() == 0) {
            // HTTP headers always start with a response code (e.g. HTTP/1.1 200 OK)
            // and a content-type so the client knows what's coming, then a blank line:
            client.println("HTTP/1.1 200 OK");
            client.println("Content-type:text/html");
            client.println();


            // the content of the HTTP response follows the header:
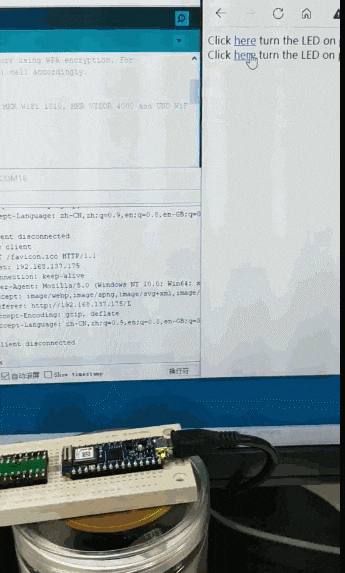
            client.print("Click <a href=\"/H\">here</a> turn the LED on pin 13 on<br>");
            client.print("Click <a href=\"/L\">here</a> turn the LED on pin 13 off<br>");


            // The HTTP response ends with another blank line:
            client.println();
            // break out of the while loop:
            break;
          } else {    // if you got a newline, then clear currentLine:
            currentLine = "";
          }
        } else if (c != '\r') {  // if you got anything else but a carriage return character,
          currentLine += c;      // add it to the end of the currentLine
        }


        // Check to see if the client request was "GET /H" or "GET /L":
        if (currentLine.endsWith("GET /H")) {
          digitalWrite(13, HIGH);               // GET /H turns the LED on
          printGoAround(HIGH) ;
          
        }
        if (currentLine.endsWith("GET /L")) {
          digitalWrite(13, LOW);                // GET /L turns the LED off
          printGoAround(LOW) ;
        }
      }
    }
    // close the connection:
    client.stop();
    Serial.println("client disconnected");
  }
}

as in

image


With gif

image


5 Summary

This is remote control part, right motor control shall be used for this go around to Play.

  • Sign in to reply
element14 Community

element14 is the first online community specifically for engineers. Connect with your peers and get expert answers to your questions.

  • Members
  • Learn
  • Technologies
  • Challenges & Projects
  • Products
  • Store
  • About Us
  • Feedback & Support
  • FAQs
  • Terms of Use
  • Privacy Policy
  • Legal and Copyright Notices
  • Sitemap
  • Cookies

An Avnet Company © 2025 Premier Farnell Limited. All Rights Reserved.

Premier Farnell Ltd, registered in England and Wales (no 00876412), registered office: Farnell House, Forge Lane, Leeds LS12 2NE.

ICP 备案号 10220084.

Follow element14

  • X
  • Facebook
  • linkedin
  • YouTube