element14 Community
element14 Community
    Register Log In
  • Site
  • Search
  • Log In Register
  • Community Hub
    Community Hub
    • What's New on element14
    • Feedback and Support
    • Benefits of Membership
    • Personal Blogs
    • Members Area
    • Achievement Levels
  • Learn
    Learn
    • Ask an Expert
    • eBooks
    • element14 presents
    • Learning Center
    • Tech Spotlight
    • STEM Academy
    • Webinars, Training and Events
    • Learning Groups
  • Technologies
    Technologies
    • 3D Printing
    • FPGA
    • Industrial Automation
    • Internet of Things
    • Power & Energy
    • Sensors
    • Technology Groups
  • Challenges & Projects
    Challenges & Projects
    • Design Challenges
    • element14 presents Projects
    • Project14
    • Arduino Projects
    • Raspberry Pi Projects
    • Project Groups
  • Products
    Products
    • Arduino
    • Avnet Boards Community
    • Dev Tools
    • Manufacturers
    • Multicomp Pro
    • Product Groups
    • Raspberry Pi
    • RoadTests & Reviews
  • Store
    Store
    • Visit Your Store
    • Choose another store...
      • Europe
      •  Austria (German)
      •  Belgium (Dutch, French)
      •  Bulgaria (Bulgarian)
      •  Czech Republic (Czech)
      •  Denmark (Danish)
      •  Estonia (Estonian)
      •  Finland (Finnish)
      •  France (French)
      •  Germany (German)
      •  Hungary (Hungarian)
      •  Ireland
      •  Israel
      •  Italy (Italian)
      •  Latvia (Latvian)
      •  
      •  Lithuania (Lithuanian)
      •  Netherlands (Dutch)
      •  Norway (Norwegian)
      •  Poland (Polish)
      •  Portugal (Portuguese)
      •  Romania (Romanian)
      •  Russia (Russian)
      •  Slovakia (Slovak)
      •  Slovenia (Slovenian)
      •  Spain (Spanish)
      •  Sweden (Swedish)
      •  Switzerland(German, French)
      •  Turkey (Turkish)
      •  United Kingdom
      • Asia Pacific
      •  Australia
      •  China
      •  Hong Kong
      •  India
      •  Korea (Korean)
      •  Malaysia
      •  New Zealand
      •  Philippines
      •  Singapore
      •  Taiwan
      •  Thailand (Thai)
      • Americas
      •  Brazil (Portuguese)
      •  Canada
      •  Mexico (Spanish)
      •  United States
      Can't find the country/region you're looking for? Visit our export site or find a local distributor.
  • Translate
  • Profile
  • Settings
Design for a Cause - Design Challenge
  • Challenges & Projects
  • Design Challenges
  • Design for a Cause - Design Challenge
  • More
  • Cancel
Design for a Cause - Design Challenge
Blog Audio4Vision #7 - The ArduCAM Mini OV2640 2MP and saving images to SD card
  • Blog
  • Forum
  • Documents
  • Polls
  • Files
  • Events
  • Mentions
  • Sub-Groups
  • Tags
  • More
  • Cancel
  • New
  • Share
  • More
  • Cancel
Group Actions
  • Group RSS
  • More
  • Cancel
Engagement
  • Author Author: pranjalranjan299
  • Date Created: 10 Sep 2018 2:02 AM Date Created
  • Views 4039 views
  • Likes 3 likes
  • Comments 7 comments
  • ardexpert
Related
Recommended

Audio4Vision #7 - The ArduCAM Mini OV2640 2MP and saving images to SD card

pranjalranjan299
pranjalranjan299
10 Sep 2018

Welcome to our seventh blog post! We are back with our newest camera module from ArduCAM which is a cracking improvement over the OV7670 that we used for testing the Deep Learning model in the last blog post.


image
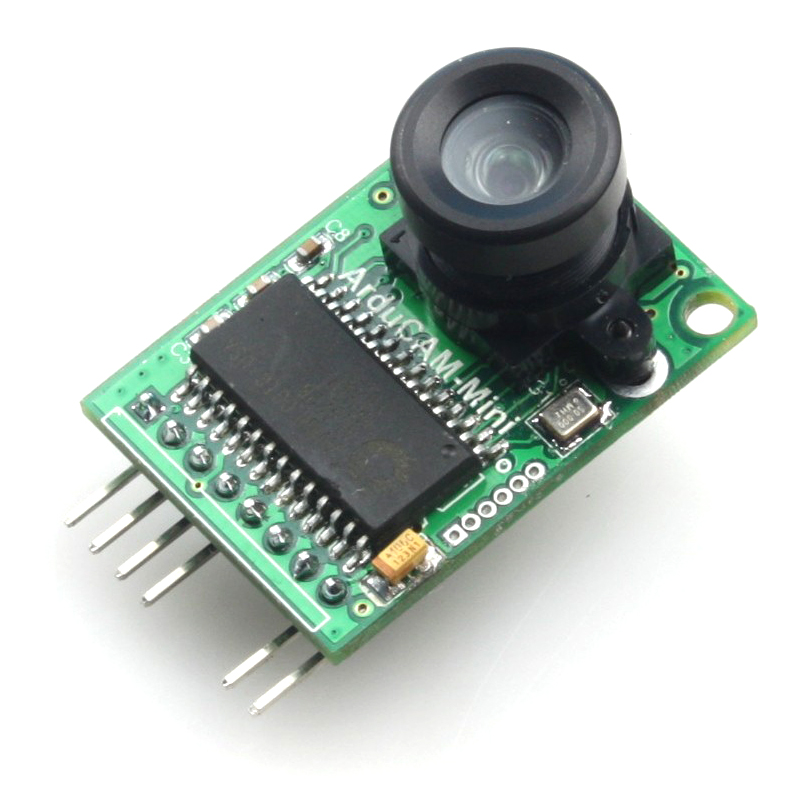
This is called
the ArduCAM Mini 2MP which is technically a shield housing the OV2640, a 2 MP image sensor that would normally come with 16 pins on its own without the shield. The advantage of this shield is that it simplifies the number of pins of the module to just 6 from the above mentioned 16, and hence simplifies I/O operations brilliantly with easily available open source code to run it on many different platforms including Arduino and RPi boards. Special shoutout to Jason Perry from Nova Scotia, an old friend who was kind enough to sponsor this camera sensor and the speaker that we are going to use later for the audio output. Thanks a lot, mate!


This camera roughly costs about 45$ as we had to get it imported from the actual manufacturer ArduCAM to get it.  That's also the reason why it took so much time for us to get our hands on this module, exactly 30 days from the date of ordering. So this caused a lot of delay in our blog posts, hope that we're not too late and we can cover up lost time very quickly.


So let's get down to business, we intend on getting our hands dirty in this blog post. The aim of this blog post is to get the ArduCAM Mini 2MP running with our MKR1000 and for it to run along with the SD Proto Shield to save images into an SD card. So let's get started with it!


Let us start by providing some insight about ArduCAM - it is a startup company dedicated to open source hardware and software designing and manufacturing from China, especially for Arduino, Raspberry Pi camera solutions. It provides easy plug and play solutions for various boards and easily available library support on GitHub. It has camera sensors ranging from the 0.3 MP OV7670 to 8MP image sensors for RPi platform. Here we have chosen a 2 MP camera because it is optimal for our MKR1000 which will handle the tasks of saving images to SD card and also transmitting them to the model. A 5 MP is bound to get overbearing on the MKR1000 and it will also cause overheating.


The libraries for interfacing ArduCAMs with various platforms is available here - https://github.com/ArduCAM . We have used the library and examples for the Arduino boards stored in the first repository. The Arduino ArduCAM library has been tested for platforms like Uno, Nano, Mega etc but it is not preconfigured for our MKR1000. So it doesn't work without a slight modification in the code. The block of code required to be added to ArduCAM.h is -


#define MKR1000 1
#if defined(MKR1000)
 #define cbi(reg, bitmask) digitalWrite(bitmask, LOW)
 #define sbi(reg, bitmask) digitalWrite(bitmask, HIGH)
 #define pulse_high(reg, bitmask) sbi(reg, bitmask); cbi(reg, bitmask);
 #define pulse_low(reg, bitmask) cbi(reg, bitmask); sbi(reg, bitmask);
 
 #define cport(port, data) port &= data
 #define sport(port, data) port |= data
 
 #define swap(type, i, j) {type t = i; i = j; j = t;}
 
 #define fontbyte(x) cfont.font[x]  
 
 #define regtype volatile uint32_t
 #define regsize uint32_t
#endif


Next we have to connect the ArduCAM Mini 2 MP with the MKR1000 according to the following pin diagram -

The SD proto shield is also connected to store the images in the SD card card, for which the chip select is 4 (D4).


image


image


image

The next step is to connect the MKR1000 to our PC and upload the following code taken from the official ArduCAM library examples to save image to SD card -


#include <ArduCAM.h>
#include <Wire.h>
#include <SPI.h>
#include <SD.h>
#include "memorysaver.h"
//This demo can only work on OV2640_MINI_2MP or OV5642_MINI_5MP or OV5642_MINI_5MP_BIT_ROTATION_FIXED platform.
#if !(defined OV5642_MINI_5MP || defined OV5642_MINI_5MP_BIT_ROTATION_FIXED || defined OV2640_MINI_2MP || defined OV3640_MINI_3MP)
  #error Please select the hardware platform and camera module in the ../libraries/ArduCAM/memorysaver.h file
#endif
#define SD_CS 4
const int SPI_CS = 0;
#if defined (OV2640_MINI_2MP)
  ArduCAM myCAM( OV2640, SPI_CS );
#elif defined (OV3640_MINI_3MP)
  ArduCAM myCAM( OV3640, SPI_CS );
#else
  ArduCAM myCAM( OV5642, SPI_CS );
#endif


void myCAMSaveToSDFile(){
char str[8];
byte buf[256];
static int i = 0;
static int k = 0;
uint8_t temp = 0,temp_last=0;
uint32_t length = 0;
bool is_header = false;
File outFile;
//Flush the FIFO
myCAM.flush_fifo();
//Clear the capture done flag
myCAM.clear_fifo_flag();
//Start capture
myCAM.start_capture();
Serial.println(F("start Capture"));
while(!myCAM.get_bit(ARDUCHIP_TRIG , CAP_DONE_MASK));
Serial.println(F("Capture Done."));  
length = myCAM.read_fifo_length();
Serial.print(F("The fifo length is :"));
Serial.println(length, DEC);
if (length >= MAX_FIFO_SIZE) //384K
{
  Serial.println(F("Over size."));
  return ;
}
if (length == 0 ) //0 kb
{
  Serial.println(F("Size is 0."));
  return ;
}
//Construct a file name
k = k + 1;
itoa(k, str, 10);
strcat(str, ".jpg");
//Open the new file
outFile = SD.open(str, O_WRITE | O_CREAT | O_TRUNC);
if(!outFile){
  Serial.println(F("File open faild"));
  return;
}
myCAM.CS_LOW();
myCAM.set_fifo_burst();
while ( length-- )
{
  temp_last = temp;
  temp =  SPI.transfer(0x00);
  //Read JPEG data from FIFO
  if ( (temp == 0xD9) && (temp_last == 0xFF) ) //If find the end ,break while,
  {
    buf[i++] = temp;  //save the last  0XD9     
    //Write the remain bytes in the buffer
    myCAM.CS_HIGH();
    outFile.write(buf, i);    
    //Close the file
    outFile.close();
    Serial.println(F("Image save OK."));
    is_header = false;
    i = 0;
  }  
  if (is_header == true)
  { 
    //Write image data to buffer if not full
    if (i < 256)
    buf[i++] = temp;
    else
    {
      //Write 256 bytes image data to file
      myCAM.CS_HIGH();
      outFile.write(buf, 256);
      i = 0;
      buf[i++] = temp;
      myCAM.CS_LOW();
      myCAM.set_fifo_burst();
    }        
  }
  else if ((temp == 0xD8) & (temp_last == 0xFF))
  {
    is_header = true;
    buf[i++] = temp_last;
    buf[i++] = temp;   
  } 
} 
}


void setup(){
uint8_t vid, pid;
uint8_t temp;
Wire.begin();
Serial.begin(115200);
Serial.println(F("ArduCAM Start!"));
//set the CS as an output:
pinMode(SPI_CS,OUTPUT);
digitalWrite(SPI_CS, HIGH);
// initialize SPI:
SPI.begin();
  
//Reset the CPLD
myCAM.write_reg(0x07, 0x80);
delay(100);
myCAM.write_reg(0x07, 0x00);
delay(100);
  
while(1){
  //Check if the ArduCAM SPI bus is OK
  myCAM.write_reg(ARDUCHIP_TEST1, 0x55);
  temp = myCAM.read_reg(ARDUCHIP_TEST1);
  
  if (temp != 0x55){
    Serial.println(F("SPI interface Error!"));
    delay(1000);continue;
  }else{
    Serial.println(F("SPI interface OK."));break;
  }
}
//Initialize SD Card
while(!SD.begin(SD_CS)){
  Serial.println(F("SD Card Error!"));delay(1000);
}
Serial.println(F("SD Card detected."));


#if defined (OV2640_MINI_2MP)
  while(1){
    //Check if the camera module type is OV2640
    myCAM.wrSensorReg8_8(0xff, 0x01);
    myCAM.rdSensorReg8_8(OV2640_CHIPID_HIGH, &vid);
    myCAM.rdSensorReg8_8(OV2640_CHIPID_LOW, &pid);
    if ((vid != 0x26 ) && (( pid != 0x41 ) || ( pid != 0x42 ))){
      Serial.println(F("Can't find OV2640 module!"));
      delay(1000);continue;
    }
    else{
      Serial.println(F("OV2640 detected."));break;
    } 
  }
#elif defined (OV3640_MINI_3MP)
  while(1){
    //Check if the camera module type is OV3640
    myCAM.rdSensorReg16_8(OV3640_CHIPID_HIGH, &vid);
    myCAM.rdSensorReg16_8(OV3640_CHIPID_LOW, &pid);
    if ((vid != 0x36) || (pid != 0x4C)){
      Serial.println(F("Can't find OV3640 module!"));
      delay(1000);continue; 
    }else{
      Serial.println(F("OV3640 detected."));break;    
    }
 } 
#else
  while(1){
    //Check if the camera module type is OV5642
    myCAM.wrSensorReg16_8(0xff, 0x01);
    myCAM.rdSensorReg16_8(OV5642_CHIPID_HIGH, &vid);
    myCAM.rdSensorReg16_8(OV5642_CHIPID_LOW, &pid);
    if((vid != 0x56) || (pid != 0x42)){
      Serial.println(F("Can't find OV5642 module!"));
      delay(1000);continue;
    }
    else{
      Serial.println(F("OV5642 detected."));break;
    } 
  }
#endif
myCAM.set_format(JPEG);
myCAM.InitCAM();
#if defined (OV2640_MINI_2MP)
  myCAM.OV2640_set_JPEG_size(OV2640_1024x768);
#elif defined (OV3640_MINI_3MP)
  myCAM.OV3640_set_JPEG_size(OV3640_320x240);
#else
  myCAM.write_reg(ARDUCHIP_TIM, VSYNC_LEVEL_MASK);   //VSYNC is active HIGH
  myCAM.OV5642_set_JPEG_size(OV5642_320x240);
#endif
delay(1000);
}
void loop(){
myCAMSaveToSDFile();
delay(8000);
}
'


After this, we open the serial monitor to see the following information


image

As we can see, the serial monitor displays the initial set up completion of ArduCAM and detects the SD card along with it, then it goes ahead to to capture pictures in it's fifo. The fifo is ArduCAM's memory which is 384K in our ArduCAM Mini 2MP module. You can see the set of pictures saved in the SD card below -


image


Some of the images taken by our module -


image

image


Thanks for reading this blog. The next one is coming up soon!

  • Sign in to reply

Top Comments

  • pranjalranjan299
    pranjalranjan299 over 6 years ago in reply to stephalene14 +1
    This configuration worked for us as you can see in the images that are of the working ArduCam with the MKR1000 and also the rest of our project was built on this which you can read about in our next blog…
  • pranjalranjan299
    pranjalranjan299 over 6 years ago in reply to stephalene14 +1
    As far as I can remember, I have listed all the steps I used to get my camera working on the MKR1000. Perhaps you should try changing the female to male connectors as I had also got some issues that were…
  • zeuschang
    zeuschang over 6 years ago

    image

    • Cancel
    • Vote Up 0 Vote Down
    • Sign in to reply
    • More
    • Cancel
  • zeuschang
    zeuschang over 6 years ago

    Sir please help me. I have an error: "File open failed" after capturing the image. Can you please help me what is wrong?

    • Cancel
    • Vote Up 0 Vote Down
    • Sign in to reply
    • More
    • Cancel
  • stephalene14
    stephalene14 over 6 years ago in reply to pranjalranjan299

    Will do. Thank you so much for your help.

    • Cancel
    • Vote Up 0 Vote Down
    • Sign in to reply
    • More
    • Cancel
  • pranjalranjan299
    pranjalranjan299 over 6 years ago in reply to stephalene14

    As far as I can remember, I have listed all the steps I used to get my camera working on the MKR1000. Perhaps you should try changing the female to male connectors as I had also got some issues that were resolved after I changed the wires. Also I used to shuffle between the power pins so you could try that too. But if the error is showing in SPI then it probably has got something to do with the pins on the ArduCAM. I would recommend you to post an issue on the GitHub page of ArduCAM, they are really quick in responding and perhaps can offer more help with regards to ArduCAM. In my experience, the ArduCAM interfacing used to fall apart just out of luck sometimes while with the same wiring and code it would work at some other time which I think is the problem with ArduCAM. Still I think you should be able to get it working with the code that I have used and also the modifications in the header file that I have explained. Try taking out the wires from ArduCAM, and putting them back in. And make sure you are correctly connecting the wires from the circuit diagram I have posted.

    • Cancel
    • Vote Up +1 Vote Down
    • Sign in to reply
    • More
    • Cancel
  • stephalene14
    stephalene14 over 6 years ago in reply to pranjalranjan299

    Thank you for the reply. I have tried all the digital pins from D0-D7 and still having the same error. Here is the code that I have altered from the code you provided. Hopefully you can help me with the error. Thank you so much for your help.


    #include <ArduCAM.h> 

    #include <Wire.h> 

    #include <SPI.h>   

    #include "memorysaver.h" 


    const int SPI_CS = 0; 

    #if defined (OV2640_MINI_2MP) 

      ArduCAM myCAM( OV2640, SPI_CS ); 

    #elif defined (OV3640_MINI_3MP) 

      ArduCAM myCAM( OV3640, SPI_CS ); 

    #else 

      ArduCAM myCAM( OV5642, SPI_CS ); 

    #endif 


    void myCAMSaveToSDFile(){

    uint8_t temp = 0,temp_last=0; 

    uint32_t length = 0; 

    bool is_header = false;   

    //Flush the FIFO 

    myCAM.flush_fifo(); 

    //Clear the capture done flag 

    myCAM.clear_fifo_flag(); 

    //Start capture 

    myCAM.start_capture(); 

    Serial.println(F("start Capture")); 

    while(!myCAM.get_bit(ARDUCHIP_TRIG , CAP_DONE_MASK)); 

    Serial.println(F("Capture Done."));   

    length = myCAM.read_fifo_length(); 

    Serial.print(F("The fifo length is :")); 

    Serial.println(length, DEC); 

    if (length >= MAX_FIFO_SIZE) //384K 

    { 

      Serial.println(F("Over size.")); 

      return ; 

    } 

    if (length == 0 ) //0 kb 

    { 

      Serial.println(F("Size is 0.")); 

      return ; 

    } 


    myCAM.CS_LOW(); 

    myCAM.set_fifo_burst(); 

    while ( length-- ) 

    { 

      temp_last = temp; 

      temp =  SPI.transfer(0x00); 


    }  

    } 


    void setup(){ 

    uint8_t vid, pid; 

    uint8_t temp; 

    Wire.begin(); 

    Serial.begin(115200); 

    Serial.println(F("ArduCAM Start!")); 

    //set the CS as an output: 

    pinMode(SPI_CS,OUTPUT); 

    digitalWrite(SPI_CS, HIGH); 

    // initialize SPI: 

    SPI.begin(); 


    //Reset the CPLD 

    myCAM.write_reg(0x07, 0x80); 

    delay(100); 

    myCAM.write_reg(0x07, 0x00); 

    delay(100); 


    while(1){ 

      //Check if the ArduCAM SPI bus is OK 

      myCAM.write_reg(ARDUCHIP_TEST1, 0x55); 

      temp = myCAM.read_reg(ARDUCHIP_TEST1); 


      if (temp != 0x55){ 

        Serial.println(F("SPI interface Error!")); 

        delay(1000);continue; 

      }else{ 

        Serial.println(F("SPI interface OK."));break; 

      } 

    } 


    #if defined (OV2640_MINI_2MP) 

      while(1){ 

        //Check if the camera module type is OV2640 

        myCAM.wrSensorReg8_8(0xff, 0x01); 

        myCAM.rdSensorReg8_8(OV2640_CHIPID_HIGH, &vid); 

        myCAM.rdSensorReg8_8(OV2640_CHIPID_LOW, &pid); 

        if ((vid != 0x26 ) && (( pid != 0x41 ) || ( pid != 0x42 ))){ 

          Serial.println(F("Can't find OV2640 module!")); 

          delay(1000);continue; 

        } 

        else{ 

          Serial.println(F("OV2640 detected."));break; 

        }  

      } 

    #elif defined (OV3640_MINI_3MP) 

      while(1){ 

        //Check if the camera module type is OV3640 

        myCAM.rdSensorReg16_8(OV3640_CHIPID_HIGH, &vid); 

        myCAM.rdSensorReg16_8(OV3640_CHIPID_LOW, &pid); 

        if ((vid != 0x36) || (pid != 0x4C)){ 

          Serial.println(F("Can't find OV3640 module!")); 

          delay(1000);continue;  

        }else{ 

          Serial.println(F("OV3640 detected."));break;     

        } 

    }  

    #endif 

    myCAM.set_format(JPEG); 

    myCAM.InitCAM(); 

    #if defined (OV2640_MINI_2MP) 

      myCAM.OV2640_set_JPEG_size(OV2640_1024x768); 

    #elif defined (OV3640_MINI_3MP) 

      myCAM.OV3640_set_JPEG_size(OV3640_320x240); 

    #else 

      myCAM.write_reg(ARDUCHIP_TIM, VSYNC_LEVEL_MASK);   //VSYNC is active HIGH 

      myCAM.OV5642_set_JPEG_size(OV5642_320x240); 

    #endif 

    delay(1000); 

    } 

    void loop(){ 

    myCAMSaveToSDFile(); 

    delay(8000); 

    } 

    • Cancel
    • Vote Up 0 Vote Down
    • Sign in to reply
    • More
    • Cancel
>
element14 Community

element14 is the first online community specifically for engineers. Connect with your peers and get expert answers to your questions.

  • Members
  • Learn
  • Technologies
  • Challenges & Projects
  • Products
  • Store
  • About Us
  • Feedback & Support
  • FAQs
  • Terms of Use
  • Privacy Policy
  • Legal and Copyright Notices
  • Sitemap
  • Cookies

An Avnet Company © 2025 Premier Farnell Limited. All Rights Reserved.

Premier Farnell Ltd, registered in England and Wales (no 00876412), registered office: Farnell House, Forge Lane, Leeds LS12 2NE.

ICP 备案号 10220084.

Follow element14

  • X
  • Facebook
  • linkedin
  • YouTube