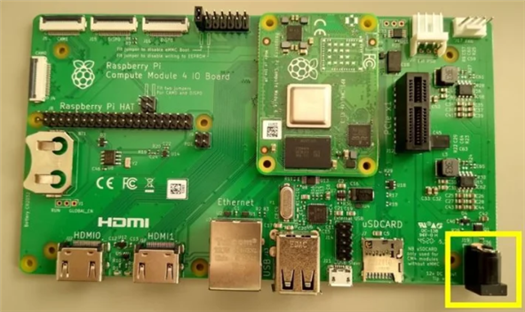
 The goal of this blog is to take a deep dive into the electronic parts supplied by Hammond for the challenge. Before I can use the parts for my project, I need to understand how the parts fit together. As part of a Design Challenge titled Experimenting with Extreme Environments, sponsored by Hammond Manufacturing, I submitted this extra credit blog. This is the 2nd blog in a series of extra credit blogs that cover topics of major steps taken to get to my final blog Final Results -- IoT Device Protection in Harsh Environments
Parts Description
Pi4 Compute Module
Pi4 Compute Module I/O Board
Display, Alphanumeric, 20X4
Antenna, WiFi, BLE, Thread, Wireless Hart, Zigbee
ADDITIONAL PART (Not Included in the challenge parts)
Enviro - Indoor Monitor (Pimoroni)
Getting to understand the Parts
Pi4 Compute Module
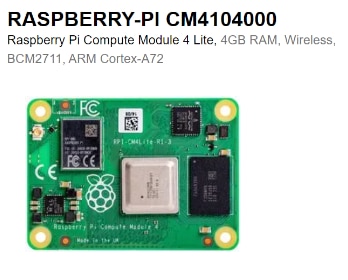
Taken from: Pi 4 Compute Module Datasheet
Part Number CM4004000
Wireless YES
RAM 4GB
eMMC 0GB (Lite)
Price* $45
Product Overview
COMPUTE MODULE 4 is built on the 64-bit quad-core BCM2711 application processor. The Compute Module 4 delivers a step change in performance over its predecessors such as faster CPU cores, better multimedia, more interfacing capabilities.
Features
-
- 4GB RAM
- 0GB(Lite) eMMC storage
- VideoCore IV graphics, supporting OpenGL ES 3.x
- 4Kp60 hardware decode of H.265 (HEVC) video
- 1080p60 hardware decode and 1080p30 hardware encode of H.264 (AVC) video
- Dual HDMI interfaces, at resolutions up to 4K
- Single-lane PCI Express 2.0 interface
- Dual MIPI DSI display, and dual MIPI CSI-2 camera interfaces
- Gigabit Ethernet PHY with IEEE 1588 support
- 28 GPIO pins, with up to 6 x UART, 6 x I2C and 5 x SPI
- 55mm x 40mm board size
Wireless Connectivity
The compute module has a Wireless chip and external antenna and an onboarding Center. I have the onboard antenna working now with you on board antenna. I plan to use the system as a headless server. What that means is that I will use another system running a Terminal emulation (Putty), connected to it to run programs. The development will be done using the SD card OS with the Desktop and the Display, keyboard, and mouse connected.as a development platform. Then to deploy the test I will use the Headless server
0GB(Lite) eMMC storage
What does “eMMC 0GB (Lite)” mean?
The answer is that there is no need to do the boot fix before flashing the OS. The module supplied comes with OGB of storage on the eMMC. And is referred to as CM4Lite in the documentation. The upside of this is that Is easier to flash the OS on the SD card as on other Raspberry PI’s. Other models can come with 8, 6 or 32 GB on the eMMC. The downside of 0GB on the EMMC is that you boot the OS off the SD card as opposed to memory on the EMMC, which has performance enhancements as described below.
- The eMMC (embedded MultiMediaCard) storage is a key feature of the Raspberry Pi Compute Module 4:
- Faster storage than microSD cards: The eMMC storage on the CM4 is much faster than typical microSD cards used with regular Raspberry Pi boards. It provides significantly better random I/O performance, which is important for most computing tasks.
- Built-in non-volatile storage: The eMMC is integrated directly onto the Compute Module 4 board, providing built-in non-volatile storage without the need for a separate microSD card.
- Customizable storage capacity: Depending on the specific CM4 variant, users can choose eMMC storage capacities ranging from 8GB to 32GB, allowing them to select the right storage size for their needs.
- Easier to use than microSD: Flashing an operating system onto the eMMC is a bit more involved than using a microSD card, but the Raspberry Pi Foundation provides tools to simplify the process.
CM4IO – Pi4 Compute Module I/O Board
Taken from: Pi 4 Compute Module I/O Board Datasheet
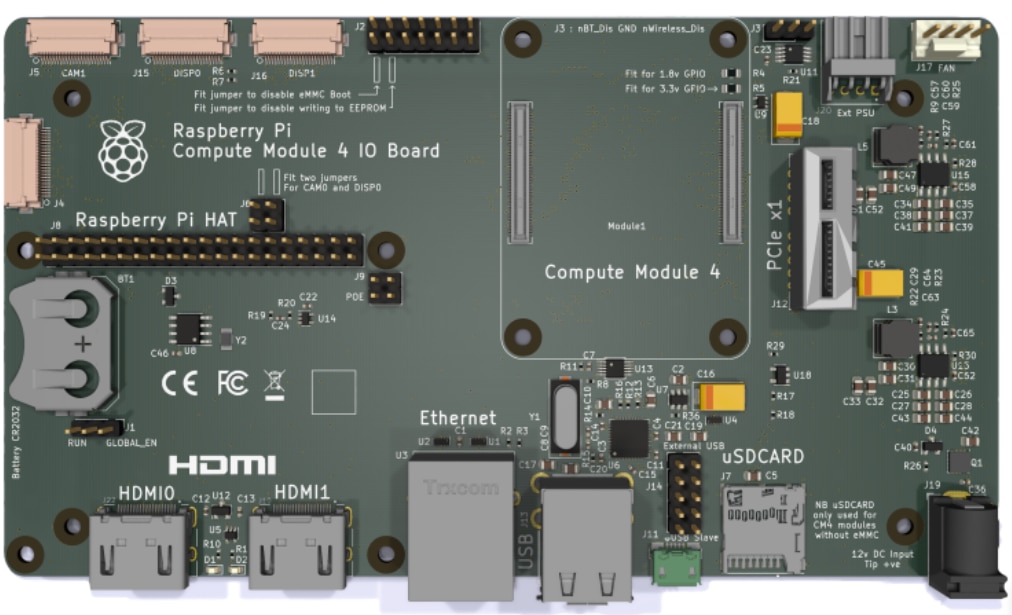
- The Raspberry Pi Compute Module 4 IO Board (CM4IO) supports product development that utilizes the Raspberry Pi Compute Module 4.
- The CM4IO comprises many interfaces similar to the Raspberry Pi 4, Model B. Refer to the Raspberry Pi 4, Model B documentation for general usage.
- The key difference between CM4IO and Raspberry Pi 4, Model B lies in the inclusion of a single PCIe socket.
- The CM4IO serves as both a reference design for CM4 and as a standalone product, with the option to add PCIe Cards and Raspberry Pi HATs.
Features
- Accepts the complete range of CM4 modules
- External +12V PSU
- 2 × Full-size HDMI 2.0 connectors
- Gigabit Ethernet RJ45 with POE support
- 2 × USB 2 Socket, with header for two more sockets
- Micro USB socket for updating the CM4
- Micro SD Card socket for CM4Lite modules.
- PCIe Gen 2 socket
- Standard Fan connector
- External power connector (+5V, +12V)
- 2 × MIPI DSI display FPC connectors (22pin 0.5mm pitch cable)
- 2 × MIPI CSI-2 camera FPC connectors (22pin 0.5mm pitch cable)
- Raspberry Pi HAT connector
- RTC with Battery socket and ability to wake up CM4
- Jumpers to disable features, e.g Wireless, EEPROM writing
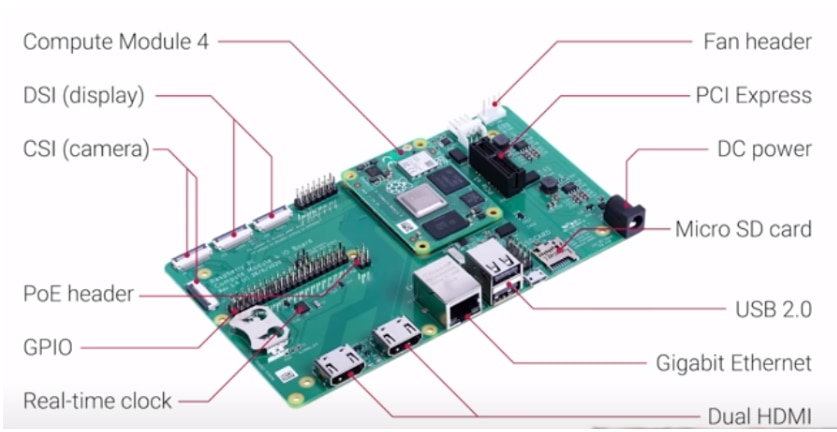
I plan to utilize the following features for my project.
- RTC with Battery socket
Not shown on the diagram above, the RTC with Battery socket and ability to wake up CM4 can be used in lew of DC power to operate the Kit I Plan to use this to power the system while running the test.. According to the silk screen it takes a CR2032 battery. The question I have is, does this battery supply adequate power to operate the board? I would like to use it in lieu of the power cable for my project. I want to run remotely with no AC power hopefully this will do it.. We will see in Blog#4 Implementation of Electronic Parts.
2. Raspberry Pi HAT connector
The HAT (Hardware Attached on Top) specification defines the requirements for add-on boards that can be connected to a Raspberry Pi board. I was glad to see this on the board. Now I can attach on of my Pi hats that I have.
3. Micro SD Card socket for CM4Lite modules
Since the Compute Module 4 Lite version, does not have built-in eMMC storage, it needs to be booted directly from a microSD card without the need for the usbboot process. This observation is not evident in the getting started guide.
What OS do I use with the Pi4 Compute module?
Some internet search results indicate that the Raspberry Pi Compute Module 4 may not be fully compatible with the latest Raspberry Pi OS Bookworm release out of the box. The recommended approach is to use the previous Bullseye release, which is known to work well with the CM4, until the Bookworm compatibility issues are resolved.
I choose to install the Bookworm Release Note that the Compute Module 4 Lite version, which does not have built-in eMMC storage, can be booted directly from a microSD card without the need for the usbboot process.
Flashing the OS
Use the Raspberry Pi Imager or another tool to flash the desired OS image onto the SD card I used the latest 64 Bit OS called Bookworm the version was released in OCT 2023
Add power with the barrel power supply.
If you are not familiar with flashing the OS, you can refer to this page:Install using Imager
Software Development environment
What is the suggested Software Development environment?
Python
- Raspberry Pi and Python work well together, and Python comes pre-installed on your Raspberry Pi OS.
- Two versions of Python come preinstalled on Raspberry Pi OS: Python 2 and Python 3. To find the exact version number, use the command line “python –version” and “python3 –version”.
Editors
- Visual Studio Code (VSCode) is a popular and powerful text editor that can be installed on the Raspberry Pi OS. It supports a wide range of programming languages and has many useful features like syntax highlighting, code folding, and debugging.
- To install
- sudo apt update
- sudo apt install ./code_*.deb
- ALREADY INSTALLED - Thonny is a simple and beginner-friendly Python IDE that comes pre-installed on the latest versions of Raspberry Pi OS. It has a straightforward interface and includes a built-in debugger. 24
- ALREADY INSTALLED -Geany is a lightweight but feature-rich text editor that can be installed on Raspberry Pi OS. It includes syntax highlighting, autocompletion, and project management tools. 34
Antenna, WiFi, BLE, Thread, Wireless Hart, Zigbee

Taken From: Antenna Datasheet
Manufacturer: MOLEX
Manufacturer Part No:146153-0050
Newark Part No.: 56Y1820
Conclusion
The Raspberry Pi 4 Compute Module is a compact and powerful computer module that offers a significant performance boost over its predecessors. It features 4GB of RAM, built-in wireless connectivity, and a variety of interfaces, including dual HDMI, Gigabit Ethernet, and multiple USB ports. The Compute Module 4 can be used for a wide range of applications, including headless servers, industrial automation, and embedded systems.
The Compute Module 4 IO Board (CM4IO) provides a convenient way to connect the Compute Module 4 to peripherals and expand its functionality. It includes a variety of ports and connectors, including HDMI, Ethernet, USB, and PCIe. The CM4IO also has a battery-backed RTC and a Raspberry Pi HAT connector.
The Compute Module 4 can be used with various operating systems, including Raspberry Pi OS, Ubuntu Server, and Debian. The recommended software development environment for the Compute Module 4 is Python, and Visual Studio Code is the suggested text editor.
I took a deep dive into the compute module 4 and analyzed how to connect it to the IO module. I choose to install the latest Raspberry pi OS, Bookworm. The release notes says that the Compute Module 4 Lite version, does not have built-in eMMC storage, and can be booted directly from a microSD card without the need for the usbboot process. This was the most challenging part of the install, because I didn’t understand the differences between the lite version and the other offerings for memory configurations for the eMMC. I devoted a section to explaining what the “eMMC Lite Version” is and it makes sense. Now I understand the usage of uMMC and the SD card to boot the OS image on the card.
I was not able to use the MIDAS DISPLAY MC42005A6W-SPTLYI-V2 display. I’m not that good with a soldering iron, so I chose to use a PI hat that has a display. The Raspberry Pi 4 Compute Module is a compact yet powerful computer module. It offers a significant performance boost compared to its predecessors, featuring 4GB of RAM, built-in wireless connectivity, and a range of interfaces, including dual HDMI, Gigabit Ethernet, and multiple USB ports. The Compute Module 4 is ideal for various applications, including headless servers, industrial automation, and embedded systems.
The Compute Module 4 IO Board (CM4IO) enables convenient connection to peripherals and expands the Compute Module 4's functionality. It includes various ports and connectors, such as HDMI, Ethernet, USB, and PCIe, as well as a battery-backed RTC and a Raspberry Pi HAT connector.
The Compute Module 4 supports multiple operating systems, including Raspberry Pi OS, Ubuntu Server, and Debian. The recommended software development environment is Python, and Visual Studio Code is the suggested text editor.
Having delved deeply into the Compute Module 4, I explored connecting it to the IO module. I opted to install the latest Raspberry Pi OS, Bookworm. According to the release notes, the Compute Module 4 Lite version lacks built-in eMMC storage but can be booted directly from a microSD card, eliminating the need for the usbboot process.
Understanding the differences between the Lite version and other memory configurations for eMMC was the most challenging aspect of the installation. I dedicated a section to explaining the "eMMC Lite Version," which clarified its purpose and the use of uMMC and the SD card to boot the OS image.
Unfortunately, I could not utilize the MIDAS DISPLAY MC42005A6W-SPTLYI-V2 display due to my limited soldering skills. Consequently, I opted for a PI HAT that had a display.
Resources
- Pi 4 Compute Module Datasheet
- Pi 4 Compute Module I/O Board Datasheet
- Midas Display Datasheet
- Antenna Datasheet
NEXT
Blog#3 Deep Dive into the Hammond Enclosure
In this blog post, I will delve into the IP68 Waterproof Enclosure offered by Hammond. The IP68 rating signifies that the enclosure is dust-tight and can withstand prolonged immersion in water at a depth of 1.5 meters for up to 30 minutes.
