Project goals
The goal of CycleSafe project is to improve safety of cyclists on the road. The secondary goal is to make it affordable for a wider community.
Project Overview
The project will use RPi 4, a camera, and machine learning algorithms to detect cars and trucks in the back of the cyclist and warn of potential collisions. The camera will classify continuously objects and will calculate the distance. If an object is recognized as a car or a truck by measuring the distance to it and the change of the distance it will be able to warn cyclists of the potential collision.

Object Detection and Classification
Implement an ML algorithm for efficient and accurate object recognition.
Continuously analyze the camera feed to identify objects in the cyclist’s vicinity.
Distance Calculation
Use computer vision techniques to estimate the distance between the cyclist and detected objects.
Combine depth perception with object size to calculate accurate distances.
Cars and Trucks Recognition and Tracking
Focus on identifying cars and trucks specifically.
Maintain a list of recognized car objects and their positions.
Collision Warning System
Monitor changes in distance to approaching cars.
If the distance decreases rapidly, trigger a warning signal (LED for cyclists, flash taillight to alert cars behind and buzzer).
User Interface and Alerts
Design a simple user interface (UI) for the cyclist.
Communicate real-time information about detected cars/trucks and their proximity.
Provide clear alerts when collision risk is high.
Testing and Optimization
Conduct extensive testing in various scenarios (day/night, different speeds, different environmental conditions, including rain, snow, vibration, dust ).
Optimize the system for accuracy, low latency, and minimal false positives/negatives.
Power Efficiency and Durability:
Optimize for energy-efficient components to prolong battery life.
Ensure the system is robust and weather-resistant.
Components
HAMMOND 1554VA2GYCL Plastic Enclosure, Watertight, Clear Lid, PCB Box, Polycarbonate, 88.9 mm, 160 mm, 240 mm, IP68
RASPBERRY-PI CM4104000 Raspberry Pi Compute Module 4 Lite, 4GB RAM, Wireless, BCM2711, ARM Cortex-A72
RASPBERRY-PI CM4IO Compute Module 4 I/O Board, Raspberry Pi, BCM2711, ARM Cortex-A72
RASPBERRY-PI RPI 8MP CAMERA BOARD Daughter Board, Raspberry Pi Camera Board, Version 2, Sony IMX219 8-Megapixel Sensor
Portable power supply
Bike rear rack
Fixtures
Potential Challenges
Creating a machine learning algorithm that can process video (object detection and classification) in near-real time using RPi4
Achieve acceptable distance calculation precision
Environmental impact (vibration, rain, snow) on hardware and video processing
Securely mounting hardware on a bicycle
Optimize power consumption to allow at least 60 minutes of ride without recharging.
Why do I need to test the enclosure?
CycleSafe will be used in the outdoor environment. It will be subject for all kinds of environmental conditions, including snow, and vibration. The role of the enclosure is to host and protect sensitive electronic components. So I'd like to understand what will be temperature and humidity inside the enclosure when I expose it to the environment.
Test Preparation
I've been using Home Assistant for a few years and I have a few XIAOMI Mijia Bluetooth-compatible Thermometers 2 connected to it. So I've placed one of them into the HAMMOND 1554VA2GYCL enclosure. I've added an element14 robot there too.
I've closed the enclosure and placed it outside. Fortunately, we've got a weather forecast for snow and rain during my test period.
Test Data
The test data represents two periods when the enclosure was outside (at the beginning and at the end of the graph). There was a period in the middle when the enclosure was inside.
Snow Test
There was a lot of snow coming.
I've prepared the enclosure for the test and set it outside.

There were a few centimeters of snow the next day. So the enclosure was covered with snow.

The next day snow starts melting.

When I zoomed in I was able to see the sensor data - 14.4C and 64% humidity.

Enclosure Test Conclusions
The enclosure protected the sensor quite well from rain and snow. The sensor was functioning all the time.
It can't protect from the temperature changes. It actually can increase the temperature inside the enclosure due to solar radiation. It may be good during the cold season and can be bad during the hot season. So, it should be taken into consideration.
The humidity was changing over time. At one point at noon on April 14 during the heavy rain, it reached above 70%. While my sensor was functioning all the time, the specification of the electronics must be validated before placing it into the enclosure and exposing it to the environment.
Design Changes
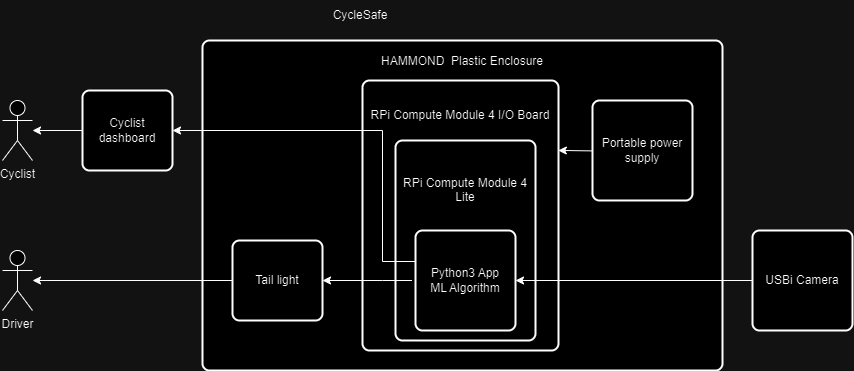
When I tried to connect the RPi Compute Module 4 I/O board with RPi Camera v2 I realized that they were not compatible. So, As I have a USB camera I've decided to reuse it instead of purchasing an additional camera. Here is the new design diagram.
Need for Data and Test Preparation
I need to collect video recordings, so I can use them to test the application and its car (obstacles) detection processing. So I need to complete a bike ride with the prototype. I've decided to use a power bank which has a 12V output as the power source. The battery can support RPi for more than a day. And it fits well inside the enclosure.
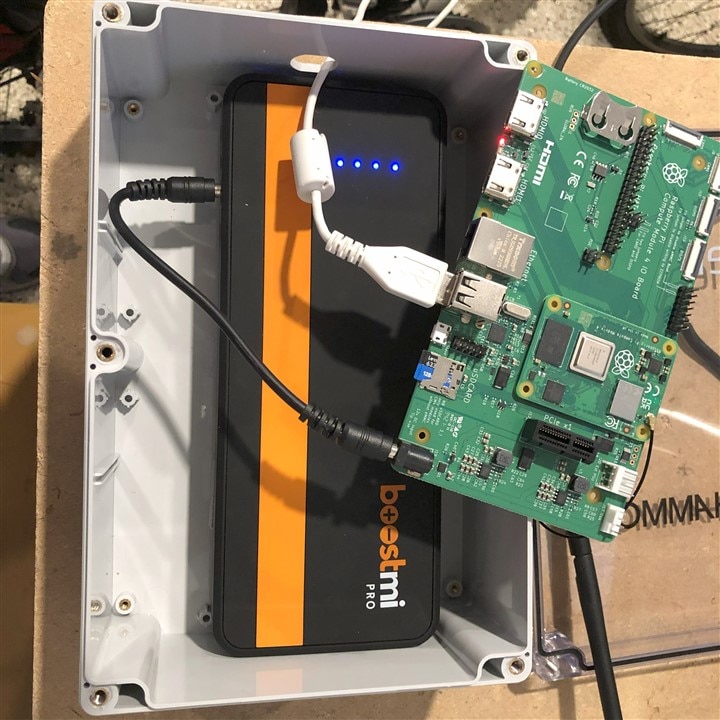
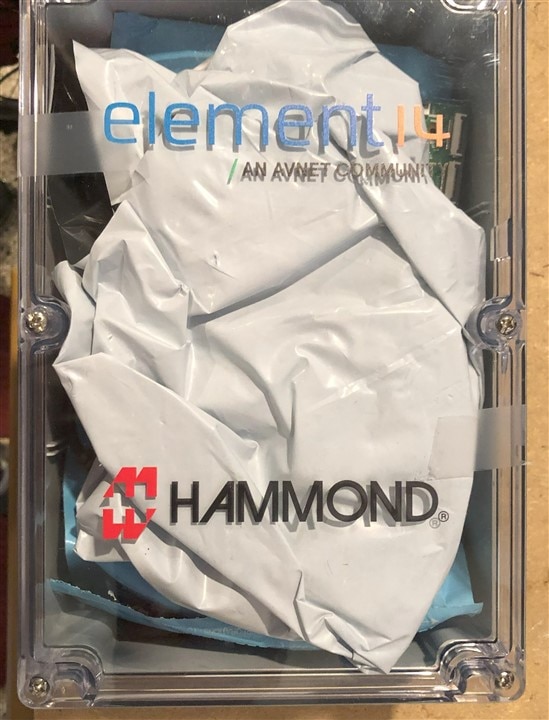
I've added some packing materials to isolate components inside the enclosure and closed it.
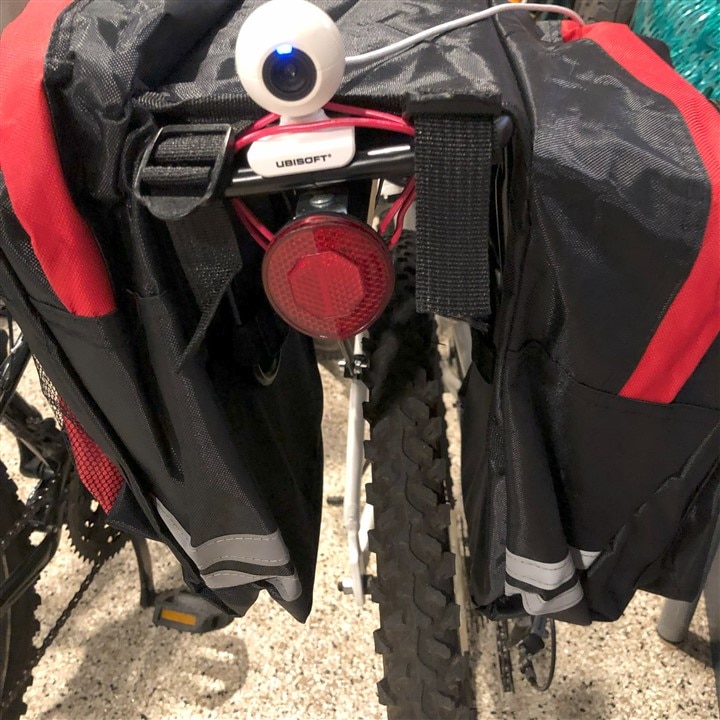
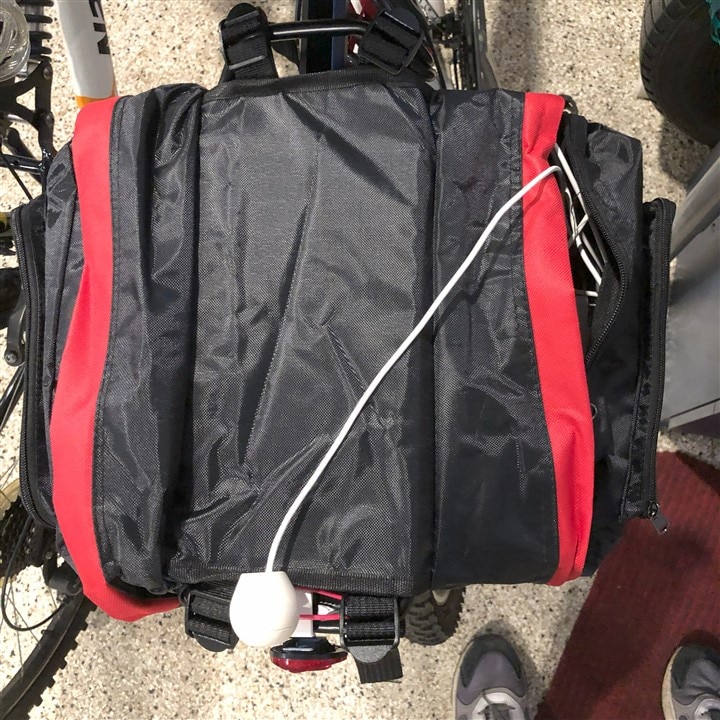
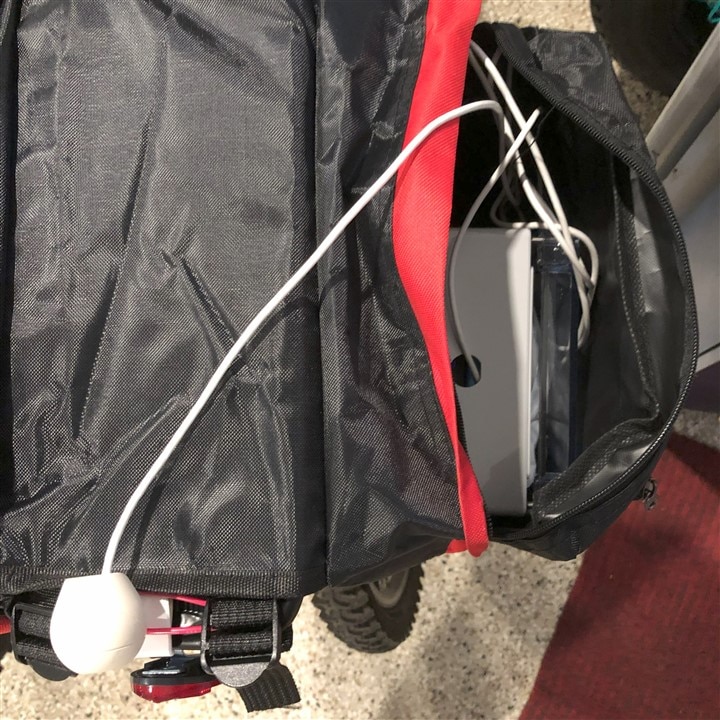
I've purchased a Large-Capacity Rear Seat Bag for Outdoor Cycling and a Bicycle Rear Seat Carrier - Luggage Cargo Rack to host my HAMMOND 1554VA2GYCL Plastic Enclosure and other components. Once the order was delivered I installed the rack and the bag on my bicycle and put the prototype inside the bag.
| {gallery}Bicycle with a rack |
|---|
|
The rack back view |
|
The rack-top view |
|
Inside the bag |
Video Recorder App
I wrote a Python app using the OpenCV library to record 20 minutes of video. Then I configured it to be started immediately after the RPi boot.
import cv2
import datetime

def get_current_datetime_string():
    """
    Returns the current date and time as a string in the format "YYYYMMDDHHMMSS".
    """
    now = datetime.datetime.now()
    return now.strftime("%Y%m%d%H%M%S")

# function video capture
cap = cv2.VideoCapture("/dev/video0",  cv2.CAP_V4L2)

if not cap.isOpened():
    print("Error: Could not open video Source.")
    exit()
"""
uvcdynctrl -f
Ubisoft camera
Pixel format: YUYV (YUYV 4:2:2; MIME type: video/x-raw-yuv)
  Frame size: 640x480
    Frame rates: 30, 20, 15, 10, 5, 1
  Frame size: 320x240
    Frame intervals: 1/30, 1/20, 1/15, 1/10, 1589/15625, 1/1
  Frame size: 160x120
    Frame intervals: 1/30, 1/20, 1/15, 1/10, 1589/15625, 1/1
  Frame size: 176x144
    Frame intervals: 1/30, 1/20, 1/15, 1/10, 1589/15625, 1/1
  Frame size: 352x288
    Frame intervals: 1/30, 1/20, 1/15, 1/10, 1589/15625, 1/1

DYNEX camera
Pixel format: MJPG (Motion-JPEG; MIME type: image/jpeg)
  Frame size: 640x480
    Frame rates: 30, 25, 20, 15, 10, 5
  Frame size: 352x288
    Frame rates: 30, 25, 20, 15, 10, 5
  Frame size: 320x240
    Frame rates: 30, 25, 20, 15, 10, 5
  Frame size: 176x144
    Frame rates: 30, 25, 20, 15, 10, 5
  Frame size: 160x120
    Frame rates: 30, 25, 20, 15, 10, 5
  Frame size: 1280x1024
    Frame rates: 15, 10, 5

"""
cap.set(3,320)
cap.set(4,320)

# rame rate or frames per second
fps = 30

# Width and height of the frames in the video stream

size = (int(cap.get(cv2.CAP_PROP_FRAME_WIDTH)), int(cap.get(cv2.CAP_PROP_FRAME_HEIGHT)))
#size = (320, 320)
"""
Create a VideoWriter object.
FourCC FourCC is a 4-byte code used to specify the video codec. The list of available codes can be found in fourcc.org. It is platform dependent.
number of frames per second (fps)
frame size should be passed.
May specify isColor flag. If it is True, encoder expect color frame, otherwise it works with grayscale frame.
"""
fourcc = cv2.VideoWriter_fourcc(*'mp4v')
videoWriter = cv2.VideoWriter('/var/lib/tail/tail-'+get_current_datetime_string()+'.mp4',
    fourcc, fps, size)
    #cv2.VideoWriter_fourcc('I','4','2','0'), fps, size)

success, frame = cap.read()

# 20 minutes maximum recording
numFramesRemaining = 20*60*fps

# loop until there are no more frames and variable > 0
while success and numFramesRemaining > 0:
    videoWriter.write(frame)
    success, frame = cap.read()
    if not success:
        print("Failed to grab the frame from the video source, Trying again...")
    #else:
    #    print(f'Height: {frame.shape[0]}, Width: {frame.shape[1]}')

    # cv2.imshow('frame',frame)
    if cv2.waitKey(1) & 0xFF == ord('q'):
        break
    numFramesRemaining -= 1

#Closes video file or capturing device
cap.release()
videoWriter.release()
cv2.destroyAllWindows()
Ready to test
At this point, I was ready to record the video and start further development.
Video Recording
I've recorded my bicycle ride from the tail camera perspective near the sunset on a nice spring evening. I've used the components and the app I've described in my previous blog CycleSafe - #3 - The Preparations for the Road Test and the Data Collection The length of the record I've published is 8 minutes as the other 12 minutes don't have seeing of cars, so I've cut them.
What is YOLOv8
YOLO v8 is a recent version of the popular YOLO (You Only Look Once) object detection algorithm, released by Ultralytics in 2022. It introduces several improvements and new features over previous versions, making it a powerful tool for real-time object detection and instance segmentation tasks.
Key Features of YOLO v8
- Instance Segmentation: In addition to object detection, YOLO v8 can perform instance segmentation, which means it can identify and segment individual objects within an image, providing pixel-level masks for each instance.
- Improved Accuracy: YOLO v8 incorporates new techniques and architectural changes that enhance its accuracy in detecting and localizing objects, especially small objects, compared to previous versions.
- Faster Inference Speed: YOLO v8 has been optimized for faster inference, making it suitable for real-time applications that require high processing speeds, such as surveillance systems and autonomous vehicles.
- New Loss Function: YOLO v8 utilizes a new loss function called "focal loss," which helps improve the detection of small objects by down-weighting well-classified examples and focusing on hard-to-detect objects.
- Higher Resolution: YOLO v8 processes images at a higher resolution (608x608 pixels) compared to previous versions, allowing for better detection of smaller objects and improved overall accuracy.
- Trainable Bag-of-Freebies: YOLO v8 introduces a "trainable bag-of-freebies" technique, which involves training the model with various data augmentation and regularization techniques to improve its performance further.
I've selected it based on its accuracy for real-time object detection capabilities and built-in capability to classify cars, trucks, and bicycles.
YOLOv8 has several models. The smallest one is nano. It is suitable to run on constrained devices with limited computing power.
Video Processing
I wrote a Python app using the OpenCV and YOLOv8 nano libraries to process the recorded video.
import cv2
import datetime
from ultralytics import YOLO
import supervision as sv

# Load the YOLOv8n model
model = YOLO('yolov8n.pt')

model.info()

def get_current_datetime_string():
    """
    Returns the current date and time as a string in the format "YYYYMMDDHHMMSS".
    """
    now = datetime.datetime.now()
    return now.strftime("%Y%m%d%H%M%S")

input_video_path = 'tail-video.mp4'

cap = cv2.VideoCapture(input_video_path)

if not cap.isOpened():
    print("Error: Could not open video Source.")
    exit()

# rame rate or frames per second
fps = 30

# Width and height of the frames in the video stream

size = (int(cap.get(cv2.CAP_PROP_FRAME_WIDTH)), int(cap.get(cv2.CAP_PROP_FRAME_HEIGHT)))
fourcc = cv2.VideoWriter_fourcc(*'mp4v')
videoWriter = cv2.VideoWriter('/var/lib/tail/tail-detection'+get_current_datetime_string()+'.mp4',
    fourcc, fps, size)

success, frame = cap.read()
count=30
# loop until there are no more frames and variable > 0
while success:
    success, frame = cap.read()
    if not success:
        print("Failed to grab the frame from the video source, Trying again...")
    if (count < fps):
        count = count+1
    else:
        count=0

        # Perform object detection https://docs.ultralytics.com/modes/predict/#inference-sources
        results = model.predict(frame, classes=[2, 3, 5, 7], conf=0.25)  # Class IDs for car, motorcycle, bus, truck imgsz=frame.shape,

        # Visualize the results on the frame
        annotated_frame = results[0].plot()
        videoWriter.write(annotated_frame)

cap.release()
videoWriter.release()
cv2.destroyAllWindows()
The record was processed using the YOLO v8 nano model. The processing was taking almost 2 seconds per 1 frame on RPi4.
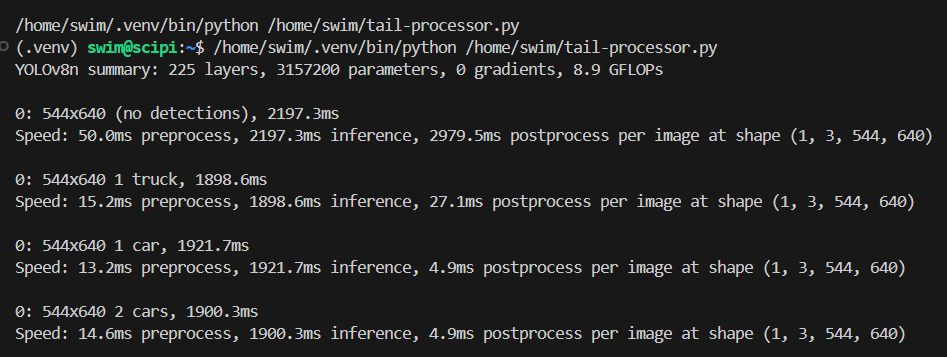
And it was using only 1 of its 4 CPU cores.

I've decided to process only 1 frame for a second of the original recording. So it appears as a fast movie replay at 30x speed. I've uploaded the video to Youtube, but I found its resolution not great.
Some math
In my estimation, a cyclist needs at least 2 seconds to react to a potential danger. If a car runs at 100 km/h it can travel ~28 m in a second. My app needs to process at least two frames to measure the distance and speed of the car relative to the cyclist. It will take ~4 seconds with YOLOv8 nano without further optimization. So it needs to be able to detect car 6 seconds in advance, which gives a distance of 168 meters. It is not realistic to expect based on my current setup. If a car is approaching at 50 km/h then the distance to detect it goes down to 84 meters, which is a more realistic scenario. But then it will reduce the usefulness of the solution.
Alternatives
Use a higher camera resolution so the app can detect cars at a longer distance, but it may result in many false positives which makes the solution useless.
Find a way to use more CPU cores for video processing.
Use a different algorithm (FOMO, other versions of YOLO).
Crop the frame to reduce the processing time.
A more in-depth look at alternatives to YOLO v8
Use a different algorithm
- Background substruction
- FOMO
- Other versions of YOLO
Optimize YOLOv8
- Find a way to use more CPU cores for video processing.
- Use a higher camera resolution so the app can detect cars at a longer distance, but it may result in many false positives, which does not work for my use case.
- Crop the frame to reduce the processing time.
- Skip some frames during video processing
Background substruction
OpenCV has a capability that works great for object detection and tracking with relatively static backgrounds (BackgroundSubtractorMOG2). It is very fast and can be used on a constrained devices like RPi4.
But I wasn't able so far to make it work reliably with fast-changing backgrounds. Here is an example where it is missing a car.
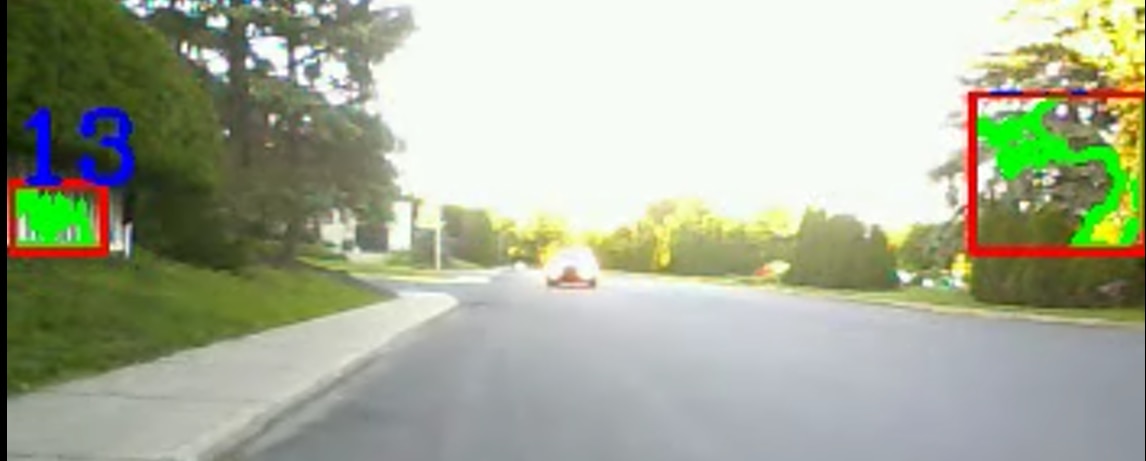
Here is a video of video processing using this method.
As reliability is critical for my use case I've dropped this option from further consideration.
FOMO
FOMO is 30x faster than MobileNet SSD and can run in <200K of RAM, however, it has significant limitations, which make it unusable for my project.
- Does not output bounding boxes. Hence the size of the object is not available. And I need its size to calculate the distance between the cyclist and cars.
- Objects shouldn’t be too close to each other. But cars can be quite close on the road.
YOLOv8 with optimization
After additional research, I discovered that the YOLO family is focused on GPU-accelerated hardware for real-time processing. While RPi4 has GPU there are no useful drivers that YOLO can leverage to achieve performance boost. I've started looking at additional optimization options.
The reason I'd like to try it again is its great reliability. It can reliably detect different classes of objects, including cars/trucks/motorcycles/buses.
As the first step, I've added support for parallel processing. RPi4 has 4 cores and they can process video frames in parallel. The multi-threading is a bit tricky in Python and requires some expertise. YOLO documentation has some good pointers on how to achieve it.
Another optimization I've used was to skip frames if RPi compute is still busy processing previous frames.
I've decided to use a custom object tracker instead of a built-in native to YOLOv8. It allowed me to save more than a hundred milliseconds of compute time per frame and I've added additional attributes, which help to reason about the road situation over different frames.

Here is the result of processing the recorded test drive using YOLOv8 with my custom tracker. Bounding boxes around cars have different colors. The red color represents potential danger when cars are close to a cyclist. When such a situation gets detected the RPi4 will notify the cyclist about approaching danger. Other colors of bounding boxes helped me with adjusting control parameters. The numbers on top of the bounding boxes represent the identification of the cars for tracking purposes.
Testing on RPi4
I did my tests on PC to iterate code development and testing faster. Now I need to deploy it on RPi4, add a notification of the cyclist feature, and run another live test.
After I've migrated the code I run the test in the multi-threaded mode. I've got "terminate called without an active exception" error and a core dump.
Ultralytics YOLOv8.2.27 🚀 Python-3.11.6 torch-2.3.0 CPU (Cortex-A72)

YOLOv8n summary (fused): 168 layers, 3151904 parameters, 0 gradients, 8.7 GFLOPs
YOLOv8n summary (fused): 168 layers, 3151904 parameters, 0 gradients, 8.7 GFLOPs

terminate called without an active exception
Aborted (core dumped)
This error was reported by other developers, so I've added a comment too.
Here is the main part of the code:
#!/usr/bin/env python
#from __future__ import print_function

import numpy as np
import cv2 as cv

from multiprocessing.pool import ThreadPool
from collections import deque

from ultralytics import YOLO
from functools import lru_cache
from tracker import*
from datetime import datetime

class DummyTask:
    def __init__(self, data):
        self.data = data
    def ready(self):
        return True
    def get(self):
        return self.data

#Returns the current date and time as a string in the format "YYYYMMDDHHMMSS".
def get_current_datetime_string():
    now = datetime.now()
    return now.strftime("%Y%m%d%H%M%S")

def main():

    #folder = "C:/Users/serge/Videos/Captures/"
    folder = "/var/lib/tail/"
    file_name = folder+"tail-trim20240601083612.mp4"
    #cap = video.create_capture(file_name)
    cap = cv.VideoCapture(file_name)
    cap.set(cv.CAP_PROP_POS_FRAMES, 30*280)

    # rame rate or frames per second
    fps = 30
    # Width and height of the frames in the video stream
    size = (int(cap.get(cv.CAP_PROP_FRAME_WIDTH)), int(cap.get(cv.CAP_PROP_FRAME_HEIGHT)))
    fourcc = cv.VideoWriter_fourcc(*'mp4v')
    videoWriter = cv.VideoWriter(folder+'/tail-detection'+get_current_datetime_string()+'.mp4', fourcc, fps, size)

    @lru_cache(maxsize=None)
    def _initializer():
        global model
        model = YOLO("yolov8n.pt")
        #model.info()
        model.fuse()
        #model.info()

    RED = (0, 0, 255)
    YELLOW = (0, 255, 255)
    BLUE = (255, 0, 0)
    GREEN = (0, 255, 0)
    obstacles_classes=[2, 3, 5, 7]

    def process_frame(frame, mytracker):
        _initializer()
        # Perform object detection https://docs.ultralytics.com/modes/predict/#inference-sources
        # Class IDs for car, motorcycle, bus, truck
        results = model.predict(frame, obstacles_classes, conf=0.25)
        for res in results:
            boxes = res.boxes
            if len(boxes)>0:
                points=[]
                for c in boxes:
                    if int(c.cls.numpy()) in obstacles_classes:
                        points.append(np.round(c.xywh[0].numpy()).astype(int))
                if len(points)>0:
                    point=mytracker.update(points)
                    for i in point:
                        x,y,w,h,id,d=i
                        if (d>0):
                            if (w>45):
                                if (abs(388/2-x)<50):
                                    color = RED
                                else:
                                    color = YELLOW
                            else:
                                color = BLUE
                        else:
                            color = GREEN

                        cv.rectangle(frame,(x-w//2,y-h//2),(x+w-w//2,y+h-h//2),color,2)
                        cv.putText(frame,str(id),(x,y -1),cv.FONT_HERSHEY_COMPLEX,1,(255,0,0),2)
        return frame

    threadn = cv.getNumberOfCPUs()
    pool = ThreadPool(processes = threadn-1)
    pending = deque()
    threaded_mode = True

    tracker=Tracker()

    while True:
        while len(pending) > 0 and pending[0].ready():
            res = pending.popleft().get()
            #cv.imshow('threaded video', res)
            videoWriter.write(res)
        _ret, frame = cap.read()
        if frame is None:
            break
        #processing only if compute is available; otherwise skipping frames
        if len(pending) < threadn:
            if threaded_mode:
                task = pool.apply_async(process_frame, (frame.copy(), tracker))
            else:
                task = DummyTask(process_frame(frame, tracker))
            pending.append(task)
        """
        ch = cv.waitKey(1)
        if ch == ord(' '):
            threaded_mode = not threaded_mode
        if ch == 27:
            break
        """
    cap.release()
    videoWriter.release()
    #cv.destroyAllWindows()

if __name__ == '__main__':
    print(__doc__)
    main()
And here is my tracker code:
import math

class Tracker:
    def __init__(self):
        # Store the center positions of the objects
        self.center_points = {}
        # Keep the count of the IDs
        # each time a new object id detected, the count will increase by one
        self.id_count = 0

    def update(self, objects_rect):
        # Objects boxes and ids
        objects_bbs_ids = []
        PROXIMITY_THRESHOLD = 35

        # Get center point of new object
        for rect in objects_rect:
            x, y, w, h = rect
            cx = x + w // 2
            cy = y + h // 2

            # Find out if that object was detected already
            same_object_detected = False
            for id, pt in self.center_points.items():
                dist = math.hypot(cx - pt[0], cy - pt[1])

                if dist < PROXIMITY_THRESHOLD:
                    self.center_points[id] = (cx, cy, w)
                    #print(self.center_points)
                    objects_bbs_ids.append([x, y, w, h, id, w-pt[2]])
                    same_object_detected = True
                    break

            # New object is detected we assign the ID to that object
            if same_object_detected is False:
                self.center_points[self.id_count] = (cx, cy, w)
                objects_bbs_ids.append([x, y, w, h, self.id_count, 0])
                self.id_count += 1
        # Clean the dictionary by center points to remove IDS not used anymore
        new_center_points = {}
        for obj_bb_id in objects_bbs_ids:
            _, _, _, _, object_id, _ = obj_bb_id
            center = self.center_points[object_id]
            new_center_points[object_id] = center

        # Update dictionary with IDs not used removed
        self.center_points = new_center_points.copy()
        return objects_bbs_ids
I'll need to troubleshoot it a bit more to resolve it and complete integration with the alerting component.
Conclusion
It was a great experience to dive again into video processing to resolve a real problem.
All electronic components and the enclosure worked very well for my project. The software part is rapidly evolving and requires additional attention. It will be great if the RPi4 GPU module get the support of OpenCV/YOLOv8 to gain more computing performance.

Top Comments