element14 Community
element14 Community
    Register Log In
  • Site
  • Search
  • Log In Register
  • About Us
  • Community Hub
    Community Hub
    • What's New on element14
    • Feedback and Support
    • Benefits of Membership
    • Personal Blogs
    • Members Area
    • Achievement Levels
  • Learn
    Learn
    • Ask an Expert
    • eBooks
    • element14 presents
    • Learning Center
    • Tech Spotlight
    • STEM Academy
    • Webinars, Training and Events
    • Learning Groups
  • Technologies
    Technologies
    • 3D Printing
    • FPGA
    • Industrial Automation
    • Internet of Things
    • Power & Energy
    • Sensors
    • Technology Groups
  • Challenges & Projects
    Challenges & Projects
    • Design Challenges
    • element14 presents Projects
    • Project14
    • Arduino Projects
    • Raspberry Pi Projects
    • Project Groups
  • Products
    Products
    • Arduino
    • Avnet Boards Community
    • Dev Tools
    • Manufacturers
    • Multicomp Pro
    • Product Groups
    • Raspberry Pi
    • RoadTests & Reviews
  • Store
    Store
    • Visit Your Store
    • Choose another store...
      • Europe
      •  Austria (German)
      •  Belgium (Dutch, French)
      •  Bulgaria (Bulgarian)
      •  Czech Republic (Czech)
      •  Denmark (Danish)
      •  Estonia (Estonian)
      •  Finland (Finnish)
      •  France (French)
      •  Germany (German)
      •  Hungary (Hungarian)
      •  Ireland
      •  Israel
      •  Italy (Italian)
      •  Latvia (Latvian)
      •  
      •  Lithuania (Lithuanian)
      •  Netherlands (Dutch)
      •  Norway (Norwegian)
      •  Poland (Polish)
      •  Portugal (Portuguese)
      •  Romania (Romanian)
      •  Russia (Russian)
      •  Slovakia (Slovak)
      •  Slovenia (Slovenian)
      •  Spain (Spanish)
      •  Sweden (Swedish)
      •  Switzerland(German, French)
      •  Turkey (Turkish)
      •  United Kingdom
      • Asia Pacific
      •  Australia
      •  China
      •  Hong Kong
      •  India
      •  Korea (Korean)
      •  Malaysia
      •  New Zealand
      •  Philippines
      •  Singapore
      •  Taiwan
      •  Thailand (Thai)
      • Americas
      •  Brazil (Portuguese)
      •  Canada
      •  Mexico (Spanish)
      •  United States
      Can't find the country/region you're looking for? Visit our export site or find a local distributor.
  • Translate
  • Profile
  • Settings
Experimenting with Extreme Environments
  • Challenges & Projects
  • Design Challenges
  • Experimenting with Extreme Environments
  • More
  • Cancel
Experimenting with Extreme Environments
Forum Driving the LCD - share your experience
  • Blog
  • Forum
  • Documents
  • Files
  • Members
  • Mentions
  • Sub-Groups
  • Tags
  • More
  • Cancel
  • New
Join Experimenting with Extreme Environments to participate - click to join for free!
Actions
  • Share
  • More
  • Cancel
Forum Thread Details
  • Replies 35 replies
  • Subscribers 39 subscribers
  • Views 3825 views
  • Users 0 members are here
Related

Driving the LCD - share your experience

Anthocyanina
Anthocyanina over 1 year ago

Hi! So, I've been working on the software for this challenge and have reached the point where i need to figure out the LCD. The datasheet has a character map and and the addresses for the position of each character. I don't have much experience with driving LCDs so I'm struggling with where to start. Have any of you figured out the LCD yet? 

I found a couple threads on the arduino forum that talk about this display, with people saying you could use the HD44780 libraries, or similar to drive it. I'll be trying that with an arduino board first, but still would like to hear about your experience with this display so far. 

Thank you!

  • Sign in to reply
  • Cancel

Top Replies

  • javagoza
    javagoza over 1 year ago in reply to BigG +5
    This one is even simpler.. github.com/.../cfah2004ac community.element14.com/.../IMG_5F00_1443.mov
  • javagoza
    javagoza over 1 year ago in reply to jc2048 +5
    jc2048 A quick adaptation of your script. Works! Thanks for sharing! from smbus2 import SMBus LCD_CLEARDISPLAY = 0x01 LCD_FUNCTIONSET_4LINE_5x8DOTS_BITMODE = 0x38 LCD_DISPLAYCONTROL_ON = 0x0C LCD_ENTRYMODESET_LEFT…
  • Anthocyanina
    Anthocyanina over 1 year ago in reply to shabaz +4
    update time! when i soldered the board to the LCD, which also served as an I2C breakout board, the flux residue was so hard to clean, i couldn't get it all out. I decided to remove that board, which i…
Parents
  • Anthocyanina
    Anthocyanina over 1 year ago

    has anyone had success driving the LCD with the provided computer for hours? 

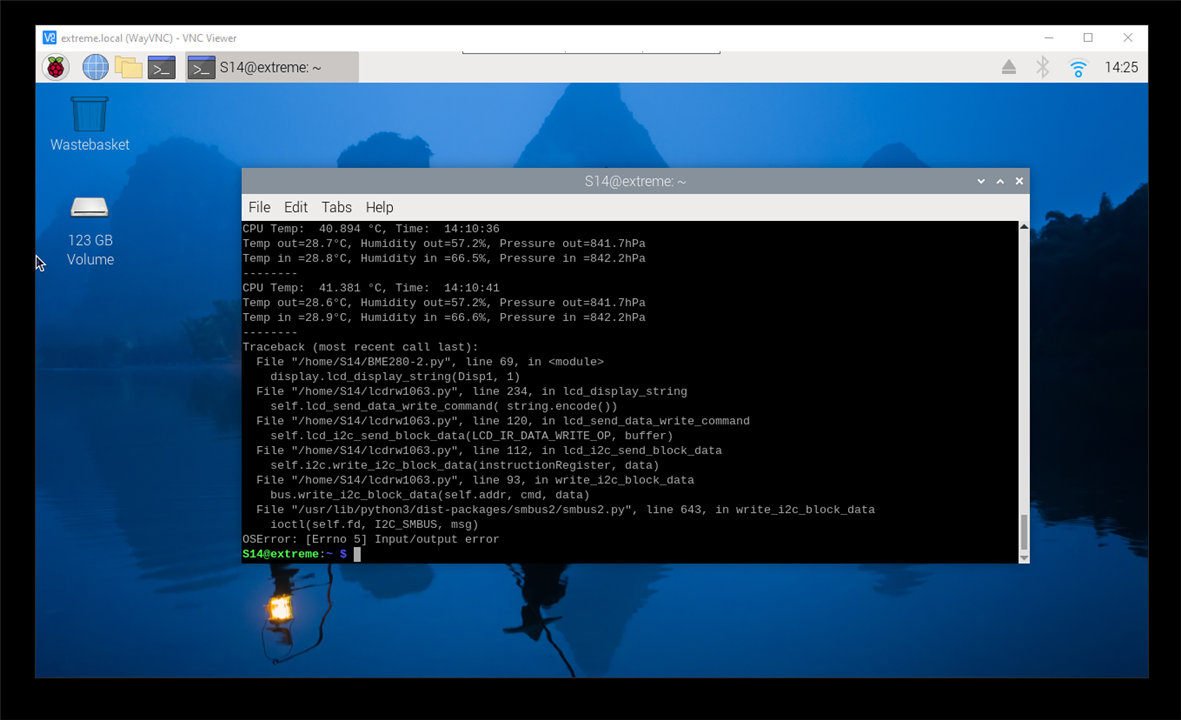
    I'm using javagoza's library, and have been getting crashes related to the lcd in my logging script like this one:

    image

    I have no idea what might be causing the crashes. I went to read the lines mentioned in the error, re-checked the connections, but this keeps happening regularly. I don't know how tight the timings are for the i2c bus, i read years ago that you couldn't drive neopixels with a Pi because of timing issues, so perhaps it's that? 

    I've been watching for errors, and managed to catch one live. I immediately re-launched the script, but it ran fine. I doubt it's a connection problem, because nothing moved within the half a second it took me to arrow up then enter to re-launch the script, or well, i doubt anything did. 

    The enclosure has been inside since yesterday as i thought maybe it getting too hot was messing with the display's controller? 

    That doesn't seem to be the case, or who knows, maybe the heat damaged in in a weird intermittent way? 


    thank you!

    • Cancel
    • Vote Up 0 Vote Down
    • Sign in to reply
    • Cancel
  • shabaz
    shabaz over 1 year ago in reply to Anthocyanina

    Do you have anything else on the I2C bus (apart from the LCD screen)? If so, what's the cable length approximately?

    Also, what software is controlling the rest of the I2C devices on the bus; is it the same Python code, or some other code, and does it run simultaneously?

    A possible workaround (but extremely ugly because it doesn't identify the actual issue) is to catch the exception using 'try..except', then wait some tens of msec, and then reattempt writing to the LCD screen. But really, the root issue should be identified.

    • Cancel
    • Vote Up 0 Vote Down
    • Sign in to reply
    • Cancel
  • Anthocyanina
    Anthocyanina over 1 year ago in reply to shabaz

    yes, there are two sensors attached to the bus, the cable from the pi to the display is about 20cm long, at the display there's a small breakout PCB that exposes the i2c lines and that's where the sensors are attached, one sensor's cable is 10cm long, the other is about 1.5m long. I've already checked signal integrity on the scope, back when i set up the sensors. 

    everything is being handled by the same python script:

    import time
    import board
    import lcdrw1063 as LCD
    import adafruit_bme680
    from adafruit_bme280 import basic as adafruit_bme280
    from gpiozero import CPUTemperature
    display = LCD.Lcd()
    i2c = board.I2C()
    
    sensor = adafruit_bme680.Adafruit_BME680_I2C(i2c)
    bme280 = adafruit_bme280.Adafruit_BME280_I2C(i2c)
    
    temperature_c = sensor.temperature
    humidity = sensor.humidity
    pressure = sensor.pressure
    
    temperature_out = bme280.temperature
    humidity_out = bme280.relative_humidity
    pressure_out = bme280.pressure
    cpu = CPUTemperature()
    
    print("ignore these:")
    print("CPU Temp: ",cpu.temperature,"°C, Time: ",time.strftime('%H:%M:%S'))
    print("Temp={0:0.1f}°C, Humidity={1:0.1f}%, Pressure={2:0.1f}hPa, Temp out={3:0.1f}°C,  Humidity out={4:0.1f}%, Pressure out={5:0.1f}hPa".format(temperature_c, humidity, pressure, temperature_out, humidity_out, pressure_out))
    print("--------")
    
    display.lcd_display_string("--------------------", 1)
    display.lcd_display_string("Extreme Environments", 2)
    display.lcd_display_string("--------------------", 3)
    display.lcd_display_string("@e14@e14@e14@e14@e14", 4)
    
    time.sleep(3.0)
    
    it=1
    while True:
            
            print("iteration: ",it,'\n')
    
            filename = "Full-Day-" + time.strftime('%m-%d-%H-%M-%S')+".txt"
            file = open(filename, 'w')
            file.write('Time, CPU Temp, Air Temp, Humidity, Pressure, Temp out, Humidity out, Pressure out\n')
    
            for count in range(180):
    
                temperature_c = sensor.temperature
                humidity = sensor.humidity
                pressure = sensor.pressure
                temperature_out = bme280.temperature
                humidity_out = bme280.relative_humidity
                pressure_out = bme280.pressure
                cpu = CPUTemperature()
    
                Disp1=("CPU Temp: "+str("%.2f" % cpu.temperature)+" C")
                Disp2=("Temp  in: "+str("%.2f" % temperature_c)+" C")
                Disp3=("Temp out: "+str("%.2f" % temperature_out)+" C")
                Disp4=("RH I:"+str(round(humidity, 1))+"%, O:"+str(round(humidity_out, 1))+"%")
    
                print("CPU Temp: ",cpu.temperature,"°C, Time: ",time.strftime('%H:%M:%S'))
                print("Temp in ={0:0.1f}°C, Humidity in ={1:0.1f}%, Pressure in ={2:0.1f}hPa".format(temperature_c, humidity, pressure))
                print("Temp out={0:0.1f}°C, Humidity out={1:0.1f}%, Pressure out={2:0.1f}hPa".format(temperature_out, humidity_out, pressure_out))
                print("--------")
    
                display.lcd_clear()
                display.lcd_display_string(Disp1, 1)
                display.lcd_display_string(Disp2, 2)
                display.lcd_display_string(Disp3, 3)
                display.lcd_display_string(Disp4, 4)
    
                file.write(time.strftime('%H:%M:%S')+','+str(cpu.temperature)+','+str(temperature_c)+','+str(humidity)+','+str(pressure)+','+str(temperature_out)+','+str(humidity_out)+','+str(pressure_out)+'\n')
    
                time.sleep(120.0)   
            it = it+1

    Thank you! 

    • Cancel
    • Vote Up 0 Vote Down
    • Sign in to reply
    • Cancel
  • shabaz
    shabaz over 1 year ago in reply to Anthocyanina

    That cable is very long for I2C : ( It's not designed for running over such long cables between devices. It's really meant to be a comms method only for inside a single device, What's the pull-up resistor values? It may be worth reducing the resistances.

    Regarding the code, the only unusual thing (not actually related to the I2C, but who knows, maybe there is some knock-on effect with resources), is that the code doesn't close the file handles. Suggestion (1): There should be a file.close() after you've finished with each file. Personally, I wouldn't keep the file handle open for ages either (no real reason in this code, but there could be reasons in other projects). In other words, as an optional suggestion (2): you could close the file after writing the line, and then after your 120 second delay, open the file again and append to it.

    Even though the suggestions 1 and 2 are not related to I2C, at least one or the other should be done, because there is still a chance that resources could be preventing I2C from functioning (a lot of OS's don't care what resources you use, but will care how many in total you use, hence why I'm mentioning it could be a knock-on effect).

    • Cancel
    • Vote Up +1 Vote Down
    • Sign in to reply
    • Cancel
Reply
  • shabaz
    shabaz over 1 year ago in reply to Anthocyanina

    That cable is very long for I2C : ( It's not designed for running over such long cables between devices. It's really meant to be a comms method only for inside a single device, What's the pull-up resistor values? It may be worth reducing the resistances.

    Regarding the code, the only unusual thing (not actually related to the I2C, but who knows, maybe there is some knock-on effect with resources), is that the code doesn't close the file handles. Suggestion (1): There should be a file.close() after you've finished with each file. Personally, I wouldn't keep the file handle open for ages either (no real reason in this code, but there could be reasons in other projects). In other words, as an optional suggestion (2): you could close the file after writing the line, and then after your 120 second delay, open the file again and append to it.

    Even though the suggestions 1 and 2 are not related to I2C, at least one or the other should be done, because there is still a chance that resources could be preventing I2C from functioning (a lot of OS's don't care what resources you use, but will care how many in total you use, hence why I'm mentioning it could be a knock-on effect).

    • Cancel
    • Vote Up +1 Vote Down
    • Sign in to reply
    • Cancel
Children
  • Anthocyanina
    Anthocyanina over 1 year ago in reply to shabaz

    thank you! i knew i was pushing it with such a long cable which is why i checked signal integrity with the scope. maybe i didn't check what i needed to. i'm going to test without the outside sensor and see if anything changes.

    i don't know the resistor values, i'll check that out as well, and i will also implement your suggestion regarding the file handling.

    Thank you!

    • Cancel
    • Vote Up +1 Vote Down
    • Sign in to reply
    • Cancel
  • Anthocyanina
    Anthocyanina over 1 year ago in reply to shabaz

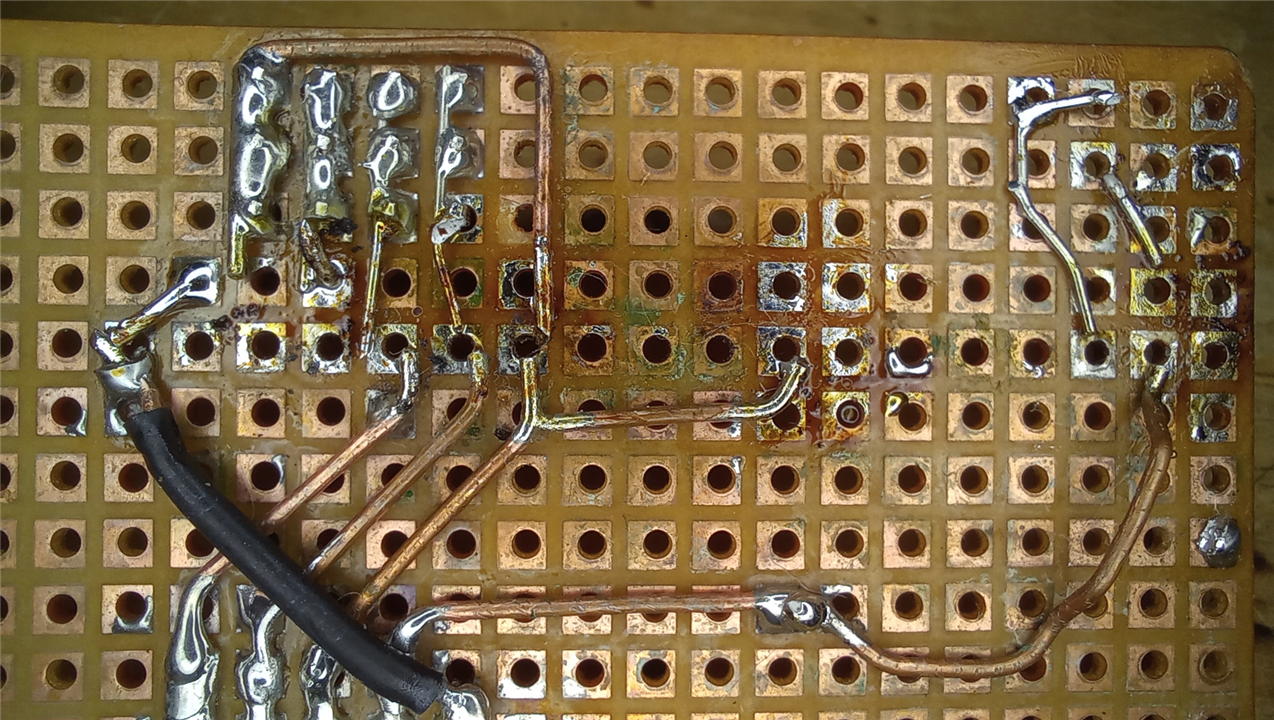
    update time! when i soldered the board to the LCD, which also served as an I2C breakout board, the flux residue was so hard to clean, i couldn't get it all out. I decided to remove that board, which i should have done in the first place, and what i saw on the bottom side was awful.

    shameful reveal:

    image

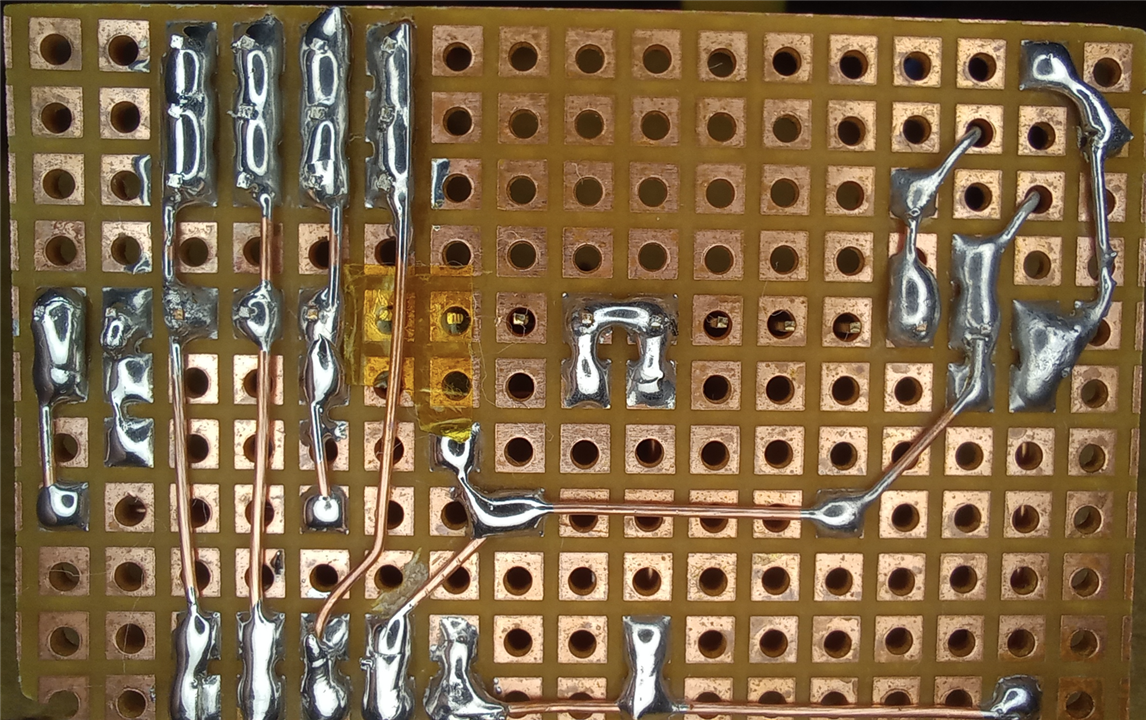
    so i redid the board:

    image

    while the new board's soldering job is still far from good, i at least was able to clean it much better than the other one (isopropyl acquired), and so i plugged everything back to the pi, and it ran uninterrupted for over 12 hours ( i moved the entire enclosure to another location, so i had to power it off). i then connected the sensor with the long cable back, and it's been running uninterrupted for a few hours already. 

    it took me way too long to consider changing that board, but it appears the problem lied there in that bath of corrosion and flux See no evilSee no evil

    • Cancel
    • Vote Up +4 Vote Down
    • Sign in to reply
    • Cancel
  • shabaz
    shabaz over 1 year ago in reply to Anthocyanina

    That's great news that it's working : ) 

    Just curious, are the wires enamelled? I couldn't tell from the photos.I too like using the separate pad perforated boards for prototypes. But normally use 30 AWG 'Kynar' or 'Tefzel' wire, which solders very well, but requires a very good wire stripper unfortunately, otherwise it's just frustration using it.

    This wire stripper is excellent for 30AWG wire, but the price is ridiculous. Ten years ago, it cost £36 when I bought it, and it still works as well as new, never needed to change the blades. But now the price is close to £100 : (

    • Cancel
    • Vote Up +2 Vote Down
    • Sign in to reply
    • Cancel
  • Anthocyanina
    Anthocyanina over 1 year ago in reply to shabaz

    the wires are bare copper, that's why there's an arch on the right of the board in the first picture, as another wire ran under that one. I use 0.5mm and 0.8mm bare copper wire since stripping became too tedious. I'll use heat-shrink tubing if i need a wire to cross over a bunch of others, also seen in the first picture.

    when the prototype is too complicated, depending on the complexity, i'll either use enameled wire and deal with the tediousness of stripping the enamel, or draw a PCB with sharpie and etch it, or design a PCB in kicad and etch it. 

    that stripper looks really nice, but yes, too expensive, wow! although, with blades lasting for 10 years, that price doesn't look that bad as a long term investment

    • Cancel
    • Vote Up +1 Vote Down
    • Sign in to reply
    • Cancel
  • beacon_dave
    beacon_dave over 1 year ago in reply to shabaz
    shabaz said:
    Ten years ago, it cost £36 when I bought it, and it still works as well as new, never needed to change the blades.

    I have the Hozan branded version which I bought around 40 years ago and it is still works as new. It was around £25 back then.

    The only thing I didn't like about it was the fiddly length gauge that screws onto the side of the jaws. Fine for a single length all the time but not if you want to constantly change it.

    • Cancel
    • Vote Up +2 Vote Down
    • Sign in to reply
    • Cancel
element14 Community

element14 is the first online community specifically for engineers. Connect with your peers and get expert answers to your questions.

  • Members
  • Learn
  • Technologies
  • Challenges & Projects
  • Products
  • Store
  • About Us
  • Feedback & Support
  • FAQs
  • Terms of Use
  • Privacy Policy
  • Legal and Copyright Notices
  • Sitemap
  • Cookies

An Avnet Company © 2025 Premier Farnell Limited. All Rights Reserved.

Premier Farnell Ltd, registered in England and Wales (no 00876412), registered office: Farnell House, Forge Lane, Leeds LS12 2NE.

ICP 备案号 10220084.

Follow element14

  • X
  • Facebook
  • linkedin
  • YouTube