Finally, I have got some results!
Before we delve into the room heating results, I would like to note a few observations:
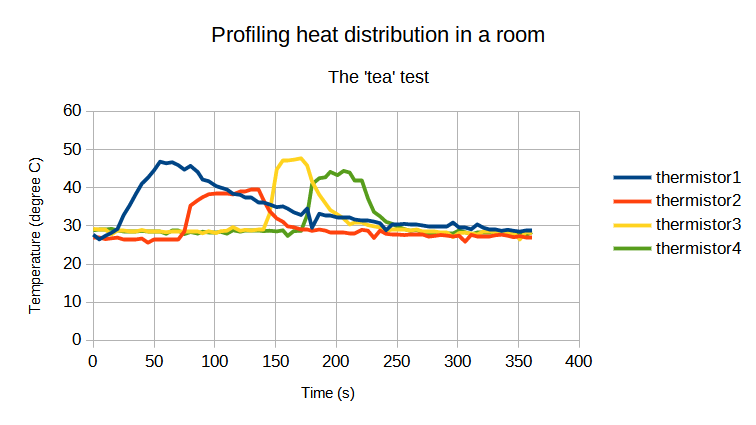
- Ring thermistors do not seem to be appropriate for measuring air temperature (this might be obvious to many). Compare thermister1 data to other thermistors in 'tea' test in my previous blog (plot re-inserted here below).
- There is discrepancy in the measured temperature using thermistors and temperature measured by my heating controller - about 4 °C.
OK. So, the first observation might be obvious because they (ring thermistors) have thermally conductive epoxy as well metal part on thermistor elements as opposed to just the thermally conductive epoxy on other thermistors. Metal part will conduct poorly if the surface contact is not proper - less surface area will mean less heat transfer. Also, if it was left to cool down on its own without convection then it will take longer time to cool down compared to forced convection. This is because air is a good heat insulator and for that exact reason we can build good insulation with fluffy materials like wool (to make sweaters) and build well insulated buildings with cavity walls. Anyways, effectively what you can see is that the ring thermistor appears to have larger time constants (shallow heating and cooling curves) with compared to bulb thermistors. However, that doesn't mean that it's unsuitable for measuring temperature. It's just that it should be used to measure surface temperature where good contact can be ensured between the metal part of the ring thermistor and the surface where temperature needs to be meausred.
Now, regarding the second observation, the thermistors were measuring around 27 °C when my central heating controller themperature sensor reckoned it was around 23°C. Although this is a precision problem in my set up, it may not be hindrance in my experiment because I am interested in relative temperature. Actually, here I am assuming that the thermistors are just offset by a few degrees and the effect is linear, i.e. I could simply subtract 4 from all readings and I should get comparable temperature values. However, I have not done that in the results that I have shown below. They are simply as is.
I did an experiment with the following scenarios.
- Heated the room with curtains drawn such that the top of the radiator is exposed towards the window. This is common occurance and this is how one would do without thinking about heating because the design is such.
- Heated the room with curtains drawn such that the top of the radiator is exposed towards the room. This is what I would think should happen. To heat the room, entire radiator should be exposed to the room side and the curtains and the air behind it should act as insulator.
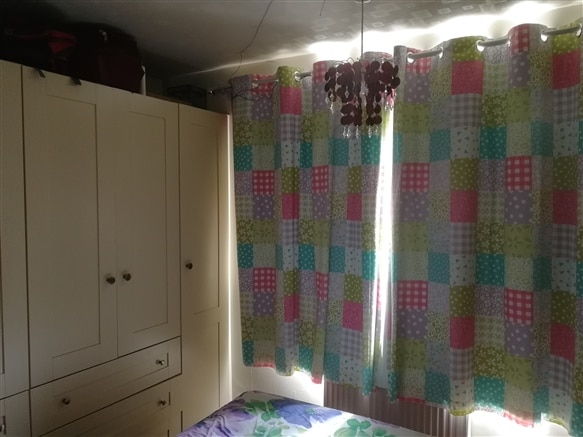
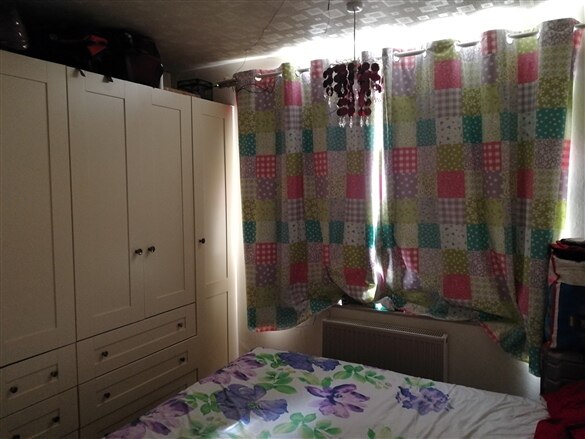
The above photos show the curtains drawn over the radiator and above the radiator. The light shining behind is simply because the experiment was done during the day time so it's the daylight! The experiments were done in a quick succession such that the background heating would be almost the same and didn't affect the results.
Let's talk aboout the results of the first experiment where the room was heated with curtains towards the room, as in they were simply drawn without handing the bottom part of the curtain and let it end up where they would normally be, by its design. This made the top part of the radiator exposed towards the window so the hot air would rise on that side of the curtain and now the room side.
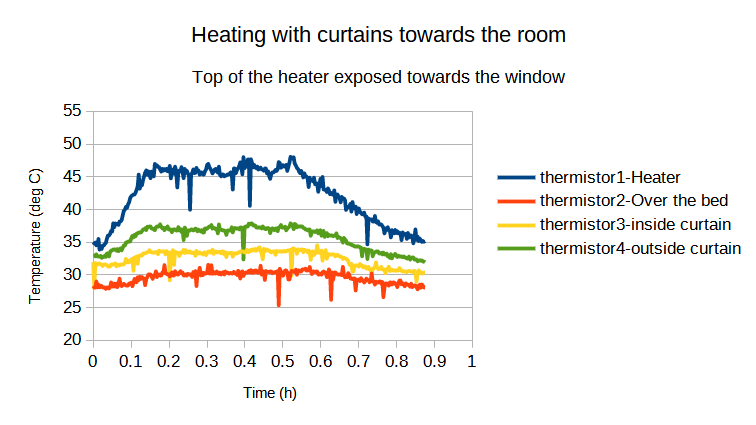
The result show clear difference in the temperature between the room (over the bed) and outside the curtain. To see the differece between the room temperature and both sides of curtains (i.e., room side of curtain and window side of curtain), I took the difference and plotted it below.

So, the difference is quite clear between the inside and outside of the curtain compared to the room. Effectively, the air outside the curtain is higher temperature, obviously because the top of the radiator is exposed on that side.
Now, lets look at the other scenario where the radiator is exposed towards the room.
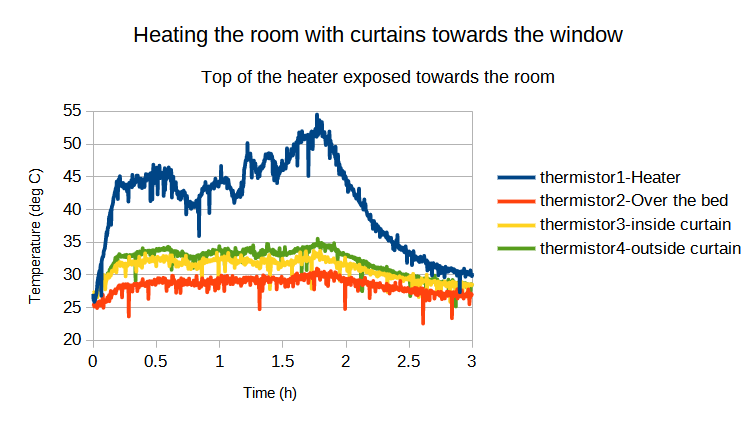
Here, compared to previous scenario, temperature measured by thermistor4 is comparable to thermistor3. However, the room temperature seems to be similar value compared to previous scenario. The heater was left on for longer than other scenario which was a mistake but nevertheless, the heater got turned off by my thermostat for a few times in between. In both cases, the room temperature got to about 30°C but in the latter case, the outside curtain temperature seems less than the first scenario. Lets see that in the difference graph.
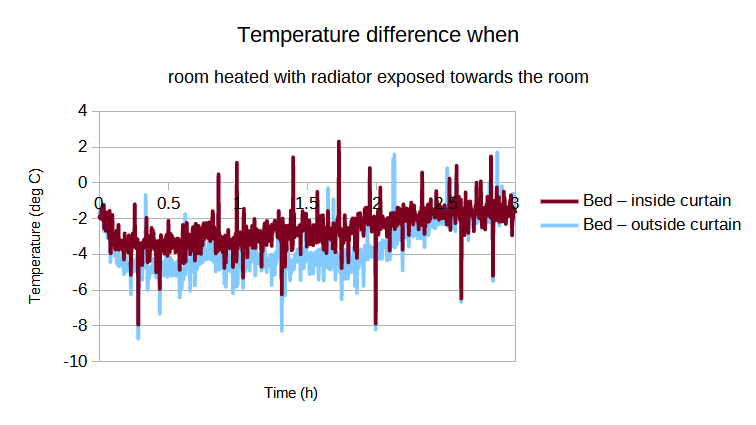
It seems the temperature difference between the room and the inside/outside curtain is similar. Also, the temperature near the curtain is around 4°C during the heating period. This is in contrast to around 7°C for the first scenario. So, it seems like the heater/radiator should be kept exposed to the room without obstructing its vents with something like curtains or clothing. This also sounds like a common sense but then I wonder why the radiators are always placed just below the window? Curtains are usually longer than the window height so they will definitely cover the vent (or keep them exposed to the window side). It begs the question then why are radiators placed this way? Or should there be guidelines on whether curtains should be left open or closed when heaters are on? The list may go on. The results of this experiments here are not conclusive as to provide hint on how one may want to keep their curtains near the radiator. This is because, the analysis here is not thorough accounting for energy input and loss, etc. However, the Molex thermistors I have received as part of this challenge would make it possible for me to investigate further to allow for such analysis.
With that said, I have had a few interesting comments and suggestions in my previous blogs which hopefully, I will try and implement and 'experiment' a little to imporve my set up. I had been wanting to do this experiment for a long time and this challenge was a perfect opportunity to do that. So, thank you element 14 community, sponsors of this challenge and everyone who one or another way contributed in my experiment!
Cheerio!
