


-
Kemet Vibration Sensor Experiment for Predictive Maintenance Model Trainer
-
1 Introduction
-
2 Hardware and Software
-
3 Unboxing and Preliminary Functional Test
-
4 Senaries to be tested
-
5 Data logging
-
6 Data training
-
7 Data Deploing with AI capabilities
-
8 Summary and Conclusion
-
9 Reference and contributions
- Kemet Vibration Sensor Experiment for Predictive Maintenance Model Trainer
- 1 Introduction
- 2 Hardware and Software
- 3 Unboxing and Preliminary Functional Test
- 4 Senaries to be tested
- 5 Data logging
- 6 Data training
- 7 Data Deploing with AI capabilities
- 8 Summary and Conclusion
- 9 Reference and contributions
Kemet Vibration Sensor Experiment for Predictive Maintenance Model Trainer
1 Introduction
Kemet Vibration Sensor show great promising application in Predictive Maintenance in industrials. I have planned to show how it works.
Within 60 days I have completed steps 1 only, and step 2 and step 3 are ongoing activities without available output data to show in this blog now. I have flahed one STM32H747-Discovery Board dead after I have completed a lot of work, with 2M Flash and LCD screen fit for ToughgfxDesigner and Cube-AI. I have to shift to fast deploy Arduino 101 to meet the schedule. Here is what I have got.
Step 1,Build one portable tool for vibration tracing on car, recording the data from Kemet vibration sensor
Complete with Arduino 101.
Step 2, Build one CNN model and train with DL framework. hopefully, the model can be convergence to one valid result.
Framework complete, but data collected is not enough for model training ,the train fail without valid model for ouput.
Step 3, Deploy the model on the Embedded platform to be used as predictive maintenance hub.
That is the part I spend most of the effort. I have try tensorflow-lite on STM32F070, STM32G431 and STM32F767-nucleo, PaddlePaddle on desktop, and DeepC in arduino,and NNoM on rtthread RTOS.
That proves not valid for most of the MCUs, Flash restriction can be top one.
While STM32L476RG-nucleo with 1M flash proves valid. But I have to change to arduino 101 for quick deploy. Deploy on MCU can be challenging, but interesting. I think I would better spend more time on one new AI Engine framework for MCU. I would share the progress in blog in this year. I am tire of so many revision-ever-changing rubishes AI engine. But SesiML may be good choice, if not as critical as I am.
2 Hardware and Software
- Arduino IDE 1.8.3 latest release
- Arduino 101
- Not including,
- STMCubeIDE
- ToucchGFX Designer
- CubeMX
- STM32H747-DIscovery, STM32G431-Nucleo,STM32-L476-Nucleo
- STMCube-AI
3 Unboxing and Preliminary Functional Test
3.1 Unboxing and wiring
Sorry for not post more picture. I start this blog on last day of submission. Deadline is good thing, or I would wander and explore more and provide no output.

The best choice for wiring of this sensor shall be to remove out-of-factory connector, cut the line to fit the length, weld new terminals with similar color and use heat-shrinkage sheath to seal the teminals.
Try use minimal length of wire as possible, that is always good.
3.2 Data logging with Arduino Serial
First, test the performance of the sensor. Arduino can provide 10-bit ADC resolution up to 1024, with 512 as still state, 29 milli-second per sample cycle. That is OK for 16kHz specification. Here is simple sketch,
unsigned long myTime;
int st=10000;
void setup() {
  Serial.begin(9600);
}
void loop() {
  Serial.print("Time: ");
  myTime = micros();
  for (int i = 0; i <= st; i++) {
    int sensorValue = analogRead(A0);
  }
  myTime=micros()-myTime;
  Serial.println(myTime); //prints time since program started
  delay(5000);          // wait a second so as not to send massive amounts of data
}
Output for Serial Console, With 29us per cycle ADC.

Use data logger for sensor data, be remember, use println() to add "\n" at each data or these is nothing to show.

peak shows the tap to the platform where the sensor is placed. That is very very sensitive.
4 Senaries to be tested
I have try with the following test,
4.1 Comparing with gryo-sensors
This vibration sensor is responsive to Z-axis acceleration, but more sensitive, the gyro-sensor on arduino 101 is Intel-Curie embedded. Not so sensitive and slow in sample frequency. But show similar tendency, it can be cross-check each other.
4.2 Tapping
Tapping, or rough rubbing on desktop can trigger the reading.
4.3 Heart beating and breath
It can be used as fast heartbeat detection and breath detection. Just hold the sensor on palm, the heartbeat can make minor shake of hand in paces, breath can bring about larger reading from sensor.
4.4 Small motor vibration
For small 5V motor drives fan for CPU heat-dissipation, it can detect the On/Off state.
4.5 Giant motor vibration
Not tested yet.
I have access to one 1MW gas turbine roaring all day aroung, that would be amazing if sensor array can be place aroung the big machine.
4.6 Car engine to be tested
Just tested to read data with Arduinio 101 data logger. Annotation is difficult simply with arduio, one Human-Machine Interface to select the running-idle-speedup-brake, the car have be mainenance recently and runs well so Fault state data is still not available.
5 Data logging
5.1 Function for the Datalogging
2M On-board winbond flash shall be used as data storage, the SPI port is occupied, I could not use SD card extension shield for larger size.
The following library shall be used,
#include "CurieTimerOne.h"
#include <CurieSerialFlash.h>
#include <SPI.h>
Here is funciton selection by means of serial connection on 115200bps,
Selection: (0)-Quit; (1)-lists; (2)- EraseALL; (3)-DataFlush;(4)-BatchSampling.
Press 0 , return to hint
Press 1, list all files on flash,
Press 2, Erase all the file. The file is named as .000 .001 ......, can be write once only. Refresh data need erase all.
Press 3, Outout the data to serial console to visualization or data record. I have design one simple Python Program to receive the data from Arduino 101, the data can be saved in to SQlite3 database
Press 4, Sampling on batches.
5.2 Arduino serial with SD
This sketch is sore of complex, with switch-case selection to define the state of Manipulation, Can not explain further, but the full code tells everything.
/* Kemet Vibration Sensor Data Logger
 *  For Experiment for Sensors
 *  Date Jan. 2021 by fyaocn
 *  Based on Paul Stoffregen's SerialFlash library @ https://github.com/PaulStoffregen/SerialFlash
*/


#include "CurieTimerOne.h"
#include <CurieSerialFlash.h>
#include <SPI.h>


#define FSIZE 2048  // One Block of 4k of 0~4095 due to SRAM limitation.
#define FAULTCOUNT  10
#define SAMPLECYCLE 32    //// Batch Cycle  for Kemet Vibration Sensors
const int oneSecInUsec = 1000000;   // A second in mirco second unit.
#define SAMPLERATE  1000  // Sample Rate for Kemet Vibration Sensors
int time=oneSecInUsec /SAMPLERATE;


bool BOOL_CHIPFULL= 1;
bool BOOL_SAMPLING= 0;
int selectionByte; // 0 For Quit.
//unsigned char bps_count=10;
//unsigned char id[5];


char afilename[12] = {'S','e','n','s','o','r','D','T','.','0','0','0'};
char contents[FSIZE];
int  idxcontents;
char filename[15]; // Format 8:3:1
unsigned long filesize;


SerialFlashFile file;
int analogPin = 0;


//Blink if fault
void error(void){
  unsigned char i;
  //Serial.println("Something Wrong with error code::0x");
  for (i=0; i<FAULTCOUNT; i++) {
    digitalWrite(LED_BUILTIN,HIGH);
    delay(500);
    digitalWrite(LED_BUILTIN,LOW);
    delay(500);
  }
}


void listfile(void){
     Serial.println("Files on the windbond Chip");
     SerialFlash.opendir();
   while (1){
    //char filename[13];
     if (SerialFlash.readdir(filename, sizeof(filename), filesize)) {
      Serial.print("  ");
      Serial.print(filename);
      Serial.print("  ");
      Serial.print(filesize);
      Serial.print(" bytes");
      Serial.println();
    }
    else   {
      Serial.println(" End of lists.");
      break;
    }
  }
}

void readfile(){
  int j;
  int dtoutput;
     Serial.println("Read File and Data Flushing.");
     SerialFlash.opendir();
   while (1){
     if (SerialFlash.readdir(filename, sizeof(filename), filesize)) {
      delay(1000);
      file = SerialFlash.open(filename);
            //Serial.println( String(filename)+"+"+String( file.size() ) );
      if (file) {
        Serial.println( String(filename)+"+"+String( file.size() ) );
        file.read(contents,file.size() );
        for (j=0; j<FSIZE ; j=j+4){
          //Serial.print(contents[j]); Serial.print(contents[j+1]);Serial.print(contents[j+2]);Serial.println(contents[j+3]);
          dtoutput=(contents[j]-48)*1000+(contents[j+1]-48)*100+(contents[j+2]-48)*10+(contents[j+3]-48);
          Serial.println(dtoutput);

        }
        //file.erase();
        //Serial.println("End of Dumping This File.");
      }
      else {
        Serial.println(" File Open Error.");
        error();
        break;
      }
    }
    else   {
      Serial.println(" End of Data Flushing..");
      break;
    }
  }
}


void writefile(char *wtfilename){
    //SerialFlash.readID(id);unsigned long size = SerialFlash.capacity(id);
    if (!SerialFlash.exists(wtfilename)) {
      //Serial.println("Creating file " + String(rtfilename));
      SerialFlash.create(wtfilename, FSIZE);
    }
    //contents[0]='K';
    file = SerialFlash.open(wtfilename);
    file.write(contents, strlen(contents) + 1);
    //Serial.println("String \"" + String(contents) + "\" written to file " + String(wtfilename));
}


void timedVibSensorIsr()   // callback function when interrupt is asserted
{
  int sensor = analogRead(analogPin);
  if (idxcontents<FSIZE){
        contents[idxcontents+3]=48+sensor%10;
        contents[idxcontents+2]=48+sensor/10%10;
        contents[idxcontents+1]=48+sensor/100%10;
        contents[idxcontents] =48+sensor/1000%10;
  idxcontents=idxcontents+4;
  }
  //toggle = !toggle;  // use NOT operator to invert toggle value
}


void vibdata_sampling(void){
  unsigned char k;
  idxcontents=0;  //Serial.println("Sampling Start...");
  delay(1000);  // 10 seconds of delay, regularly 'interrupted' by the timer interrupt
  for (k=0; k< SAMPLECYCLE; k++) {
      CurieTimerOne.start(time, &timedVibSensorIsr);
      while (1) {
        delay(1);
        if (CurieTimerOne.readTickCount()>=FSIZE){
            CurieTimerOne.stop();
          afilename[11]=char( (48+(k%10)));
          afilename[10]=char( ( 48+( int(k/10)) ));
          writefile(afilename);
          break;
          }
      }
  }
  delay(1000);  // 10 seconds of delay, regularly 'interrupted' by the timer interrupt
  Serial.println("Vibdata Sampling OK.");
    //Serial.println(CurieTimerOne.rdRstTickCount());  // Reads and Resets tick count
}


void setup() {
  pinMode(LED_BUILTIN, OUTPUT);
  if (!SerialFlash.begin(ONBOARD_FLASH_SPI_PORT, ONBOARD_FLASH_CS_PIN)) {
    //Serial.println("Unable to access SPI Flash chip");
    error();
    }
  else {
     //SerialFlash.opendir();
    if (SerialFlash.readdir(filename, sizeof(filename), filesize)) {
         //Serial.print("There is file ");Serial.print(filename);
      BOOL_CHIPFULL=1;
      BOOL_SAMPLING =!BOOL_CHIPFULL;
    }
    else {
        //Serial.print("Empty Flash.");
      BOOL_CHIPFULL=0;
      BOOL_SAMPLING =!BOOL_CHIPFULL;
      SerialFlash.eraseAll();
      vibdata_sampling();
      //Serial.println(BOOL_SAMPLING);SerialFlash.eraseAll();
    }
  }


  // Init Serial if chip is full,
  if (BOOL_CHIPFULL){
    Serial.begin(115200);
    while (!Serial){
      //Wait for the serial ;
      }
      delay(100);
      Serial.println("Ready for Serial Connection and Data Flushing collection.");
      Serial.println("Selection: (0)-Quit; (1)-lists; (2)- EraseALL; (3)-DataFlush;(4)-BatchSampling.");
      //Serial.println   (BOOL_SAMPLING);
  }
//Serial.println("End of Setup");
}


void loop() {
  delay(1000);
  if (BOOL_SAMPLING){
    vibdata_sampling();
  }
  else {
    //Serial.println("Selection: (0)-Quit; (1)-lists; (2)- EraseALL; (3)-DataFlush; (4)-BatchSampling.");
    if (Serial.available() > 0) {
      selectionByte = Serial.read();
      //Serial.println(selectionByte, DEC); // '/n' show with value 10 after number pressed.
    }
    switch (selectionByte) {
      case '0':
        //Serial.println(selectionByte, DEC);
        Serial.println("0 Quit and Re-entry.");
        Serial.println("Selection: (0)-Quit; (1)-lists; (2)- EraseALL; (3)-DataFlush;(4)-BatchSampling.");
        break;
      case '1':
        //Serial.println(selectionByte, DEC);
        Serial.println("1 List ALL.");
        listfile();
        break;
      case '2':
        //Serial.println(selectionByte, DEC);
        Serial.println("2 Erase ALL.");
        SerialFlash.eraseAll();
        Serial.println("Full chip erase completed.");
        break;
      case '3':
        //Serial.println(selectionByte, DEC);
        Serial.println("3 DataFlush.");
        readfile();
        break;
      case '4':
        //Serial.println(selectionByte, DEC);
        Serial.println("4 Sensor Batch Sampling.");
        SerialFlash.eraseAll();
        vibdata_sampling();
        break;
      default:
        break;
    }
    //End of Console Selection.
  }
  delay(1000);
  //End of Loop
}
5.3 Code for desktop control in python
# Read serail into file


import serial
import time
from datetime import datetime
import os
import pandas as pd
import numpy as np
from sqlalchemy import create_engine
import matplotlib as plt


db_name_merge='kemetvibration'
engine  = create_engine('sqlite:///kemetvib.db')


#
#vbdata=pd.DataFrame(data=np.full([1,len(['vibsample'])],np.nan),columns=['vibsample'])


BATCHCOUNT=8


def batchreadserial(ser):
    brs_count=0
    while (True):
        #ser.write(b"0\n")
        ser.write(b"3\n")
        #selectionzero=str.encode("0\n");ser.write(selectionzero)
        #rddata=int(ser.readline());brs_count =brs_count +1;
        rd=ser.readline()
        print((rd[0]))
            print (rd)
            readdaba()


def readdb():
    vibdb='kemetvibdata'
    vibdata=pd.read_sql("vibdb", con=engine)


def readdaba():
    rdcount=0;
    ser.write(b"3\n")
    while (rdcount<256):
        rddata=ser.readline()
        rdcount=rdcount+1
        print(rddata)
        if (rddata==4096):
            rdcount=0


if __name__=="__main__" :
    ser=serial.Serial('COM4',115200) #Open port for serial
    ser.close()
    ser.open()
    batchreadserial(ser)
    ser.close()
    print("End of dataread.")
5.4 Refer to the flash tiff show,
5.5 Data logging in Car Engine
Thanks to the 3m length wire, the vibration sensor can be sticked on top cover of engine and put the arduino 101 inside the car, available for driving state data logging.

Look closer,

With 9V battery plugged, the arduino 101 can be powered by battery.


Start the car, wait for the data to be collected.
Connected the arduino board again with Arduino IDE 1.8.5, the reading is different,

Fetch the data from the board, the data can be used to train the model.
I have set 64 segment of file.But for data training, that is still not enough.
This car runs in good mode, just routine maintenance out of workshop. The running mode is different after about 5000km running. The data can be collect and tagged with different millage as annotation.
For example, the vibration data of 500km, 1000km, 2000km, 3000km, 5000km, 8000km or 10000km. I have tried 10000km without maintenance , the roaring of engine is quite diffent. But not recommend such a try, damage to car for sure.
Interesting if logging vibration data since 0km. I would make a try if I change new one.
Sample Data collected is attached for reference. The head, tail, and segment text shall be removed for use.
6 Data training
6.1 Make the data annotation and feed into training mode, then model output for next step.
Even there is no final product. I would like to enlight some idea on how to train data. Basicly,
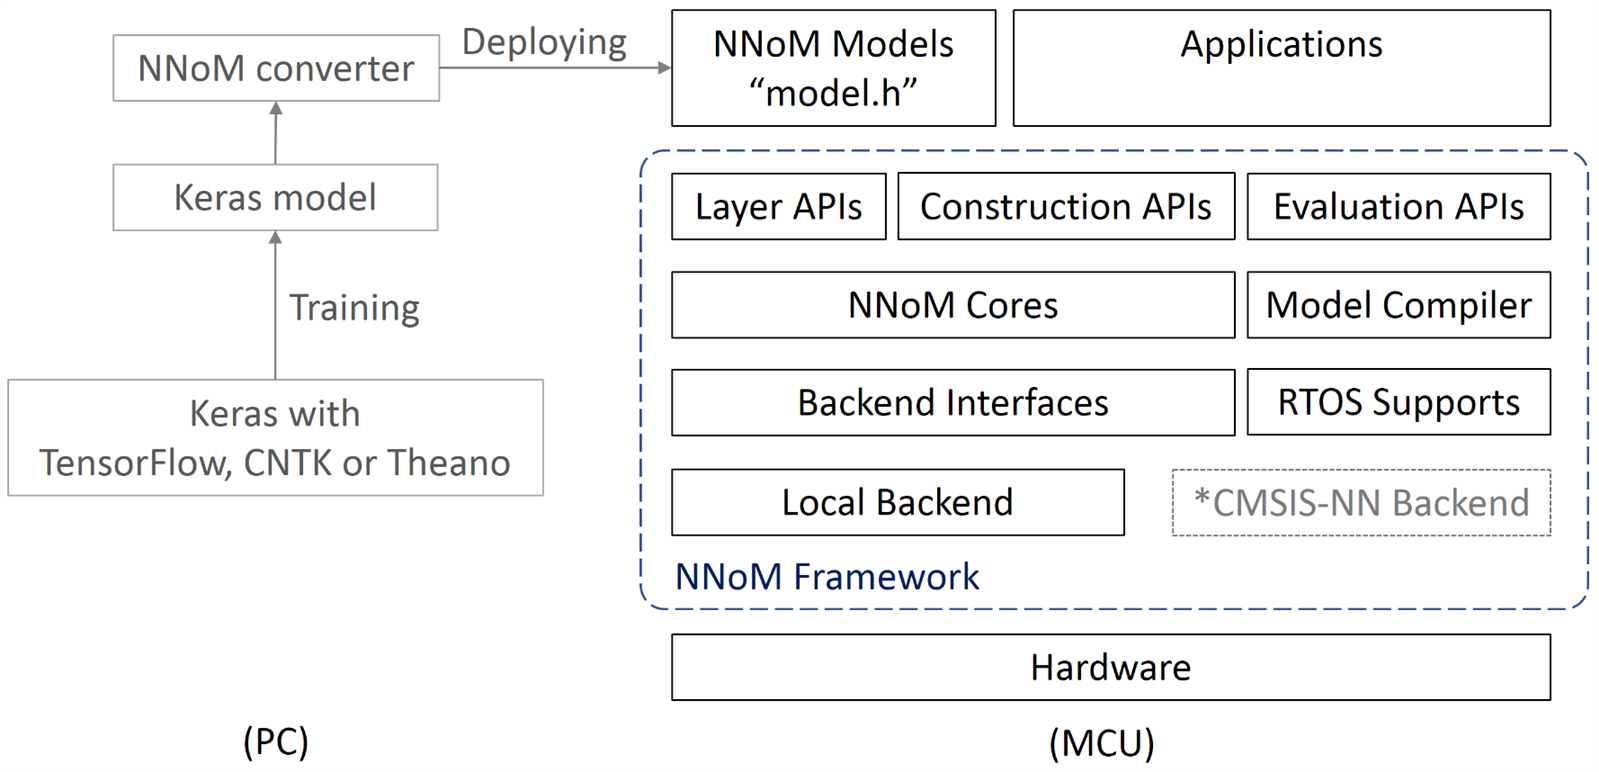
NNoM is best for ARM-M4 core MCU with 1M flash. Refer to https://majianjia.github.io/nnom/ for more. The example uci-inception with UCI HAR dataset can be used as start point, from gyro-sensor combination to model training. https://github.com/majianjia/nnom/tree/master/examples/uci-inception
6.2 The codeing flow shall be
  Input
  |
  |
  Conv
  / | \
  / | \
Conv Conv Maxpool
  \ | /
  \ | /
  Concat
  |
  Conv
  |
  Dense
  |
  Dense
  |

  Softmax
The abbrievation means as follows,

Based on The structure of NNoM to deploy on MCU
6.3 Training shall be made on Keras, simple to use and to understand.
Simple training net can be ,
model = Sequential()
model.add(Dense(32, input_dim=784))
model.add(Activation('relu'))
model.add(Dense(10))
Then generated Keras model shall be changed to MCU applicable data in commond in NNoM as
generate_model(model, x_test, name='weights.h')
The weights.h is generated and to be used in program as of,
#include "nnom.h"
#include "weights.h"
int main(void)
{
nnom_model_t *model;
model = nnom_model_create();
model_run(model);
}
But this can not compatible with arduino 101. Which I have just realized, CMSIS pack shall be included beforehead. STM32Fxxx can be good.
I have placed order for one new STM32Fxx-nucleo, but can not be here right away.
6.4 The routine is quite simple,
- Collected annotated data with arduino 101, tagging millage of 500km~10000km
- Train the data with classification model like Keras.Sequential, the data shall be split into training dataset and test dataset randomly with ratio about 8:2. With some luck, the model can be trained with accuracy above 75%,
- Generate th weight.h by transform the keras model weight,
- Finally, deploy the model into MCU.
Luck is neccesary element, no doult.
7 Data Deploing with AI capabilities
Deploy the model in MCU.
With two arduino 101, one is for datalogging , the other for Prediction.

Best part shall be independant lightweight integer type DL engine. I may try build one if I have free time later.
8 Summary and Conclusion
The kemet vibration sensor is sensitive and easy to deploy. Best application shall be predictive maintenance with quite a lot space to envision.
9 Reference and contributions
Refer to relevent website and git retros.
Some datasheep and source code is attached here.
| VS-BV203-B.pdf | |

Top Comments