


With a sufficiently large dataset created, the next step is training a model to run on the DPU. I couldn’t find a full list of supported models for the DPU and its corresponding toolchain, but YOLOv3 is confirmed to be working, so I will be using that.
Training Environment
I will be using the Darknet library to train YOLOv3, which is its original implementation. Unfortunately, it hasn’t been updated for a while, and it refuses to work with modern versions of its dependencies, specifically CUDA. I need CUDA for GPU support, otherwise the training will take forever.
To fix this issue, I created a Ubuntu 18.04 VM, and used QEMU’s PCIe passthrough capabilities to add an Nvidia Tesla P40 GPU to the VM.
With the installation finished, I did the usual post-install tasks, like updating all packages, installing build-essential, git, and an ssh server. I also installed libopencv-dev, which will be needed for opencv support in Darknet.
After a bit of research, I found that CUDA 10.2 with cuDNN 7.6.5 should work with Darknet.
I downloaded the CUDA 10.2 “runfile” installer from Nvidia’s website, which also includes a suitable GPU driver version. The installation, however, failed.
The first issue was the open-source “nouveau” driver still being loaded, which conflicts with the Nvidia proprietary driver. The Nvidia installer automatically makes a modprobe blacklist file with the proper module names though, so the fix for this is to simply restart and try again.
The solution for the second problem was to disable secure boot in the VM, using this command:
sudo mokutil –disable-validation
Then reboot the machine, and disable secure boot when prompted.
After the installation finished, all that’s left to do is to add CUDA’s lib folder to LD_LIBRARY_PATH. My preferred way is adding it to /etc/ld.so.conf, which looks like this now:
/usr/local/cuda-10.2/targets/x86_64-linux/lib
/usr/local/cuda-10.2/lib64
Afterwards I did “sudo ldconfig” to apply the changes
The last step is to add CUDA related programs to path. I did this by adding the following line to ~/.profile:
PATH="$PATH:/usr/local/cuda-10.2/bin"
Later I found out that CUDA 10.0 and 9.0 will also be needed, along with cuDNN 7.4.1 for CUDA 10.0 and cuDNN 7.1 for CUDA 9.0.
The installation is done the same way as before, the only exception is adding to PATH. Since each CUDA version includes programs with the same name, only one of these PATH settings should be active at a time. I added them all to my ~/.profile file, but commented all except one out:
#PATH="$PATH:/usr/local/cuda-10.2/bin"
#PATH="$PATH:/usr/local/cuda-10.0/bin"
PATH="$PATH:/usr/local/cuda-9.0/bin"
To switch between versions, just uncomment a different line, then run:
source ~/.profile
Compiling Darknet
First, got the source code:
git clone https://github.com/pjreddie/darknet.git
cd darknet
I edited the Makefile to enable GPU, cuDNN, and OpenCV support by setting the corresponding variables to 1 at the top:
GPU=1
CUDNN=1
OPENCV=1
OPENMP=0
DEBUG=0
Then built Darknet by running make.
To confirm everything went well, I started the program to check if it shows any errors:
$ ./darknet
usage: ./darknet <function>
Everything seems to be working so far.
Training YOLOv3
First, I downloaded a copy of my dataset from Roboflow in the “YOLO Darknet” format. The “train” and “valid” folders will be the important part. The dataset consists of .jpg files, and a .txt file along with each image, sharing the same filename.
The text files contain the object locations within an image, for example:
33 0.3143888888888889 0.11387037037037037 0.0204375 0.06477777777777777
9 0.6836111111111111 0.5178148148148148 0.06678472222222222 0.019287037037037037
33 0.4489722222222222 0.10475925925925926 0.020270833333333335 0.06766666666666667
33 0.6222222222222222 0.07262962962962963 0.020493055555555556 0.07066666666666666
9 0.3927777777777778 0.49181481481481476 0.029625 0.009916666666666667
10 0.6610902777777778 0.3902777777777778 0.011076388888888889 0.013888888888888888
33 0.5638888888888889 0.29814814814814816 0.009722222222222222 0.03148148148148148
33 0.6849652777777778 0.3876203703703704 0.006458333333333334 0.02325925925925926
23 0.8263541666666667 0.3760092592592592 0.010118055555555555 0.01349074074074074
29 0.6625416666666666 0.4045 0.010694444444444444 0.013657407407407408
The first number corresponds to the class, the next two are the center coordinates for the object, and the next two are the width and height of the object. Visually, it looks like this:
The downloaded dataset contains “train”, “valid” and “test” folders. These are just 70%-20%-10% splits of the dataset. YOLOv3 does not use the test set, so I just copied its contents into train.
A file that maps the numerical IDs to actual labels is also required, this can be found within “train”/”valid”. They are both the same, so I moved one out of its subdirectory, and renamed it to classes.names.
This is what this new file looks like:
bike_green
bike_red
bike_redyellow
bike_yellow
caution
city_begin
city_end
height_limit
left_prohibited
license_plate
main_route
main_route_end
overtake_prohibited
overtake_prohibited_end
pedestrian_crossing
pedestrian_crossing_early
prohibited
region
right_prohibited
speedlimit100
speedlimit110
speedlimit120
speedlimit20
speedlimit30
speedlimit30_zone
speedlimit30_zone_end
speedlimit40
speedlimit50
speedlimit60
speedlimit70
speedlimit80
speedlimit_end
stop
trafficlight_green
trafficlight_green_forward
trafficlight_green_left
trafficlight_green_leftforward
trafficlight_green_right
trafficlight_green_rightforward
trafficlight_red
trafficlight_red_forward
trafficlight_red_left
trafficlight_red_leftforward
trafficlight_red_right
trafficlight_red_rightforward
trafficlight_red_turnaround
trafficlight_redyellow
trafficlight_redyellow_forward
trafficlight_redyellow_left
trafficlight_redyellow_leftforward
trafficlight_redyellow_right
trafficlight_redyellow_rightforward
trafficlight_yellow
trafficlight_yellow_forward
trafficlight_yellow_left
trafficlight_yellow_leftforward
trafficlight_yellow_right
trafficlight_yellow_rightforward
The next requirement is having two files, one for “train”, one for “valid”, that lists the filename of every single image within the train/ and valid/ dataset folders. To do this, I wrote this short python script:
import os
import sys

def create_image_list(directory, output_file):
    try:
        directory = os.path.abspath(directory)
        if not os.path.isdir(directory):
            print(f"Error: Directory '{directory}' does not exist.")
            return

        jpg_files = [os.path.join(directory, f) for f in os.listdir(directory) if f.lower().endswith('.jpg')]

        with open(output_file, 'w') as f:
            for jpg in jpg_files:
                f.write(jpg + '\n')

        print(f"Successfully wrote {len(jpg_files)} image paths to '{output_file}'.")
    except Exception as e:
        print(f"An error occurred: {e}")

if __name__ == "__main__":
    if len(sys.argv) != 3:
        print("Usage: python create_image_list.py <directory> <output_file>")
    else:
        create_image_list(sys.argv[1], sys.argv[2])
Then created the two text files with it:
python gentxt.py train/ train.txt
python gentxt.py valid/ valid.txt
Next is the model configuration file. This is available from a git repo:
wget https://github.com/pjreddie/darknet/blob/master/cfg/yolov3.cfg
There are a few things that need to be changed though. Let’s go through them:
- batch and subdivisions at the top will need to be adjusted to maximize but not exceed VRAM
- max_batches increased to 200000
- There are 3 [yolo] sections, within each section, the value of classes was changed to 59
- In the [convolutional] section above each [yolo] section, filters was changed to (classes+5)*3, which is 192 for my dataset.
Then I downloaded a pretrained model from the creator’s website, to use as a starting point, instead of training from scratch.
wget https://pjreddie.com/media/files/darknet53.conv.74
A final configuration file is needed that includes where the dataset is located, where to save the model, and how many classes there are total:
classes = 59
train = train.txt
valid = valid.txt
names = classes.names
backup = backup/
I saved this as training.data
With that, everything is ready to start training:
darknet detector train training.data yolov3.cfg darknet53.conv.74
During training, two relevant types of output are produced:
Region 106 Avg IOU: 0.099362, Class: 0.615384, Obj: 0.388820, No Obj: 0.440194, .5R: 0.000000, .75R: 0.000000,  count: 29
1: 697.997437, 697.997437 avg, 0.000000 rate, 1.173476 seconds, 32 images
The first type, those that start with “Region”, show how well the model is performing. The .5R and .75R numbers show what percentage of detections are at least 50% or least 75% overlapping with the ground truth in the dataset labels.
The second type of output starts with a number, showing iteration count, essentially how long training has been running.
Darknet saves the model every 100 iteration until iteration 1000, then every 10000 iterations, so try and stop after one of these thresholds if manually stopping early.
I ended up running the training for 30000 iterations, taking about 16 hours total.
The trained model file in the folder specified by the configuration made earlier, in my case backup/, with the filename yolov3_30000.weights.
Converting the model
To be able to use the DPU for inference, several conversion steps will need to be used.
First is to convert the format used by Darknet to one readable by Keras.
For this, I used a script in https://github.com/qqwweee/keras-yolo3
python convert.py yolov3.cfg backups/yolov3_30000.weights yolo.h5
This produces a .h5 file easily readable by Keras.
The next step is to convert to the “frozen graph” format. This is done similarly to the previous step, using a script(yolo_keras/keras_to_tensorflow.py) from this repo: https://github.com/wutianze/dnndk-pynqz2
python keras_to_tensorflow.py --input_model yolo.h5 --output_model yolo.pb
In this format, the Xilinx DNNDK tools can now work with the model.
Quantization
The model needs to be quantized to use int8 instead of float32 for the DPU. This isn’t as simple as just converting every float32 in the weights to int8.
Xilinx’ DNNDK provides the decent_q program to do this quantization.
First, we need to find the names of the input and output tensors, the following command lists them:
$ decent_q inspect --input_frozen_graph=yolo.pb
Op types used: 453 Const, 366 Identity, 75 Conv2D, 74 Mul, 72 FusedBatchNorm, 72 Maximum, 23 Add, 5 Pad, 3 BiasAdd, 2 ConcatV2, 2 ResizeNearestNeighbor, 2 Shape, 2 StridedSlice, 1 Placeholder

Found 1 possible inputs: (name=input_1, type=float(1), shape=[?,?,?,3])
Found 3 possible outputs: (name=conv2d_59/BiasAdd, op=BiasAdd) (name=conv2d_67/BiasAdd, op=BiasAdd) (name=conv2d_75/BiasAdd, op=BiasAdd)
The input tensor name is therefore “input_1”, and the output tensors are “conv2d_59”, “conv2d_67”, and “conv2d_75”.
The quantization process also requires a dataset(or at least images) to test the model during quantization, and a helper script to load and resize these images.
The helper script is “graph_input_fn.py” from the same place as the keras_to_tensorflow.py script used previously.
I changed a variable inside the script to point to my folder of training images, then ran this command to start quantization:
decent_q quantize \
  --input_frozen_graph ./yolo.pb \
  --input_nodes input_1 \
  --input_shapes ?,608,608,3 \
  --output_nodes "conv2d_59/BiasAdd,conv2d_67/BiasAdd,conv2d_75/BiasAdd" \
  --method 1 \
  --input_fn graph_input_fn.calib_input \
  --gpu 0 \
  --calib_iter 100
After about an hour of waiting, the quantized model is available in the quantize_results folder.
This step also benefits from having a GPU, running on CPU would’ve taken about 9 hours.
Testing the model on the Arty Z7
I used the following program to test if my model works:
https://github.com/andre1araujo/YOLO-on-PYNQ-Z2/tree/main/Deployment/yolo_pynqz2
I overwrote the two files in info/ with the files created during quantization, deleted the contents of objects/, and edited programs/yolo_image.cpp
First I changed the const int classification variable to be 59, which is the number of classes in my dataset, then I changed the class_names vector to be a list of classes from the dataset used.
Then used `make` to build the program.
I also copied an image over to the Arty to test the model with. I ran this command:
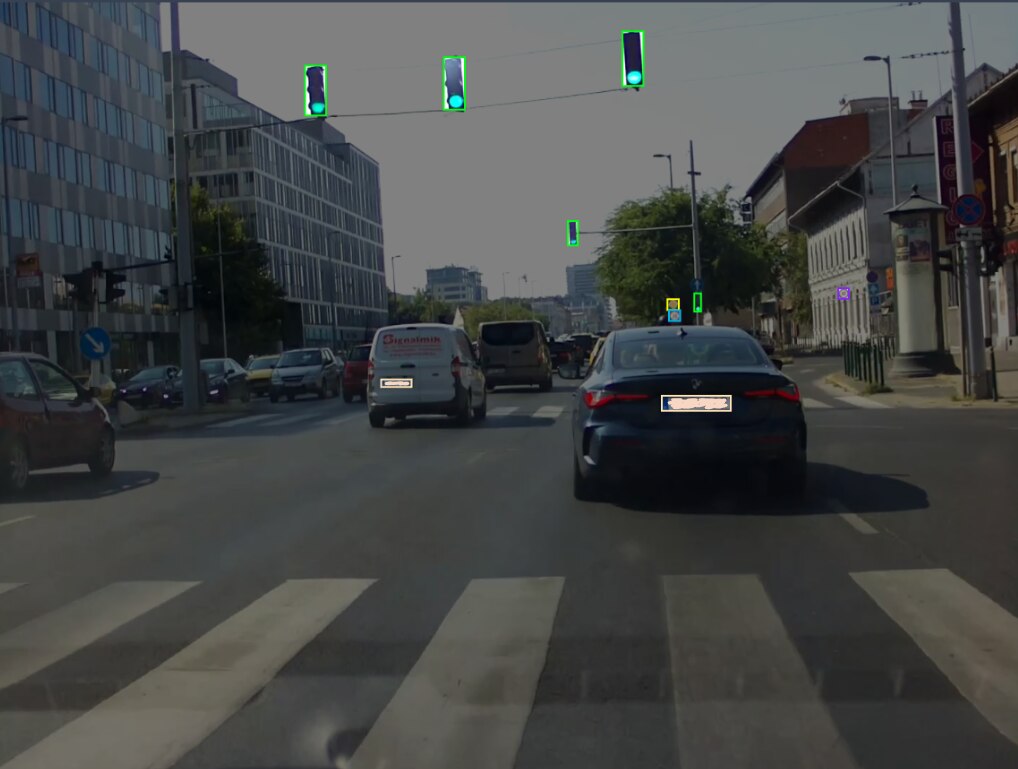
# ./yolo_image testimage.jpg
-----------------------------
Class name: license_plate     [ID]:9
-----------------------------
Class name: trafficlight_green     [ID]:33

(yolo-v3:1237): Gtk-WARNING **: 21:35:17.037: cannot open display:
The warning is shown because the test program wants to show a window with the image and detections overlaid, but there is no X server running. The important parts are the Class name lines, showing that the model detected two objects in the test image:
It missed a hard to detect stop sign, partially obscured by a lamp post, but found the license plate and green traffic light.
I changed the code a bit to continuously do detection on the input image, so inference speed is measurable, removed the GUI code, and added prints for the detection coordinates:
#include <algorithm>
#include <vector>
#include <atomic>
#include <queue>
#include <iostream>
#include <fstream>
#include <iomanip>
#include <chrono>
#include <mutex>
#include <zconf.h>
#include <thread>
#include <sys/stat.h>
#include <dirent.h>
#include <iomanip>
#include <iosfwd>
#include <memory>
#include <string>
#include <utility>
#include <math.h>
#include <arm_neon.h>
#include <opencv2/opencv.hpp>
#include <dnndk/n2cube.h>
#include <opencv2/core/core.hpp>
#include <opencv2/highgui/highgui.hpp>
#include <opencv2/imgproc/imgproc.hpp>
#include <opencv2/opencv.hpp>
using namespace std;
using namespace cv;
using namespace std::chrono;
// confidence and threshold
#define CONF 0.5
#define NMS_THRE 0.1
// dpu kernel info
#define YOLOKERNEL "yolo"
#define INPUTNODE "conv2d_1_convolution"
vector<string> outputs_node = {"conv2d_59_convolution", "conv2d_67_convolution", "conv2d_75_convolution"};
// yolo parameters
const int classification = 59;
const int anchor = 3;
vector<float> biases{116, 90, 156, 198, 373, 326, 30, 61, 62, 45, 59, 119, 10, 13, 16, 30, 33, 23};

vector<string> class_names = {
    "bike_green", "bike_red", "bike_redyellow", "bike_yellow", "caution", "city_begin", "city_end", "height_limit", "left_prohibited", "license_plate", "main_route", "main_route_end", "overtake_prohibited", "overtake_prohibited_end", "pedestrian_crossing", "pedestrian_crossing_early", "prohibited", "region", "right_prohibited", "speedlimit100", "speedlimit110", "speedlimit120", "speedlimit20", "speedlimit30", "speedlimit30_zone", "speedlimit30_zone_end", "speedlimit40", "speedlimit50", "speedlimit60", "speedlimit70", "speedlimit80", "speedlimit_end", "stop", "trafficlight_green", "trafficlight_green_forward", "trafficlight_green_left", "trafficlight_green_leftforward", "trafficlight_green_right", "trafficlight_green_rightforward", "trafficlight_red", "trafficlight_red_forward", "trafficlight_red_left", "trafficlight_red_leftforward", "trafficlight_red_right", "trafficlight_red_rightforward", "trafficlight_red_turnaround", "trafficlight_redyellow", "trafficlight_redyellow_forward", "trafficlight_redyellow_left", "trafficlight_redyellow_leftforward", "trafficlight_redyellow_right", "trafficlight_redyellow_rightforward", "trafficlight_yellow", "trafficlight_yellow_forward", "trafficlight_yellow_left", "trafficlight_yellow_leftforward", "trafficlight_yellow_right", "trafficlight_yellow_rightforward", "yield"};

// ANSI escape codes for text colors
#define ANSI_COLOR_RED "\x1b[31m"
#define ANSI_COLOR_GREEN "\x1b[32m"
#define ANSI_COLOR_YELLOW "\x1b[33m"
#define ANSI_COLOR_BLUE "\x1b[34m"
#define ANSI_COLOR_MAGENTA "\x1b[35m"
#define ANSI_COLOR_CYAN "\x1b[36m"
#define ANSI_COLOR_RESET "\x1b[0m"

class image
{
public:
    int w;
    int h;
    int c;
    float *data;
    image(int ww, int hh, int cc, float fill) : w(ww), h(hh), c(cc)
    {
        data = new float[h * w * c];
        for (int i = 0; i < h * w * c; ++i)
            data[i] = fill;
    };
    void free() { delete[] data; };
};

void detect(vector<vector<float>> &boxes, vector<float> result, int channel, int height, int weight, int num, int sh, int sw);
image load_image_cv(const cv::Mat &img);
image letterbox_image(image im, int w, int h);

void get_output(int8_t *dpuOut, int sizeOut, float scale, int oc, int oh, int ow, vector<float> &result)
{
    vector<int8_t> nums(sizeOut);
    memcpy(nums.data(), dpuOut, sizeOut);
    for (int a = 0; a < oc; ++a)
    {
        for (int b = 0; b < oh; ++b)
        {
            for (int c = 0; c < ow; ++c)
            {
                int offset = b * oc * ow + c * oc + a;
                result[a * oh * ow + b * ow + c] = nums[offset] * scale;
            }
        }
    }
}

void set_input_image(DPUTask *task, const Mat &img, const char *nodename)
{
    Mat img_copy;
    int height = dpuGetInputTensorHeight(task, nodename);
    int width = dpuGetInputTensorWidth(task, nodename);
    int size = dpuGetInputTensorSize(task, nodename);
    int8_t *data = dpuGetInputTensorAddress(task, nodename);
    // cout<<"set_input_image height:"<<height<<" width:"<<width<<" size"<<size<<endl;

    image img_new = load_image_cv(img);
    image img_yolo = letterbox_image(img_new, width, height);
    vector<float> bb(size);
    for (int b = 0; b < height; ++b)
        for (int c = 0; c < width; ++c)
            for (int a = 0; a < 3; ++a)
                bb[b * width * 3 + c * 3 + a] = img_yolo.data[a * height * width + b * width + c];

    float scale = dpuGetInputTensorScale(task, nodename);
    // cout<<"scale: "<<scale<<endl;
    for (int i = 0; i < size; ++i)
    {
        data[i] = int(bb.data()[i] * scale);
        if (data[i] < 0)
            data[i] = 127;
    }
    img_new.free();
    img_yolo.free();
}

inline float sigmoid(float p)
{
    return 1.0 / (1 + exp(-p * 1.0));
}

inline float overlap(float x1, float w1, float x2, float w2)
{
    float left = max(x1 - w1 / 2.0, x2 - w2 / 2.0);
    float right = min(x1 + w1 / 2.0, x2 + w2 / 2.0);
    return right - left;
}

inline float cal_iou(vector<float> box, vector<float> truth)
{
    float w = overlap(box[0], box[2], truth[0], truth[2]);
    float h = overlap(box[1], box[3], truth[1], truth[3]);
    if (w < 0 || h < 0)
        return 0;
    float inter_area = w * h;
    float union_area = box[2] * box[3] + truth[2] * truth[3] - inter_area;
    return inter_area * 1.0 / union_area;
}

vector<vector<float>> apply_nms(vector<vector<float>> &boxes, int classes, const float thres)
{
    vector<pair<int, float>> order(boxes.size());
    vector<vector<float>> result;
    for (int k = 0; k < classes; k++)
    {
        for (size_t i = 0; i < boxes.size(); ++i)
        {
            order[i].first = i;
            boxes[i][4] = k;
            order[i].second = boxes[i][6 + k];
        }
        sort(order.begin(), order.end(),
             [](const pair<int, float> &ls, const pair<int, float> &rs)
             { return ls.second > rs.second; });
        vector<bool> exist_box(boxes.size(), true);
        for (size_t _i = 0; _i < boxes.size(); ++_i)
        {
            size_t i = order[_i].first;
            if (!exist_box[i])
                continue;
            if (boxes[i][6 + k] < CONF)
            {
                exist_box[i] = false;
                continue;
            }
            // add a box as result
            result.push_back(boxes[i]);
            // cout << "i = " << i<<" _i : "<< _i << endl;
            for (size_t _j = _i + 1; _j < boxes.size(); ++_j)
            {
                size_t j = order[_j].first;
                if (!exist_box[j])
                    continue;
                float ovr = cal_iou(boxes[j], boxes[i]);
                if (ovr >= thres)
                    exist_box[j] = false;
            }
        }
    }
    return result;
}

static float get_pixel(image m, int x, int y, int c)
{
    assert(x < m.w && y < m.h && c < m.c);
    return m.data[c * m.h * m.w + y * m.w + x];
}

static void set_pixel(image m, int x, int y, int c, float val)
{
    if (x < 0 || y < 0 || c < 0 || x >= m.w || y >= m.h || c >= m.c)
        return;
    assert(x < m.w && y < m.h && c < m.c);
    m.data[c * m.h * m.w + y * m.w + x] = val;
}

static void add_pixel(image m, int x, int y, int c, float val)
{
    assert(x < m.w && y < m.h && c < m.c);
    m.data[c * m.h * m.w + y * m.w + x] += val;
}

image resize_image(image im, int w, int h)
{
    image resized(w, h, im.c, 0);
    image part(w, im.h, im.c, 0);
    int r, c, k;
    float w_scale = (float)(im.w - 1) / (w - 1);
    float h_scale = (float)(im.h - 1) / (h - 1);
    for (k = 0; k < im.c; ++k)
    {
        for (r = 0; r < im.h; ++r)
        {
            for (c = 0; c < w; ++c)
            {
                float val = 0;
                if (c == w - 1 || im.w == 1)
                {
                    val = get_pixel(im, im.w - 1, r, k);
                }
                else
                {
                    float sx = c * w_scale;
                    int ix = (int)sx;
                    float dx = sx - ix;
                    val = (1 - dx) * get_pixel(im, ix, r, k) + dx * get_pixel(im, ix + 1, r, k);
                }
                set_pixel(part, c, r, k, val);
            }
        }
    }
    for (k = 0; k < im.c; ++k)
    {
        for (r = 0; r < h; ++r)
        {
            float sy = r * h_scale;
            int iy = (int)sy;
            float dy = sy - iy;
            for (c = 0; c < w; ++c)
            {
                float val = (1 - dy) * get_pixel(part, c, iy, k);
                set_pixel(resized, c, r, k, val);
            }
            if (r == h - 1 || im.h == 1)
                continue;
            for (c = 0; c < w; ++c)
            {
                float val = dy * get_pixel(part, c, iy + 1, k);
                add_pixel(resized, c, r, k, val);
            }
        }
    }
    part.free();
    return resized;
}

image load_image_cv(const cv::Mat &img)
{
    int h = img.rows;
    int w = img.cols;
    int c = img.channels();
    image im(w, h, c, 0);

    unsigned char *data = img.data;

    for (int i = 0; i < h; ++i)
    {
        for (int k = 0; k < c; ++k)
        {
            for (int j = 0; j < w; ++j)
            {
                im.data[k * w * h + i * w + j] = data[i * w * c + j * c + k] / 255.;
            }
        }
    }

    // bgr to rgb
    for (int i = 0; i < im.w * im.h; ++i)
    {
        float swap = im.data[i];
        im.data[i] = im.data[i + im.w * im.h * 2];
        im.data[i + im.w * im.h * 2] = swap;
    }
    return im;
}

image letterbox_image(image im, int w, int h)
{
    int new_w = im.w;
    int new_h = im.h;
    if (((float)w / im.w) < ((float)h / im.h))
    {
        new_w = w;
        new_h = (im.h * w) / im.w;
    }
    else
    {
        new_h = h;
        new_w = (im.w * h) / im.h;
    }
    image resized = resize_image(im, new_w, new_h);
    image boxed(w, h, im.c, .5);

    int dx = (w - new_w) / 2;
    int dy = (h - new_h) / 2;
    for (int k = 0; k < resized.c; ++k)
    {
        for (int y = 0; y < new_h; ++y)
        {
            for (int x = 0; x < new_w; ++x)
            {
                float val = get_pixel(resized, x, y, k);
                set_pixel(boxed, dx + x, dy + y, k, val);
            }
        }
    }
    resized.free();
    return boxed;
}

//------------------------------------------------------------------

void correct_region_boxes(vector<vector<float>> &boxes, int n, int w, int h, int netw, int neth, int relative = 0)
{
    int new_w = 0;
    int new_h = 0;
    if (((float)netw / w) < ((float)neth / h))
    {
        new_w = netw;
        new_h = (h * netw) / w;
    }
    else
    {
        new_h = neth;
        new_w = (w * neth) / h;
    }
    for (int i = 0; i < n; ++i)
    {
        boxes[i][0] = (boxes[i][0] - (netw - new_w) / 2. / netw) / ((float)new_w / (float)netw);
        boxes[i][1] = (boxes[i][1] - (neth - new_h) / 2. / neth) / ((float)new_h / (float)neth);
        boxes[i][2] *= (float)netw / new_w;
        boxes[i][3] *= (float)neth / new_h;
    }
}

void deal(DPUTask *task, Mat &img, int sw, int sh)
{
    vector<vector<float>> boxes;
    for (int i = 0; i < outputs_node.size(); i++)
    {
        string output_node = outputs_node[i];
        int channel = dpuGetOutputTensorChannel(task, output_node.c_str());
        int width = dpuGetOutputTensorWidth(task, output_node.c_str());
        int height = dpuGetOutputTensorHeight(task, output_node.c_str());

        int sizeOut = dpuGetOutputTensorSize(task, output_node.c_str());
        int8_t *dpuOut = dpuGetOutputTensorAddress(task, output_node.c_str());
        float scale = dpuGetOutputTensorScale(task, output_node.c_str());
        vector<float> result(sizeOut);
        boxes.reserve(sizeOut);
        get_output(dpuOut, sizeOut, scale, channel, height, width, result);
        detect(boxes, result, channel, height, width, i, sh, sw);
    }
    correct_region_boxes(boxes, boxes.size(), img.cols, img.rows, sw, sh);
    vector<vector<float>> res = apply_nms(boxes, classification, NMS_THRE);

    float h = img.rows;
    float w = img.cols;
    for (size_t i = 0; i < res.size(); ++i)
    {
        float xmin = (res[i][0] - res[i][2] / 2.0) * w;
        float ymin = (res[i][1] - res[i][3] / 2.0) * h;
        float xmax = (res[i][0] + res[i][2] / 2.0) * w;
        float ymax = (res[i][1] + res[i][3] / 2.0) * h;
        int cls = static_cast<int>(res[i][4]);
        string class_name = class_names[cls];
        float conf = res[i][5];

        cout << class_name << "     [ID]:" << cls << endl;
        cout << "   Confidence: " << conf << endl;
        cout << "   Bounding box: (" << xmin << ", " << ymin << ", " << xmax << ", " << ymax << ")" << endl << endl;
    }
}

void detect(vector<vector<float>> &boxes, vector<float> result, int channel, int height, int width, int num, int sh, int sw)
{
    {
        int conf_box = 5 + classification;
        float swap[height * width][anchor][conf_box];
        for (int h = 0; h < height; ++h)
        {
            for (int w = 0; w < width; ++w)
            {
                for (int c = 0; c < channel; ++c)
                {
                    int temp = c * height * width + h * width + w;
                    swap[h * width + w][c / conf_box][c % conf_box] = result[temp];
                }
            }
        }

        for (int h = 0; h < height; ++h)
        {
            for (int w = 0; w < width; ++w)
            {
                for (int c = 0; c < anchor; ++c)
                {
                    float obj_score = sigmoid(swap[h * width + w][c][4]);
                    if (obj_score < CONF)
                        continue;
                    vector<float> box;
                    box.push_back((w + sigmoid(swap[h * width + w][c][0])) / width);
                    box.push_back((h + sigmoid(swap[h * width + w][c][1])) / height);
                    box.push_back(exp(swap[h * width + w][c][2]) * biases[2 * c + anchor * 2 * num] / float(sw));
                    box.push_back(exp(swap[h * width + w][c][3]) * biases[2 * c + anchor * 2 * num + 1] / float(sh));
                    box.push_back(-1);        // class
                    box.push_back(obj_score); // this class's conf
                    for (int p = 0; p < classification; p++)
                    {
                        box.push_back(obj_score * sigmoid(swap[h * width + w][c][5 + p]));
                    }
                    boxes.push_back(box);
                }
            }
        }
    }
}
int main(const int argc, const char **argv)
{
    dpuOpen();
    DPUKernel *kernel = dpuLoadKernel(YOLOKERNEL);
    DPUTask *task = dpuCreateTask(kernel, 0);
    int sh = dpuGetInputTensorHeight(task, INPUTNODE);
    int sw = dpuGetInputTensorWidth(task, INPUTNODE);
    if (argc < 2)
    {
        cout << "You should use like: ./yolo dog.jpg";
        return -1;
    }

    while (true) {
        string name(argv[1]);
        Mat img = imread(name);
        set_input_image(task, img, INPUTNODE);
        dpuRunTask(task);
        deal(task, img, sw, sh);
    }

    dpuDestroyTask(task);
    dpuDestroyKernel(kernel);
    dpuClose();
    return 0;
}
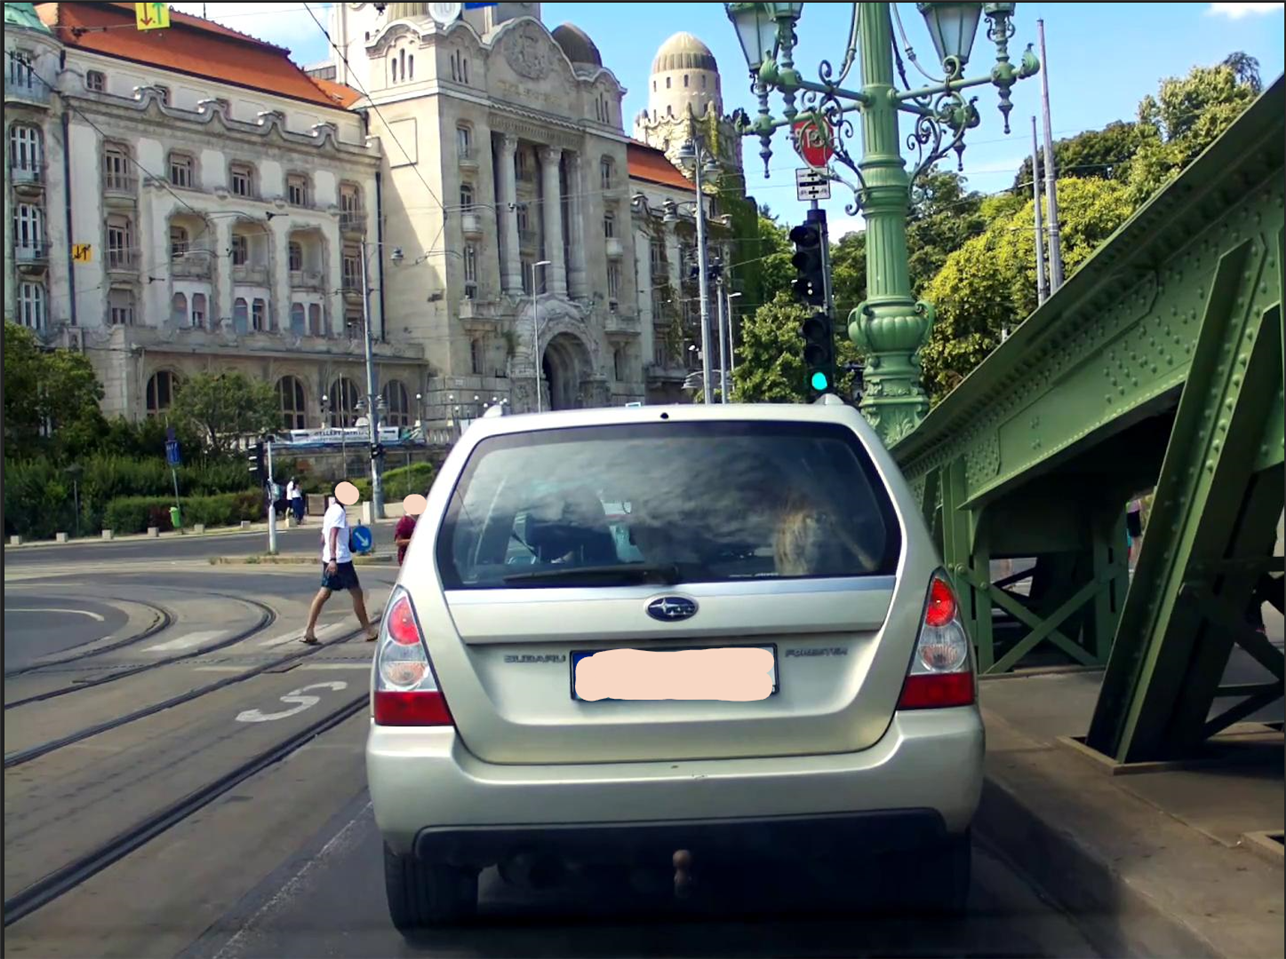
license_plate     [ID]:9
   Confidence: 0.939913
   Bounding box: (649.313, 720.74, 837.862, 785.383)

trafficlight_green     [ID]:33
   Confidence: 0.982014
   Bounding box: (904.06, 349.958, 927.044, 441.191)
(the input image was 1440x900)
With this, I get roughly 2 seconds per frame. Not great, but workable. It is theoretically possible to speed this up further, the Zynq-7020 looks like could fit a very slighly larger DPU, and a newer YOLO model with faster inference speeds might also be supported.

(graph from darknet GitHub repo)
YOLOv7-tiny would be significantly faster while also being more accurate, so this could be worth to investigate later.
Conclusion
With the custom model working on the DPU, the next step is to hook the Arty up to the Raspberry Pi 4, and offload inference to it.
The plan is to use the Ethernet port for the connection, and communicate using ZeroMQ. The Pi will send images, the Arty responds with detection classes and coordinates.
The detection results, along with the camera image will be displayed, and the sensor data in addition to the detections can be used to generate warnings for the driver.
References
https://github.com/andre1araujo/YOLO-on-PYNQ-Z2/tree/main/Deployment/yolo_pynqz2
https://github.com/wutianze/dnndk-pynqz2
Top Comments