


In my second blog, I discussed the ZYNQ SoC and PYNQ overlay in detail. I also controlled the onboard LEDs of the Arty Z7 board with the onboard buttons and switches using the base overlay. At the beginning of this blog, I will show how I made a simple overlay using Vitis HLS and Vivado. Later in this blog, I will try to modify an overlay to make it suitable for our specific project.
To follow this blog, you will need to access various Xilinx tools. Let's introduce some of them first.
Vivado
Vivado is a suite containing various tools that allow to develop Hardware to be used on the PL of Xilinx FPGA's. You can essentially create hardware in 3 ways:
-
High-Level Syntesis (HLS) - Vivado HLS is a tool that allows to create hardware using high level programming languages like C, C++ or OpenCL. This allows the developer to express desired functionalities at a more abstract level, making the hardware development process easier and more accessible.
-
Hardware Description Languages (HDL) - The traditional approach on hardware development consists of writing code in Hardware description languages like VHDL or Verilog. Vivado offers a Integrated Development Environment (IDE), to write, test, verify and debug these projects.
-
Block Design - For complex projects, Vivado offers a system design tool based on graphics that allows to connect functional blocks pre-projected and customize the behavior of the system. These blocks are called Intellectual Property (IP) and were designed by Xilinx and other creators.
Vivado also allows the user to perform simulation and validation on the Hardware before its physical implementation. After the creation and development of the desired functions in Hardware, Vivado is able to generate a Bitstream, which is a binary file that has the information to configure the FPGA with the implemented logic.
Petalinux
Petalinux is an open-source development platform from Xilinx used to create, customize and implement Linux OS (Operational Systems) on Xilinx devices. So, it's possible to configure libraries and packages on the board's OS, define the Kernel, I/O's, drivers, etc. In addition to Software, this is the platform that links the Hardware created on Vivado to the board. After all configurations and after defining the binary file relative to de desired Hardware, we are able to copy specific files to a micro SD card and later start the board with it.
It's also important to mention that Petalinux is a Linux distribution and is normally used on a Virtual Machine so it's possible to make tests and configurations without worrying about damaging the native Operating System. I will guide you trough that process on the specific chapter.
Making a PYNQ Overlay
While there are a wide range of overlays for our PYNQ boards available from pynq.io, there will come a time when we need to create our own overlay to meet our specific goal. We will need to do some simple digital design using Vivado to make a custom overlay. When we make an overlay we are creating a design that is loaded into the programmable logic (PL) half of the Zynq SoC.
In this tutorial, we will create a custom PYNQ overlay for the Arty Z7 board. The overlay contains one custom IP (a simple calculator for doing addition, subtraction, multiplication, and division of two 32-bit integer numbers) with an AXI-Lite interface and six registers accessible over that interface: a, b, sum, sub, mul, and div. To use the IP we will write a number to input registers a and b, and then we will read the output registers sum, sub, mul, and div which contain the summation, difference, product, and quotient of a and b. We will create the IP in Vitis HLS, and then we will create the overlay in Vivado by bringing the custom IP into our block design. Then we will copy the overlay files (.bit, .tcl and .hwh) over the network and onto the SD card of the Arty Z7. Finally, we will open the Jupyter web application from a web browser and we will write some Python code to test our overlay and custom IP. The tutorial is based on the one in the PYNQ online documentation here: PYNQ Overlay Tutorial.
This custom IP doesn’t make a good accelerator but it’s useful for demonstrating some of the basic PYNQ concepts such as the Overlay and DefaultIP drivers.
Creating custom Calculator IP
We will create a custom IP for doing addition, subtraction, multiplication, and division of two 32-bit numbers with C++ code using Vitis HLS. We will synthesize it, and export the RTL of this IP to the Vivado IP integrator.
First, we created a new Vitis HLS Project named calculator_hls.

In the solution configuration, we must select the correct Part number (Arty Z7: xc7z020clg400-1 in our case).

After creating the project we created a calculator.cpp file and added it to the source. Then we pasted the following code into the code editor.

Code:
void calculate(int a, int b, int& sum, int& sub, int& mul, int& div) {
#pragma HLS INTERFACE ap_ctrl_none port=return
#pragma HLS INTERFACE s_axilite port=a
#pragma HLS INTERFACE s_axilite port=b
#pragma HLS INTERFACE s_axilite port=sum
#pragma HLS INTERFACE s_axilite port=sub
#pragma HLS INTERFACE s_axilite port=mul
#pragma HLS INTERFACE s_axilite port=div

    sum = a + b;
	sub = a - b;
	mul = a * b;
	div = a / b;
}
Then we run C Synthesis for the Active Solution.

The following screenshot shows the Synthesis summary:

The S_AXILITE Registers table is very important. We will use the Registers Offset in our Python code for reading and writing data. The registers address for two input variables a and b are 0x10 and 0x18. The addresses for four output variables are 0x20, 0x30, 0x40 and 0x50.

Finally, we exported the RTL as Vivado IP as a .zip file.


Creating Overlay in Vivado
In Vivado we are going to create a Block Design with ZYNQ PS and our custom HLS IP. We need to create an HDL wrapper of the block design, synthesize the design, implement the design, and finally generate the bitstream of the design.
First, we created a Vivado RTL project for the Arty Z7 board.

Then we added the custom IP we had created to the IP Repository of Vivado.

We created the following block design including our custom IP block and Zynq processing block (PS).

We validated the design to check for any errors. Then we created an HDL wrapper for the block design and finally, we generated the bitstream for the design.

After generating the bitstream the following three files were transfered to the Arty Z7 board. Transferring files from the PC to the Arty Z7 board is easy when both are connected to a same network. Just entering \\pynq to the address bar of the file explorer will give access to the home directory of the Pynq board. You may need to enter the password (xilinx) for the first time. Then you just need to do some copy paste.

The following screen recording shows the complete process we followed for making the overlay. We also showed how we tested it using Notebook.
The following screenshot shows the result for simple operations using the custom overlay. By reading the driver source code generated by Vitis HLS we can determine that offsets we need to write the two arguments are at offsets 0x10 and 0x18 and the result can be read back from 0x20, 0x30, 0x40 and 0x50.

Creating a Driver
We can create a driver to access the results without using the register offsets. Custom drivers are created by inheriting from DefaultIP and adding a bindto class attribute consisting of the IP types the driver should bind to. The constructor of the class should take a single description parameter and pass it through to the super class __init__. The description is a dictionary containing the address map and any interrupts and GPIO pins connected to the IP.
The following code snippet was used to create the custom driver.
from pynq import DefaultIP

class AddDriver(DefaultIP):
    def __init__(self, description):
        super().__init__(description=description)

    bindto = ['xilinx.com:hls:calculate:1.0']

    def add(self, a, b):
        self.write(0x10, a)
        self.write(0x18, b)
        return self.read(0x20)

    def sub(self, a, b):
        self.write(0x10, a)
        self.write(0x18, b)
        return self.read(0x30)

    def mul(self, a, b):
        self.write(0x10, a)
        self.write(0x18, b)
        return self.read(0x40)

    def div(self, a, b):
        self.write(0x10, a)
        self.write(0x18, b)
        return self.read(0x50)
Easy access to the function independent of offset:

PYNQ DPU Overlay
The Xilinx Deep Learning Processor Unit(DPU) is a configurable computation engine dedicated to convolutional neural networks. The degree of parallelism utilized in the engine is a design parameter and application. It includes highly optimized instructions and supports most convolutional neural networks like VGG, ResNet, GoogleNet, YOLO, SSD, MobileNet, FPN, and others. I used the DPU Overlay and YOLOv3 to detect objects in real-time. I implemented it in the KR260 Robotics starter kit. As I have previous experience with DPU overlay in the PYNQ environment I decided to use it in this project. However, after some experiments and research, I realized that it would be very tough to implement it in the ArtyZ7 board because of some limitations in the PL section.
I was able to successfully install the pynq dpu on my Arty Z7 board using the following command:
pip3 install pynq-dpu --no-build-isolation
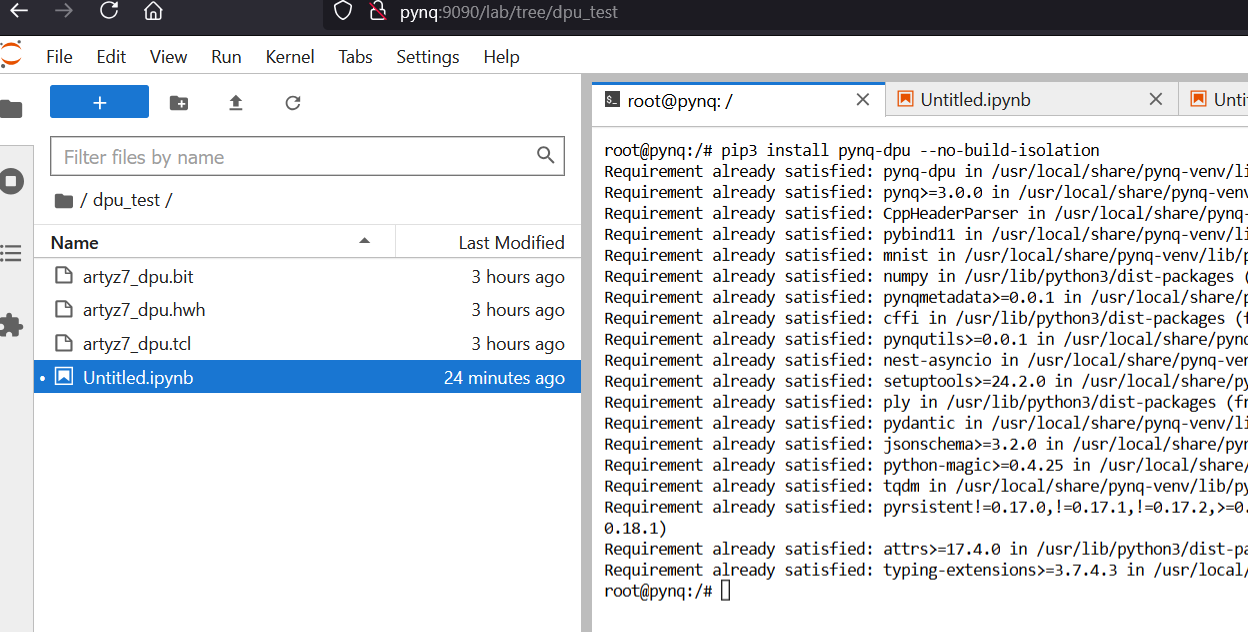
But when I tried to install the example Notebook for DPU-PYNQ I got the following error:
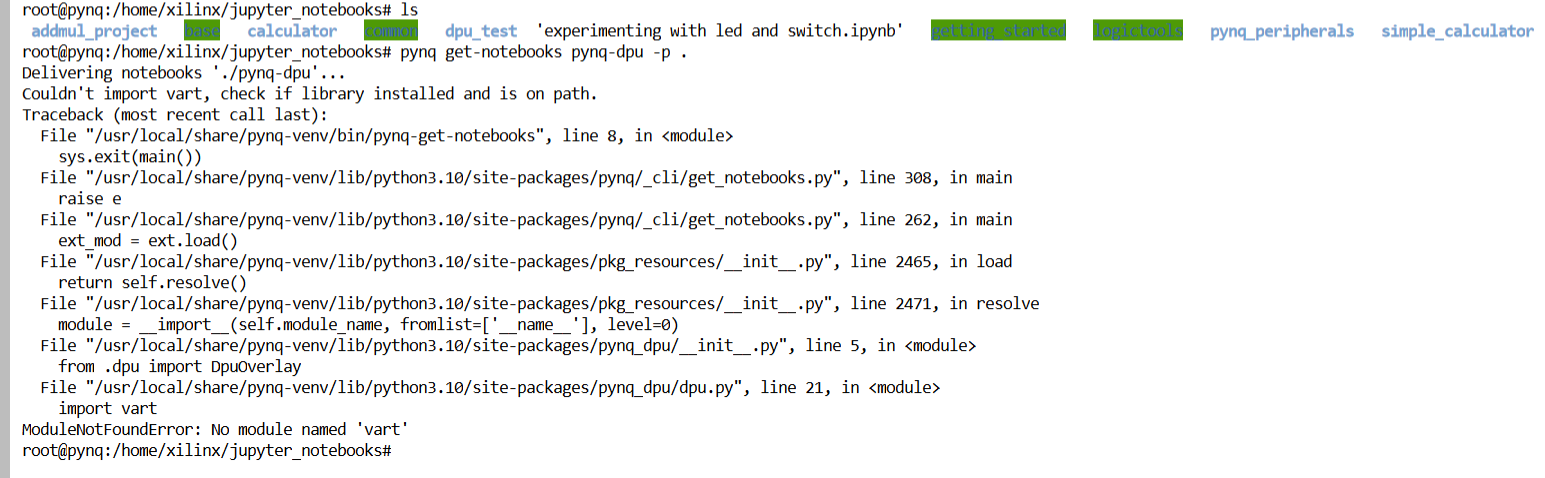
I tried to install 'vart' as I got the No module found error. But I failed to solve it. Even I did not get any solution on the Internet.

Ignoring the error I tried to load the DPU overlay from the Notebook as the DPU-PYNQ was installed successfully but I was out of luck.

I will try to find a different solution in my next blog. Thank you for being with me. See you in my next blog.

