My project "Third Eye for Blind" is based on object detection. So, what is object detection? Object detection is a computer vision technique that allows us to identify and locate objects in an image or video. With this kind of identification and localization, object detection can be used to count objects in a scene and determine and track their precise locations, all while accurately labeling them. Object detection is a key field in artificial intelligence, allowing computer systems to “see” their environments by detecting objects in visual images or videos. Object detections are essential for applications like autonomous driving, video surveillance, and medical imaging, providing real-time, accurate object recognition and localization.
Object detection can be performed using either traditional image processing techniques or modern deep learning networks. Image processing techniques generally don’t require historical data for training and are unsupervised. OpenCV is a popular tool for image processing tasks. Deep Learning methods generally depend on supervised or unsupervised learning, with supervised methods being the standard in computer vision tasks.
Popular object detection algorithms include YOLO (You Only Look Once), SSD (Single Shot MultiBox Detector), and Faster R-CNN. YOLO is one of the most popular deep learning-based one-stage object detection models known for its speed and accuracy. It processes images in real time, making it suitable for applications requiring quick detection. This algorithm is the perfect choice for my project because any assistive tools for the blind need rapid detection.
What is Deep Learning?
Deep learning is a subset of machine learning that uses multilayered neural networks, called deep neural networks, to simulate the complex decision-making power of the human brain. Some form of deep learning powers most of the artificial intelligence (AI) applications in our lives today. The biggest difference between Deep Learning and other models is the architecture of the Neural Networks used. These networks use multiple layers of artificial neurons that are processing units that mimic biological neurons.
Deep learning algorithms are typically trained on large datasets of labeled data. The algorithms learn to associate features in the data with the correct labels. For example, in an image recognition task, the algorithm might learn to associate certain features in an image (such as the shape of an object or the color of an object) with the correct label (such as "dog" or "cat").
Why DPU for Deep Learning?
DPU (Data Processing Unit or Deep Learning Processing Unit) is a specialized processor designed specifically for deep learning tasks such as image classification and object detection. DPUs are optimized for the matrix computations commonly used in deep learning, allowing them to perform these tasks much faster than a traditional CPU or GPU. This special piece of Hardware (DPU) can be easily implemented on the FPGA (PL side) and it is able to process various types of Deep Neural Networks more efficiently than CPU.
Xilinx offers a DPU IP that can be implemented in the programmable logic (PL) of the selected Zynq®-7000 SoC or Zynq UltraScale+ MPSoC devices with direct connections to the processing system (PS). The Xilinx® Deep Learning Processor Unit (DPU) is a programmable engine optimized for convolutional neural networks. The unit includes a high-performance scheduler module, a hybrid computing array module, an instruction fetch unit module, and a global memory pool module.
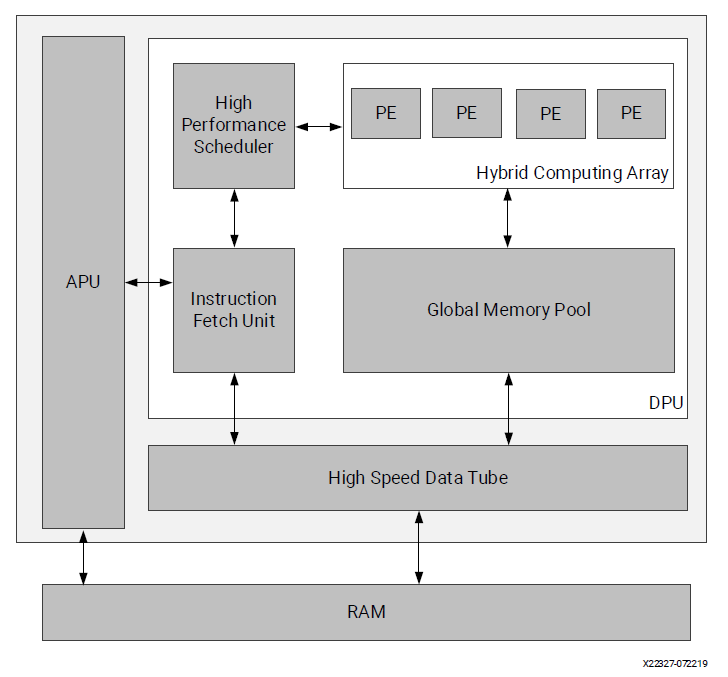
The DPU requires instructions to implement a neural network and accessible memory locations for input images as well as temporary and output data. A program running on the application processing unit (APU) is also required to service interrupts and coordinate data transfers. The DPU uses a specialized instruction set, which allows for the efficient implementation of many convolutional neural networks. Some examples of convolutional neural networks that have been deployed include VGG, ResNet, GoogLeNet, YOLO, SSD, MobileNet, FPN, and many others.
Neural Networks like YOLOv3 can be implemented on the DPU but there needs a special configuration file communicating with it. This file indicates the DPU to create the specific layers of the Neural Network.What is DNNDK?
DNNDK is a set of tools developed by Xilinx to accelerate the development and implementation of Deep Neural Networks (DNN's) on Xilinx FPGA devices. This development kit was specially designed to take advantage of the power of parallel processing and reconfigurable flexibility of the FPGA's to accelerate machine learning tasks and DNN inference. This tool will be essential on the development of an object detector because it will be responsible to optimize the YOLO model to fit the PYNQ-Z2 requirements. The DNNDK User Guide (UG1327) describes how to use the DPU with the DNNDK tools.
DNNDK User Guide (UG1327).https://www.xilinx.com/support/documentation/user_guides/ug1327-dnndk-user-guide.pdf
Development flow for Object Detection
The basic development flow for Xilinx DPU based object detection is shown in the following figure.
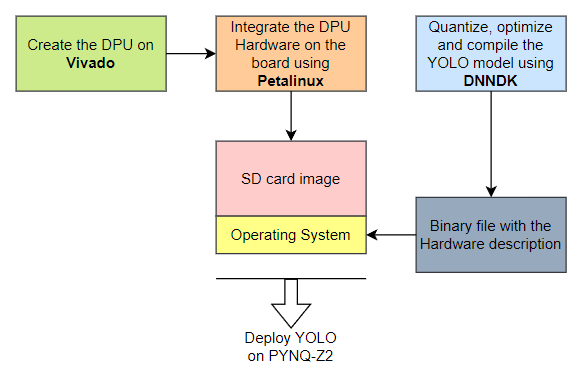
Image source: https://andre-araujo.gitbook.io/yolo-on-pynq-z2/introduction
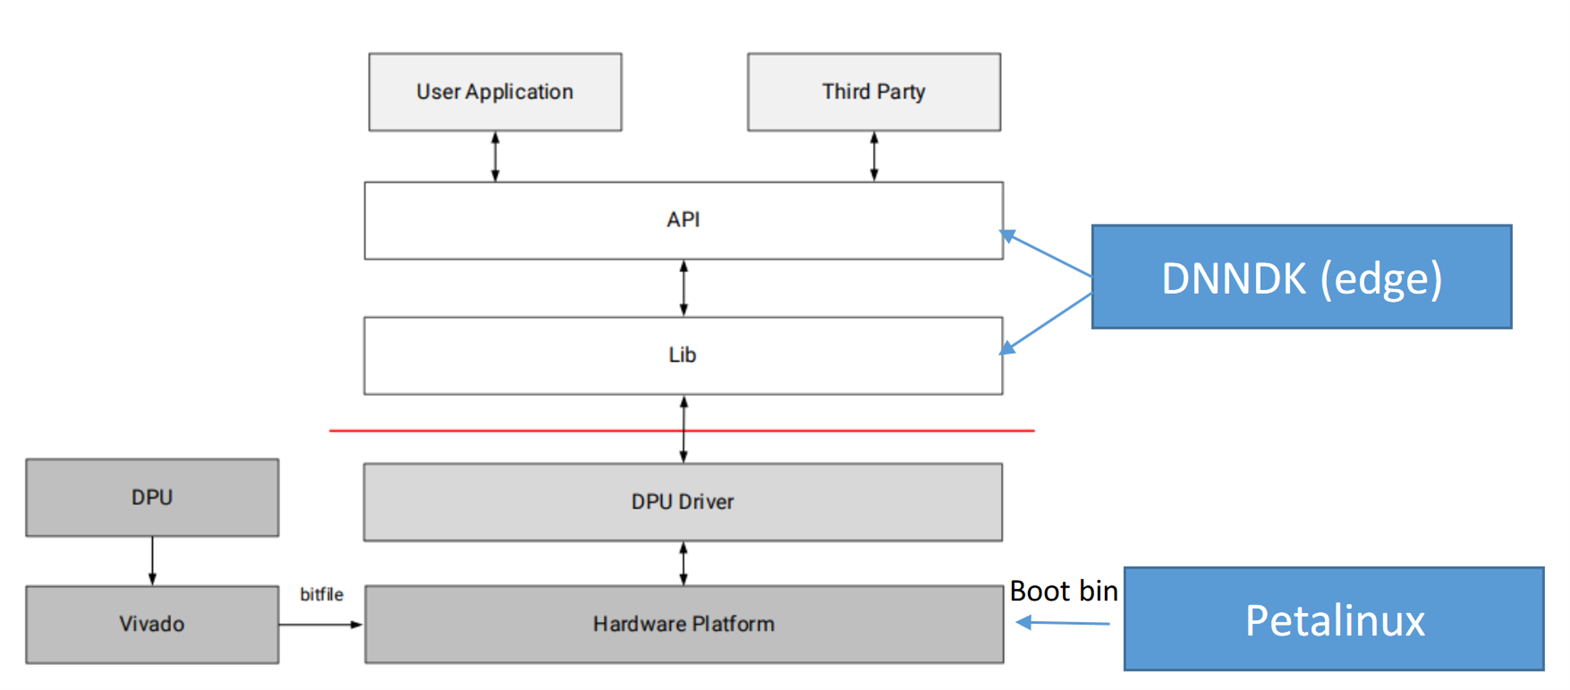
As described in the diagram above, we will first develop the DPU on Vivado according to the architecture that considers the limitations of the board and generate the bitstream. After the development, we will have a collection of files relative to the project, including the binary file describing the DPU. Then we will integrate the DPU Hardware on an SD card image followed by the Operating System specs on Petalinux. Lastly, we will quantize, optimize and compile the YOLO model using DNNDK. The DPU will be implemented in the PL side. We will give instruction to DPU from the PS and we will have to do a little bit of programming to establish a connection between the DPU and PS. To communicate with the DPU on the PS, we will use the DNNDK API.
What is Petalinux?
Petalinux is an open-source development platform from Xilinx used to create, customize and implement Linux OS (Operational Systems) on Xilinx devices. Petalinux contains a set of high level commands that are built on top of the Yocto Linux distribution. It allows users to customize, build, and deploy Embedded Linux Solutions/Linux images for the Xilinx processing system.
So, it's possible to configure libraries and packages on the board's OS, and define the Kernel, I/O's, drivers, etc. Petalinux is used for accelerating design productivity, and works with the Xilinx hardware design tools (Vivado).
We have a lot of background. Now let's start working.
DPU implementation on Arty Z7
For creating the DPU we need to use Xilinx Vivado and this will only work with Vivado 2020.1. So, if you have a higher version installed you must migrate to 2020.1. For implementing the DPU on ZYNQ 7000 I followed Aiotlab tutorial. You can also find a video tutorial in Chinese on how to implement the DPU 3.0 Hardware on the same website.
Following the mentioned tutorial, I was able to successfully prepare the DPU hardware and generate the bitstream.
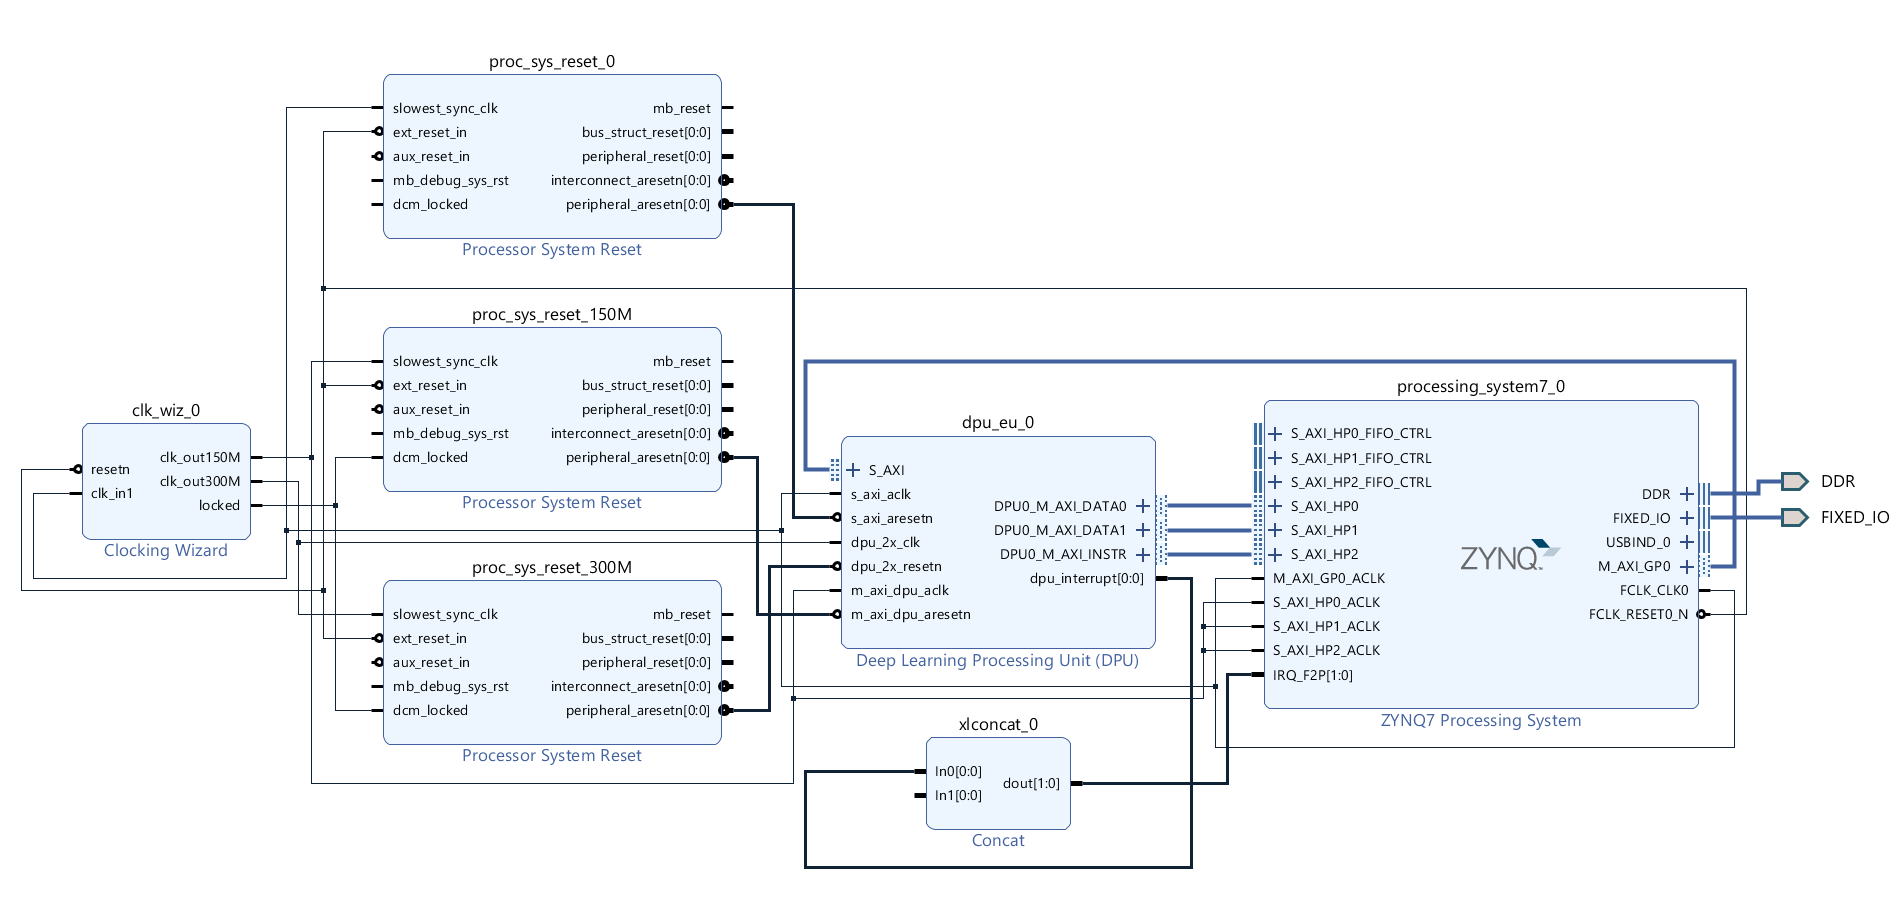
The tutorial is very well illustrated, so I don't feel I should re-illustrate the step-by-step process. The only difference is that I selected the Arty Z7 board instead of the PYNQ-Z2 board while creating the Vivado project. If you don't find your board in Vivado follow this guide: Installing Vivado, Xilinx SDK, and Digilent Board Files.
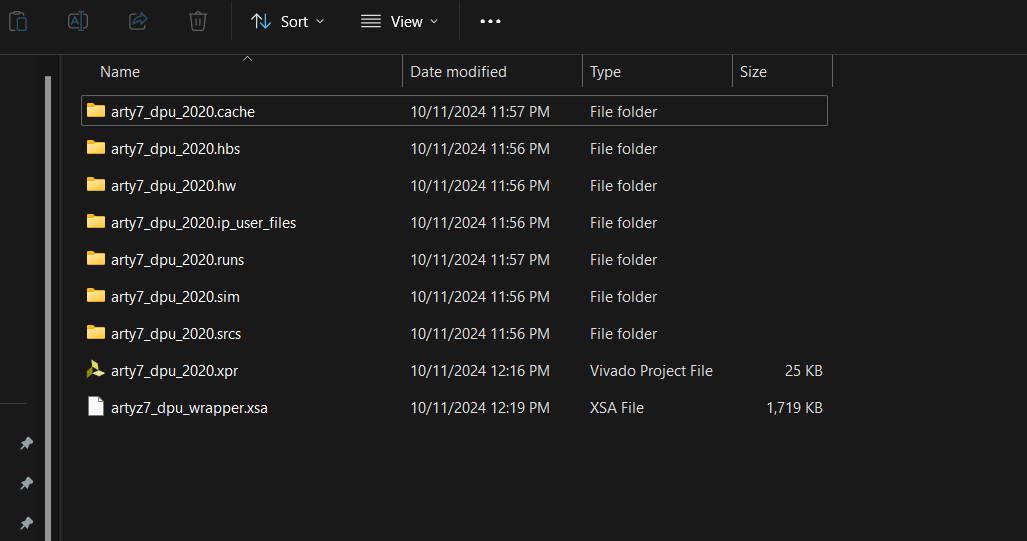
The arty7_dpu_2020 folder refers to the Vivado project files. The project folder is too big to add here. This is the drive link for the Vivado project, the most important part is the project file arty7_dpu_wrapper.xsa that will be used on the Petalinux project as a base.
The files and folders were generated after the completion of bitstream generation.
After finishing the Vivado project, the next step is to implement the designed Hardware (the DPU) on an SD card image. To do that we will use a Xilinx software called Petalinux. It allows us to create an SD card image with the Linux Operating System and the packages and libraries we want, and it also holds the DPU hardware information to be sent to the Zynq-7020 chip. This image will be flashed on an actual Micro SD card and later to be inserted on the Arty Z7 board.
Implementing the DPU on an SD Card Image
After generating the DPU bitstream in Vivado, it's time to implement the designed DPU on an SD card image. To do so we will use Petalinux. Petalinux allows us to create an SD card image with the Linux Operating System including required libraries, and it also holds the DPU hardware information to be sent to the Zynq-7020 chip. This image will be flashed on an actual Micro SD card and later to be inserted on the Arty Z7 board.
Unlike Vivado Petalinux only works in Ubuntu. The compatible version of Petalinux for Vivado 2020.1 version hardware is 2019.2. You can download any version of Petalinux from here (https://www.xilinx.com/support/download/index.html/content/xilinx/en/downloadNav/embedded-design-tools/archive.html).
As installing Petalinux requires Ubuntu you can either use an Ubuntu machine or a Windows machine with Virtual Machine. I used Virtual Box to install Ubuntu 18.04 (recommended for Petalinux 2019). You can directly download Ubuntu 18.04 from here (http://old-releases.ubuntu.com/releases/18.04.4/ubuntu-18.04.2-desktop-amd64.iso).
For installing Ubuntu in Virtual Box I followed this tutorial. The following screenshot shows the summary of my configuration for the Ubuntu.

I allocated 70GB HDD space for VM but it may work with lesser space. After clicking the Finish button the VM should start automatically and should install the Ubuntu but in my case it was Aborted. From the right side of the following screenshot an error message is identified as AMD-V is disabled in the BIOS.

I rechecked and confirmed it from the Windows task manager.

I enabled it from the BIOS and the VM was successfully started. It took several minutes to install the Ubuntu.

It is running successfully.

If you face any difficulties opening the terminal follow this tutorial: (https://medium.com/@bonguides25/how-to-fix-terminal-not-opening-on-ubuntu-virtualbox-7-18a2f4659a76). My problem was solved following Method 2 on the tutorial.
If you find any difficulties making a full-screen VM follow this video tutorial: https://www.youtube.com/watch?v=w4E1iqsn_wA&ab_channel=tanzTalks.tech.
Our Ubuntu 18.04 machine is ready to install Petalinux. If you already downloaded the Petalinux 2019.1 you can just follow the previous tutorial or you can follow this official user guide (https://docs.xilinx.com/v/u/2019.2-English/ug1144-petalinux-tools-reference-guide) from Xilinx.
Following the tutorial and user guide, I installed the Petalinux successfully to my Ubuntu 18.04 VM.

For using Petalinux I changed the system from dash to bash as per the instruction on the tutorial. After changing the system from dash to bash we should restart the VM.

After restarting the Ubuntu the system is ready to create a Petalinux project.
Every time you want to start Petalinux, you have to source it from the terminal using the below command:

The above screenshot shows the successful creation of the Petalinux project.
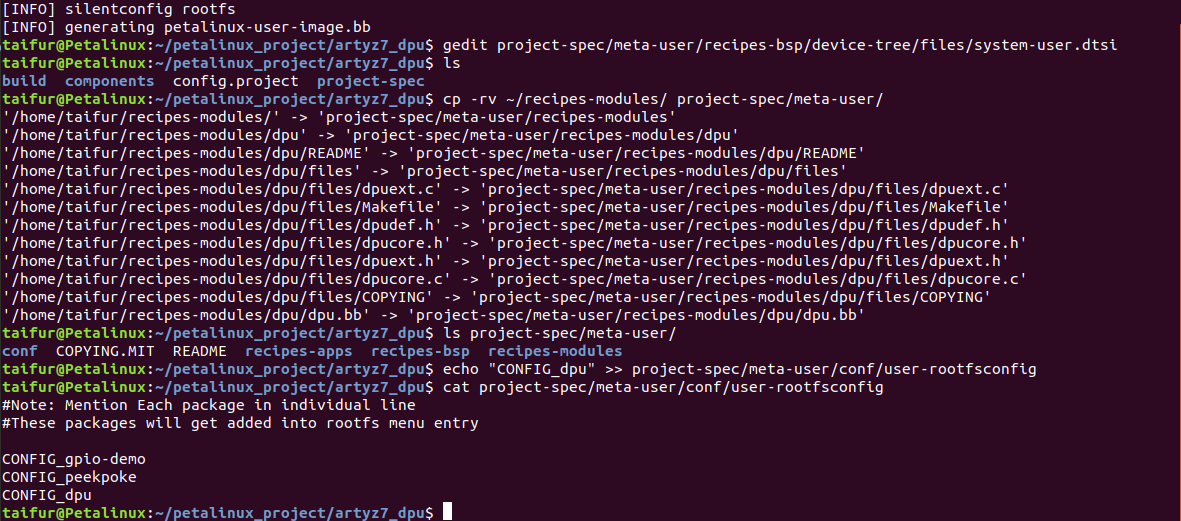
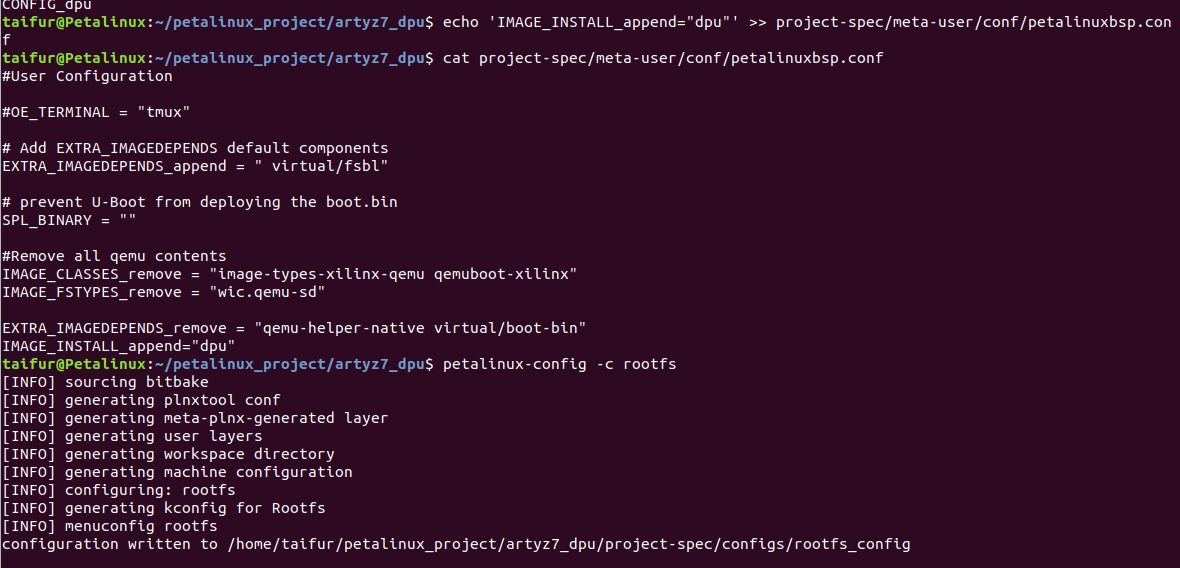
According to the tutorial, I made the necessary configuration on the Root filesystem and Kernel.
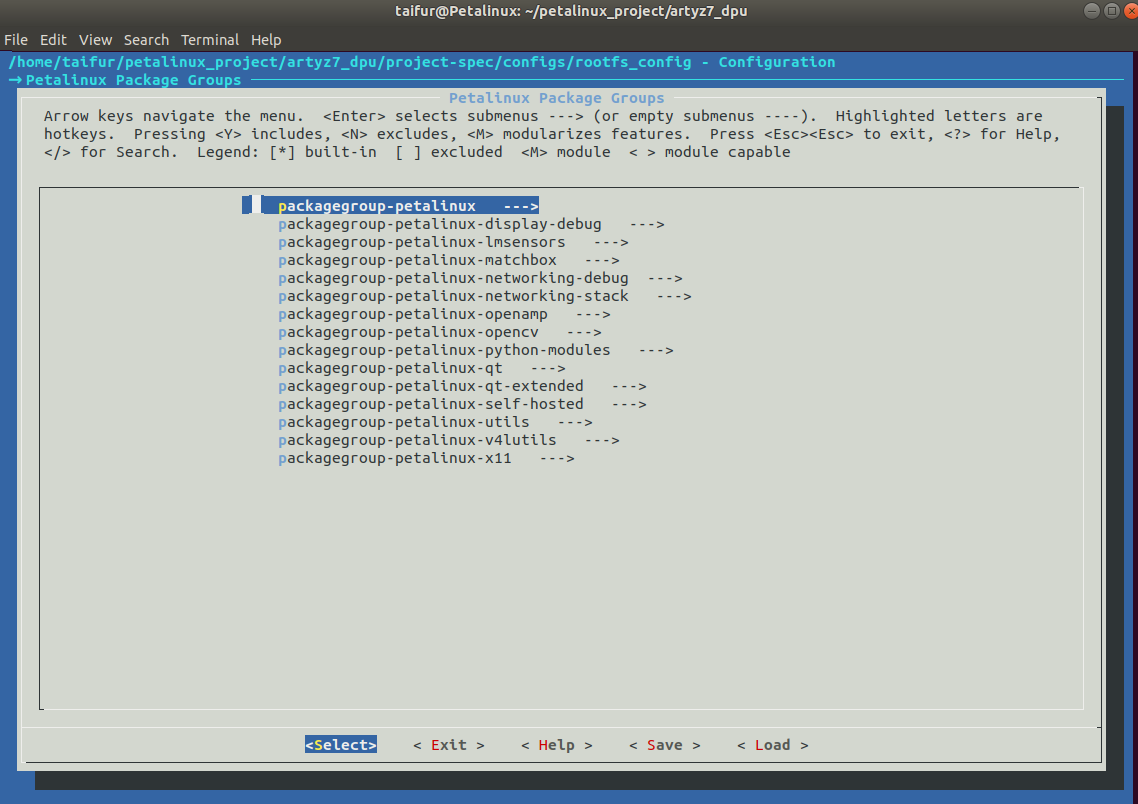
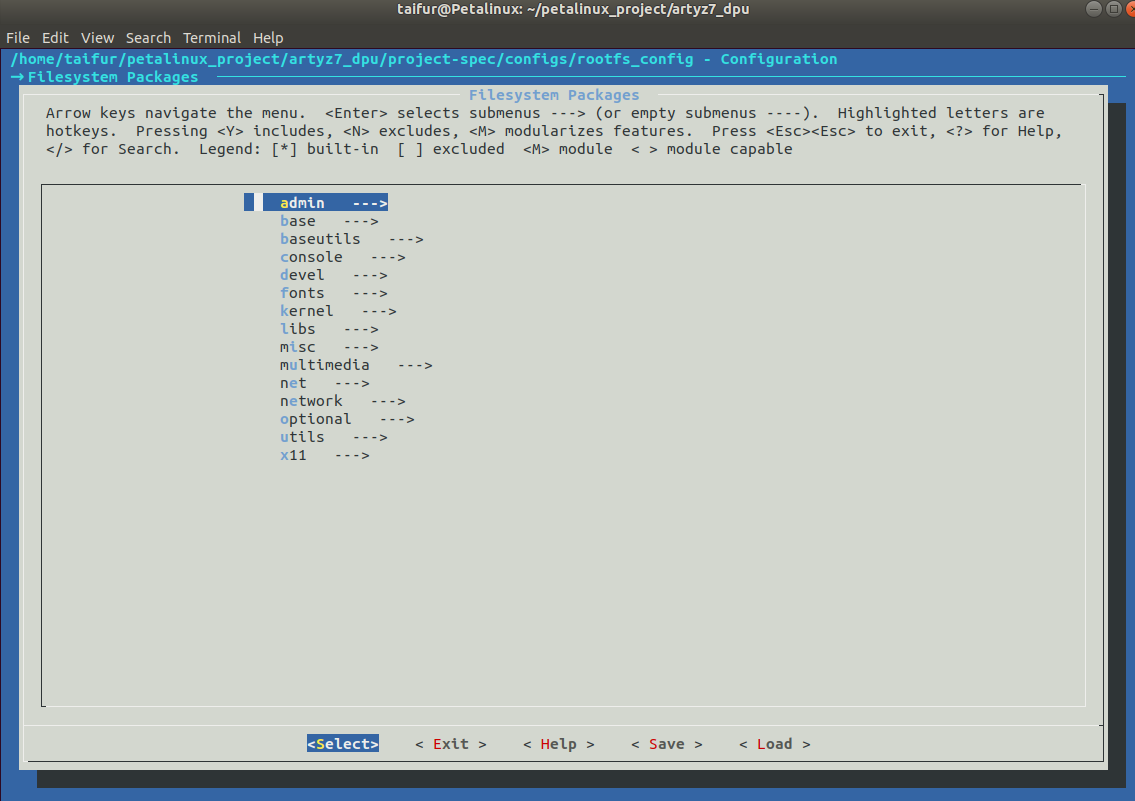
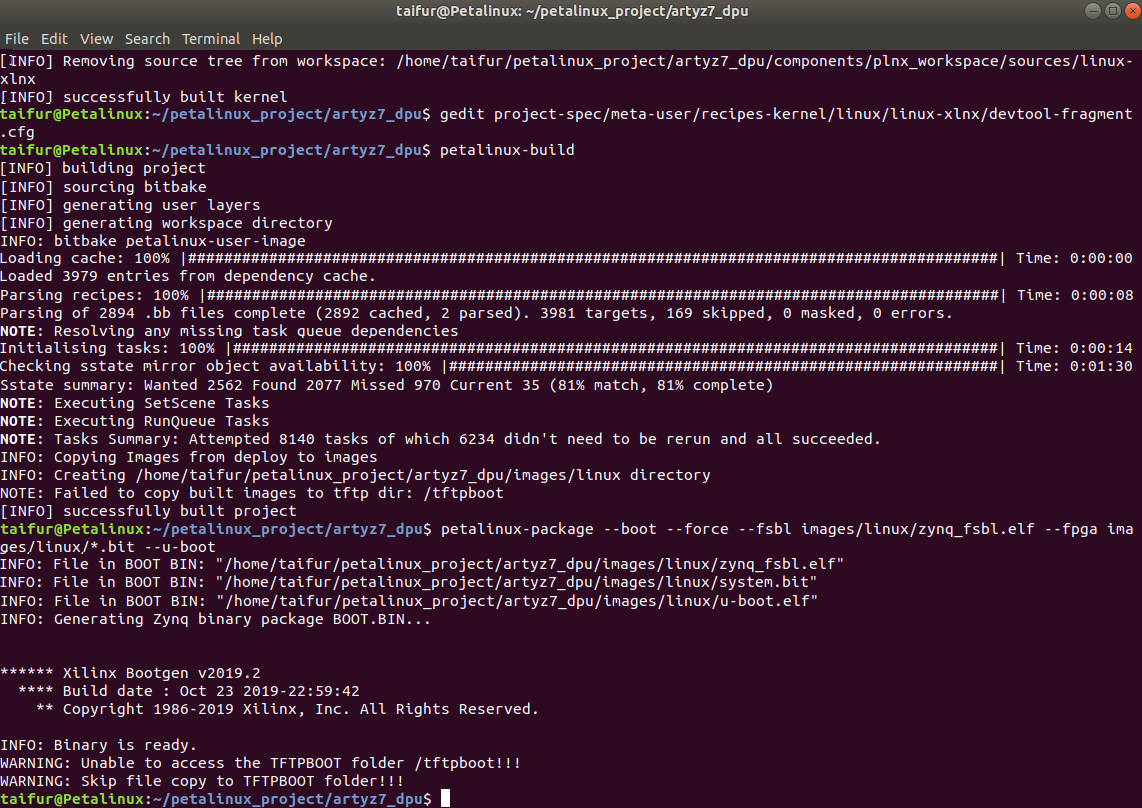
Everything was correct and the Petalinux project was built successfully without any issues.
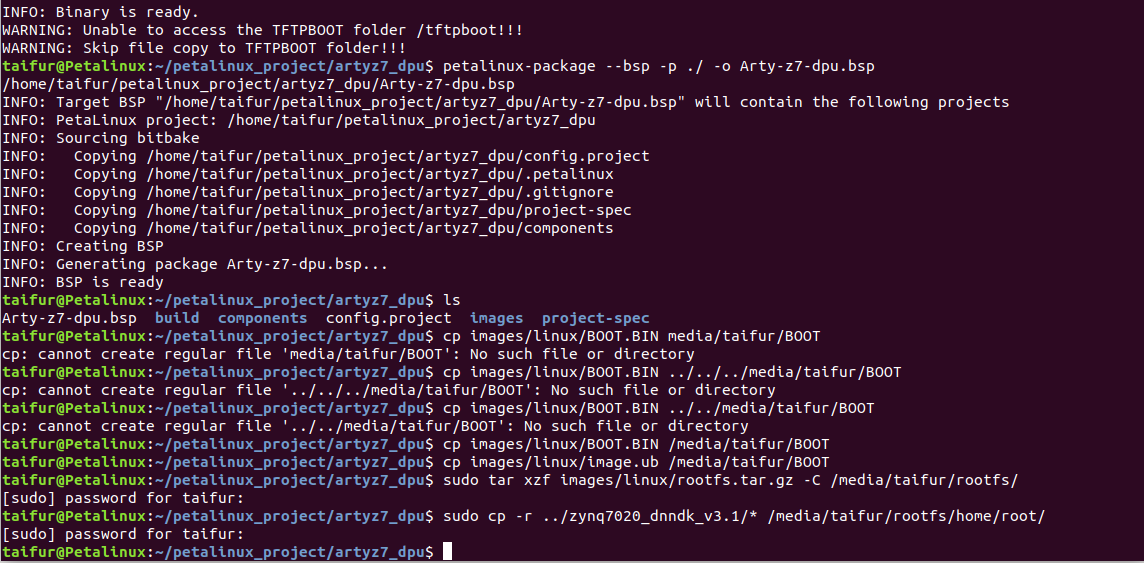
For writing the Petalinux to the SD card I made two partitions on the SD card as shown in the screenshot.

Finally, all the configurations and project files were copied to the right partition of the SD card.
Setting up PYNQ-Z2
I followed the following steps to set up PYNQ-Z2:
- Set the Boot jumper to the SD position. (This sets the board to boot from the Micro-SD card)
- To power the board from the external 12V power regulator, set the Power jumper to the REG position.
- Inserted the Micro SD card loaded with the PYNQ-Z2 image into the Micro SD card slot underneath the board
- (Optional) Connected the USB cable to your PC/Laptop, and to the PROG - UART MicroUSB port on the board
- Connected the Ethernet port to the router
- Connected the power adapter's coaxial port on the PYNQ-Z2 to give it the power
- I turned on the PYNQ-Z2 and the boot sequence corresponds to a red LED turning immediately on representing that the board has power. Finally the green LED called Done was turned on showing that the Zynq service was ready.
After everything was ready I launched the Putty for establishing serial communication to the board and I got the following info in the Putty terminal.


I got the IP address of the board from the serial terminal. Using the IP address I connected the board with MobaXterm for using X-11 protocol (Graphical interface Network protocol (GUI - Graphical User Interface).

Then I installed DNNDK 3.1 in the Arty Z7 board.

Before training my own model I wanted to try a premade model for testing and understanding. I downloaded the model from GitHub and transferred it to my Arty Z7 board using WinSCP.

After transferring the necessary files and model in my Arty Z7 board I built the model using the make command.

The project was built successfully and I could run the output but did not get any results. I tried with different models in different ways but there was no luck. For some models, it shows some error message related to DNNDK and for some models, it just stuck after running the program.

After doing lots of experiments and spending several sleepless nights, I realized it could be very tough and time-consuming for me to solve the issue and get a successful output using my limited knowledge. So, I decided to use another way. I believe it can be done easily using Python and OpenCV without using the DPU.
For making this blog I followed this tutorial (https://andre-araujo.gitbook.io/yolo-on-pynq-z2/dpu-implementation/implementing-the-dpu-on-a-sd-card-image) and it is very well written, so I did not rewrite same commands again. I just checked every step works without any issues. I did not find any serious issues while following the tutorial without the final output.
Reference used in this blog:
[1]. https://andre-araujo.gitbook.io/yolo-on-pynq-z2
[2]. http://www.aiotlab.org/teaching/fpga.html
[3]. https://github.com/andre1araujo/YOLO-on-PYNQ-Z2/tree/main
[4]. https://github.com/wutianze/dnndk-pynqz2
[5]. https://github.com/wutianze/HydraMini
[6]. https://github.com/sumilao/Zynq-7000-DPU-TRD
[7]. https://github.com/JinChen-tw/pynqz2_dpu140
[8]. https://pjreddie.com/darknet/yolo/


-

vlasov01
-
Cancel
-
Vote Up
0
Vote Down
-
-
Sign in to reply
-
More
-
Cancel
Comment-

vlasov01
-
Cancel
-
Vote Up
0
Vote Down
-
-
Sign in to reply
-
More
-
Cancel
Children