element14 Community
element14 Community
    Register Log In
  • Site
  • Search
  • Log In Register
  • About Us
  • Community Hub
    Community Hub
    • What's New on element14
    • Feedback and Support
    • Benefits of Membership
    • Personal Blogs
    • Members Area
    • Achievement Levels
  • Learn
    Learn
    • Ask an Expert
    • eBooks
    • element14 presents
    • Learning Center
    • Tech Spotlight
    • STEM Academy
    • Webinars, Training and Events
    • Learning Groups
  • Technologies
    Technologies
    • 3D Printing
    • FPGA
    • Industrial Automation
    • Internet of Things
    • Power & Energy
    • Sensors
    • Technology Groups
  • Challenges & Projects
    Challenges & Projects
    • Design Challenges
    • element14 presents Projects
    • Project14
    • Arduino Projects
    • Raspberry Pi Projects
    • Project Groups
  • Products
    Products
    • Arduino
    • Avnet Boards Community
    • Dev Tools
    • Manufacturers
    • Multicomp Pro
    • Product Groups
    • Raspberry Pi
    • RoadTests & Reviews
  • Store
    Store
    • Visit Your Store
    • Choose another store...
      • Europe
      •  Austria (German)
      •  Belgium (Dutch, French)
      •  Bulgaria (Bulgarian)
      •  Czech Republic (Czech)
      •  Denmark (Danish)
      •  Estonia (Estonian)
      •  Finland (Finnish)
      •  France (French)
      •  Germany (German)
      •  Hungary (Hungarian)
      •  Ireland
      •  Israel
      •  Italy (Italian)
      •  Latvia (Latvian)
      •  
      •  Lithuania (Lithuanian)
      •  Netherlands (Dutch)
      •  Norway (Norwegian)
      •  Poland (Polish)
      •  Portugal (Portuguese)
      •  Romania (Romanian)
      •  Russia (Russian)
      •  Slovakia (Slovak)
      •  Slovenia (Slovenian)
      •  Spain (Spanish)
      •  Sweden (Swedish)
      •  Switzerland(German, French)
      •  Turkey (Turkish)
      •  United Kingdom
      • Asia Pacific
      •  Australia
      •  China
      •  Hong Kong
      •  India
      •  Korea (Korean)
      •  Malaysia
      •  New Zealand
      •  Philippines
      •  Singapore
      •  Taiwan
      •  Thailand (Thai)
      • Americas
      •  Brazil (Portuguese)
      •  Canada
      •  Mexico (Spanish)
      •  United States
      Can't find the country/region you're looking for? Visit our export site or find a local distributor.
  • Translate
  • Profile
  • Settings
Forget Me Not Design Challenge
  • Challenges & Projects
  • Design Challenges
  • Forget Me Not Design Challenge
  • More
  • Cancel
Forget Me Not Design Challenge
Blog Episode 6: Forget Me Not: Plant Watering System Design
  • Blog
  • Forum
  • Documents
  • Files
  • Events
  • Mentions
  • Sub-Groups
  • Tags
  • More
  • Cancel
  • New
  • Share
  • More
  • Cancel
Group Actions
  • Group RSS
  • More
  • Cancel
Engagement
  • Author Author: michaelwylie
  • Date Created: 22 Aug 2014 6:28 AM Date Created
  • Views 1017 views
  • Likes 2 likes
  • Comments 4 comments
  • forget_me_not
  • forget-me-not
  • iot_monitor_auto
  • forget-me-not-challenge-2014
Related
Recommended

Episode 6: Forget Me Not: Plant Watering System Design

michaelwylie
michaelwylie
22 Aug 2014

Previous Posts:

Epidode 1: Forget Me Not: Application

Episode 2: Forget Me Not: The Best Laid Plans ...

Episode 3: Forget Me Not: Setup EnOcean with openHAB

Episode 4: Forget Me Not: Medication System

Episode 5A: Forget Me Not: Using Notify My Android with OpenHab


Problems to Date:

  1. Newark does not carry the STM 320U, so if I really need it I'll have to purchase it from Digikey on my own dime.
  2. I placed my first order on August 4th, but there are delays. I compensated for this by working on my design and the medication reminder system


The Idea

Let me start by describing how my plant watering should work. The sensor of Figure 1 will be placed in the soil of a potted plant on my patio. I purchased this one from DX.com. This sensor will be interfaced to the Raspberry Pi. When a certain low threshold is reached the system will activate a sump pump to water the plant until a high threshold is reached. Simple right?


image

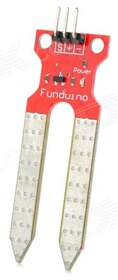
Figure 1: Soil Moisture Sensor (Picture from DX.com)


Functional Diagram

Figure 2 shows the functional diagram of the plant watering system. I will be building this system with the components I receive from Newark. I've also purchased a few prototyping boards from Amazon to put the comparator circuit on.


image

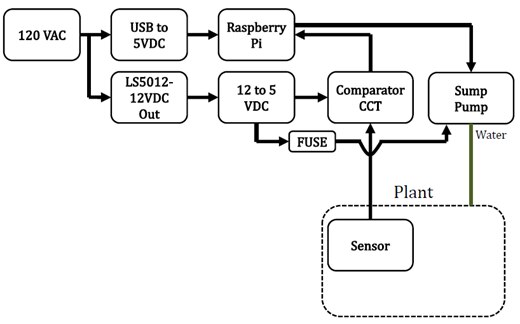
Figure 2: Watering System Functional Block Diagram.


120 VAC - The mains voltage in North America.

LS5012 – Lambda-Tek power supply. 12 VDC out.

USB to 5 VDC - Standard Pi Power Supply unit. MWS158-0502200UC

RASPBERRY PI - Model B+

12 to 5 VDC - LT1529CT-5

FUSE - 2A fuse to protect the sump pump. It's in water after all.

COMPARATOR CIRCUIT - Circuit to determine when the soil is at the low and high thresholds.

SUMP PUMP - Estone DC 3.5V - 9V 3W USB Submersible Water Pump Aquarium Fish Tank Fountain Pond Pump (Amazon)

SENSOR - Funduino soil moisture sensor.


The Comparator Logic

The sensor will be powered by 3.3 Volts. The output swings from 0V to 2.3V, where 2.3 Volts is when the sensor is in water. Since the Raspberry Pi does not have a built-in ADC, we'll have to be a bit creative in reading the sensor output. I'm not concerned with the with the exact moisture level, just whether or not it is above or below set thresholds. My proposed system involves a dual comparator with a low threshold on one comparator and a high threshold on the other. The logic of the system can be deduced from Figure 3.


image

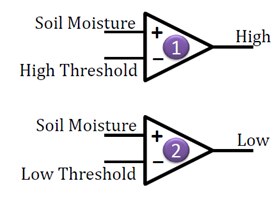
Figure 3: Comparator circuit logic


The soil moisture signal appears on both non-inverting inputs of the two comparators. The high and low thresholds are set through resistive dividers and placed on the two inverting inputs. The two outputs, High and Low, will be logic level signals that I can read with the Raspberry Pi, which means no ADC is required.


Suppose the low and high soil moisture thresholds are set at 20% and 80% respectively and the soil has a moisture reading of 50%. As the moisture drops to below 20% the raspberry pi will read a ‘0’ on the outputs of the comparators and trigger the sump pump to periodically water the plant until 80% soil moisture is reached. At this point the raspberry pi will read a ‘1’ on each output of the comparators. The plant will not be watered again until the soil moisture goes below 20%.


The Circuit

Figure 4 shows the complete circuit for my add-on to the Raspberry Pi. The new 40 pin header appears in the upper right corner. Input connections, power supplies, and decoupling appear on the left. Finally, the dual op-amp appears in the lower right corner.


image

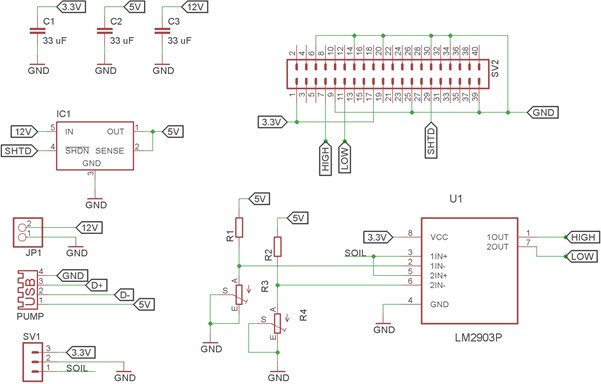
Figure 5: The Raspberry Pi Comparator Board Add-on


Conclusion

The circuitry is quite simple and shouldn’t take very long to build. It will be my first task when I receive my parts. If the delay continues, I will write the Raspberry Pi code assuming my circuit will work. That’s all for this post!

  • Sign in to reply

Top Comments

  • ipv1
    ipv1 over 11 years ago in reply to michaelwylie +1
    I usually do single page schematics where I add small wire pieces to pins and then using the NAME tool, rename it like 5V0. Then where ever I want to connect them, I add another small wire piece and name…
  • doctorcdf
    doctorcdf over 11 years ago

    Just a note - if there are parts that aren't in the Newark catalogue, let me know and we'll make alternative arrangements. image

    • Cancel
    • Vote Up 0 Vote Down
    • Sign in to reply
    • More
    • Cancel
  • ipv1
    ipv1 over 11 years ago in reply to michaelwylie

    I usually do single page schematics where I add small wire pieces to pins and then using the NAME tool, rename it like 5V0. Then where ever I want to connect them, I add another small wire piece and name it 5V0 as well. Eagle asks if you want to rename them- click yes and they are now connected. This becomes useful if you want to change VCC from 5V to 3V3 all around the schematic. You can use the lable tool to display the net name at the wire ends etc.


    Hope this helps.

    • Cancel
    • Vote Up +1 Vote Down
    • Sign in to reply
    • More
    • Cancel
  • michaelwylie
    michaelwylie over 11 years ago in reply to ipv1

    Eagle was new for me, I'm use to Altium. So, the tagged nets are offpage and just a regular net in onpage?

    • Cancel
    • Vote Up 0 Vote Down
    • Sign in to reply
    • More
    • Cancel
  • ipv1
    ipv1 over 11 years ago

    Delays are inevitable. In the schematic you need not add offpage connectors.You can simply change the net names and label them. It saves some space... I think. image

    • Cancel
    • Vote Up 0 Vote Down
    • Sign in to reply
    • More
    • Cancel
element14 Community

element14 is the first online community specifically for engineers. Connect with your peers and get expert answers to your questions.

  • Members
  • Learn
  • Technologies
  • Challenges & Projects
  • Products
  • Store
  • About Us
  • Feedback & Support
  • FAQs
  • Terms of Use
  • Privacy Policy
  • Legal and Copyright Notices
  • Sitemap
  • Cookies

An Avnet Company © 2025 Premier Farnell Limited. All Rights Reserved.

Premier Farnell Ltd, registered in England and Wales (no 00876412), registered office: Farnell House, Forge Lane, Leeds LS12 2NE.

ICP 备案号 10220084.

Follow element14

  • X
  • Facebook
  • linkedin
  • YouTube