element14 Community
element14 Community
    Register Log In
  • Site
  • Search
  • Log In Register
  • About Us
  • Community Hub
    Community Hub
    • What's New on element14
    • Feedback and Support
    • Benefits of Membership
    • Personal Blogs
    • Members Area
    • Achievement Levels
  • Learn
    Learn
    • Ask an Expert
    • eBooks
    • element14 presents
    • Learning Center
    • Tech Spotlight
    • STEM Academy
    • Webinars, Training and Events
    • Learning Groups
  • Technologies
    Technologies
    • 3D Printing
    • FPGA
    • Industrial Automation
    • Internet of Things
    • Power & Energy
    • Sensors
    • Technology Groups
  • Challenges & Projects
    Challenges & Projects
    • Design Challenges
    • element14 presents Projects
    • Project14
    • Arduino Projects
    • Raspberry Pi Projects
    • Project Groups
  • Products
    Products
    • Arduino
    • Avnet Boards Community
    • Dev Tools
    • Manufacturers
    • Multicomp Pro
    • Product Groups
    • Raspberry Pi
    • RoadTests & Reviews
  • Store
    Store
    • Visit Your Store
    • Choose another store...
      • Europe
      •  Austria (German)
      •  Belgium (Dutch, French)
      •  Bulgaria (Bulgarian)
      •  Czech Republic (Czech)
      •  Denmark (Danish)
      •  Estonia (Estonian)
      •  Finland (Finnish)
      •  France (French)
      •  Germany (German)
      •  Hungary (Hungarian)
      •  Ireland
      •  Israel
      •  Italy (Italian)
      •  Latvia (Latvian)
      •  
      •  Lithuania (Lithuanian)
      •  Netherlands (Dutch)
      •  Norway (Norwegian)
      •  Poland (Polish)
      •  Portugal (Portuguese)
      •  Romania (Romanian)
      •  Russia (Russian)
      •  Slovakia (Slovak)
      •  Slovenia (Slovenian)
      •  Spain (Spanish)
      •  Sweden (Swedish)
      •  Switzerland(German, French)
      •  Turkey (Turkish)
      •  United Kingdom
      • Asia Pacific
      •  Australia
      •  China
      •  Hong Kong
      •  India
      •  Korea (Korean)
      •  Malaysia
      •  New Zealand
      •  Philippines
      •  Singapore
      •  Taiwan
      •  Thailand (Thai)
      • Americas
      •  Brazil (Portuguese)
      •  Canada
      •  Mexico (Spanish)
      •  United States
      Can't find the country/region you're looking for? Visit our export site or find a local distributor.
  • Translate
  • Profile
  • Settings
Forget Me Not Design Challenge
  • Challenges & Projects
  • Design Challenges
  • Forget Me Not Design Challenge
  • More
  • Cancel
Forget Me Not Design Challenge
Blog Forget Me Not: Episode 11A: Watering System Construction
  • Blog
  • Forum
  • Documents
  • Files
  • Events
  • Mentions
  • Sub-Groups
  • Tags
  • More
  • Cancel
  • New
  • Share
  • More
  • Cancel
Group Actions
  • Group RSS
  • More
  • Cancel
Engagement
  • Author Author: michaelwylie
  • Date Created: 19 Sep 2014 5:12 AM Date Created
  • Views 1512 views
  • Likes 1 like
  • Comments 6 comments
  • forget_me_not
  • iot_monitor_auto
Related
Recommended

Forget Me Not: Episode 11A: Watering System Construction

michaelwylie
michaelwylie
19 Sep 2014

Previous Posts:

Epidode 1: Forget Me Not: Application

Episode 2: Forget Me Not: The Best Laid Plans ...

Episode 3: Forget Me Not: Setup EnOcean with openHAB

Episode 4: Forget Me Not: Medication System

Episode 5A: Forget Me Not: Using Notify My Android with OpenHab

Episode 6: Forget Me Not: Plant Watering System Design

Episode 7: Forget Me Not: Medication System Demo

Episode 8: Forget Me Not: Using Twitter

Episode 9: Forget Me Not: Sunshine, Lollipops, and Rainbows

Episode 10: Forget Me Not: It's so hot!


Problems To Date:

1. Logistics are a nightmare; I placed my first order on July 21st, but some of the parts I ordered were UK Stock and I'm in California. This ones my fault.

2. I ordered a soil moisture sensor from DX.com, and it been 8 weeks with no delivery ...


Progress:

So, I've built the circuit to interface my soil sensor to my Raspberry Pi. I modified the previous circuit to work with the B instead of the B+ because I couldn't get my B+ to recognize my USB keyboard. It's slightly weird because the B recognizes the keyboard. I've included a picture in Figure 1 that shows the soldered modifications. I needed to access some of the GPIO of the RaspPi, and the female header is surface mount. This means I cannot solder wires to the back of the board, or simply replace the header and extend the pins through the board. Note, the picture shows one wire soldered to GPIO17, but I didn't notice that pin is reserved for the RTS of the UART. After noticing this, I moved the wire to GPIO22.


image

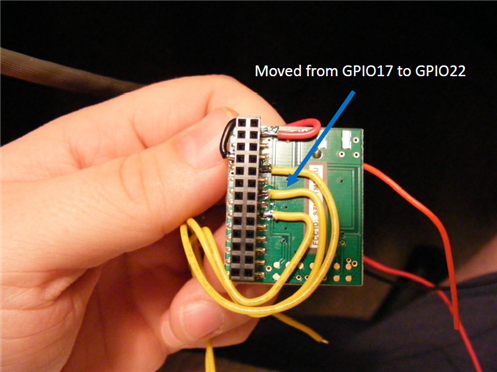
Figure 1: Modifications to the EnOcean Pi board. One wire was originally connected to GPIO17 but was moved to GPIO22.


The modified lines are soldered to the following signals:

  • 3.3 Volt line
  • Ground
  • GPIO4 -> Pump Activation
  • GPIO22 -> Low threshold (Shown as GPIO17 in the picture and modified after the picture was taken)
  • GPIO27 -> High threshold


In the picture below we can see the modified EnOcean PI placed back on the Raspberry Pi header and in a case I purchased from Amazon. I really like this case because you can access the header even with the lid on. Notice I marked my wires. You only have to make that mistake once and you'll tag your wires from then on.

image

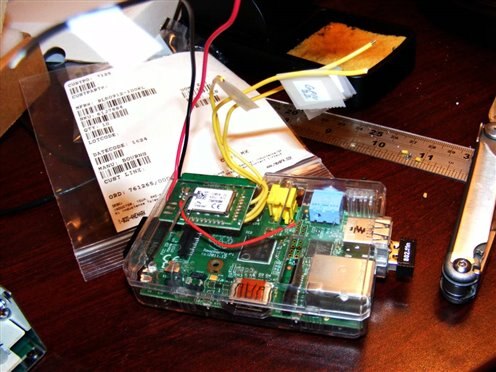
Figure 2: EnOcean Pi back on the Raspberry Pi in its case. Wires are labelled as they exit the case.


Figure 3 shows the modified circuit diagram of the comparator interface board. A fuse was added to the pump for protection and the header is now for a B unit instead of a B+. Some pullups were added to the output of the dual comparator (U1) because it has open collector outputs.


image

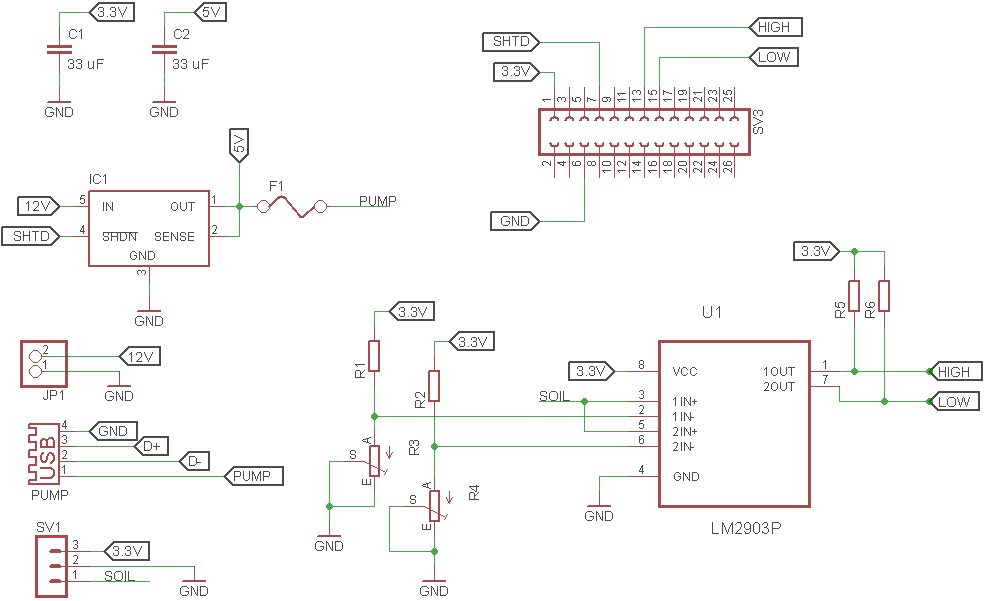
Figure 3: Modified circuit. A few changed were made from the original circuit: a fuse was added, pullups were added to U1's outputs, and the header was swapped for a B instead of a B+


Here is the board I made based on the circuit in Figure 3. On the left side is the heat sink for the regulator that powers the pump. The USB connector on the right side goes the pump and the round black piece below that is the fuse (removable). The IC is the dual comparator and the two potentiometers on the top control the high and low threshold levels. I have not received my soil moisture sensor from DX.com yet (it's been over 8 weeks), so I wired a potentiometer to act as the input voltage. You can see that pot in the lower right corner.

image

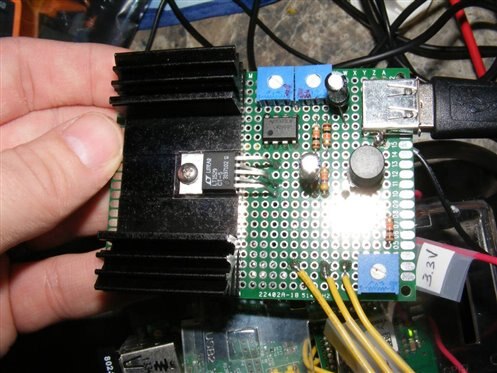
Figure 4: Constructed comparator board. Note the large heat sink. I blogged about the heat sink previously.


I included the shot in Figure 5 to show the work in wiring that circuit. I only have three wire colours in my collection right now, so red is positive voltage, black is ground, and yellow is signal. It's definitely not a stretch of the imagination to see why they call it a Rat's Nest.

image

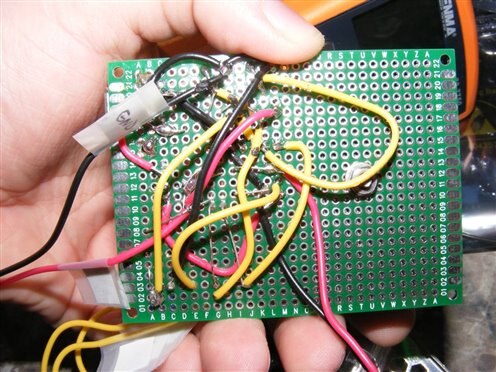
Figure 5: A picture showing the bottom of the board. Not hard to figure out where the term Rat's Nest comes from ...


Having the circuit wired, it was time to write some code. I decided to start by testing with a Python script. The script below checks the input levels and decides when to water the system. I started with a flag. If we are below the low threshold, the plant needs to be watered until the high threshold is reached. The plant does not need to be watered again until the low threshold is crossed.


import RPi.GPIO as GPIO
import time
GPIO.setmode(GPIO.BCM)
GPIO.setup(27, GPIO.IN, pull_up_down = GPIO.PUD_UP)    #low
GPIO.setup(22, GPIO.IN, pull_up_down = GPIO.PUD_UP)    #high
GPIO.setup(4, GPIO.OUT)                    #pump

GPIO.output(4, GPIO.LOW)    #make sure pump is off

wateringFlag = 0
print("Starting Up")

while True:

    if(GPIO.input(27) == 0):
        wateringFlag = 1
        GPIO.output(4, GPIO.HIGH)
        print("Low threshold")
        time.sleep(30)    #water for 30 seconds
        print("Watering")
        GPIO.output(4, GPIO.LOW)
        print("Watering Wait")
    If (wateringFlag == 1):
        if( (GPIO.input(27) == 1) and (GPIO.input(22) == 0) ):
            GPIO.output(4, GPIO.HIGH)
            print("Watering")
            time.sleep(30)
            GPIO.output(4, GPIO.LOW)
            print("Watering Wait")
        if(GPIO.input(22) == 1)
            wateringFlag = 0
            print("Watering Finished")
    if(GPIO.input(22) == 0)
        print("High Threshold")

    time.sleep(300)

GPIO.cleanup()


The output from the system is shown below.


pi@raspberrypi ~/openHAB $ sudo python wateringSystem.py
Starting Up
Low threshold
Watering
Watering Wait
High Threshold
Low Threshold
Watering
Watering Wait
Watering Finished


So, after a little bit of debugging IT WORKS! The system waters for 30 seconds and checks for watering conditions every 5 minutes. My next steps will be to record a video of the system working and work with the openHAB GPIO binding to interface the watering system into openHAB.

  • Sign in to reply
  • bose
    bose over 10 years ago

    Nice way to utilize the same Pi ports for multiple stuff.

    Actually for the B+ version you get a couple of pins outside the rim of the TCM310 board so possibly some single wire jumpler might be useful.


    I will follow you route to test my watering system too.


    Thanks,

    Abhijit

    • Cancel
    • Vote Up 0 Vote Down
    • Sign in to reply
    • More
    • Cancel
  • DAB
    DAB over 10 years ago

    Good post.


    Good detail and explanation.

    I really do need to improve my graphics capability.  Well maybe someday. image


    Thanks

    DAB

    • Cancel
    • Vote Up 0 Vote Down
    • Sign in to reply
    • More
    • Cancel
  • mcb1
    mcb1 over 10 years ago

    Nice to see function over form once again back in fashion...


    I was wondering about accessing the unused GPIO pins ...didn't consider your trick ...Thanks.


    Mark

    • Cancel
    • Vote Up 0 Vote Down
    • Sign in to reply
    • More
    • Cancel
  • fvan
    fvan over 10 years ago in reply to michaelwylie

    It is indeed useful image


    I even have neighbours knocking on the door to print replacement parts for whatever is broken ... Might be some opportunities there image

    • Cancel
    • Vote Up 0 Vote Down
    • Sign in to reply
    • More
    • Cancel
  • michaelwylie
    michaelwylie over 10 years ago in reply to fvan

    Thanks. Finally something done. I saw your scale post, it makes me really want a 3D printer imageimageimage

    • Cancel
    • Vote Up 0 Vote Down
    • Sign in to reply
    • More
    • Cancel
>
element14 Community

element14 is the first online community specifically for engineers. Connect with your peers and get expert answers to your questions.

  • Members
  • Learn
  • Technologies
  • Challenges & Projects
  • Products
  • Store
  • About Us
  • Feedback & Support
  • FAQs
  • Terms of Use
  • Privacy Policy
  • Legal and Copyright Notices
  • Sitemap
  • Cookies

An Avnet Company © 2025 Premier Farnell Limited. All Rights Reserved.

Premier Farnell Ltd, registered in England and Wales (no 00876412), registered office: Farnell House, Forge Lane, Leeds LS12 2NE.

ICP 备案号 10220084.

Follow element14

  • X
  • Facebook
  • linkedin
  • YouTube