element14 Community
element14 Community
    Register Log In
  • Site
  • Search
  • Log In Register
  • About Us
  • Community Hub
    Community Hub
    • What's New on element14
    • Feedback and Support
    • Benefits of Membership
    • Personal Blogs
    • Members Area
    • Achievement Levels
  • Learn
    Learn
    • Ask an Expert
    • eBooks
    • element14 presents
    • Learning Center
    • Tech Spotlight
    • STEM Academy
    • Webinars, Training and Events
    • Learning Groups
  • Technologies
    Technologies
    • 3D Printing
    • FPGA
    • Industrial Automation
    • Internet of Things
    • Power & Energy
    • Sensors
    • Technology Groups
  • Challenges & Projects
    Challenges & Projects
    • Design Challenges
    • element14 presents Projects
    • Project14
    • Arduino Projects
    • Raspberry Pi Projects
    • Project Groups
  • Products
    Products
    • Arduino
    • Avnet Boards Community
    • Dev Tools
    • Manufacturers
    • Multicomp Pro
    • Product Groups
    • Raspberry Pi
    • RoadTests & Reviews
  • Store
    Store
    • Visit Your Store
    • Choose another store...
      • Europe
      •  Austria (German)
      •  Belgium (Dutch, French)
      •  Bulgaria (Bulgarian)
      •  Czech Republic (Czech)
      •  Denmark (Danish)
      •  Estonia (Estonian)
      •  Finland (Finnish)
      •  France (French)
      •  Germany (German)
      •  Hungary (Hungarian)
      •  Ireland
      •  Israel
      •  Italy (Italian)
      •  Latvia (Latvian)
      •  
      •  Lithuania (Lithuanian)
      •  Netherlands (Dutch)
      •  Norway (Norwegian)
      •  Poland (Polish)
      •  Portugal (Portuguese)
      •  Romania (Romanian)
      •  Russia (Russian)
      •  Slovakia (Slovak)
      •  Slovenia (Slovenian)
      •  Spain (Spanish)
      •  Sweden (Swedish)
      •  Switzerland(German, French)
      •  Turkey (Turkish)
      •  United Kingdom
      • Asia Pacific
      •  Australia
      •  China
      •  Hong Kong
      •  India
      •  Korea (Korean)
      •  Malaysia
      •  New Zealand
      •  Philippines
      •  Singapore
      •  Taiwan
      •  Thailand (Thai)
      • Americas
      •  Brazil (Portuguese)
      •  Canada
      •  Mexico (Spanish)
      •  United States
      Can't find the country/region you're looking for? Visit our export site or find a local distributor.
  • Translate
  • Profile
  • Settings
Forget Me Not Design Challenge
  • Challenges & Projects
  • Design Challenges
  • Forget Me Not Design Challenge
  • More
  • Cancel
Forget Me Not Design Challenge
Blog Pas Home / PiTFT
  • Blog
  • Forum
  • Documents
  • Files
  • Events
  • Mentions
  • Sub-Groups
  • Tags
  • More
  • Cancel
  • New
  • Share
  • More
  • Cancel
Group Actions
  • Group RSS
  • More
  • Cancel
Engagement
  • Author Author: verrverr
  • Date Created: 7 Sep 2014 4:30 AM Date Created
  • Views 837 views
  • Likes 0 likes
  • Comments 1 comment
  • forget_me_not
  • pas_home
Related
Recommended

Pas Home / PiTFT

verrverr
verrverr
7 Sep 2014

Pas Home - Index


This week a play with the PiTFT from Adafruit https://www.adafruit.com/products/1601, also available on newark Product LinkProduct Link

image


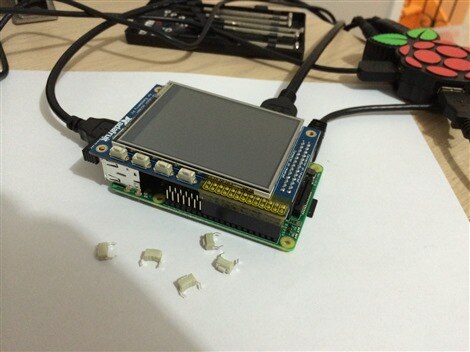
I want use the PiTFT with Pi for made a control panel to install in my kitchen and easily open/close my curtain, view and change heating temperature and control my home ventilation.


Setup


This is the procedure a use to setup my device https://github.com/pascalmartin/ForgetMeNot/tree/master/bundles/pitft


Usefull tips

  • To startx to HDMI Display

FRAMEBUFFER=/dev/fb0 startx

  • To open a console after start with browser in full screen Press CTRL+ALT+F1 and hit return and enter your login

Pi Installation

More complete documentation on Adafruit

Summary :

Step 1

Prepare Micro SD card:

  • Download RASPBIAN Ready to go image with PiTFT ready from Adafruit
  • Format SD Card with SDFormatter.exe
  • Write Raspbian with win32diskimager-v0.9-binary

Step 2

Pi configuration

  • Boot Pi with PiTFT on it, extend file system and configure password, timezone and keyboard reboot
  • Configure wifi using WiFi Config utility

Use this command to startx using the hdmi display (Very more usefull for configure WIFI)

FRAMEBUFFER=/dev/fb0 startx

The normal startx command use PiTFT display

  • Logout and Reboot

sudo reboot

  • Update raspberrypi

sudo apt-get update
sudo apt-get upgrade
sudo reboot

Step 3

Change Pi hostname for easily identification on your wifi router Details

sudo sed -i 's/raspberrypi/RPi-PiTFT/g' /etc/hosts 
sudo sed -i 's/raspberrypi/RPi-PiTFT/g' /etc/hostname 
sudo /etc/init.d/hostname.sh 
sudo reboot

Step 4

Auto run browser on startup

Some resource :

  • http://blogs.wcode.org/2013/09/howto-boot-your-raspberry-pi-into-a-fullscreen-browser-kiosk/
  • (Not tested) http://www.raspberry-projects.com/pi/pi-operating-systems/raspbian/gui/auto-run-browser-on-startup

Summary:

  • Install dependency package

sudo apt-get install matchbox chromium x11-xserver-utils ttf-mscorefonts-installer xwit sqlite3 libnss3 sudo reboot

  • Adding the following to /etc/rc.local:

if [ -f /boot/xinitrc ]; then
  ln -fs /boot/xinitrc /home/pi/.xinitrc;
  su - pi -c 'startx' &
fi


  • Create xinitrc file /boot/xinitrc

#!/bin/sh
while true; do

  # Clean up previously running apps, gracefully at first then harshly
  killall -TERM chromium 2>/dev/null;
  killall -TERM matchbox-window-manager 2>/dev/null;
  sleep 2;
  killall -9 chromium 2>/dev/null;
  killall -9 matchbox-window-manager 2>/dev/null;

  # Clean out existing profile information
  #rm -rf /home/pi/.cache;
  #rm -rf /home/pi/.config;
  #rm -rf /home/pi/.pki;

  # Generate the bare minimum to keep Chromium happy!
  #mkdir -p /home/pi/.config/chromium/Default
  #sqlite3 /home/pi/.config/chromium/Default/Web\ Data "CREATE TABLE meta(key LONGVARCHAR NOT NULL UNIQUE PRIMARY KEY, value LONGVARCHAR); INSERT INTO meta VALUES('version','46'); CREATE TABLE keywords (foo INTEGER);";

  # Disable DPMS / Screen blanking
  #xset -dpms # disable DPMS (Energy Star) features.
  #xset s off # don't activate screensaver

  # Reset the framebuffer's colour-depth
  #fbset -depth $( cat /sys/module/*fb*/parameters/fbdepth );

  # Hide the cursor (move it to the bottom-right, comment out if you want mouse interaction)
  #xwit -root -warp $( cat /sys/module/*fb*/parameters/fbwidth ) $( cat /sys/module/*fb*/parameters/fbheight )

  # Start the window manager (remove "-use_cursor no" if you actually want mouse interaction)
  #matchbox-window-manager -use_titlebar no -use_cursor no &
  matchbox-window-manager -use_titlebar no &

  # Start the browser (See http://peter.sh/experiments/chromium-command-line-switches/)
  chromium --app=http://192.168.0.150:8080/openhab.app?sitemap=demo

done;

  • Reboot

sudo reboot


Step 5

Configure tactile switch as power button From Adafruit
gpio pin from left to right : 23, 22, 21, 18 (I'm not use 23 because is on top of usb connector and the metal short the switch, i need a case)

Summary:

  • Add rpi_power_switch to /etc/modules

sudo sed -i '$ a\rpi_power_switch' /etc/modules

  • Append options rpi_power_switch gpio_pin=18 mode=0 to /etc/modprobe.d/adafruit.conf

sudo sed -i '$ a\options rpi_power_switch gpio_pin=18 mode=0'  /etc/modprobe.d/adafruit.conf

  • To make it active immediately run sudo modprobe rpi_power_switch or reboot

sudo modprobe rpi_power_switch


You don't have permission to edit metadata of this video.
Edit media
x
image
Upload Preview
image

  • Sign in to reply
  • mcb1
    mcb1 over 11 years ago

    Nice.

    I'm still waiting on two I kickstarted, and he seems to have gone to ground unfortunately.


    I always dislike shields and other items that rely solely on a connector for physical attachment.

    You could stick a bit of mylar onto the USB using double sided tape.


    Mark

    • Cancel
    • Vote Up 0 Vote Down
    • Sign in to reply
    • More
    • Cancel
element14 Community

element14 is the first online community specifically for engineers. Connect with your peers and get expert answers to your questions.

  • Members
  • Learn
  • Technologies
  • Challenges & Projects
  • Products
  • Store
  • About Us
  • Feedback & Support
  • FAQs
  • Terms of Use
  • Privacy Policy
  • Legal and Copyright Notices
  • Sitemap
  • Cookies

An Avnet Company © 2025 Premier Farnell Limited. All Rights Reserved.

Premier Farnell Ltd, registered in England and Wales (no 00876412), registered office: Farnell House, Forge Lane, Leeds LS12 2NE.

ICP 备案号 10220084.

Follow element14

  • X
  • Facebook
  • linkedin
  • YouTube