element14 Community
element14 Community
    Register Log In
  • Site
  • Search
  • Log In Register
  • About Us
  • Community Hub
    Community Hub
    • What's New on element14
    • Feedback and Support
    • Benefits of Membership
    • Personal Blogs
    • Members Area
    • Achievement Levels
  • Learn
    Learn
    • Ask an Expert
    • eBooks
    • element14 presents
    • Learning Center
    • Tech Spotlight
    • STEM Academy
    • Webinars, Training and Events
    • Learning Groups
  • Technologies
    Technologies
    • 3D Printing
    • FPGA
    • Industrial Automation
    • Internet of Things
    • Power & Energy
    • Sensors
    • Technology Groups
  • Challenges & Projects
    Challenges & Projects
    • Design Challenges
    • element14 presents Projects
    • Project14
    • Arduino Projects
    • Raspberry Pi Projects
    • Project Groups
  • Products
    Products
    • Arduino
    • Avnet Boards Community
    • Dev Tools
    • Manufacturers
    • Multicomp Pro
    • Product Groups
    • Raspberry Pi
    • RoadTests & Reviews
  • Store
    Store
    • Visit Your Store
    • Choose another store...
      • Europe
      •  Austria (German)
      •  Belgium (Dutch, French)
      •  Bulgaria (Bulgarian)
      •  Czech Republic (Czech)
      •  Denmark (Danish)
      •  Estonia (Estonian)
      •  Finland (Finnish)
      •  France (French)
      •  Germany (German)
      •  Hungary (Hungarian)
      •  Ireland
      •  Israel
      •  Italy (Italian)
      •  Latvia (Latvian)
      •  
      •  Lithuania (Lithuanian)
      •  Netherlands (Dutch)
      •  Norway (Norwegian)
      •  Poland (Polish)
      •  Portugal (Portuguese)
      •  Romania (Romanian)
      •  Russia (Russian)
      •  Slovakia (Slovak)
      •  Slovenia (Slovenian)
      •  Spain (Spanish)
      •  Sweden (Swedish)
      •  Switzerland(German, French)
      •  Turkey (Turkish)
      •  United Kingdom
      • Asia Pacific
      •  Australia
      •  China
      •  Hong Kong
      •  India
      •  Korea (Korean)
      •  Malaysia
      •  New Zealand
      •  Philippines
      •  Singapore
      •  Taiwan
      •  Thailand (Thai)
      • Americas
      •  Brazil (Portuguese)
      •  Canada
      •  Mexico (Spanish)
      •  United States
      Can't find the country/region you're looking for? Visit our export site or find a local distributor.
  • Translate
  • Profile
  • Settings
In the Air Design Challenge
  • Challenges & Projects
  • Design Challenges
  • In the Air Design Challenge
  • More
  • Cancel
In the Air Design Challenge
Blog Carbon Footprint Monitoring - Outdoor Sensor Enclosure
  • Blog
  • Forum
  • Documents
  • Polls
  • Files
  • Events
  • Mentions
  • Sub-Groups
  • Tags
  • More
  • Cancel
  • New
  • Share
  • More
  • Cancel
Group Actions
  • Group RSS
  • More
  • Cancel
Engagement
  • Author Author: xever
  • Date Created: 18 Feb 2015 8:27 AM Date Created
  • Views 931 views
  • Likes 1 like
  • Comments 5 comments
  • iot_footprint
  • in_the_air_design_challenge_2014
  • in_the_air
Related
Recommended

Carbon Footprint Monitoring - Outdoor Sensor Enclosure

xever
xever
18 Feb 2015

Recently, I updated the CT sensor post with the current test and power measurements done on bench.  In this post, I will run through the enclosure design process.  The enclosure design is intentionally made simple and really is used to conceal any hazardous voltages that the user might touch accidentally.


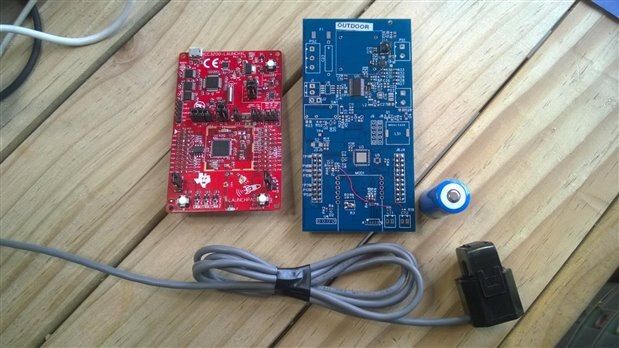
For the enclosure design, I used AutoDesk Inventor Fusion and using it is quite intuitive.  I started by measuring the dimensions of the CC3200 Launchpad with the outdoor sensor module connected.  From the measurements, I sketched the base in Fusion, adjust the base sketch with an offset to draw the wall.  Once the base was sketched, I applied the extrude on the drawn planes, this immediately resulted to be the shell of the enclosure.  Examining the CC3200 Launchpad board, the PCBoard is actually raised from the base because of the female 20-pin connector.  To prevent the Launchpad from tipping and have it more stable, the walls were extended to provide some sort of a rise.  Below is a screenshot of the modeled enclosure.


image


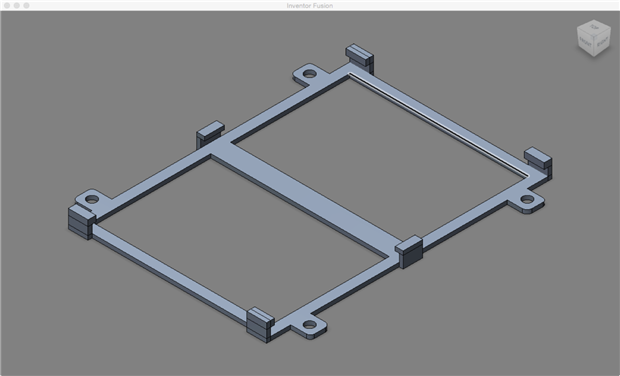
The next part of the enclosure is a frame for the solar panel.  Again the process was mostly the same, that is, measure the solar panel, use the dimensions to sketch the base and extrude.  To be able to mount the solar panel, I added a few screw holes.  See model below.


image

The files were then saved and exported in STL format ready for printing.  image

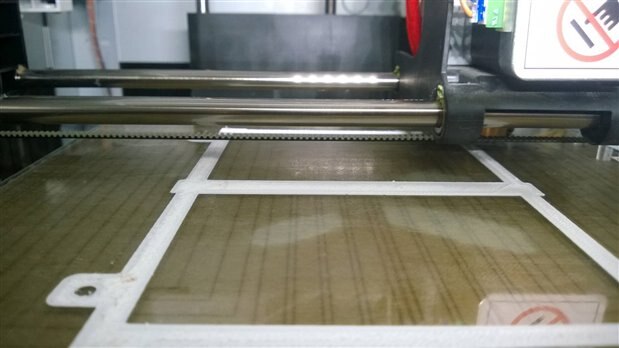
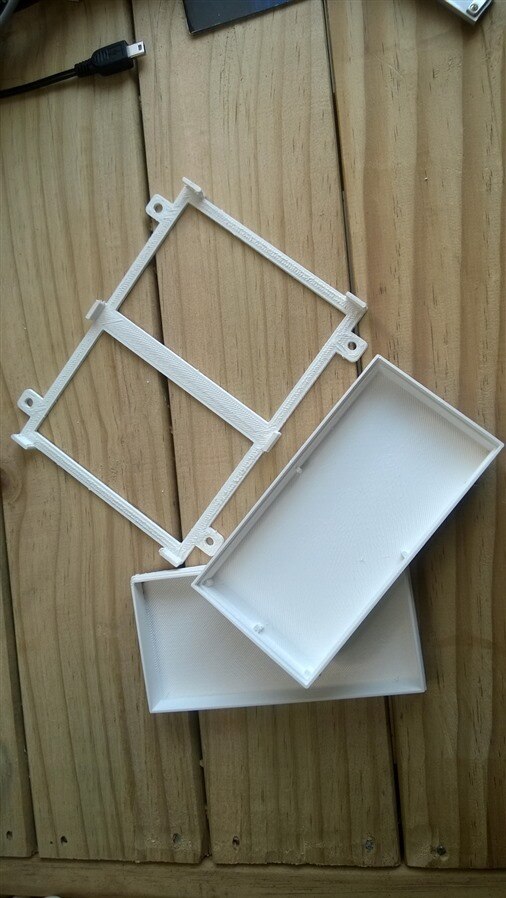
Solar panel frame being printed (above).  Printed enclosure (below).


image

Then assembly and installation.


image

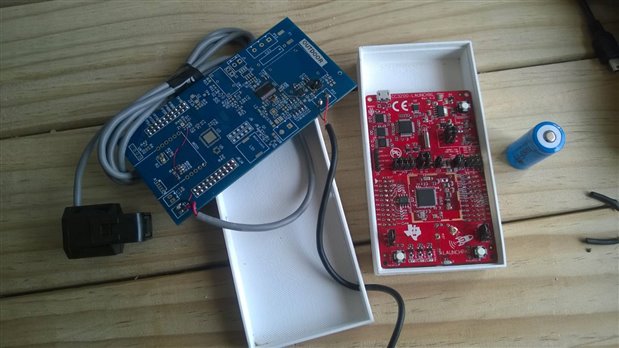
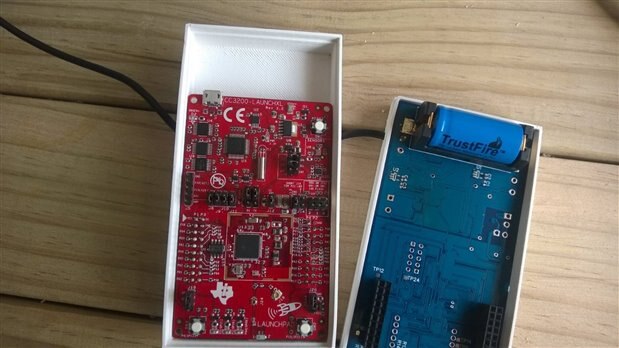
Btw, I drilled a few holes for the CT sensor and solar panel wires, a couple more holes on each side for airflow to the humidity and temperature sensor (currently not fitted in these pictures).

image

image


image

Then installed inside the meter box.

image

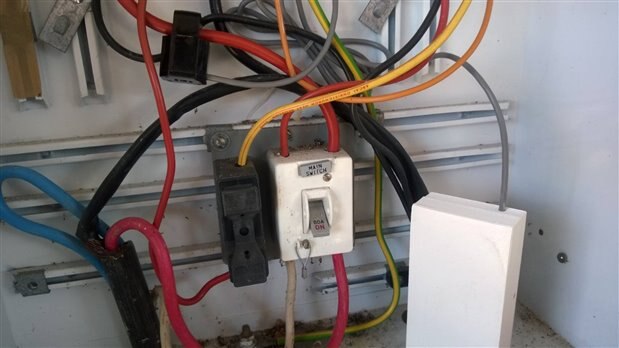
The wiring inside the box is already in spaghetti state, and was hard to route the cable safely.


I will leave this box collect some data for a day or two while I will be working on the other parts of the project.


Lastly, how I wish I incorporated in the design a quick way to reset the system.  Taking the top assembly off tends to be quite challenging as the box is too tight.


Next post, I will share some Sierra Wireless AirVantage helper libraries that you might find useful.

  • Sign in to reply

Top Comments

  • fvan
    fvan over 10 years ago +1
    Nicely done!
  • xever
    xever over 10 years ago in reply to fvan +1
    Thanks. Its adrenaline pumping time for this challenge, and 9 days to go.
  • mcb1
    mcb1 over 10 years ago +1
    Nice job. Yes the wiring can kill you, so isolating it and ensuring it is seperated wirelessly is a great solution. For the reset you could use a Hall Effect switch which you trigger with a magnet. I used…
  • mcb1
    mcb1 over 10 years ago in reply to xever

    Christever.


    You will find the magnet required is far less to trigger a Hall Effect.

    It's also very much smaller.


    There are different types ... some latch, some can handle both ends while other are North or South pole only.

    You should also note the trigger distance .. I'm picking 5mm would be useful in your situation.


    mark

    • Cancel
    • Vote Up 0 Vote Down
    • Sign in to reply
    • More
    • Cancel
  • xever
    xever over 10 years ago in reply to mcb1

    Thanks mark.


    Re: Hall Effect switch.  Aha! Now that is a very brilliant idea!  Thanks for suggesting that, I will have to revisit this sometime in the future and enhance and tidy up the system.  i do have a few reed switches somewhere which can be used as you've suggested.  i also want to implement some sort of OTA upgrades, but not now I guess, if I want to complete as much as planned for this challenge.


    -christever

    • Cancel
    • Vote Up 0 Vote Down
    • Sign in to reply
    • More
    • Cancel
  • mcb1
    mcb1 over 10 years ago

    Nice job.

    Yes the wiring can kill you, so isolating it and ensuring it is seperated wirelessly is a great solution.


    For the reset you could use a Hall Effect switch which you trigger with a magnet.

    I used one here.

    Wireless Challenge .... Beer Tap (the other bit) - 4  Assembly


    mark

    • Cancel
    • Vote Up +1 Vote Down
    • Sign in to reply
    • More
    • Cancel
  • xever
    xever over 10 years ago in reply to fvan

    Thanks.  Its adrenaline pumping time for this challenge, and 9 days to go. image

    • Cancel
    • Vote Up +1 Vote Down
    • Sign in to reply
    • More
    • Cancel
  • fvan
    fvan over 10 years ago

    Nicely done!

    • Cancel
    • Vote Up +1 Vote Down
    • Sign in to reply
    • More
    • Cancel
element14 Community

element14 is the first online community specifically for engineers. Connect with your peers and get expert answers to your questions.

  • Members
  • Learn
  • Technologies
  • Challenges & Projects
  • Products
  • Store
  • About Us
  • Feedback & Support
  • FAQs
  • Terms of Use
  • Privacy Policy
  • Legal and Copyright Notices
  • Sitemap
  • Cookies

An Avnet Company © 2025 Premier Farnell Limited. All Rights Reserved.

Premier Farnell Ltd, registered in England and Wales (no 00876412), registered office: Farnell House, Forge Lane, Leeds LS12 2NE.

ICP 备案号 10220084.

Follow element14

  • X
  • Facebook
  • linkedin
  • YouTube