element14 Community
element14 Community
    Register Log In
  • Site
  • Search
  • Log In Register
  • About Us
  • Community Hub
    Community Hub
    • What's New on element14
    • Feedback and Support
    • Benefits of Membership
    • Personal Blogs
    • Members Area
    • Achievement Levels
  • Learn
    Learn
    • Ask an Expert
    • eBooks
    • element14 presents
    • Learning Center
    • Tech Spotlight
    • STEM Academy
    • Webinars, Training and Events
    • Learning Groups
  • Technologies
    Technologies
    • 3D Printing
    • FPGA
    • Industrial Automation
    • Internet of Things
    • Power & Energy
    • Sensors
    • Technology Groups
  • Challenges & Projects
    Challenges & Projects
    • Design Challenges
    • element14 presents Projects
    • Project14
    • Arduino Projects
    • Raspberry Pi Projects
    • Project Groups
  • Products
    Products
    • Arduino
    • Avnet Boards Community
    • Dev Tools
    • Manufacturers
    • Multicomp Pro
    • Product Groups
    • Raspberry Pi
    • RoadTests & Reviews
  • Store
    Store
    • Visit Your Store
    • Choose another store...
      • Europe
      •  Austria (German)
      •  Belgium (Dutch, French)
      •  Bulgaria (Bulgarian)
      •  Czech Republic (Czech)
      •  Denmark (Danish)
      •  Estonia (Estonian)
      •  Finland (Finnish)
      •  France (French)
      •  Germany (German)
      •  Hungary (Hungarian)
      •  Ireland
      •  Israel
      •  Italy (Italian)
      •  Latvia (Latvian)
      •  
      •  Lithuania (Lithuanian)
      •  Netherlands (Dutch)
      •  Norway (Norwegian)
      •  Poland (Polish)
      •  Portugal (Portuguese)
      •  Romania (Romanian)
      •  Russia (Russian)
      •  Slovakia (Slovak)
      •  Slovenia (Slovenian)
      •  Spain (Spanish)
      •  Sweden (Swedish)
      •  Switzerland(German, French)
      •  Turkey (Turkish)
      •  United Kingdom
      • Asia Pacific
      •  Australia
      •  China
      •  Hong Kong
      •  India
      •  Korea (Korean)
      •  Malaysia
      •  New Zealand
      •  Philippines
      •  Singapore
      •  Taiwan
      •  Thailand (Thai)
      • Americas
      •  Brazil (Portuguese)
      •  Canada
      •  Mexico (Spanish)
      •  United States
      Can't find the country/region you're looking for? Visit our export site or find a local distributor.
  • Translate
  • Profile
  • Settings
In the Air Design Challenge
  • Challenges & Projects
  • Design Challenges
  • In the Air Design Challenge
  • More
  • Cancel
In the Air Design Challenge
Blog Dust, Temperature and Humidity Monitor Chapter 3
  • Blog
  • Forum
  • Documents
  • Polls
  • Files
  • Events
  • Mentions
  • Sub-Groups
  • Tags
  • More
  • Cancel
  • New
  • Share
  • More
  • Cancel
Group Actions
  • Group RSS
  • More
  • Cancel
Engagement
  • Author Author: engswee
  • Date Created: 13 Nov 2014 8:50 AM Date Created
  • Views 844 views
  • Likes 3 likes
  • Comments 4 comments
  • haze_monitor
  • in_the_air
Related
Recommended

Dust, Temperature and Humidity Monitor Chapter 3

engswee
engswee
13 Nov 2014

In this chapter I am going to write about dust sensor. If you follow my project then you will know I plan to use Sharp GP2Y1010AU0F dust sensor.

Again I will provide the information here in case someone is not read my previous chapter.


SHARPGP2Y1010AU0F

Link to Element 14

http://sg.element14.com/sharp/gp21010au0f/dust-sensor/dp/9707956?COM=IntheAirDesignChallenge


Link for datasheet

http://www.farnell.com/datasheets/73805.pdf

https://www.sparkfun.com/datasheets/Sensors/gp2y1010au_e.pdf


Related connector

http://sg.element14.com/jst-japan-solderless-terminals/zhr-6/connector-housing-6way/dp/3357570

http://sg.element14.com/jst-japan-solderless-terminals/szh-003t-p0-5/contact-crimp-receptacle-32-28awg/dp/3357533


This is a simple dust sensor, it shine an LED light and measure light power or density to determine the dust or particle in the air.

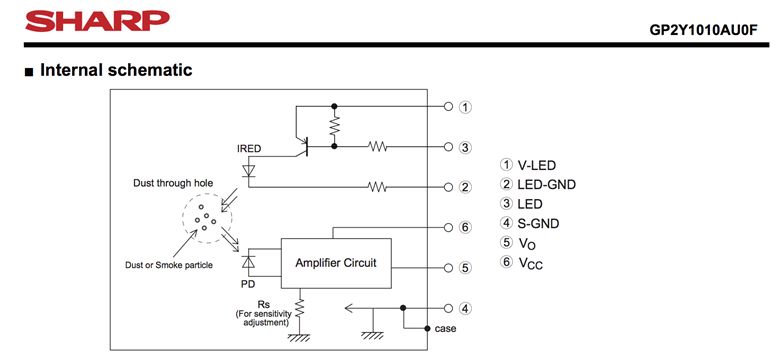
Given picture below show the internal design of the sensor.

image


T

To anyone who want to use this sensor please noted that this sensor is not accurate calibrated and user need to calibrated them to get correct and good data (base on my experience).

They never mention to use different supply for LED and the amplifier circuit. In my case I using same supply 5V for LED and amplifier circuit.

For this testing I using workbench power supply unit but in the real application I going to use DC-DC converter or Power Bank to run the circuit.

I hope those dc-dc not affected the stability of the output data. My selection power bank is Xiaomi power bank due to price and battery given (Mi Power Bank - Mi Singapore).

Will DIY the power management part if possible but for now just keep with power bank.


image

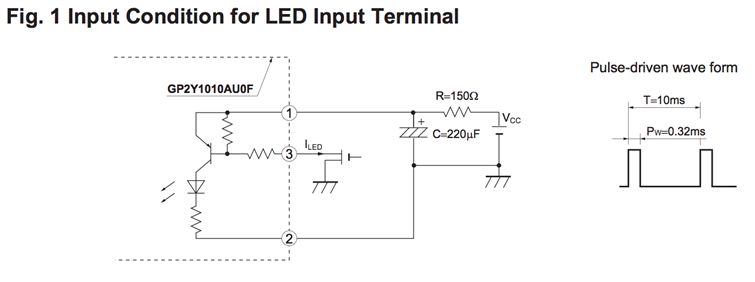
Warning: Please remember to install the 150Ω resistor before power up the LED to prevent damage to the LED.


LED is driving using pulse wave, LED is activated when the input is low. Mean LED ON when the drive pulse at 0v or lower then 2.5V.

You need a digital output or PWM output for this LED drive pulse.


image


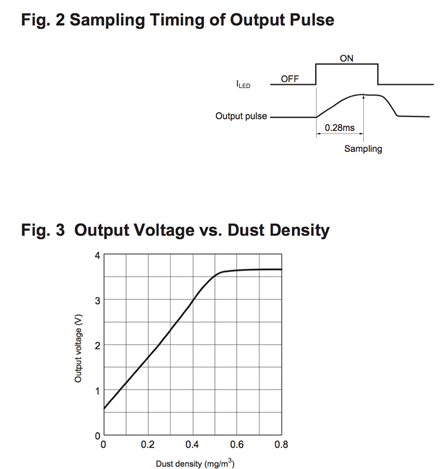
For data it look straight forward. Output of amplifier is analog signal form about 0.9v to 3.5V.

The important is the data taking need to be taken 0.28ms after the on stage for LED to get the accurate data.
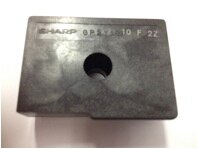
 

Dust sensor detail:

image

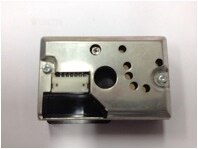
This is front view of dust sensor(I think). They have 6 pin 1.5mm pitch header and some test point with opening hole from the metal housing.

The variable resistor to set the sensitivity of the sensor also can be access from this side.

Higher resolution picture:

https://www.dropbox.com/s/d4begl1qdhi6z5x/IMG_3672.JPG?dl=0


image

This is back view of dust sensor(also I think). The hole in the middle is to allow air pass and where the air dust will be measure.

Here you also can identifier the sensor brand and model. They are indicated on the housing (this angle of picture normally see for Element 14 order) .

Higher resolution picture:

https://www.dropbox.com/s/82l3oh7225bcc0s/IMG_3673.JPG?dl=0


image

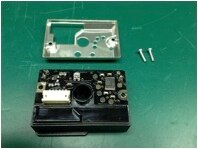
This view is after metal cover been remove.

Here you can see the transistor, amplifier and PCB where all the component been put together.

The metal cover hold by two screw that screw to the plastic housing.

Higher resolution picture:

https://www.dropbox.com/s/a8wual3fe6yeppi/IMG_3677.JPG?dl=0


image

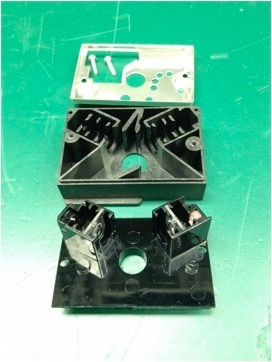
The last view is LED, photo detector and lenses in black plastic housing. They been arrange nicely to detect the light reflection

Look like this sensor is not design for servicing. Everything is keep hidden inside and lenses also unable to access from outside.

Higher resolution picture:

https://www.dropbox.com/s/z09ity0ommgrrhn/IMG_3682.jpg?dl=0


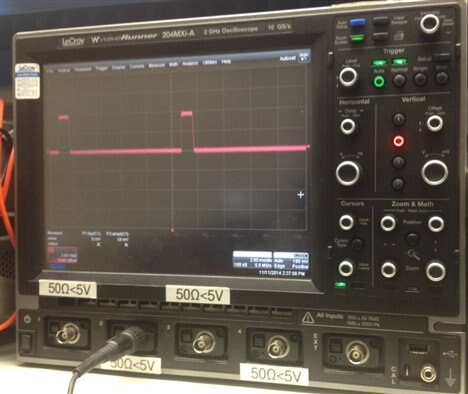
Dust sensor testing:

image

Higher resolution picture:

https://www.dropbox.com/s/yi6ktuqaeh24r7e/IMG_3675.JPG?dl=0


image

Higher resolution picture:

https://www.dropbox.com/s/wemnngbtam4045i/IMG_3685.JPG?dl=0


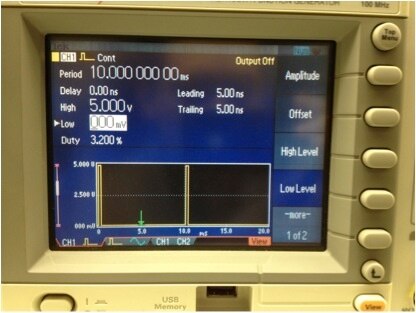
For testing I'm using function generator to drive LED and oscilloscope for output reading and measurement.

Look like a particle counter is needed to calibrate this sensor. The output is just difficult to see from oscilloscope and it come in random unless you put something in the hole image


Vibration will affected the output of this sensor, mean that this sensor is not suitable to use in a vibrating or very hash environment.

The output signal will keep jumping although the LED pulse is not given.

Lighting also will affected the output signal, this mean when there are strong light shine to sensor it will provide some reading.

This will affected data and provide an error data when in the event of data reading.


Some advice:

Try to make the connection as short as possible to get nice and more accurate data. This also will help to reduce the noise and prevent delay that will affect data taking.

Solder directly to the PCB on this sensor will be better way of connection. Having some issue with the connection using DIY clamp header.


Sharing:

Some example form other work on same sensor.

http://www.howmuchsnow.com/arduino/airquality/

http://sensorapp.net/sharp-dust-sensor-and-arduino/


Please check the code I not sure it working

Arduino code for this sensor http://www.howmuchsnow.com/arduino/airquality/dust.ino


Another similar sensor found just for sharing.

image

Buy Grove - Dust Sensor [SEN12291P] | Seeedstudio


Previous

Dust, Temperature and Humidity Monitor Chapter 2


Next

Dust, Temperature and Humidity Monitor Chapter 4

  • Sign in to reply
  • engswee
    engswee over 10 years ago in reply to amgalbu

    Oh... Don't forget the 150ohm resistor if not then you may kill the LED image

    • Cancel
    • Vote Up 0 Vote Down
    • Sign in to reply
    • More
    • Cancel
  • engswee
    engswee over 10 years ago

    Glad that this post able to help other or provide knowledge to other.

    I will try my best to create blog update for this project and show the detail as possible. Right now overloaded with work and some urgent project.

    Hope able to transfer some family time to this project. image


    cheer

    ES

    • Cancel
    • Vote Up 0 Vote Down
    • Sign in to reply
    • More
    • Cancel
  • DAB
    DAB over 10 years ago

    Cool


    I had not looked into how these sensors worked, but it makes sense.


    Let us know how it works for your project.


    DAB

    • Cancel
    • Vote Up 0 Vote Down
    • Sign in to reply
    • More
    • Cancel
  • amgalbu
    amgalbu over 10 years ago

    Great work

    I'm going to use the same sensor and this info are really valuable!!

    • Cancel
    • Vote Up 0 Vote Down
    • Sign in to reply
    • More
    • Cancel
element14 Community

element14 is the first online community specifically for engineers. Connect with your peers and get expert answers to your questions.

  • Members
  • Learn
  • Technologies
  • Challenges & Projects
  • Products
  • Store
  • About Us
  • Feedback & Support
  • FAQs
  • Terms of Use
  • Privacy Policy
  • Legal and Copyright Notices
  • Sitemap
  • Cookies

An Avnet Company © 2025 Premier Farnell Limited. All Rights Reserved.

Premier Farnell Ltd, registered in England and Wales (no 00876412), registered office: Farnell House, Forge Lane, Leeds LS12 2NE.

ICP 备案号 10220084.

Follow element14

  • X
  • Facebook
  • linkedin
  • YouTube