


![]() Blog#2 Design (Case Enclosure Reliability Monitor)
Blog#2 Design (Case Enclosure Reliability Monitor)
This blog will include the Design of my Idea. My Idea is described in the previous blog in this series
My idea is to conduct a number of test to determine if the Ingress Properties Ratings of each enclosure is met.
A project utilizing the provided 2 Arduino MKR WAN 1300 and 2 Enclosure Cases supplied by Hammond Manufacturing for
Design Challenge: Just Encase Blog Series
| <<< PREVIOUS BLOG | NEXT BLOG >>> |
|---|---|
| Blog#3 Implementation (Case Enclosure Reliability Monitor) |
Table of Contents
Design Specification
- One MKR will be placed in an Enclosure
- A Dashboard will be implemented on The Arduino IoT Cloud.
- The Dashboard will display telemetry data from the MKR WAN 1300 in the Enclosure.
- How to get status info of the MKR? I would be nice to report information to the dashboard.
- How to get battery power levels over time? it would be nice to report this to the dashboard?
- LoRaWAN Connection to the Arduino IoT Cloud
- MKR WAN 1300 -> Antenna -> Arduino IoT Cloud -> Dashboard
- Possible Sensors that can be used
- Inside Temp
- Can be used to measure inside temperature
- possible sensor: Seed Grove starter kit Temperature Sensor
- Outside Temp
- can be Used to measure the temperature outside the enclousure.
- possible sensor: the Supplied Adafruit 642 Digital Temperature Sensor
- Water Moisture
- can be used to detect moisture in the enclosure..
- Dust Particle Sensor.
- Humidity
- Rainfall sensor.
- Inside Temp
- A series of test projects will be conducted to exercise the IP ratings of each enclosure supplied with the Design Challenge kit.
- A Basic core sketch structure will be implemented to Connect to the Arduino IoT cloud via the LoRaWAN.
- ALL test will be built on this basic sketch structure.
- This basic structure sketch will be Built, Coded and Tested before any other test are Designed.
- Each test project will use Sensors attached to the MKR WAN 1300 and send telemetry data an IoT cloud Dashboard design to display variables defined in the test sketch.
Basic Diagram for all TEST (1st try)
- The following Basic Design will be used for all enclosure test.
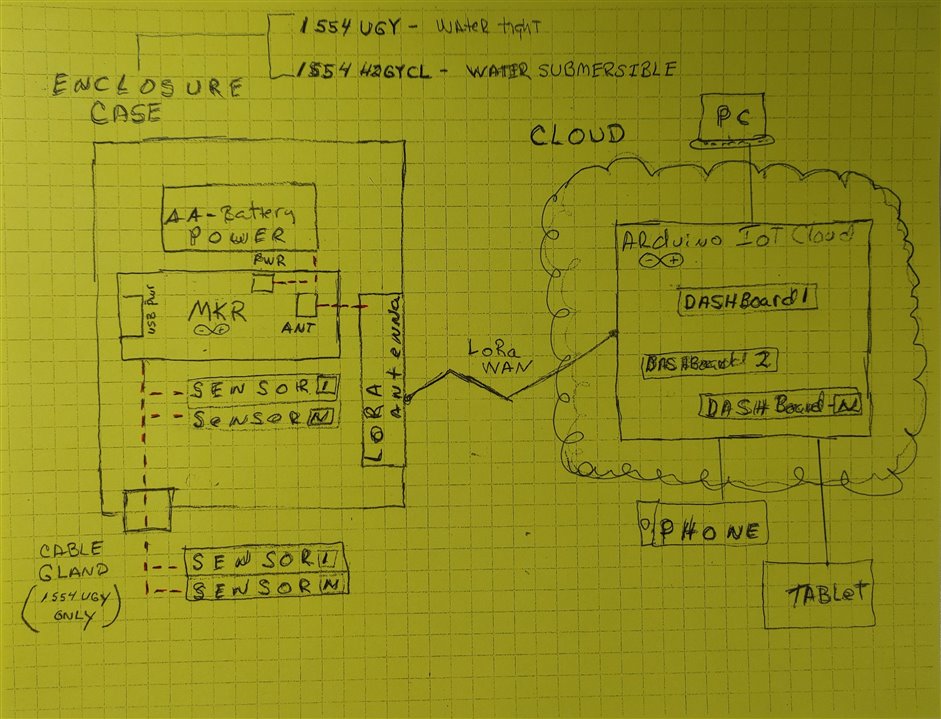
- all test will include:
- An Enclosure case either:
- 1554UGY IP66 Water Resistant
- 1554H2GYCL IP68 Watertight Water submergible
- An MKR WAN 1300
- A basic sketch that will connect to the IoT Cloud Dashboard
- A 2 AA Battery Holder attached to the MKR WAN 1300 connector
- A connection to the Arduino IoT Cloud over the LoRaWAN
- An LoRa Antenna attached to the MKR WAN 1300
- An Enclosure case either:
- Each test will contain
- Sensor(s) attached to the MKR WAN 1300
- A minimum of 1 sensor will be attached per test. (For example a temperature sensor to measure the enclosures internal Temperature )
- Sketch code added to the basic sketch mentioned above.to READ values from the attached sensors.
- An Arduino IoT Dashboard to display the sensor(s) values.
Wiring Diagram (1st try)
- Basic wiring diagram showing LoRa antenna and AA-Battery connections
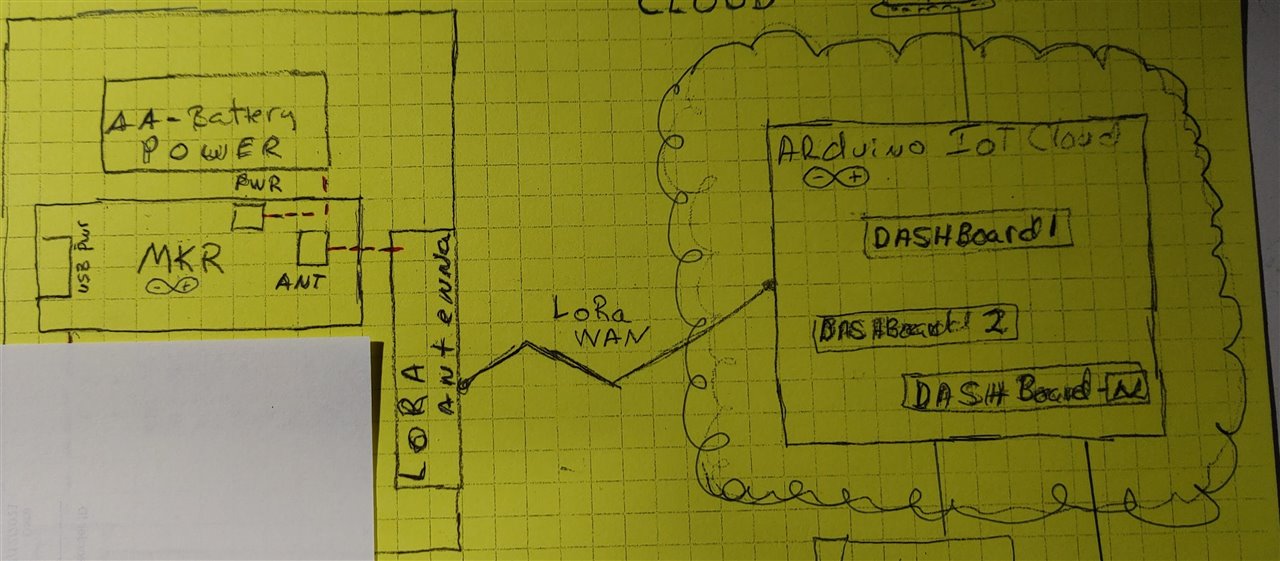
- Basically the design includes all the parts of the above diagram except for the sensors. It will be used all the sensor test.
- The IoT cloud will create this basic sketch for you when you create a dashboard. Really nice feature.
- The antenna and Battery power connections will be the same for all test.
Software Design (1st try)
- As mentioned the IoT cloud will construct the basic sketch when creating a dash board.
- I will describe the code for the sketch in pseudo code as follows:
- #include "thingsProperties.h"
- in setup function
- from thingsProperties.h , initProperties();
- from the ArduinoCloud object , Begin(connection);
- for debugmessages, from the ArduinoCloud object
- Set message level
- PrintDebugInfo()
- In the loop function
- from the ArduinoCloud object , update()
- put sensor code after it
- delay
- That's the basic flow of all the IoT cloud based code.
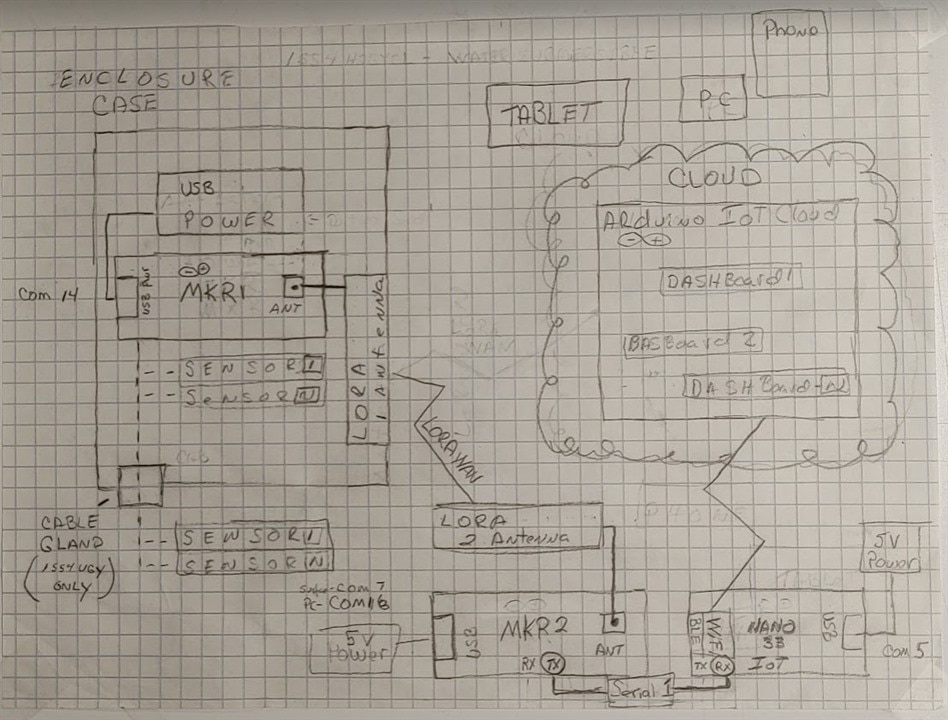
Basic Diagram for all TEST (New Solution)
- My original design in the first try, could not connect to the Arduino IoT Cloud directly over LoRaWAN because of my location to a Pro Gateway in the Things network
- I needed to design an additional piece in, that would allow the two MKR WAN1300's to talk together over LoRaWAN and one MKR WAN 1300 would connect to a Nano WIFI IoT board over a TX/RX serial connection.
- Then the Nano would talk to the IoT cloud over my home WIFI router.
- The next Section describes my New Solution.
Wiring Diagram (New Solution)
Software Programming (New Solution)
- To get Telemetry data from the MKR1 board to the MKR2 board I'm sending packets from a sketch on the MKR1 over LoraWAN to a receiver sketch on the MKR2.
- TO get the Telemetry data from the MKR2 to the Wi-Fi Nano, I'm using a jumper wire with one end connected to TX pin on the MKR2 and the other end connected to the RX pin on the Nano.
- LoRA Sender on MKR1
- LoRa Receiver on MKR2
- Serial1 Sender on MKR2
- Serial1 Receiver on NANO IoT
- Wi-Fi connection to the Cloud on NANO IoT
Libraries
IF your coding Completely on the IoT CLoud Web Editor, then the Arduino Cloud Package is included
Otherwise if your using the IDE, You will need to install the Arduino Cloud Package with the Package Manager.
| <<< PREVIOUS BLOG | NEXT BLOG >>> |
|---|---|
| Blog#3 Implementation (Case Enclosure Reliability Monitor) |
-

DAB
-
Cancel
-
Vote Up
-1
Vote Down
-
-
Sign in to reply
-
More
-
Cancel
-

skruglewicz
in reply to DAB
-
Cancel
-
Vote Up
0
Vote Down
-
-
Sign in to reply
-
More
-
Cancel
Comment-

skruglewicz
in reply to DAB
-
Cancel
-
Vote Up
0
Vote Down
-
-
Sign in to reply
-
More
-
Cancel
Children