


![]()
Hi all !
Hope everyone is well.
On this post I will discuss the role of the Arduino UNO. This one is the one that displays the data measured and saves it to an SD Card.
This Arduino receives the values from I2C, sent from the local MKR 1300 WAN .
The data received is a string. It then splits the string into various components and displays them.
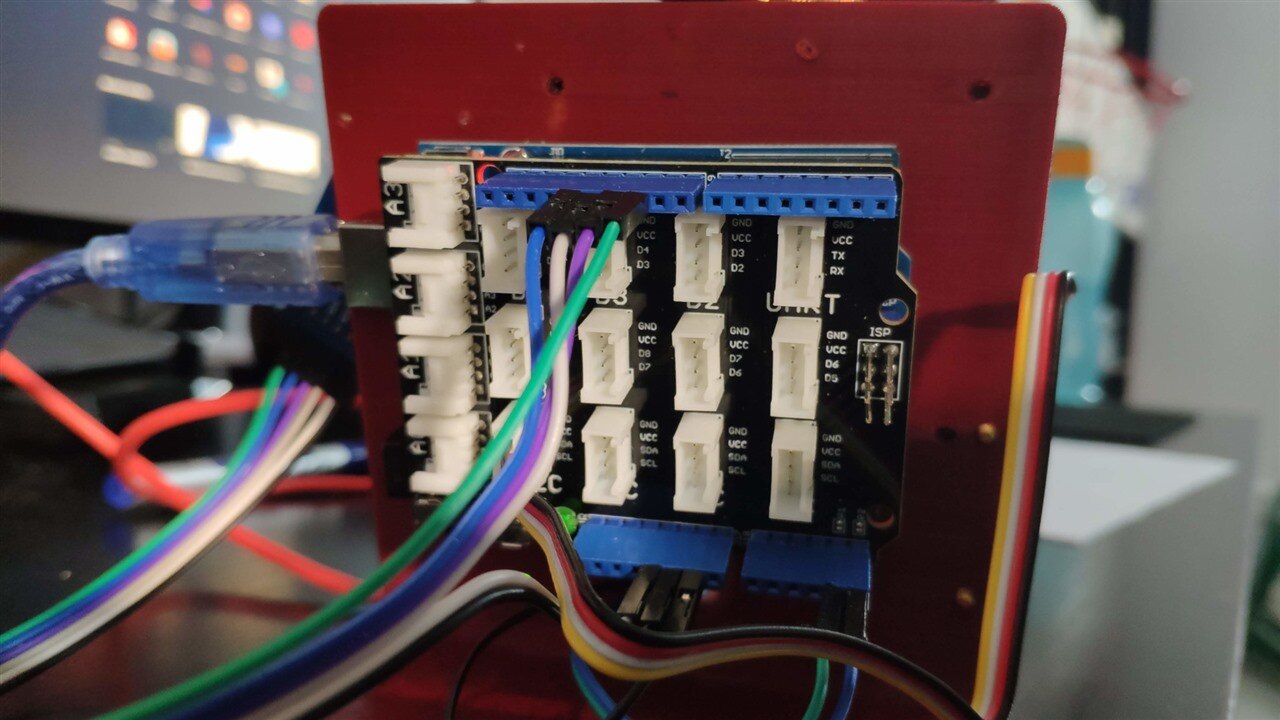
Here's the schematics

You can see that the Grove base shield is on top of the Arduino UNO, but the pins remain the same.


Because I can't send the data to the Arduino IoT Cloud, nor I was able to send it via WiFi to ThingSpeak, I decided to save the data to a SD CARD.
Here's an example of the data saved
15.90|57.70|13.25|3.00|0.0015.90|57.60|13.31|3.00|0.0015.90|57.60|13.31|3.00|0.0011.90|80.80|10.31|2941.00|89.2511.60|92.20|10.31|2866.00|86.12 nan| nan|10.31|2847.00|85.3412 nan| nan|10.25|2842.00|84.5612 nan| nan|10.12|2839.00|83.281213.90|45.20|10.81|2839.00|100.0013.70|56.90|11.19|70.00|96.5814.60|44.90|10.88|2974.00|96.2914.60|51.20|10.75|2925.00|92.6711.80|66.00|10.56|2880.00|88.9510.70|78.00|10.44|2868.00|87.10 nan| nan|10.31|2811.00|83.68 nan| nan|10.25|2796.00|82.60 nan| nan|10.25|2787.00|82.21 nan| nan|10.25|2787.00|82.21
The nan is the data from the AM2302 sensor. I'm guessing, when the battery drops to low, there's not enough juice to power it.
Code
Here's the application code.
#include <Wire.h>
#include "rgb_lcd.h"
#include <SPI.h>
#include <SD.h>

#define debug 0

String filename = "poolval.txt";

rgb_lcd lcd;

File myFile;

char buff[40];

String package;
String oldpackage = "";
String seperator = "|";

int waitingTime = 6000;

/* Warning values
 *  Temp min, temp max
    humidity min, humidity max
    Water min, water max,
    TDS min, TDS max
    battery min, battery max (not such thing)*/
int warningValues[] = {1, 45, 1, 100, 15, 45, 300, 5500, 15, 105};


void setup() {
  if (debug) {
    Serial.begin(115200);
    Serial.println("SD Card initializing..");
  }

  if (!SD.begin(10)) {
    if (debug) {
      Serial.println("Initialization of SD Card failed!");
    }
    while (1); //without SD, there's nothing
  }
  // put your setup code here, to run once:
  lcd.begin(16, 2);
  Wire.begin(100);      //start wire in 100 address
  Wire.onReceive(receiveEvent);
}


void receiveEvent(int howMany) {
  if (debug) {
    Serial.println("received I2C..");
  }
  for (int i = 0; i < howMany; i++) {
    char c = Wire.read();
    buff[i] = c;
  }
  //put it in a string
  package = buff;
  writeSDCard();  //write to SD CARD
}

void displayMessage(int index, String message, String values) {
  lcd.clear();
  if (values.toFloat() < warningValues[index] || values.toFloat() > warningValues[index+1]) {
    lcd.setRGB(255, 0, 0);
  }
  else {
    lcd.setRGB (255, 255, 255);
  }
  lcd.setCursor(0, 0);
  lcd.print (message);
  lcd.setCursor(8,1);
  lcd.print (values);
}

void writeSDCard() {
  //save package to SDCARD

  myFile = SD.open("poolval.txt", FILE_WRITE);
  if (myFile) {
    if (debug) {
      Serial.println("Writing data...");
    }
    myFile.println(package);
    myFile.close();
  }
  else {
    if (debug) {
      Serial.println("error opening poolval.txt");
    }
  }

}


void loop() {
  if (debug) {
    Serial.println(package);
  }

  /*
  * insideTemp | insideHum | outsideTemp | TDS values | batteryVoltage
  */
  //package only changes if there's a new message comming in


  int seperatorInsideTemp = package.indexOf(seperator);
  int seperatorInsideHum = package.indexOf(seperator, seperatorInsideTemp + 1);
  int seperatorOutsideTemp = package.indexOf(seperator, seperatorInsideHum + 1);
  int seperatorTDSValues = package.indexOf(seperator, seperatorOutsideTemp + 1);
  int seperatorBatteryVoltage = package.indexOf(seperator, seperatorTDSValues + 1);


  // put your main code here, to run repeatedly:
 // put your main code here, to run repeatedly:
  String insideTemp = package.substring(0, seperatorInsideTemp);
  displayMessage(0, "Enclosure Temp", insideTemp + " c");
  delay (waitingTime);

  String insideHum = package.substring(seperatorInsideTemp + 1,seperatorInsideHum);
  displayMessage(2, "Enclosure Hum", insideHum + " %");
  delay (waitingTime);
  if (debug) {
    Serial.println(insideHum);
  }

  String outsideTemp = package.substring(seperatorInsideHum + 1,seperatorOutsideTemp);
  displayMessage(4, "Water Temp", outsideTemp + " c");
  if (debug) {
    Serial.println(outsideTemp);
  }
  delay (waitingTime);


  String tdsValues = package.substring(seperatorOutsideTemp + 1,seperatorTDSValues);
  displayMessage(6, "Water TDS", tdsValues + " ppm");
  if (debug) {
    Serial.println(tdsValues);
  }
  delay (waitingTime);

  String batteryValues = package.substring(seperatorTDSValues + 1,seperatorBatteryVoltage);
  displayMessage(8, "Baterry status", batteryValues + " %");
  if (debug) {
    Serial.println(batteryValues);
  }
  delay (waitingTime);
}
The code is pretty straightforward.
We start by including the necessary libraries and set the debugging flag.
We define the filename to store the values in the SD Card. The library has a 8 characters restriction for the filename + 3 for the extension.
String filename = "poolval.txt";
We initialize the rgb LCD from Grove.
rgb_lcd lcd;
Open a file descriptor. This will be used to write to the SD Card.
File myFile;
We define an Array of 40 characters. 40 because the string coming from the MKR will never by bigger. This will hold the values - more on that bellow and you will see why 40.
char buff[40];
We next define a number of strings that will help us below.
String package;String seperator = "|";
The waitingTime variable is the time that the LCD will display each value.
int waitingTime = 6000;
Next, we define an array with the Warning Values.
/* Warning values * Temp min, temp max humidity min, humidity max Water min, water max, TDS min, TDS max battery min, battery max (not such thing)*/int warningValues[] = {1, 45, 1, 100, 15, 45, 300, 5500, 15, 105};
This values come from one of my earlier posts. [Pool Water Monitoring] #14 Values to measure and meanings
This will allow that, when the received values are below or above this ones, the LCD will turn RED, showing that the value is outside of safe parameters.
setup()
Next, the setup() comes.
We initialize the SD Card and hang if there's some error.
if (!SD.begin(10)) {
if (debug) {
Serial.println("Initialization of SD Card failed!");
}
while (1); //without SD, there's nothing
}
We the define the LCD size.
We initialize the wire library and join the I2C bus, in the address 100. This Arduino will be a slave. Next, we define a function to be called every time this UNO receives a transmission from the sender.
Wire.onReceive(receiveEvent);
receiveEvent
Next, the receiveEvent function. This will be called when received a transmission.
void receiveEvent(int howMany) { if (debug) { Serial.println("received I2C.."); } for (int i = 0; i < howMany; i++) { char c = Wire.read(); buff[i] = c; } //put it in a string package = buff; writeSDCard(); //write to SD CARD}
Like already said, this will be called when a transmission arrives.
In a loop, until we get all the bytes received (variable howmany), we read the byte -as a character - received and store it in the array declared .
char c = Wire.read();buff[i] = c;
After we got all the characters, we copy it to the package string.
Next, we write the values to the SDCard.
Write to SDCard
The writeSDCard function does exactly that.
void writeSDCard() { //save package to SDCARD myFile = SD.open("poolval.txt", FILE_WRITE); if (myFile) { if (debug) { Serial.println("Writing data..."); } myFile.println(package); myFile.close(); } else { if (debug) { Serial.println("error opening poolval.txt"); } }}
We start by opening our file to save the data.
myFile = SD.open("poolval.txt", FILE_WRITE);
if we're successful, we save the package string into the file and close it.
myFile.println(package);myFile.close();
If we're not, then, if debug is active, we print an error.
displayMessage
Next, we have the function that displays messages on the LCD.
void displayMessage(int index, String message, String values) { lcd.clear(); if (values.toFloat() < warningValues[index] || values.toFloat() > warningValues[index+1]) { lcd.setRGB(255, 0, 0); } else { lcd.setRGB (255, 255, 255); } lcd.setCursor(0, 0); lcd.print (message); lcd.setCursor(8,1); lcd.print (values);}
This function takes 3 arguments:
- index (refering to warningValues)
- the message to display
- the values to display
We start by clearing the LCD
lcd.clear();
Next, we compare the values with their counterpart in the warningValues array. If they are outside of the values in there, we change the LCD background to red.
Otherwise, it stays white.
if (values.toFloat() < warningValues[index] || values.toFloat() > warningValues[index+1]) { lcd.setRGB(255, 0, 0); } else { lcd.setRGB (255, 255, 255); }
Let's explain the warningValues array.
This array contains the min and the max values of each parameter measured. In the comments for the array you can read what are max and min values for what parameters.
Let's continue on the displayMessage function
Finally, we set the cursor to 0,0 (x and y coordinates).
We print the message in the LCD.
The first row will print the message and the second row the values
We then set the cursor to the second row and the 8th column (enough space for values and units).
lcd.setCursor(0, 0);lcd.print (message);lcd.setCursor(8,1);lcd.print (values);
The loop function.
Our package arrives in the form:
14.60|44.90|10.88|2974.00|96.29
We have all the values separated by a vertical bar - | - in a single string. We need to split them.
int seperatorInsideTemp = package.indexOf(seperator); int seperatorInsideHum = package.indexOf(seperator, seperatorInsideTemp + 1); int seperatorOutsideTemp = package.indexOf(seperator, seperatorInsideHum + 1); int seperatorTDSValues = package.indexOf(seperator, seperatorOutsideTemp + 1); int seperatorBatteryVoltage = package.indexOf(seperator, seperatorTDSValues + 1);
To do this, we define a separator for each value. In each variable we're holding the index where the seperator - | - is located within the string.
Because the values are:
insideTemp | insideHum | outsideTemp | TDS values | batteryVoltage
Inside Temperature is the first, so, the seperatorInsideTemp will be 5 . Look the string above.
The seperatorInsideHum will search for - | -, but not from the beginning, but from the value searched before plus 1 . So, this will start in 6 and search for the next separator, that will be 11 . This will be repeated until all the indexes for all the separators are located.
Next, for the insideTemperature, we use the substring function.
String insideTemp = package.substring(0, seperatorInsideTemp);
This will get a substring from the begining of the package until the first seperator.
We then call the function displayMessage with the value and the string we want to display.
displayMessage(0, "Enclosure Temp", insideTemp + " c");
Next, we wait for the predefined time.
delay (waitingTime);
We repeat this for all the values to display.
The only diference in the substring is that we start always from the previous index.
We do this in a loop. The package contents will only be changed every time we receive a message from the I2C bus.
And that's that. This is how I show the values on the LCD and write the SDCard.
References
https://docs.arduino.cc/learn/communication/wire
Excellent reference to I2C and common mistakes - https://github.com/Koepel/How-to-use-the-Arduino-Wire-library/wiki
-

DAB
-
Cancel
-
Vote Up
0
Vote Down
-
-
Sign in to reply
-
More
-
Cancel
Comment-

DAB
-
Cancel
-
Vote Up
0
Vote Down
-
-
Sign in to reply
-
More
-
Cancel
Children