


Designing three different devices with minimum resources was a little bit challenging but I came across a way to make it happen. Let's start with the different Function I need (irrespective of the device)
Functionality
1. Power:
All three devices require a LiPo battery which can be charged by USB-C. For the hand held device, LiPo is the primary source and is subject to regular charge and discharge cycle whereas in the wall mounted device, it is optional as a backup, but can be used as primary. Therefore the requirement of a Charger. A power path management IC, Voltage regulator for 3.3V. Now, when the devices are being powered by the battery, we need to provide 5V to the LED. I initially thought, why not output the LiPO voltage directly to the LED and Voltage level converter? It had worked for me in WS2812B projects in the past. But i decided to go against it because for me i need maximum LED brightness when needed, and so rated typical voltage is the way to go.
2. CPU:
I am a big fan of STM32 and so will be going ahead with that. Reasons apart from my experience and comfort level is that for the handheld device i want to reduce the power consumption as low as possible and so STM32L031 Chip is what i will go with and for other devices, STM32F103C8T6, the infamous Blue pill chip. Chip.. not the development board. There are better options in STM32 Family but both L031 and F103 are chosen because of a healthy balance of low cost, easy availability and has plenty of support in the stm32duino community. I would have loved to go with NRF5 series due to their super low power consumption, and have been itching to do it for this project but sadly, another project which i am working on got delayed and so, i wont have enough time to experiment with the NRF
3. Co-Processor:
ESP32-S3. Cheap, Edge Impulse supported and easy to implement, the downside being the power draw. But since I will be there only in the wall mounted device and is expected to always be connected to mains, I am not gonna worry about the power draw. It is an AI based project anyway
4. Communication:
NRF24L0 Module is what I will be using to create a mesh network inside the home to carry the alert signals. The Interrupt option allows me to wake up the primary CPU while it's sleeping thus reducing the power consumption of the hand held device as low as possible. Again, I wanted to use the NRF5 series, as it can also use Enhanced Shock Burst protocol to communicate with each other by wireless transmission. It would have replaced both stm32 and the nrf24 together. But a working prototype in time is priority
5. Microphone:
The INMP441 is ideal for this project because it’s a low-noise, digital I²S microphone that connects directly to the ESP32-S3 without extra ADC circuitry, giving you clear audio capture for reliable sound detection with minimal hardware effort. I hate using ADC for audio applications, as they add noise, complexity, and calibration hassles compared to the clean digital stream from I2S.
6. Others:
I need a Light sensor to adjust the Brightness of the LED automatically, but have not started any research on it. In fact, this will be the first time I am gonna be using a light sensor in any of my projects. The last time I used it was during my college lab 10 years ago. Gotta see what's new there. For the hand held device, I will be using a powerful vibration motor. I got 3 with me. The big one wins my heart. It will be driven by DRV2605L from TI. It makes it very easy to generate a wide range of vibration patterns, and I can also pair different sounds detected with the patterns. The Adafruit’s DRV2605 Library is very well designed for it.

7. LED:
I saved this for the last. It is where I got into depths of the datasheet to make my engineering choice, for my application, it is a critical aspect to choose the correct LED. So first let’s understand the LED’s Optical parameters.

- Peak Wavelength: The most intense (brightest) color the LED emits.
- Dominant Wavelength: The color your eye perceives most.
- Luminous Intensity (Brightness): Measured in mcd (millicandela) Indicates how bright the LED appears from a specific angle.
- Viewing Angle (Φ 0°): No explanation needed i guess
- Spectral Bandwidth : How Pure the color is, smaller value means more pure value.
With this known, lets look at the values of each LED's as shown in the Wurth Website
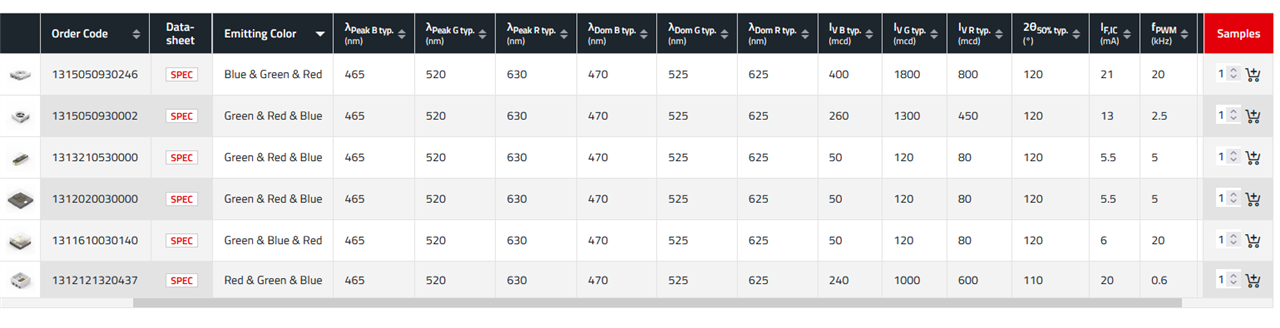
Final LED Selections
Critical Alerts Notification LED:
1315050930246 (Round, 21 mA, high‑brightness alert)
With a flashy 800 Ivr value, It has the highest among all others, and so best to catch the attention of a person for critical alerts and since they are gonna be rarely used, Power is not of a concern here. And will be used in all devices
Hand Held Device Notification LED
1312121320437 (Square, 20 mA)
This was tricky. Initially i proposed 1312020030000 (Square, 5.5 mA) due to its low power draw as for critical alerts there is already an high intensity LED, but later on second thoughts’ i decided to settle on 1312121320437 which is the third most bright led overall and is also having a small form factor. Actually it is the brightest among the small size LED’s 4 each in wall mounted device (both tileable and halo), 2 in hand held.
Halo Light LED
1311610030140 (Square, 6 mA),
The visibility is from the ring made from a large number of LED’s and it’s LED effects and it should be diffused glow so i need low power and small size also. 24 LED in one ring
Wall mounted LEDs
1315050930002 (Round, 13 mA)
I need uniformity on the hexagonal tile and so the larger the LED the better, high intensity in all three colors. Power is not an issue. 12 per wall mounted tileable
Status LED
1313210530000 (Dome, 5.5 mA),
It needs to be small, need not be that bright but it definitely has to be low power. What status should it indicate? Errors, charging etc. 2 per device
Power Budget
Architecture
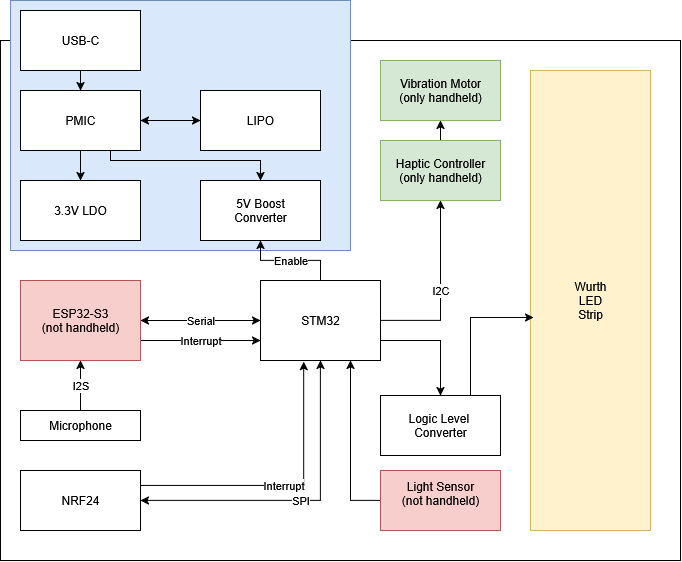
Legend:
- Blue Box - Power
- Red Box: Peripherals only in wall mounted device
- Green Box: peripherals only in hand held device
This is the overall system architecture for the AuraAlert device family. At the core of the design is an STM32 microcontroller that handles all coordination. It interfaces with different modules depending on the variant. Power comes from a LiPo battery managed via a PMIC and is regulated through a 3.3V LDO and a 5V boost converter—used for driving high-brightness LEDs and other peripherals. Communication with the ESP32-S3 (only on non-handheld variants) happens over Serial and Interrupt, primarily for audio classification via the I2S microphone. The NRF24 handles radio communication, which is ideal for low-power wake-on-interrupt use cases.
On the handheld variant, there’s also a haptic controller and vibration motor connected over I2C to provide tactile feedback. The Würth Elektronik LED strip is controlled directly by the STM32, and power is routed through the boost converter. This setup allows the design to be modular, power-efficient, and adaptable across use cases like handheld, wall-mounted, and tileable devices. When working in KiCad, I can draw all the parts in a single schematic sheet and simply copy the project to create different layouts for each variant.
Planned PCBs
- Handheld Device PCB: A single monolithic board integrating all components. Includes the microcontroller, power management, sensors, radio, critical alert LED, and notification LEDs. Designed for compactness and low power consumption with ergonomic placement of buttons and indicators.
- Wall-Mounted Device – Control PCB: The main controller board for wall-mounted variants. Hosts the microcontroller, power and connectivity logic, sound detection circuitry, and critical alert LED. Interfaces with a separate LED module for the main notification light.
- Wall-Mounted Device – Tileable LED PCB: A small trapezoidal LED-only PCB designed to be chained into a hexagonal pattern. Houses the main notification LED, optimized for uniform light distribution across tiles. Supports daisy-chaining for flexible tiling and expandability.
- Sector Ring LED PCB (Halo Effect): A modular arc-shaped PCB segment designed to be chained to form a full circular LED ring. Each sector includes a fixed number of addressable LEDs to create a diffused halo glow. Facilitates low-cost manufacturing, easy replacement, and scalable designs.
Feel free to ask doubts and comment and criticize me.


