


What is ModusToolbox?
ModusToolbox was built to make it easier and more efficient by removing development barriers and allowing the user to create real-time applications quickly. ModusToolbox is a set of tools and software that includes configuration tools, low-level drivers, middleware libraries, and operating system support, as well as other packages that enable you to create MCU and wireless applications. It also includes an Eclipse IDE, which is a multi-platform development environment that supports application configuration and development. ModusToolbox supports stand-alone device and middleware configurators that are fully integrated into the Eclipse IDE. ModusToolbox supports all PSoC 6 MCU devices. It is recommended that you use ModusToolbox for all application development for PSoC 6 MCUs. ModusToolbox leverages popular third-party ecosystems such as FreeRTOS and Arm
 Mbed, and adds specific features for Wi-Fi, Bluetooth, CAPSENSE , and security.
What is PSoC 6 MCU?
PSoC 6 MCU is an ultra-low-power PSoC device with a dual-CPU architecture tailored for smart homes, IoT gateways, etc. The PSoC 6 MCU device is a programmable embedded system-on-chip that integrates the following features on a single chip:
• Single-CPU microcontroller: Arm Cortex-M4 (CM4); or dual-CPU microcontroller: Arm Cortex-M4 (CM4) and Cortex-M0+ (CM0+)
• Programmable analog and digital peripherals
• Up to 2 MB of flash and 1 MB of SRAM
• Fourth-generation CAPSENSE technology
• PSoC 6 MCU is suitable for a variety of power-sensitive applications such as:
− Smart home sensors and controllers
− Smart home appliances
− Gaming controllers
− Sports, smartphone, and virtual reality (VR) accessories
− Industrial sensor nodes − Industrial logic controllers
− Advanced remote controllers
− Wearables

Fig 1: Application-level block diagram of PSoC 6 MCU
The PSoC 6S2 + AIROC Wi-Fi/Bluetooth Pioneer Kit (CY8CKIT-062S2-43012)
The PSoC 62S2 Wi-Fi BT Pioneer Kit (CY8CKIT-062S2-43012) is a low-cost hardware platform that enables the design and debug of the PSoC 62 MCU and the Murata 1LV Module (CYW43012 Wi-Fi + Bluetooth Combo Chip). The kit has the following features:
• Ultra-low-power PSoC 62 MCU that integrates an Arm Cortex-M4 and Cortex-M0+ onto a single chip and provides up to 2 MB of Flash and 1 MB of SRAM
• The Murata 1LV Module hosting the ultra-pow-power Infineon AIROC CYW43012 802.11 b/g/n Wi-Fi + Dual-Mode Bluetooth combo chipset radio
• CapSense capacitive touch sensing enabled buttons and sliders
• PSoC 5LP MCU for program/debug
• Excelon-Ultra 4Mbit 108-MHz QSPI nonvolatile F-RAM in an 8-SOIC package
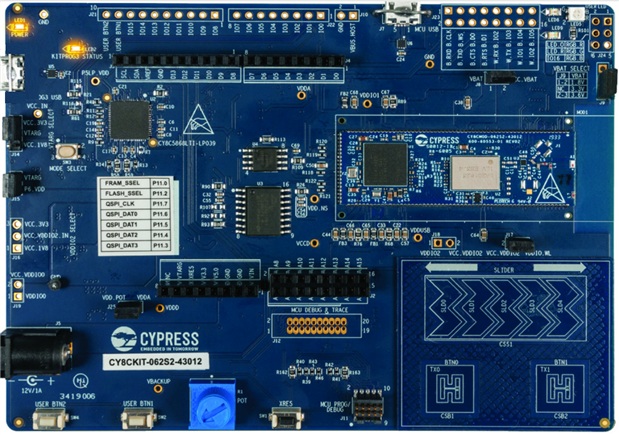
Fig 2: PSoC 6S2 AIROC Wi-Fi/Bluetooth Pioneer Kit
The Hello World Program using PSoC 6S2 Kit
Before starting the application development purchase the kit from here and prepare yourself following the steps below:
- Install the ModusToolbox from here: http://www.cypress.com/modustoolbox
- For getting the details about the installation read the ModusToolbox Installation Guide: https://www.cypress.com/file/504351/download
- To know the details about ModusToolbox read the ModusToolbox User Guide: https://www.cypress.com/file/520251/download
- You can read the PSoC 6 MCU ModusToolbox getting started guide from here: https://www.cypress.com/file/495071/download
- Download and install PuTTY serial monitor from here: https://www.putty.org/
Instead of PuTTY, you can also use other serial terminals like Tera Term (https://filehippo.com/download_tera_term/ ).
I hope you are ready with all the tools. Launch Eclipse IDE for ModusToolbox to get started. Please note that Eclipse IDE for ModusToolbox software needs access to the internet to successfully clone the starter application onto your machine.
1. Select your preferred workspace
At launch, Eclipse IDE for ModusToolbox presents a dialog to choose a directory for use as the workspace directory. The workspace directory is used to store workspace preferences and development artifacts. You can choose an existing empty directory by clicking the Browse button, as Figure 3 shows. Alternatively, you can type in a directory name to be used as the workspace directory along with the complete path, and Eclipse IDE will create the directory for you.

Fig 3: Choosing the workspace directory
2. Create a new ModusToolbox application
a) Click New Application in the Start group of the Quick Panel, as figure 4 shows.
b) Alternatively, you can choose File > New > ModusToolbox Application, as Figure 5 shows.
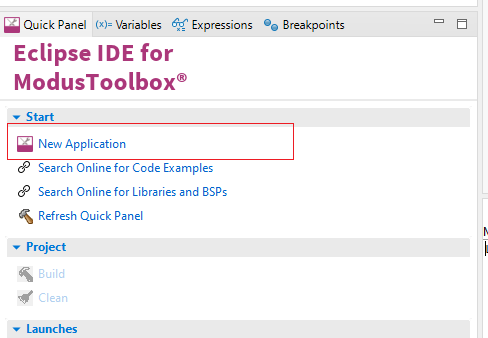
Fig 4: Creating a new application
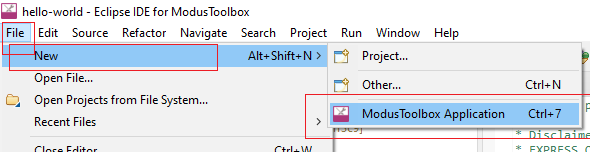
Fig 5: Creating a new application from the file menu
The Eclipse IDE for ModusToolbox Application window appears as figure 6 shows.

Fig 6: Project Creator window
3. Select a target PSoC 6 development kit
ModusToolbox speeds up the development process by providing BSPs that set various workspace/project options for the specified development kit in the new application dialog.
a) In the Choose Board Support Package (BSP) dialog, choose the Kit Name. In our case it is CY8CKIT-062S2-43012. See Figure 7 for help with this step.
b) Click Next.
c) In the Starter Application dialog, select the Hello World application, as Figure 8 shows.
d) In the Name field, type in a name for the application, or you can choose to leave the default name if you prefer.
e) Click Create to create the application, as Figure 8 shows, wait for the Project Creator to automatically close once the project is successfully created. A welcome screen will appear as the figure 9 shows.
You have successfully created a new ModusToolbox application for a PSoC 6 MCU.
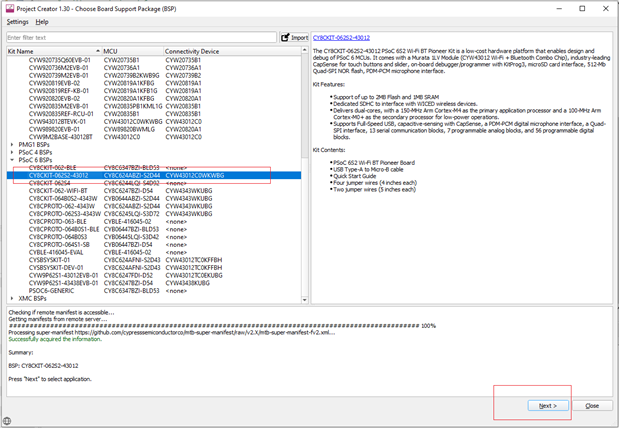
Fig 7: Choosing the Kit
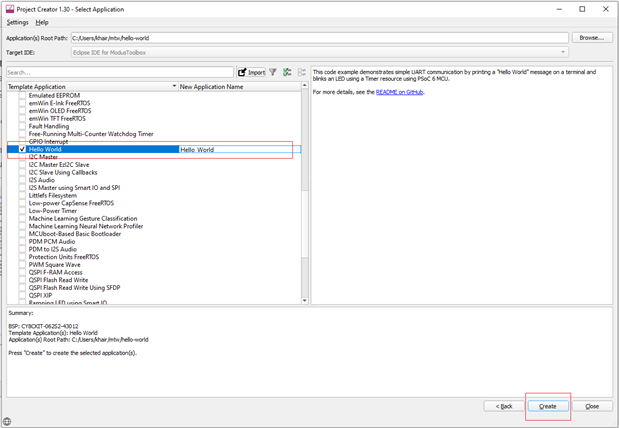
Fig 8: Choosing sample application

Fig 9: Created hello world project
Now you can open the main.c from the project window and observe the code for our hello world application as shown in figure 10.

Fig 10: Sample hello world code
4. Build the Application
Click on the Build <<name>> Application shortcut under the Start group in the Quick Panel as shown in figure 11. It selects the Debug build configuration and compiles/links all projects that constitute the application. The Console view lists the results of the build operation, as Figure 12 shows.
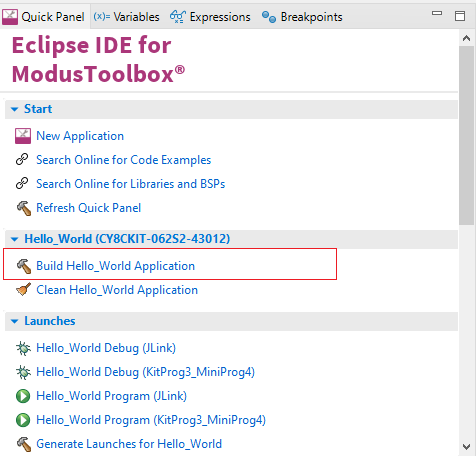
Fig 11: Building hello world project
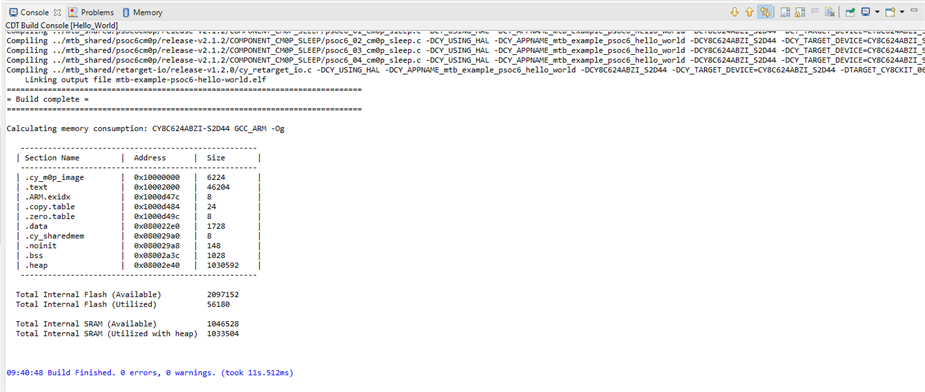
Fig 12: Build result in the console
5. Program the Device
ModusToolbox uses the OpenOCD protocol to program and debug applications on PSoC 6 MCU devices. For ModusToolbox to identify the device on the kit, the kit must be running KitProg3 and our board already has KitProg3. So no firmware update is required.
a) Connect to the board and perform the following step.
b) Select the Hello_World application project and click on the Hello_World Program (KitProg3_MiniProg4) shortcut under the Launches group in the Quick Panel, as Figure 13 shows. The IDE will select and run the appropriate run configuration.
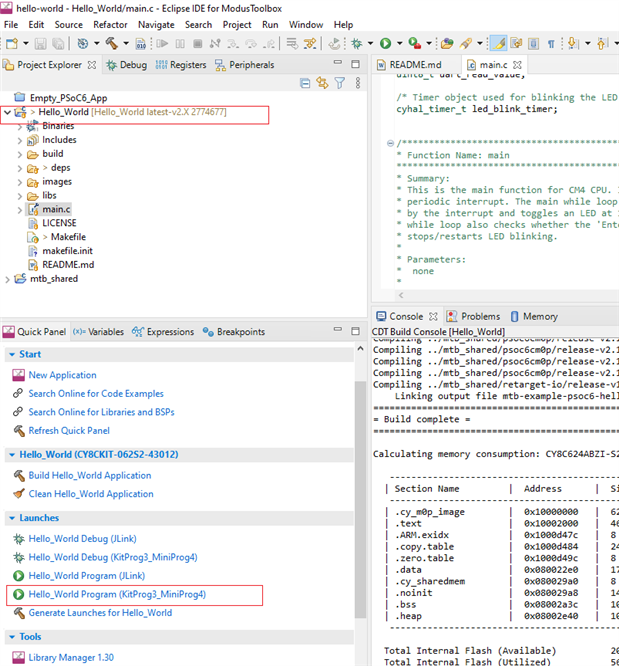
Fig 13: Programming the application to the device

Fig 14: Uploading console view
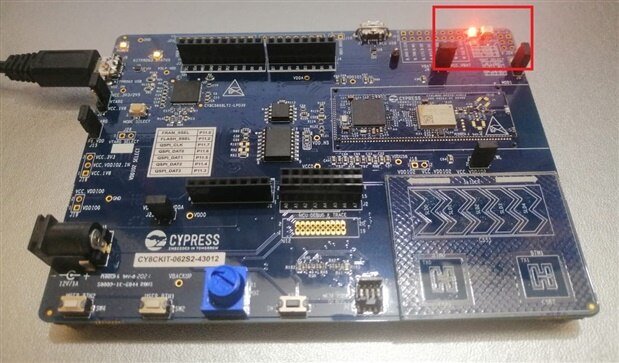
Fig 15: User LED8 will start blinking
6. Test Your Design
Follow the steps below to observe the output of your design. Note that the below steps use PuTTY as the UART terminal emulator to view the results. You can use any terminal of your choice to view the output.
a) Find the serial port: From your computer management console find the COM port number for the connected PSoC Kit. COM11 in my case is shown in figure 16.
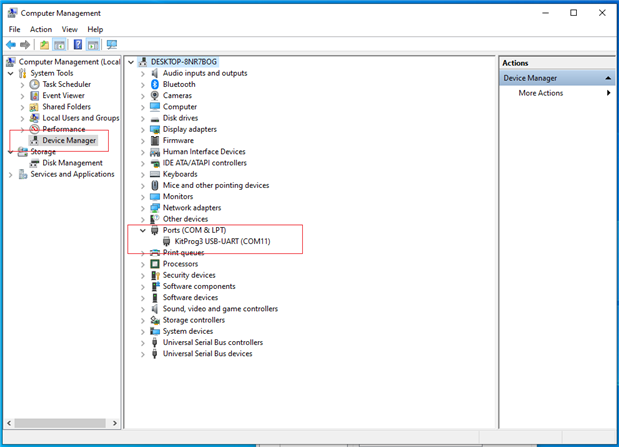
Fig 16: Finding COM port number
b) Open PuTTY, select Serial, and set the COM port and baud rate as shown in figure 17. Then click on Open.
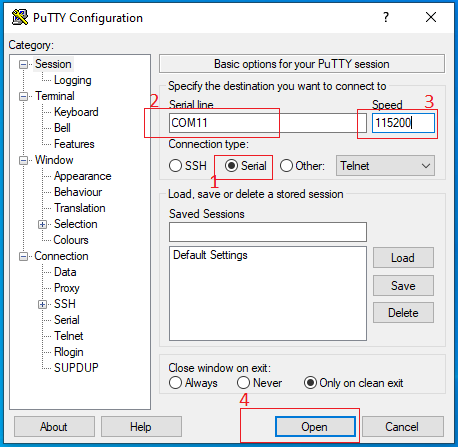
Fig 17: PuTTY Configuration
c) You will get the following output as shown in figure 18 from the PuTTY terminal. Press Enter to pause and resume the LED blinking.
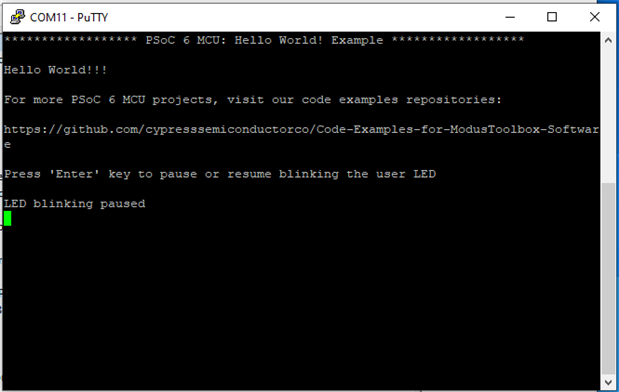
Fig 18: Output from the PSoC Kit
If you get everything as expected then Well Done! You have successfully completed the Hello World project using PSoC 6S2 + AIROC Wi-Fi/Bluetooth Pioneer Kit.