


Preparing Dataset
In the last blog, I developed a device firmware to provide sensor data to SensiML Data Capture Lab using UART. In this step, we will prepare our dataset using DCL for developing a machine learning model. Before going to DCL we need to connect sensors with the PSoC 6 Kit. Then we will run DCL and record the sensor data. We will connect and run different household appliances and record the data for every appliance.

The above image shows the connection of sensors with the PSoC 6 board. I added a multiport socket with the sensors so that I can easily connect and disconnect different devices. A connected hairdryer is shown in the following image.

For capturing the data we need to run the DCL. After running it we need to import the device plugin.

Then we will choose Simple Streaming Interface.

We need to go to capture mode, create a sensor configuration to connect the device. For details of configuring DCL read the documentation: https://sensiml.com/documentation/guides/getting-started/index.html

When sensor configuration is ready we need to connect by connecting the connect button. I have recorded data for five different devices like an electric beater, hair-dryer, heater, iron and LED light.

The voltage and current waveform for a resistive load is found as follows.

Training Model using Analytics Studio
The Analytics Studio is an application that filters and optimizes your labeled sensor data through machine learning algorithms. It generates a model (SensiML Knowledge Pack) ready to be flashed into the firmware of your device of choice. The most powerful part of the Knowledge Pack is that it will be detecting events on the low memory sensor without ever requiring a connection to the cloud. The Analytics Studio uses AutoML to abstract the complexities of machine learning algorithms and translates them to a user-friendly interface. To build the model:
Open the Analytics Studio by going to https://app.sensiml.cloud/ and log in to your account. You will be taken to the Home page where you can see the projects uploaded to your account from the Data Capture Lab. (DCL project automatically uploaded to the SensiMl Cloud)

Open your project by clicking the Open Project icon or double-clicking on the project name

The project summary page gives you an overview of your project. You can edit the image and project description to provide more context about each project you work on.

Each tab also provides more information about the Captures, Queries, Pipelines, and Knowledge Packs in your project. To know the details about building a project in SensiML please visit: https://sensiml.com/documentation/guides/getting-started/building-a-model.html . I will show here the result of the model I have built for five devices.

In the Explore Model tab, you can get more information about the models that were generated from the Build Model tab. The Model Visualization tab provides feature visualization as a 2-D comparison plot and a density plot.

The Confusion Matrix tab shows the averaged confusion matrix for the validation data. The confusion matrix describes how well the model performed at recognizing each class. It also provides information about how the model misclassifies classes. The confusion matrix for models generated by SensiML’s AutoML pipeline is created by averaging across the results of the validation data sets for each fold.

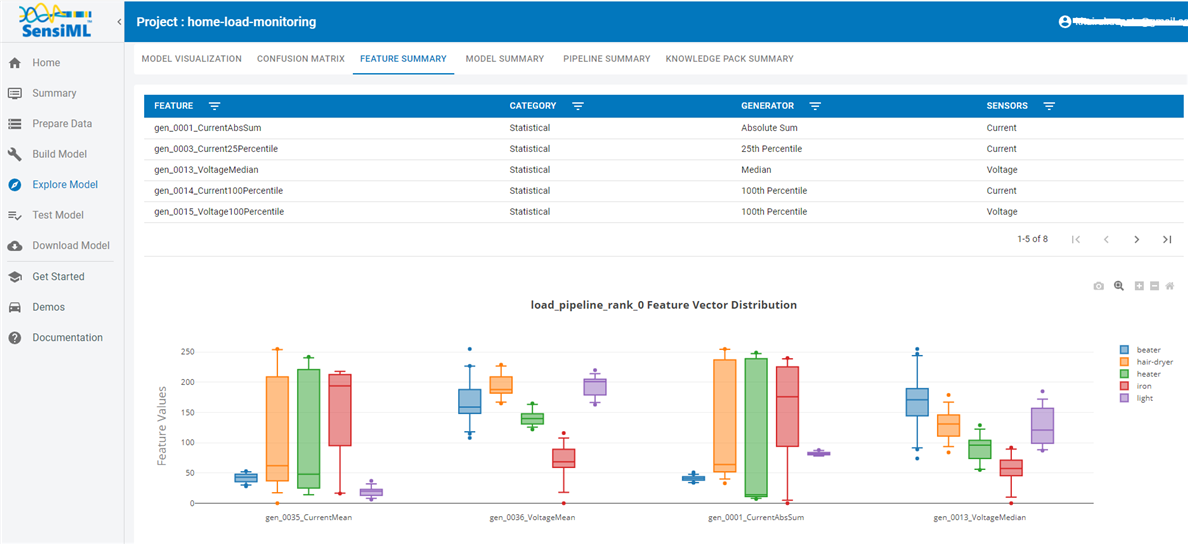
The Feature Summary tab shows which feature extractors and sensors were used to feed into the model. The Feature Summary tab contains information about the features that are used during the feature extraction step of the Knowledge Pack. This was a simple example project and only needed two feature extractors to generate a high accuracy model. You can see the Category of the feature generator in the first column, which describes the family type to which a feature generator belongs. The Generator column has the name of the feature extractor, which can be used to reference the feature generator when building custom pipelines. The Sensors column describes the sensors that were used as input into this feature extractor.
Model pipelines consist of data input, signal conditioning, signal preprocessing, feature extraction, sampling, and model training. The Pipeline Summary provides the graphical representation of the pipeline steps used to create this model.

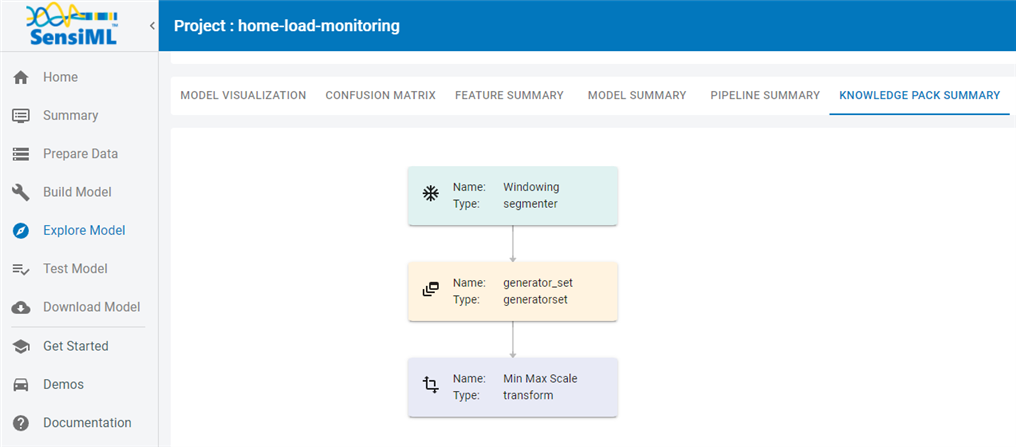
Knowledge Packs consist of data input, signal conditioning, signal preprocessing, feature extraction, and classification. The Knowledge Pack Summary provides the graphical representation of the steps that will be part of the Knowledge Pack.
Generating a Knowledge Pack
In the Download Model tab, we are going to generate a SensiML Knowledge Pack. A Knowledge Pack takes the event detection model you generated in the pipeline and transforms it into a binary or library file that can be run on your hardware device at the edge. Once the Knowledge Pack is on your hardware device, it starts outputting classification IDs that correspond to your events of interest. We are going to build a Knowledge Pack Library for the M4 microcontroller for PSoC 6 Kit.
First, we need to select a model we want to use from the list. Next, we are going to select our target hardware that we will want to flash our Knowledge Pack to. Let’s look at a screenshot and dive a little deeper.

Then click Download to build your Knowledge Pack and download it to your computer. In the next blog, we will use this knowledge pack to develop our device firmware.
-

asokfair
-
Cancel
-
Vote Up
0
Vote Down
-
-
Sign in to reply
-
More
-
Cancel
Comment-

asokfair
-
Cancel
-
Vote Up
0
Vote Down
-
-
Sign in to reply
-
More
-
Cancel
Children