


This week I've been looking at the communication between the hexynth modules and the BBB. I'm using i2c, which is a bus consisting of a Serial Data Line (SDA) and Serial Clock Line (SCL), for communicating with connected devices. The BBB will be the primary device controlling and reading from the secondary devices (i.e. hexynth modules) connected via the bus. The BBB actually has 3 i2c buses, but I'll just be using one to keep things simple. Each hexynth module will need custom firmware running on a secondary micro-controller to respond to i2c messages and read requests sent from the BBB.
So far I've been using an Arduino Nano to prototype with, using the Wire library for the i2c communication. If I want to switch to using ATTiny85 micro-controllers later, I could use TinyWire instead.
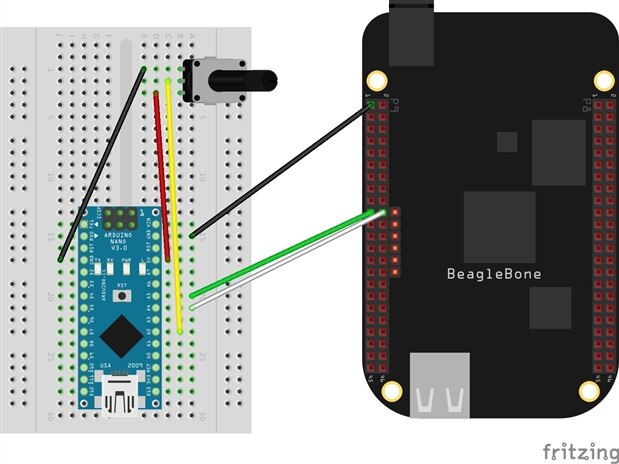
My first simple prototype module has a single potentiometer which can be used as a knob to control a synth parameter. The potentiometer is hooked up to analog pin 2 on the the module's MCU (i.e. Arduino nano at the moment). The MCU runs a C program that responds to i2c requests by sending the currently stored value read from the potentiometer. Each device on the i2c bus needs a unique address, so I'm setting this in the code for now - this could be set using jumpers later. This code is uploaded to the nano using Arduino IDE.
#include <Wire.h>

#define I2C_SENSOR_ADDRESS  0x20
#define REGISTER_MAP_SIZE 2
#define LOOP_FREQUENCY 50

volatile int32_t pot_val = 0;
int pot_pin = 2;
byte register_map[REGISTER_MAP_SIZE];

void setup() {
  Wire.begin(I2C_SENSOR_ADDRESS);
  Wire.onRequest(requestData);
}
void loop() {
  pot_val = analogRead(pot_pin);
  delay(LOOP_FREQUENCY);
}
void requestData() {
  register_map[0] = pot_val >> 8;
  register_map[1] = pot_val & 0xFF;
  Wire.write(register_map, REGISTER_MAP_SIZE);
}
This module is connected to the BBB via i2c by connecting the clock and data lines from BBB to the corresponding pins (i.e. analog 4 & 5) on the arduino.
Note: before installing any modules from npm, it's really important to have the system time set correctly or it will keep trying to rebuild libraries like serialport, which takes a long time. Use ntpupdate-debian to fix it.
It's possible to test if device is connected on the i2c bus using the node i2c library (make sure to install the older version on Wheezy because we are using node < 0.11, i.e npm install i2c@0.1.8):
var i2c = require('i2c');
var address = 0x20;
var wire = new i2c(address, {device: '/dev/i2c-1'});
// wire.scan, wire.read ... etc
The node-red-contrib-gpio library includes Johnny-Five node-red nodes for working with GPIO, including i2c communication. I've installed a slightly older version to work with the version of node.js with Debian Wheezy, I'm still using Wheezy to avoid the issues with 4.x kernel & beaglebone-io:
npm install node-red-contrib-gpio@0.2.2I also installed the beaglebone-io library from npm globally to make sure it can be found by node-red.
Then I can set up the board in node-red and add a node to read from i2c within a flow:
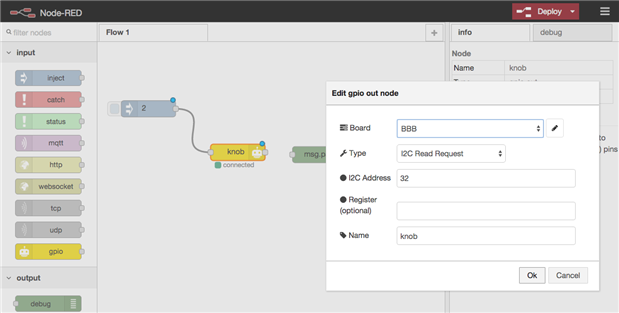
The payload from the node coming in to the i2c node needs to be the number of bytes to read (i.e. 2 for this example), and the address in the config needs to be the hex address for the module, converted to decimal (in this case 0x20 converts to 32 in decimal).
I've also been writing a wrapper to make it easier to work with this knob module, so it could eventually be used from JS code with Johnny-Five like this:
var five = require("johnny-five");
var HexynthKnob = require('./HexynthKnob.js');
var BeagleBone = require('beaglebone-io');
var board = five.Board({ io: new BeagleBone() });
board.on('ready', function() {
 var k = new HexynthKnob({
  addr: 0x20,
  freq: 500,
  board: this,
 });
 k.on("data", function(){
  console.log("knob value is", this.value);
 });
});
board.on('error', function(err) {
  console.log(err);
  process.exit();
});
I've still got a few bugs to iron out with the i2c communication but I think these are to do with versions incompatibilities with the various libraries and version of node. However, hopefully I'll iron these out soon, and now that I know roughly how the communication between modules and the BBB can work, I can start building more interesting circuits for modules to produce and manipulate sound (& hopefully the kit parts will arrive soon!)
Top Comments