


Bringing Touch-Free Gesture Control to Tiltie with the ADI CN0569 - Infrared Light Angle Sensor Module for Gesture Recognition.
In the previous post, I unboxed the challenge kit and promised to start validating its key components. The CN0569 gesture sensor was first on the list, and, as readers of the comments already know, it did not give in easily.
After working through I2C integration, FIFO timing, ADC offsets and one particularly misleading channel problem, the board is now running directly from Tiltie’s Raspberry Pi CM4. It can detect presence, recognise directional swipes and provide continuous two-dimensional hand tracking.
This post explains how the ADI CN0569 works, what went wrong during the port, how the resulting Python library is structured, and how I tested it with two headless applications over SSH:
- Magpie Recycler
and Theremin Painter.
Why a gesture interface for a bin?
Tiltie is a smart bin that classifies waste, but it won't always get it right. When it doesn't, the user should be able to label the sample. Nobody wants to poke a touchscreen on a rubbish bin, so Tiltie needs a hygienic, touch-free interface (ready for the next global pandemic, just in case).
I want the CN0569 to do three jobs:
- Presence detection: wake up the rest of the sensors when someone approaches or drops something in.
- Labelling: swipe left, right, up or down to tag an unknown item.
- Games: an educational recycling game controlled by hand gestures.
Meet the CN0569
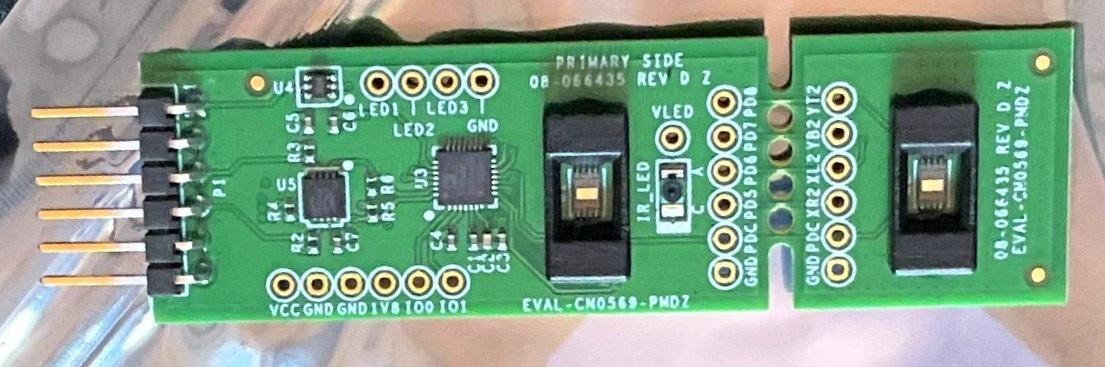
The EVAL-CN0569-PMDZ (circuit note CN-0569) is a small I2C Pmod board with:
- 2 × ADPD2140 infrared light angle sensors (four photodiode quadrants each)
- 1 × ADPD1080 photometric front end
- 1 × 850 nm IR LED as the emitter
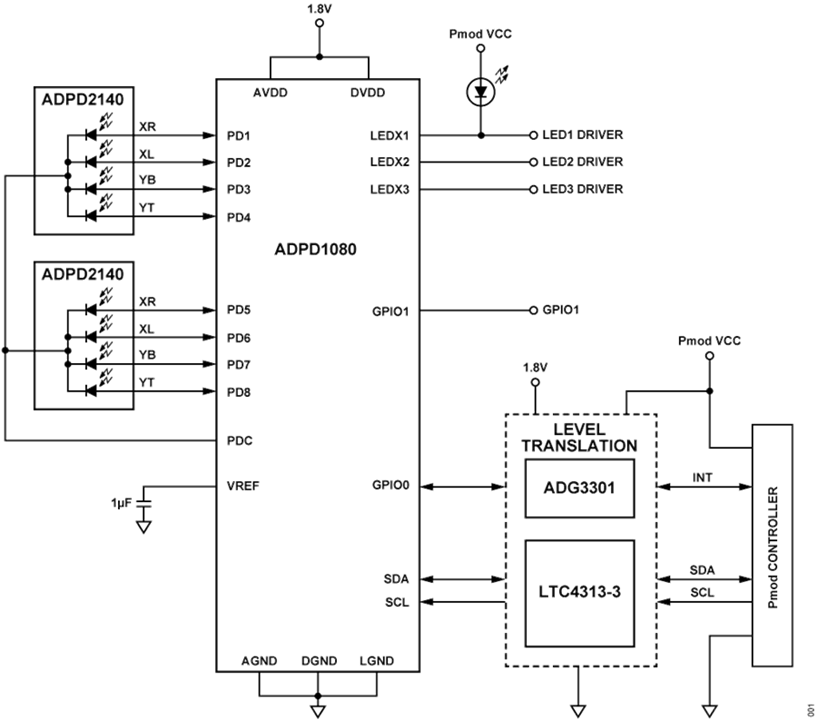
- level translation, because the ADPD1080 runs at 1.8 V and the Pmod world at 3.3 V
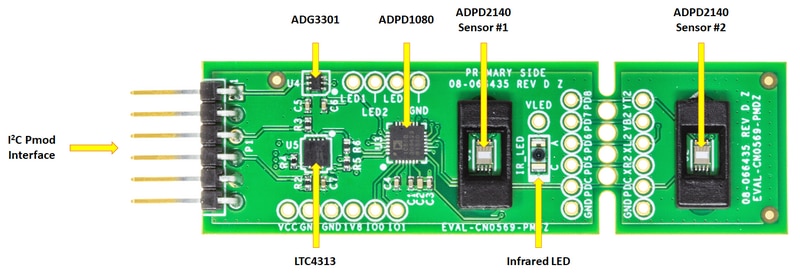
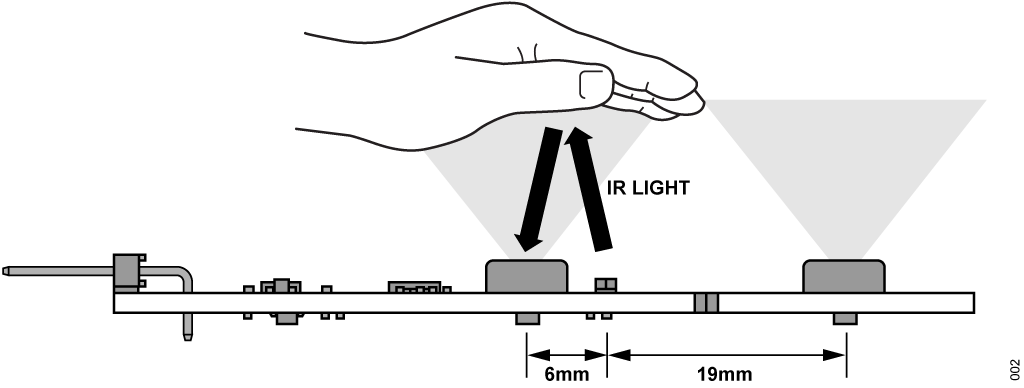
The idea is simple. The LED sends pulses of infrared light, a hand reflects them back, and the sensors measure how much light each quadrant receives. From that you compute where the hand is and how it moves. ADI quotes a typical range of up to 20 cm and up to 512 samples per second.
The ADPD2140 is "just" a photodiode
The ADPD2140 is not a smart sensor. It is a special photodiode split into four channels: XL (left), XR (right), YT (top) and YB (bottom). Each one outputs a current proportional to the light it receives, and it has a built-in filter that blocks visible light. All the "intelligence" is software.
The ADPD1080 does the heavy lifting
The ADPD1080 pulses the LED, reads the photocurrents, integrates them, digitises them and hands the numbers over via I2C:

Each FIFO read already contains many LED pulses integrated, chopped (which cancels ambient light) and accumulated.
Slots and channels
The key concept is the time slot. The ADPD1080 has two (A and B), and each can have its own LEDs, photodiodes, gains and integration time. Each slot has four logical channels, CH1 to CH4, so a frame has 8 results:
| Slot | Photodiodes | Sensor | Channels in the library |
|---|---|---|---|
| A | PD1–PD4 | ADPD2140 #1 | 0–3 |
| B | PD5–PD8 | ADPD2140 #2 | 4–7 |
Each FIFO sample is 8 channels × 32 bit = 32 bytes, and the FIFO is only 128 bytes, i.e. four samples. Drain it too slowly and you lose data.
['0x3', '0x0', '0x82b', '0x0', '0x909', '0x0', '0x82b', '0x0', '0x0', '0x0', '0x315', '0x0', '0x1d7', '0x0', '0x281', '0x0']
The maths (it is surprisingly simple)
With XL, XR, YT and YB as the four quadrant readings:
L = XL + XR + YT + YB       # total intensity
X = (XL − XR) / (XL + XR)   # horizontal position
Y = (YT − YB) / (YT + YB)   # vertical position
L tells you whether something is there. X and Y tell you where.
ADI's algorithm is a small state machine:
- Subtract the offsets so that
L ≈ 0with nothing in front of the sensor. - When
Lgoes above a threshold (1000 by default), the gesture starts. Store (X, Y). - Keep going for a minimum number of samples (5 by default).
- When
Lfalls below the threshold, the gesture ends. Store (X, Y) again. - Compute the distance between start and end, and its slope.
- Short distance means click. Otherwise, a mostly vertical move is up/down and a mostly horizontal one is left/right.
Porting ADI's demo to a Raspberry Pi CM4
ADI's demo uses pyadi-iio talking to an EVAL-ADICUP3029. I wanted the sensor directly on the CM4's I2C bus, with no extra microcontroller in between. So I wrote an I2C driver, ported the init sequence from ADI's no-OS code, and ported the gesture algorithm.
My first port worked, but badly. So I went back to the circuit note and reviewed everything. A few things stood out, even in ADI's reference Python:
- It calls
rx()once per sensor, so the two sensors see different data. - The baseline is a class attribute, shared between instances.
- A gesture that ends too soon leaves the state machine armed with a stale start point.
- The "end" position is measured on the frame where the signal has already dropped below the threshold, where X and Y are basically noise.
I fixed all of those. Then came the hardware surprises.
Build your debugging tools first
Before touching the algorithm any more, I added a few diagnostic modes: a live view of the 8 raw channels, an LED-current sweep, a register dump, and a noise/threshold estimator. This turned a vague "it doesn't work" into actual numbers.
Troubleshooting ADC offset issues
At first, several channels kept reading exactly zero even when neighbouring ones were showing a valid signal. The ADPD1080 subtracts a per-channel ADC offset (SLOTx_CHy_OFFSET, 0x18..0x21, which defaults to 0x2000 / 8192) and clamps negative results to zero, so I initially went down a rabbit hole trying to calibrate those offsets in hardware and eventually resorted to a plain software baseline.
What I had missed in the datasheet (ADPD1080/ADPD1081 Rev. C, p. 40) is that when Integrator Chop Mode is active (0x17 = 0x0009, 0x1D = 0x0009, 0x58 = 0x0544), the subtraction across the four-pulse chop sequence (-P1 + P2 + P3 - P4) already cancels digital offsets automatically - so those ADC offset registers must be explicitly set to 0x0000. Leaving them at the 0x2000 power-on reset default was causing the weaker channels (especially on Sensor #2) to clamp at zero.
The odd channel (and what was actually breaking it)
Even after zeroing the ADC offsets, one channel still refused to behave: channel 0 (PD1, the first channel of Sensor #1). It idled around a few dozen counts at minimum LED power and dropped straight to 0 as soon as the LED current went up, while channel 4 (PD5, the first channel of Sensor #2) jumped around noisily.
At first I assumed it might be a hardware quirk and worked around it by ignoring the first channel of each sensor and building the position from the other three:
L = c1 + c2 + c3
x = (c2 - c1) / (c2 + c1)
y = (c3 - c1) / (c3 + c1)
That worked well enough for basic directional swipes, even though it was no longer a true angle (it was computing diagonal axes rather than horizontal and vertical ones).
Still, I wasn't happy leaving two channels unexplained, so I dumped all the chip registers and checked every single one against the datasheet. That turned up three bugs hiding in my original adpd1080.py port:
- A sneaky wrap-around bug in calibrate_clk32m(): Instead of adding the calculated adjustment (clk_error / 112 kHz) to the default 0x98 value in REG_CLK32M_ADJUST (0x4D), my code overwrote 0x4D directly with int(clk_error / 112000) & 0xFF. When the clock ratio gave an adjustment of -14, masking with 0xFF turned it into 0xF2 (242) - cranking the internal 32 MHz oscillator all the way up to ~42 MHz and throwing off the AFE integration timing against the fixed analogue band-pass filter.
- Too short a pulse period (0x0E vs 0x13): The LED period in 0x31/0x36 was set to 0x0E (14 µs, inherited from an ADPD188BI reference snippet), violating the datasheet minimum of 2 × AFE_WIDTH + 11 = 19 µs (0x13) for a 4 µs AFE window. Combined with the overclocked ~42 MHz clock, the real period shrank to ~10.6 µs, starving the sequential 4-channel ADC conversion/reset between pulses and corrupting the first channel of each time slot (ch0 and ch4).
- Missing photodiode reverse bias (0x54): Register 0x54 had been left at its reset value (0 V bias) instead of 0x0AA0 (~250 mV reverse bias recommended by the datasheet to lower photodiode capacitance and noise).
To be 100% sure the board wasn't damaged, I also ran the datasheet's TIA ADC Mode leakage test in the dark. With photodiodes both connected and disconnected, all eight channels sat cleanly around ~13,400 LSB (within 10 counts of each other) - zero PCB leakage, completely healthy silicon.
Once those three register fixes went into adpd1080.py, channel 0 and channel 4 immediately sprang back to life and the overall signal jumped by roughly 10× (because the integrator window finally lined up with the band-pass filter peak). In fact, Sensor #1 - which sits just 6 mm from the IR LED - became so sensitive that at the default 200 kΩ TIA gain and coarse = 6 LED current it clipped right at the Chop Mode ceiling of 262,128 (8 × 2 × 16,383). Dropping Slot A's TIA gain to 50 kΩ (0x42) while keeping Slot B (19 mm away) at 200 kΩ (0x44) gave both sensors plenty of headroom.
With all four quadrants (XR, XL, YB, YT) working cleanly on both ADPD2140s, I could finally throw away the 3-channel workaround in gesture.py and restore the real CN0569 angular equations:
L = c0 + c1 + c2 + c3          # XR + XL + YB + YT
x = (c1 - c0) / (c1 + c0)      # (XL - XR) / (XL + XR)
y = (c3 - c2) / (c3 + c2)      # (YT - YB) / (YT + YB)
Not only did swipe detection become cleaner, it also unlocked true continuous 2D (x, y) tracking - which came in very handy for the demos below.
Seeing the CN0569 in Action
After fixing the offset issues, FIFO handling, and channel mapping problems, the first milestone was simply to verify that the sensor could reliably detect presence and classify gestures directly on the Raspberry Pi CM4.
The demo application continuously monitors both ADPD2140 sensors and reports:
- PRESENCE and ABSENCE events,
- directional gestures (LEFT, RIGHT, UP, DOWN),
- short CLICK gestures,
- the sensor instance that detected the event.
Video: Real-Time Gesture Detection on the Raspberry Pi CM4
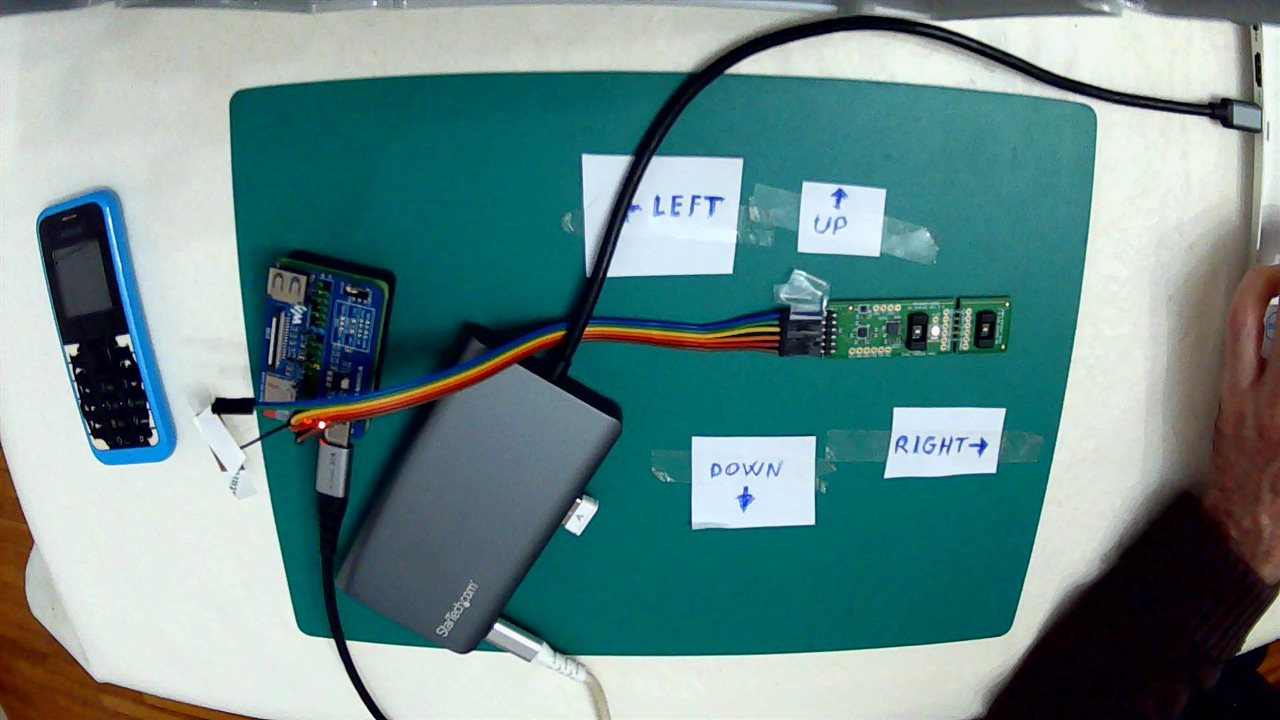
The video shows the CN0569 connected directly to the CM4 over I2C while the Python demo application runs in a terminal session. Hand movements above the sensor generate presence events and directional gestures in real time, providing a quick way to validate both the hardware interface and the gesture recognition algorithm.
This simple console application became one of the most useful debugging tools during development. Before moving on to games or user-interface experiments, it allowed me to verify that the complete data path was working correctly: infrared sensing, FIFO reads, coordinate calculation, gesture classification, and event generation.
How the library works
The code is in the smart-tilting-bin repository. It has five files:
| File | What it does |
|---|---|
adpd1080.py |
I2C driver: register map, init sequence, FIFO reads |
gesture.py |
Gesture and presence engine, independent of the hardware |
irq.py |
Optional: waits for an edge on the Pmod INT line with libgpiod, so the read loop sleeps instead of polling |
demo.py |
Command-line demo and data recorder |
test_cn0569.py |
Unit tests that run without hardware: a fake I2C bus, a fake GPIO line and synthetic hand movements |
Wiring is minimal: SDA/SCL to GPIO2/GPIO3, 3.3 V and GND, and optionally the Pmod INT pin to GPIO4. On the Pi, add dtparam=i2c_arm=on,i2c_arm_baudrate=400000 to config.txt. The 400 kHz is not optional at 512 Hz: every sample is 32 bytes, about 16 kB/s, which is roughly 147 kbit/s on the wire once you count the ACK bits. That doesn’t fit in 100 kHz.
The driver talks to the chip with smbus2. It configures both slots (4 pulses each, 32-bit data, 4 channels), calibrates the 32 MHz clock and sets the sample rate. next_frame() reads the FIFO and sums 8 samples per channel, which gives about 64 frames per second at 512 Hz. The FIFO holds only four samples, 7.8 ms at 512 Hz, so a slow loop loses data silently.
Interrupts. INT is the ADPD1080’s GPIO0. use_interrupt() makes it fire when 1 to 3 complete samples are in the FIFO, and the read loop sleeps on that line instead of polling (demo.py --int-gpio 4).
The gesture engine doesn’t know anything about I2C. It takes a function that returns a frame of 8 integers, so you can also feed it recorded data. It has:
- a
SensorTrackerper ADPD2140, which is the state machine described above; - debounced presence/absence events, handy for waking the rest of Tiltie;
- a stored (x, y, L) trajectory for each gesture, which I plan to use to record data and train a classifier for richer gestures such as rotations for the game.
A minimal example:
from adpd1080 import ADPD1080, SMBus2Bus
from gesture import GestureEngine

dev = ADPD1080(SMBus2Bus(1), fs_hz=512)
dev.init()
dev.start()

def on_event(e):
    if e.kind == "gesture":
        print("sensor", e.sensor, e.gesture.name)   # CLICK / UP / DOWN / LEFT / RIGHT
    else:
        print(e.kind)                               # presence / absence

engine = GestureEngine(dev.next_frame, on_event)
engine.calibrate()      # keep your hand away!
try:
    engine.run()
finally:
    dev.stop()
The command-line demo wraps all of this:
python3 demo.py                       # gestures + presence
python3 demo.py --raw                 # print raw frames, check that the 8 channels react
python3 demo.py --record data.csv     # also save raw frames for training
python3 demo.py --int-gpio 25         # sleep on the INT line wired to GPIO25
Two practical tips. Start with --raw to make sure the channels respond. And note that UP and DOWN are relative to how the board is mounted, so if you rotate it, swap the labels in classify().
With the electrical and timing problems solved, printing gesture names in a terminal was no longer enough. I needed to validate the library against Tiltie’s three real requirements: background presence detection, discrete directional gestures, and continuous two-dimensional tracking.
Putting it to the test: Magpie Recycler, an ASCII gesture game over SSH
Once the CN0569 was finally talking cleanly to the CM4 and all four photodiode quadrants on each sensor were behaving properly, I wanted a real test that pushed the library beyond printing "LEFT" and "RIGHT" in a terminal.
The third item on Tiltie’s wish list is an educational recycling game. In the final version, the CM4 camera will identify waste items using ArUco markers, while the player uses hand gestures detected by the CN0569 to choose the correct bin. Once the item is dropped, Tiltie will provide feedback through LEDs and a two-line display, showing whether the classification was correct and how long it took to sort all the objects.
The game itself is still under development, so I needed a way to validate the gesture interface first. There was just one small catch: my CM4 test setup currently has no display attached, so everything had to run headless over an SSH session.
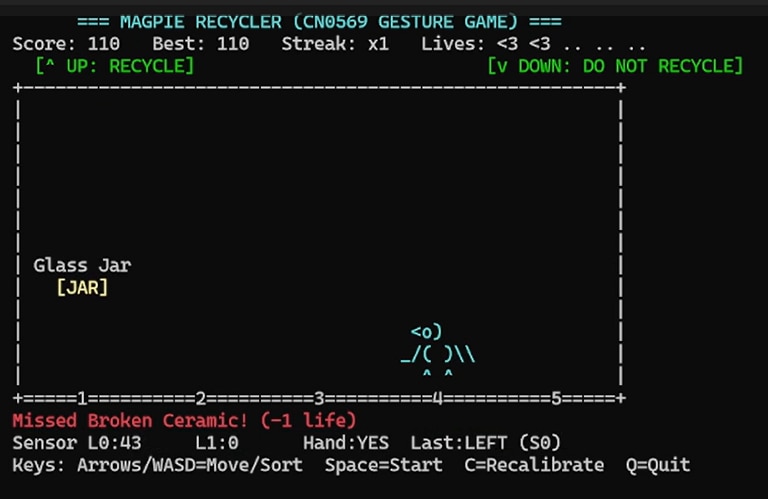
Instead of waiting for a display, I built a lightweight terminal game in pure Python using the standard curses library: Magpie Recycler (magpie_game.py). Since magpies are famous for swooping in to grab shiny objects, your job is to guide Tiltie, an ASCII magpie across the screen, catch falling rubbish, and decide whether it belongs in the recycling bin.
Controlling the ASCII magpie over SSH with the CN0569 - swiping left/right to catch items and up/down to sort them into recycling or general waste.
How the game works
Optical swipe gestures are discrete events - you wave your hand across the sensor and pull back - so sliding smoothly pixel by pixel across an 80-column terminal would be exhausting. Instead, the arena is split into 5 discrete lanes, so one swipe hops the magpie one lane over (meaning you are never more than two swipes away from any catch):
- Catch (LEFT / RIGHT): Items such as a Plastic Bottle, Aluminium Can, Glass Jar, Apple Core, or Greasy Pizza Box drop slowly down one of the 5 lanes. Swipe LEFT or RIGHT to hop underneath and catch the item in the magpie’s beak.
- Sort (UP / DOWN): Once caught, the magpie holds the item and a 5-second sorting prompt appears:
- Swipe UP to toss it into Recycling (bottles, cans, glass jars, newspapers, cardboard boxes).
- Swipe DOWN to toss it into General Waste (apple cores, banana peels, greasy pizza boxes, used tissues, broken ceramics).
- Start / Restart (CLICK): A quick hover/tap (CLICK) gesture - or Space / Enter - starts a new round.
Get it right and your score and combo streak climb; drop an item or contaminate the recycling bin and you lose one of your five lives.
Under the hood: wiring the library into a console game
Keeping a curses terminal UI snappy over SSH while polling or waiting on an I2C sensor at 512 Hz takes a small bit of separation:
- Background sensor thread (SensorWorker): ADPD1080.next_frame() averages 8 samples (~64 frames/s) and feeds GestureEngine.process_frame() in a daemon thread. Detected gestures are pushed into a thread-safe queue.Queue, leaving the curses loop free to animate falling items smoothly and handle keyboard fallbacks (Arrow keys / WASD, C to recalibrate, Q to quit).
- Cooldown & sensor selection: Because the CN0569 packs two ADPD2140 sensors side by side, a wide hand swipe can trigger both sensors a few milliseconds apart. By default, the game listens to Sensor 0 (--sensor 0, which sits closer to the IR LED and gives the strongest signal) and applies a 250 ms cooldown (--cooldown 0.25) so a single wave never counts as a double hop.
- Live SSH telemetry bar: At the bottom of the screen, the game prints the live L0 and L1 signal levels, hand presence state, and the last recognised gesture. That makes it trivial to tune --l-thresh while playing headless without guessing whether the board saw your hand.
Running it on the CM4 over SSH is just one line (using the GPIO interrupt pin to keep CPU usage near zero):
python3 magpie_game.py --int-gpio 4
And if you just want to try the terminal layout before wiring up the hardware, there is a built-in keyboard-only mode too:
python3 magpie_game.py --keyboard
It started as a quick sanity check for the driver, but it actually turned into a great prototype for Tiltie’s final UX: left/right to navigate choices, up/down to confirm or reject, and presence to wake everything up - all without ever touching the bin.
Bonus demo: Theremin Painter, a 2D optical Theremin in ASCII greyscale
Magpie Recycler proved that discrete swipe classification (LEFT, RIGHT, UP, DOWN) worked nicely, but while looking at the raw (x, y) coordinates and intensity L streaming out of gesture.py, I realised the CN0569 can do something even cooler.
Because the ADPD2140 gives you continuous 2D angular coordinates (x, y) and total reflected signal intensity L on every frame, it behaves a bit like a two-dimensional optical Theremin. Instead of synthesising sound, though, I turned it into an ASCII gesture painter over SSH: theremin_painter.py.
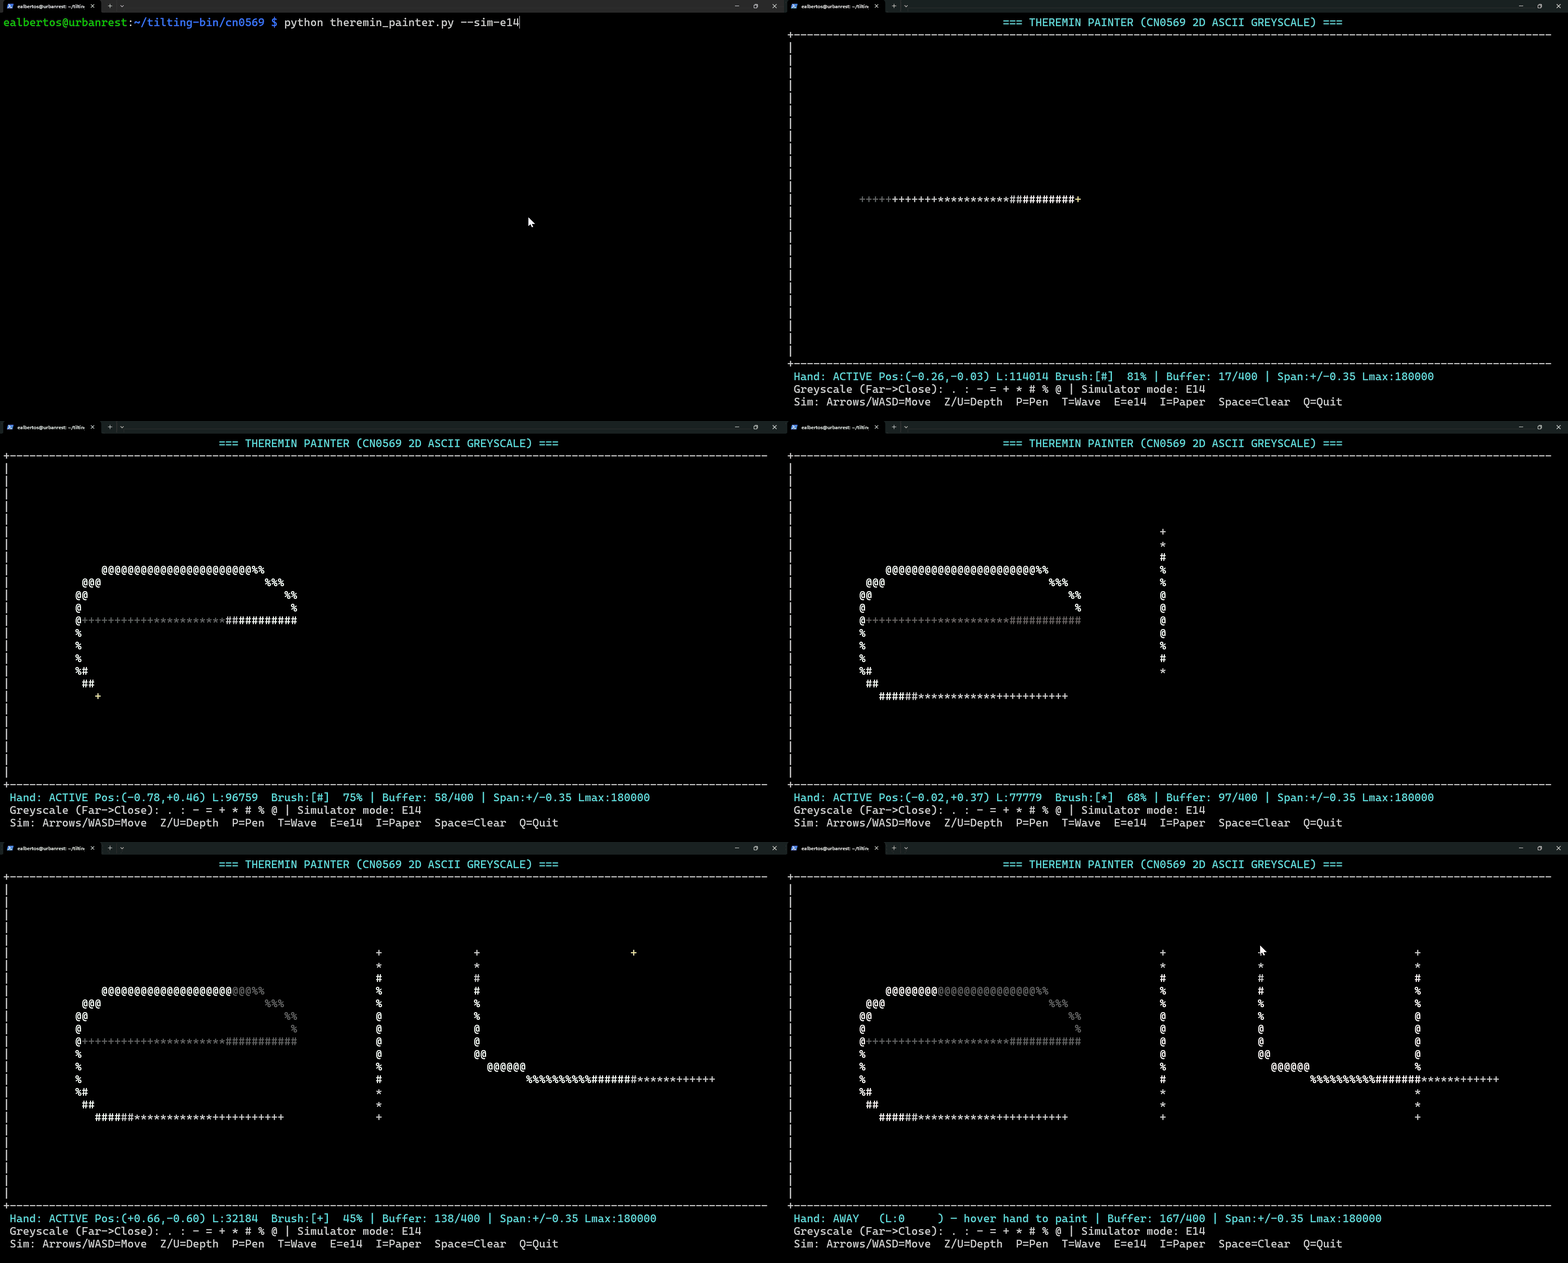
Move your hand in the air above the board and your trajectory is painted live in the terminal - the closer your hand gets, the darker and denser the brushstroke becomes; move your hand higher and the line fades to fine, light dots.
Drawing in mid-air over SSH - closer hand positions paint denser ASCII characters (# % @), while higher/farther movements leave lighter trails (. : -), all stored in a rolling circular buffer.
Turning infrared reflections into ASCII brushstrokes
Building a continuous "air canvas" out of an optical sensor turned up a few fun little problems - and a few neat tricks to make it feel responsive over SSH:
- A 9-level ASCII greyscale ramp (.:-=+*#%@): Far-away hand movements map to sparse characters (., :, -), mid-range positions use =, +, *, and close hovers near the LED turn into dense ink (#, %, @). Since most SSH terminals are white-on-black, hitting I (or launching with --paper) flips into Light Paper mode, rendering dark ink on a light background so @ looks darker than ..
- Perceptual distance curve (gamma = 0.45): Infrared reflection drops off sharply with distance. A linear mapping would leave almost everything stuck at . until your hand nearly touched the PCB. Passing the normalised intensity through a norm_l ** 0.45 curve spreads the greyscale smoothly across the whole working height above the sensor.
- Circular history buffer (collections.deque): Every point (x, y, intensity) is pushed into a fixed-size circular buffer (--history 400 by default), but only while a hand is present (L > l_thresh). That means you can lift your hand away and admire your doodle without empty frames wiping it out - and as you keep drawing, the oldest strokes gently dim at the tail before rolling out of the buffer.
- Smoothing & stroke interpolation: Optical angle quotients get slightly jittery at the edge of detection, so a lightweight exponential moving average (--smooth 0.35) keeps curves fluid. Fast sweeps also interpolate along the line between consecutive samples (as long as they belong to the same continuous stroke), giving clean strokes instead of scattered dots. And if you hold your hand completely still, it throttles duplicate points so you do not accidentally flush your whole circular buffer in one spot.
Live tuning over SSH
Because the CN0569's 3D-printed baffle limits the field of view to roughly ±35°, the raw (x, y) values normally sit inside [-0.35, +0.35] rather than reaching ±1.0. Instead of hardcoding everything and restarting the script every two minutes, you can tune the canvas live from the keyboard while waving your other hand:
- + / -: Zoom the active angle span in or out so your hand sweeps cover the entire terminal window.
- [ / ]: Raise or lower the proximity ceiling (L_max) for the darkest @ brush.
- X / Y: Flip axis on the fly if you rotated the board on your desk.
- Space / C / I: Clear the canvas, recalibrate the baseline, or toggle Light Paper mode.
To try it on the CM4 over SSH:
python3 theremin_painter.py --int-gpio 4
(Or drop --int-gpio 4 to run in I2C polling mode.)
And just like the magpie game, there is an offline simulator mode (--sim) that draws an automated 2D Lissajous wave with oscillating "height" so you can preview the ASCII greyscale circular buffer in any SSH terminal without touching the hardware:
python3 theremin_painter.py --sim
Between Magpie Recycler and Theremin Painter, the library has now been tested for everything Tiltie needs background presence, crisp directional swipes for touch-free labelling, and smooth 2D continuous tracking - all validated headless over SSH before a screen even gets attached.
A quick enclosure test
Since the final sensor won't be exposed directly, I also took the opportunity to test the CN0569 behind the transparent polycarbonate lid of the Hammond enclosure I plan to use for Tiltie.
The good news is that the sensor still works through the polycarbonate, provided it is mounted flush against the inside of the lid. The additional reflections introduced by the plastic change the baseline readings, but a fresh calibration compensates for them and restores normal operation
 .
The bad news is that the mounting distance matters. When I moved the sensor further away from the lid, the extra reflections became large enough that gesture detection stopped working reliably. In practice, this means the sensor will need to be mounted directly against the transparent cover as part of the final enclosure design.
This was a useful result because it confirms that the CN0569 can operate from behind a protective window, avoiding a visible opening in the enclosure while still providing touch-free interaction. Of course, the calibration step must be performed with the sensor installed in its final mechanical position.
What's next
The CN0569 has now proven it can deliver everything Tiltie currently needs reliable presence detection, directional swipe gestures, and continuous two-dimensional hand tracking, all running directly on the Raspberry Pi CM4.
With the sensor validation phase complete, the next steps are focused on integrating it into the wider Tiltie platform:
- finish the mechanical build,
- bring in the ADXL372 to start analysing impact signatures from discarded items,
- mount the CN0569 in its final position behind the enclosure's transparent polycarbonate lid,
- connect the CN0569 library to the main Tiltie software stack running on the CM4,
- implement Tiltie's waste-recognition pipeline, combining camera-based object identification with sensor data,
- integrate gesture-based labelling into the waste-classification workflow,
- implement the educational recycling game using ArUco-tagged objects, gesture-controlled bin selection, and real-time feedback through LEDs and the status display.
- The original goal of this is to provide a touch-free way for people to interact with the system. After a few unexpected hardware and software detours, that goal now looks well within reach.
Want to Follow the Complete Journey?
This is the fourth article in the Tiltie series. You can find all previous and future project updates in the Tiltie tag page:
See you in the next update!