element14 Community
element14 Community
    Register Log In
  • Site
  • Search
  • Log In Register
  • Community Hub
    Community Hub
    • What's New on element14
    • Feedback and Support
    • Benefits of Membership
    • Personal Blogs
    • Members Area
    • Achievement Levels
  • Learn
    Learn
    • Ask an Expert
    • eBooks
    • element14 presents
    • Learning Center
    • Tech Spotlight
    • STEM Academy
    • Webinars, Training and Events
    • Learning Groups
  • Technologies
    Technologies
    • 3D Printing
    • FPGA
    • Industrial Automation
    • Internet of Things
    • Power & Energy
    • Sensors
    • Technology Groups
  • Challenges & Projects
    Challenges & Projects
    • Design Challenges
    • element14 presents Projects
    • Project14
    • Arduino Projects
    • Raspberry Pi Projects
    • Project Groups
  • Products
    Products
    • Arduino
    • Avnet & Tria Boards Community
    • Dev Tools
    • Manufacturers
    • Multicomp Pro
    • Product Groups
    • Raspberry Pi
    • RoadTests & Reviews
  • About Us
  • Store
    Store
    • Visit Your Store
    • Choose another store...
      • Europe
      •  Austria (German)
      •  Belgium (Dutch, French)
      •  Bulgaria (Bulgarian)
      •  Czech Republic (Czech)
      •  Denmark (Danish)
      •  Estonia (Estonian)
      •  Finland (Finnish)
      •  France (French)
      •  Germany (German)
      •  Hungary (Hungarian)
      •  Ireland
      •  Israel
      •  Italy (Italian)
      •  Latvia (Latvian)
      •  
      •  Lithuania (Lithuanian)
      •  Netherlands (Dutch)
      •  Norway (Norwegian)
      •  Poland (Polish)
      •  Portugal (Portuguese)
      •  Romania (Romanian)
      •  Russia (Russian)
      •  Slovakia (Slovak)
      •  Slovenia (Slovenian)
      •  Spain (Spanish)
      •  Sweden (Swedish)
      •  Switzerland(German, French)
      •  Turkey (Turkish)
      •  United Kingdom
      • Asia Pacific
      •  Australia
      •  China
      •  Hong Kong
      •  India
      • Japan
      •  Korea (Korean)
      •  Malaysia
      •  New Zealand
      •  Philippines
      •  Singapore
      •  Taiwan
      •  Thailand (Thai)
      • Vietnam
      • Americas
      •  Brazil (Portuguese)
      •  Canada
      •  Mexico (Spanish)
      •  United States
      Can't find the country/region you're looking for? Visit our export site or find a local distributor.
  • Translate
  • Profile
  • Settings
Path to Programmable 3
  • Challenges & Projects
  • Design Challenges
  • Path to Programmable 3
  • More
  • Cancel
Path to Programmable 3
Blog 3. LED Blink Part-3: 256 PYNQ Numbers
  • Blog
  • Forum
  • Documents
  • Leaderboard
  • Files
  • Members
  • Mentions
  • Sub-Groups
  • Tags
  • More
  • Cancel
  • New
Join Path to Programmable 3 to participate - click to join for free!
  • Share
  • More
  • Cancel
Group Actions
  • Group RSS
  • More
  • Cancel
Engagement
  • Author Author: rajivbishwokarma
  • Date Created: 27 Jul 2023 6:44 AM Date Created
  • Views 730 views
  • Likes 6 likes
  • Comments 0 comments
  • AMD XILINX
  • fpga
  • pynq
  • Ultra96-V2 Board
  • Path to Programmable 3
Related
Recommended

3. LED Blink Part-3: 256 PYNQ Numbers

rajivbishwokarma
rajivbishwokarma
27 Jul 2023

1. Introduction

In this blog, we will extend our previous LED blinking example to again blink more LEDs. We will see how we can use PYNQ to program our FPGA. In this design, we will use the low speed expansion header in the Ultra96v2 board to connect to external LEDs and then we will implement an 8-bit UP-DOWN counter using Python in PYNQ and then make our LEDs show us those numbers.

However, before we get started, it is necessary that we follow the PYNQ setup guidelines provided in the following link.

PYNQ Setup: https://ultra96-pynq.readthedocs.io/en/latest/getting_started.html

All the files for this blog are available here: https://github.com/rajivbishwokarma/element14_p2p_blogs

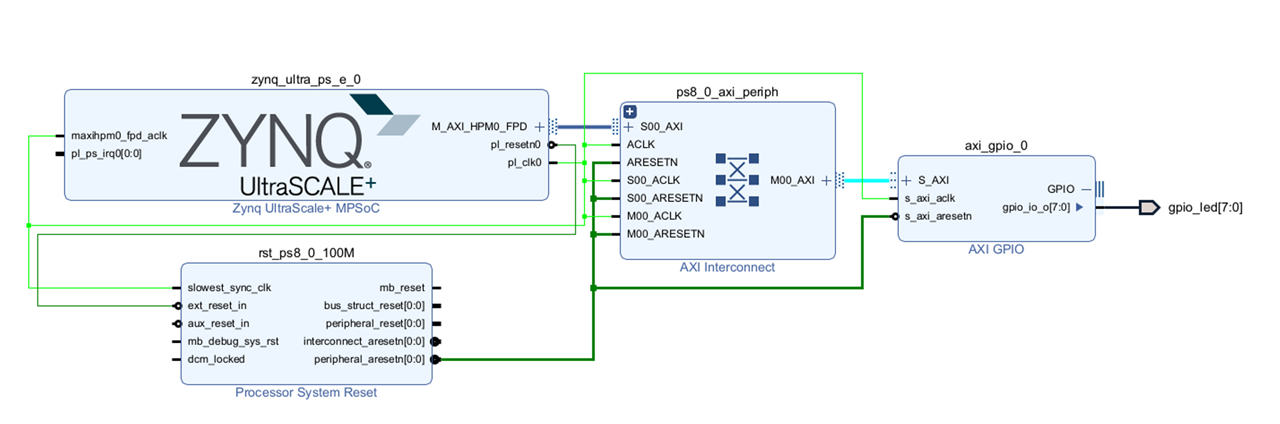
2. Setting up hardware in Vivado

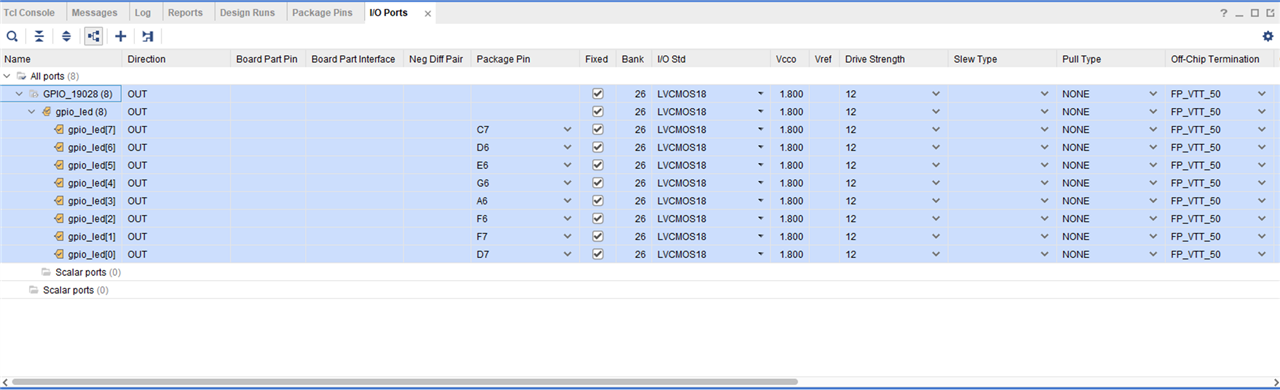
The block design that we create in this project is similar to the previous block. But rather than using just 2 bit lines in the AXI GPIO, we will use 8.

image

image

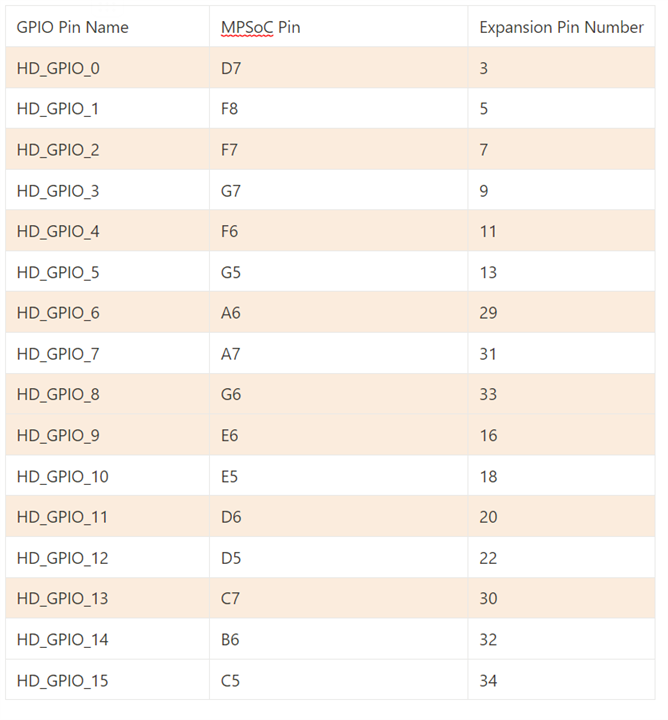
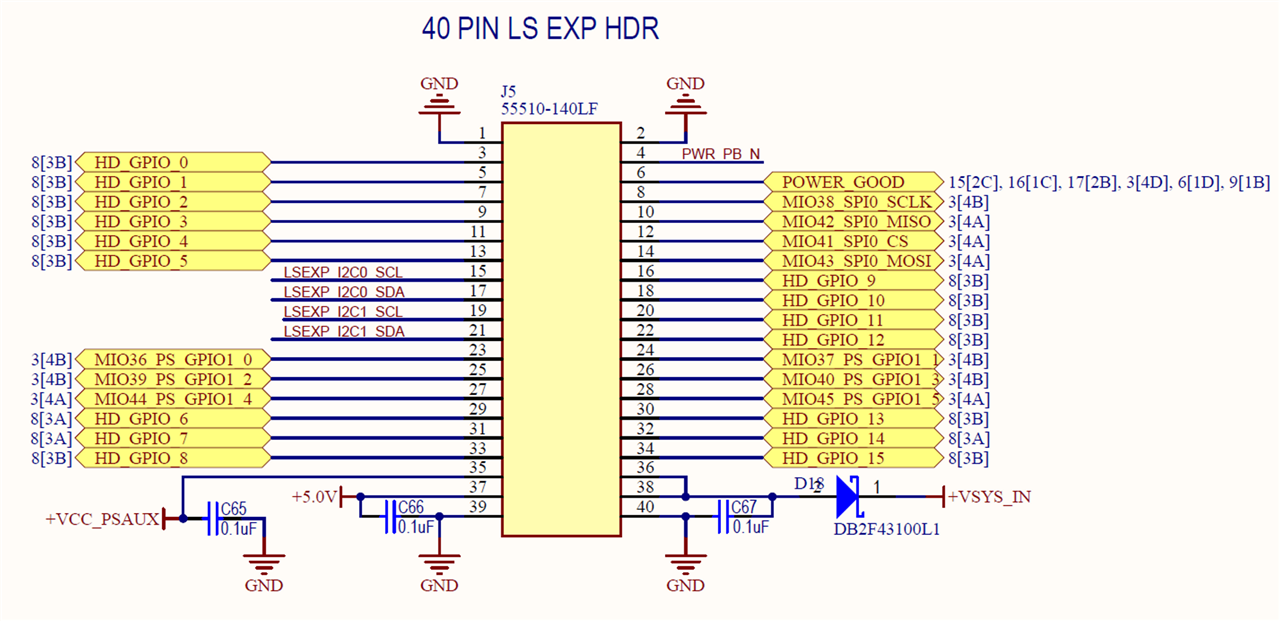
We then map the physical pins to the Zynq MPSoC pins in the constraint file. The way we do is using the Ultra96v2 schematic available here: Ultra96-V2 | Avnet Boards

In the schematic, we can see that the 40 PIN low-speed expansion header (LS EXP HDR) has the HD_GPIO_0 through HD_GPIO_15. So we can utilize all of them through PL. I have used the following orange highlighted pins because my jumper pins were larger than the spacing of the two pins in the LS EXP HDR and did not fit in slots sequentially.

image

image

Then creating the constraint file according to the required specification.

image

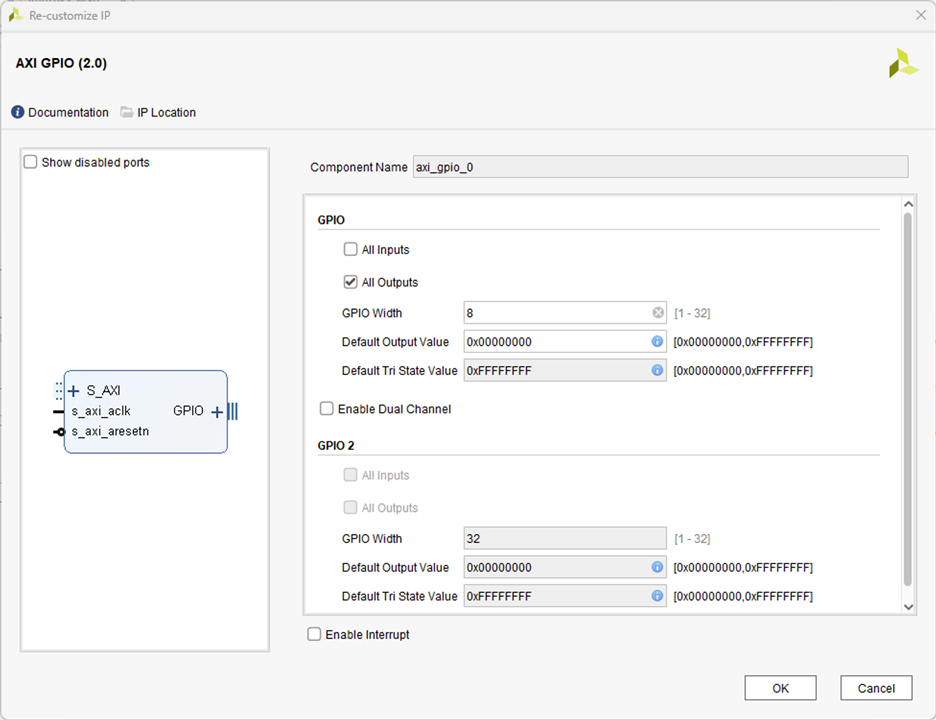
[Note: This image is here just to make this blog look more sophisticated.]

image

The constraint file.

set_property IOSTANDARD LVCMOS18 [get_ports {gpio_led[7]}]
set_property IOSTANDARD LVCMOS18 [get_ports {gpio_led[6]}]
set_property IOSTANDARD LVCMOS18 [get_ports {gpio_led[5]}]
set_property IOSTANDARD LVCMOS18 [get_ports {gpio_led[4]}]
set_property IOSTANDARD LVCMOS18 [get_ports {gpio_led[3]}]
set_property IOSTANDARD LVCMOS18 [get_ports {gpio_led[2]}]
set_property IOSTANDARD LVCMOS18 [get_ports {gpio_led[1]}]
set_property IOSTANDARD LVCMOS18 [get_ports {gpio_led[0]}]
set_property PACKAGE_PIN D7 [get_ports {gpio_led[0]}]
set_property PACKAGE_PIN F7 [get_ports {gpio_led[1]}]
set_property PACKAGE_PIN F6 [get_ports {gpio_led[2]}]
set_property PACKAGE_PIN A6 [get_ports {gpio_led[3]}]
set_property PACKAGE_PIN G6 [get_ports {gpio_led[4]}]
set_property PACKAGE_PIN E6 [get_ports {gpio_led[5]}]
set_property PACKAGE_PIN D6 [get_ports {gpio_led[6]}]
set_property PACKAGE_PIN C7 [get_ports {gpio_led[7]}]

Now, after this we just generate the bitstream and export it. And, we then make note of the two files that we need, namely. Then after starting a new Jupyter notebook within Ultra96v2, we can upload these files as shown in the image.

  • Hardware handoff (.hwf)
  • Bitstream (.bit)

image

In the Jupyter Notebook, we can run the following code.

from pynq import Overlay
from pynq.lib import AxiGPIO
import time

overlay = Overlay('u96_8bit_expynq.bit')
gpio_led = overlay.ip_dict['axi_gpio_0']

LED = AxiGPIO(gpio_led).channel1
LED[0:8].write(0)

while (1):
    # 8-bit up counter
    for i in range(255):
        LED[0:8].write(i)
        print(f"LED: {hex(i)}")
        time.sleep(1)

    # 8-bit down counter    
    for i in range(255, 0, -1):
        LED[0:8].write(i)
        print(f"LED: {hex(i)}")
        time.sleep(1)

The end result would be as shown in the video below.

YouTube: https://youtu.be/T47WlpKiQ8Q

You don't have permission to edit metadata of this video.
Edit media
x
image
Upload Preview
image

  • Sign in to reply
element14 Community

element14 is the first online community specifically for engineers. Connect with your peers and get expert answers to your questions.

  • Members
  • Learn
  • Technologies
  • Challenges & Projects
  • Products
  • Store
  • About Us
  • Feedback & Support
  • FAQs
  • Terms of Use
  • Privacy Policy
  • Legal and Copyright Notices
  • Sitemap
  • Cookies

An Avnet Company © 2025 Premier Farnell Limited. All Rights Reserved.

Premier Farnell Ltd, registered in England and Wales (no 00876412), registered office: Farnell House, Forge Lane, Leeds LS12 2NE.

ICP 备案号 10220084.

Follow element14

  • X
  • Facebook
  • linkedin
  • YouTube