


Table of Contents
Objectives
I continued to use Lab 7 Vivado project to build a couple of simple user APIs under Petalinux environment. I don’t have a PMOD module, HTU21D, for Avnet MiniZed TTC Petalinux training labs. I tried to integrate PWM LED module into Petalinux to learn how to integrate a peripheral into MiniZed Petalinux system.
However, after a couple of days’ iterations, my GPIO UIO driver was not integrated into Petalinux successfully. I basically followed the guidance from Roy Meesigner blog[1]: GPIO and Petalinux (Embedded Linux, Yocto based). At the end of the day, I decided to publish this blog and would like to get supports from Element14.com Community on GPIO UIO API topic. It is a learning-by-doing process.
Background Knowledge about Petalinux Drivers
Let us review Lab 7 HW design first. Fig 1 is copied from my blog 3 on this topic, which illustrates Lab 7 HW design at Vivado flow.

Fig 1. Lab 7 Vivado HW Design Block Diagram
PWM_w_init_0 module is the targeted peripheral to be integrated into Petalinux now. PWM_w_init_0 is a simple AXI bus add-on GPIO module. The flow to integrate it into Petalinux might not be as simple as the initial thinking. There are several dependencies to be covered before we jump into Petalinux flow.
- Kernel and Layers
A brief overview of the embedded Linux system is helpful for integrating a peripheral into a Linux OS. One embedded Linux OS can be divided into three layers: User API/space, kernel space and hardware(HW) components.

Fig 2. A Simplified Structure of Embedded Linux OS (Ref from Wikipedia)
Kernel space is the center layer to connect the HW components with user space or APIs. AMD/Xilinx Petalinux GUI can help us with the kernel configuration without deep knowledge of the kernel building blocks. In general, the kernel takes care of memory management, scheduling access to different peripherals, such as input/output support. User applications cannot talk to HW components without kernel support.
From AMD/Xilinx documents, SysFs driver is a common framework for accessing various GPIOs at user space/APIs.
2. Device Tree
Device tree are a database for a kernel to manage the HW components’ interface. A proper device tree file can make the associated HW component accessible by the kernel, then by the user APIs.
3. HW components
A finished Vivado project provides all the information for the HW layer in the Petalinux flow. As today’s Vitis tool chain, XSA file contains HW component information and is used as the input for building a Petalinux project.
Build Simple User APIs for Petalinux Project
1. A simple user API to let Petalinux print out a Hello World string after MiniZed booting up
The basic procedure to create a Petalinux is similar to Blog 3.
Step 01: Create a Petalinux project
$ petalinux-create --force --type project --template zynq --name MiniZed_UIO_LED
Step 02: Configure Vivado/Petalinux hardware
$ petalinux-config --get-hw-description=../
Step 03: Create User API
$ petalinux-create -t apps --name linuxapi
Configure rootfs
$ petalinux-config -c rootfs
Petalinux GUI will let us to select linuxapi app into user space as below.
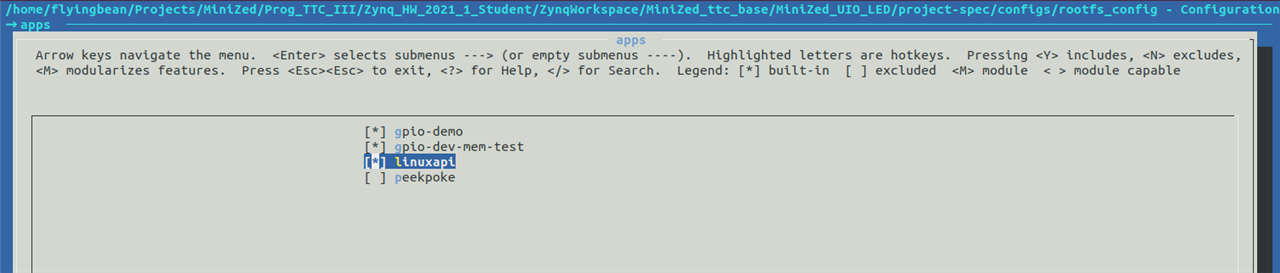
Fig 3. Petatlinux Rootfs: apps configuration
Step 04: Build Petalinux Images
$ petalinux-build
After generating booting image artifacts, I am able to boot MiniZed from JTAG port as my blog 3 instructed. Here is the snapshot to get a Hello World API running on Petalinux.
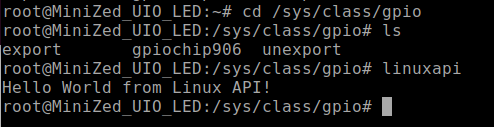
Fig 4. Hello World Linux API Working
2. The second user API is to create a PL GPIO API driver to dim PL LED on MiniZed after Petalinux booting up.
Step 1-2 is same as previous to create Petalinux project.
Step 3: Configure kernel
$ petalinux-config -c kernel
I did select GPIO UIO setting as below, which should mount GPIO UIO at MiniZed initial booting phase.
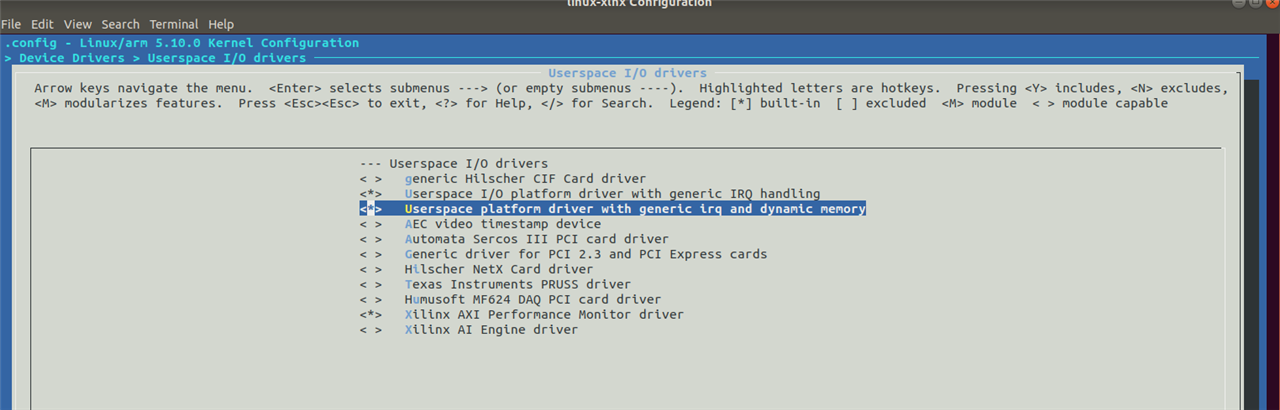
Fig 5. GPIO UIO Rootfs Configuration
Step 4: Create GPIO UIO API
$ petalinux-create -t apps --name gpio-dev-mem-test
I used Avnet source file, gpio-dev-mem-test.c to testing the UIO API which is same as Roy Meesigner blog. The source code is attached.
/*
 * This test application is to read/write data directly from/to the device
 * from userspace.
 *
 */
#include <stdio.h>
#include <stdlib.h>
#include <unistd.h>
#include <sys/mman.h>
#include <fcntl.h>

#define IN 0
#define OUT 1

void usage(void)
{
	printf("*argv[0] -g <GPIO_ADDRESS> -i|-o <VALUE>\n");
	printf("    -g <GPIO_ADDR>   GPIO physical address\n");
	printf("    -i               Input from GPIO\n");
	printf("    -o <VALUE>       Output to GPIO\n");
	return;
}

int main(int argc, char *argv[])
{
	int c;
	int fd;
	int direction=IN;
	unsigned gpio_addr = 0;
	int value = 0;

	unsigned page_addr, page_offset;
	void *ptr;
	unsigned page_size=sysconf(_SC_PAGESIZE);

	printf("GPIO access through /dev/mem.\n", page_size);

	/* Parse command line arguements */
	while((c = getopt(argc, argv, "g:io:h")) != -1) {
		switch(c) {
		case 'g':
			gpio_addr=strtoul(optarg,NULL, 0);
			break;
		case 'i':
			direction=IN;
			break;
		case 'o':
			direction=OUT;
			value=atoi(optarg);
			break;
		case 'h':
			usage();
			return 0;
		default:
			printf("invalid option: %c\n", (char)c);
			usage();
			return -1;
		}

	}

	if (gpio_addr == 0) {
		printf("GPIO physical address is required.\n");
		usage();
		return -1;
	}

	/* Open /dev/mem file */
	fd = open ("/dev/mem", O_RDWR);
	if (fd < 1) {
		perror(argv[0]);
		return -1;
	}

	/* mmap the device into memory */
	page_addr = (gpio_addr & (~(page_size-1)));
	page_offset = gpio_addr - page_addr;
	ptr = mmap(NULL, page_size, PROT_READ|PROT_WRITE, MAP_SHARED, fd, page_addr);

	if (direction == IN) {
	/* Read value from the device register */
		value = *((unsigned *)(ptr + page_offset));
		printf("gpio dev-mem test: input: %08x\n",value);
	} else {
	/* Write value to the device register */
		*((unsigned *)(ptr + page_offset)) = value;
	}


	munmap(ptr, page_size);

	return 0;
}
Step 5: Update device tree
I need to update system-usr.dtsi for gpio UIO node. The file can be found from the hiercharch as below.

Fig 6. Hierarchy Location of system-user.dtsi
Here is the snippet of the updated device tree.
/include/ "system-conf.dtsi"
/ {
 chosen {
		bootargs = "earlycon consol=ttyPS0,115200 earlyprintk clk_ignore_unused uio_pdrv_genirg.of_id=generic-uio";
		stdout-path = "serial0:115200n8";
	};
};


 &amba {
    	ptm@f889d000 {
    		cpu = <&cpu0>;
    	};
    };


&PWM_w_Int_0 {
        compatible = "generic-uio";
        status = "okay";
   };
Step 6: Configure rootfs
$ petalinux-config -c rootfs
After Petalinux GUI pop up, selet app: gpio-dev-mem-test, as Fig 3 shew.
Step 7: Build Petalinux Image and test APIs
$ petalinux-build
After using JTAG to load the Petalinux images into MiniZed, I cannot find UIO populated under /sys/class/uio.

Fig 7. No PL GPIO Node Populated on MiniZed
I can only find gpiochip906 under /sys/class/gpio, which is PS GPIO for PS LED.
My very first GPIO UIO API on MiniZed was failed for now.
Conclusions
I learned how to use Petalinux to create a simple Linux version, Hello World API, which can be called at user space. However, I was not able to create a UIO API to call PL GPIO at user space. I think the root cause was the kernel configuration, which was not properly implemented. Vivado HW design should be fine since baremetal API was successfully running on MiniZed. I do need some advises from our community to fix the issues.
References
[1] https://www.hackster.io/Roy_Messinger/gpio-and-petalinux-embedded-linux-yocto-based-c71773

