


Introduction
In the previous blog post, we created a minimal hardware platform to get started with the Ultra96V2.
Path to Programmable III: Ultra96v2 Basic Hardware Platform - Vivado 2022.2
In this post we will continue from where we left things in the previous post and try to build a basic software application to run on our hardware platform. If you haven't followed along on with the previous post, I encourage you to do so and then come back to this post.
The Ultra96-V2 is based on the AMD Zynq Ultrascale+ MPSoC ZU3EG, which, in addition to generous amount of FPGA fabric, also includes 4 cores of ARM A53 application processors as well as 2 cores of R5 Real time processors. In this post we will write our application for A53 core. Since ours will be a single threaded application, it will run on one of the A53 cores.
Launch Vitis
In the previous blog post we already exported our platform in the xsa format. Now we need to launch Vitis.
My preferred way to launch Vitis is to just launch it from Vivado itself.
For this, inside Vivado, go to Tools -> Launch Vitis IDE

This will launch the Vitis IDE. Note that you can also launch it from your windows start menu or desktop shortcut if that exists.
A window appears asking which folder to set as your "Workspace" folder. While you are free to set any folder for this, my personal preference is to create a folder inside the project folder we created when we created the new Vivado folder in our last blog post. I named this new folder "VITIS" but you can use any name that makes sense to you. The reason I like to create the folder inside our existing project folder is to keep the hardware and software (Vitis) files inside the same project folder. This makes it easier to locate everything even if I come back to this 3 years later.

Click Browse to set your Workspace folder and then click Launch. This opens the Vitis application.

Create Platform
Now before we can start to compile and run a software application on our hardware, VITIS needs to know all the details about the hardware that we have created. For this, we need to create a "Platform Project" first.
Click File -> New -> Platform Project

This opens the "New Platform Project" Wizard window.
Since we will be using the custom hardware platform we created ourselves, we will go with the "Created a new platform from hardware (XSA)" option.

Click Browse to locate and select the .xsa file we exported from Vivado in our previous blog post

Vitis will take a minute to read the Hardware Specification file. Once done, it will appear in the list along with the previously populate generic platforms.

For this tutorial we will be leaving the various options to default values, however, I want to touch on the various options before we proceed.
For our OS, we can use
- Standalone -> Baremetal application that does not use any operating system. This is the most low "level application" you can run.
- freertos10_xilinx -> Freertos is a real time operating system (RTOS) available for free. Very handy for real time control applications
- linux -> If you plan to run linux on your hardware (e.g., AMD's petalinux)

You can also select exactly which core to run the application on. By default the first A53 core is selected.

We can also select if we want to build a 32bit of 64bit platform. The default for our A53 processor is 64 bit. Note that if you were to select one of the R5 cores, this option is not there anymore.

Anyway, for this project, we will leave all settings to default, and click "Finish". Vitis will take a minute to create our new platform project. This new project is also now seen in the "Explorer" tab inside Vitis.

Modifying BSP
By default the BSP (board support package) uses UART0 for the standard input and outputs (known as "stdin" and "stdout"). These are the devices used by the baremetal OS (in this case) to send or receive data from the console. So for example, when you use a printf() or xil_printf() function in your code, it gets sent to the stdout device. From the Ultra96v2 schematics and Zynq MPSoC settings (in Vivado) we can verify that it's the UART1 that is actually connected to the JTAG uart on the Ultra96v2 board. So we need to update this in our BSP.
To do this, click the "Modify BSP Settings..." button in the BSP window. For this, make sure that on the left side, you have the "Board support Package" selected from under the "standalone on psu_cortexa53_0" selected, otherwise you will be modifying the fsbl or pmufw BSPs, which is not what we need.

This opens the BSP settings window. On the left side , click "standalone" category

Now you can see the stdin and stdout parameters, which are both set to psu_uart_0 currently. We need to change these both (using the respective drop-downs) to psu_uart_1. Once this is done, it will look like the following:

Click OK to close this window.
At this point, we can observe that out Platform project is showing to be "out-of-date".

To fix this, we right click the platform project name, and click "Build Project".

This will take a few minutes, and once done successfully, you will see a "Build Finished" message in the Console window at bottom, and also the Platform project will no longer show "out-of-date" anymore


Create Application Project
Now that the platform project is created, now we can create the Application project. This is where we write our own application code. In the engineering world, it's good omen to start with a "Hello World" application, so that's what we're going to do.
In the Main Vitis window, click File -> New -> New Application Project

This opens the Wizard to create new application project. On the first page we just click Next.

On the next page, make sure the platform project we created just now is selected (by default), then click Next.

Give a reasonable name to the Application project. The name of the System project is automatically populated and I have no reason to change now. Click Next.

In the domain, we don't need to do anything as the correct domain is already selected. Click Next.

This brings us to a list of templates to get started quickly. We stick to our plan of creating the "Hello World" application, so after selecting it from the list, click Finish.

This finishes the process of creating our new application project.
Now we are back to the main Vitis window. You can see the new Application project appear in the "Explorer" window on the left side.
Let's personalize the application a bit 
Expand the "src" folder under our new Application project and double click the "HelloWorld.c" file. This opens the source code file in the main window.

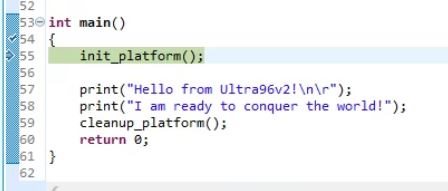
I am going to edit edit the "print" statements to something different.

Now we can save the file by clicking the "Save All" button.
To build the Application, first make sure we have the Application Project selected at top level (this is very important), then click Project -> Build Project

This will start the build process. you can monitor the progress by looking at the output in the Console tab. Building can typically take several tens of seconds to several minutes depending on your Application project size and build machine specifications. In this case it shouldn't take very long.
Once done, we can see the "Build Finished" message in the Console window.

Deploying on Hardware
Now that our application is compiled, we can launch it on our Ultra96v2 board.
We need to do some preparatory steps first:
- Connect JTAG Adapter Pod to the Ultra96v2. Make sure the pins' alignment is good before you push the two boards together.
- On the Ultra96v2, make sure SW3 is set to [ON, ON] positions (both switches in ON position) to set boot mode to JTAG.
- Apply power to the board using the correct power supply plugged into the board's barrel jack.
- Connect a USB cable from the JTAG Adapter pod's USB port to the development computer's USB port.
- Press the power switch (SW4) to turn on the board (Yes, the Ultra96v2 requires this step!)
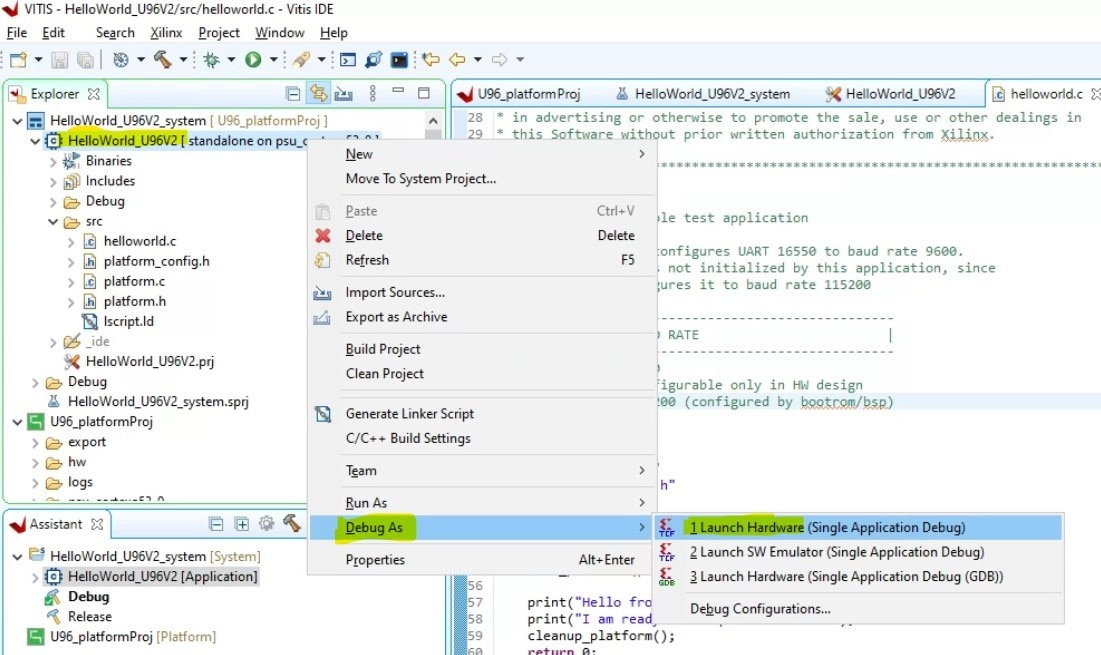
Now, we can launch the application in Debug mode by right clicking our application's name in Explorer window -> Debug As -> Launch Hardware.
This will switch Vitis to the "Debug" perspective. In the bottom right of the Vitis window, you will see the status of the application being launched.

You can also monitor the exact status of this launch process in the "XSCT Console" tab.
Once the application is finished launching, it will "break" at a default breakpoint on the first line (you don't have to add this breakpoint yourself).
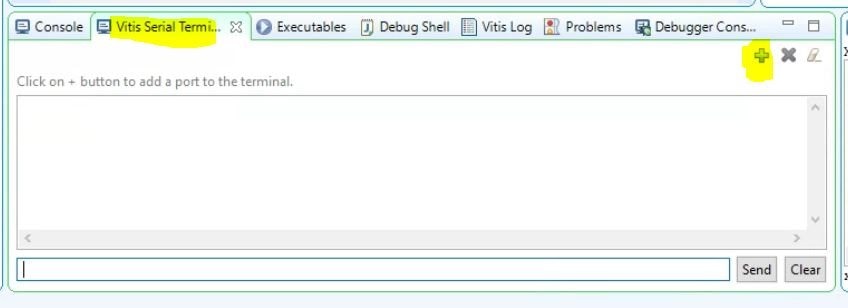
The debug process is basically awaiting your GO for proceeding with code execution. Remember we are expecting the application to print something to the UART console? Well, we need to connect a Serial Terminal to the UART console to be able to receive the message. While this can be done using any serial console application, one of the easiest ways is to use the "Vitis Serial Terminal" which appears automatically the Debug perspective is launched in VITIS. To connect with the JTAG port's UART console (which is connected to the Ultra96v2's ps_uart1), click the "+" button in the Vitis Serial Terminal window.
This opens up a Dialog box. Choose the correct serial port for your machine (you can use the Windows Device Manager if you're using Windows). Other settings can be left to default and press OK.
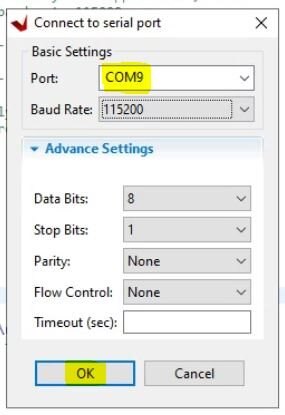
The Vitis Serial Console should display a message "Connected to COMX at 115200" where X is the COM port number in your case.
Now, you can proceed with executing our application by hitting the F8 button, or clicking Run -> Resume in the Vitis window.
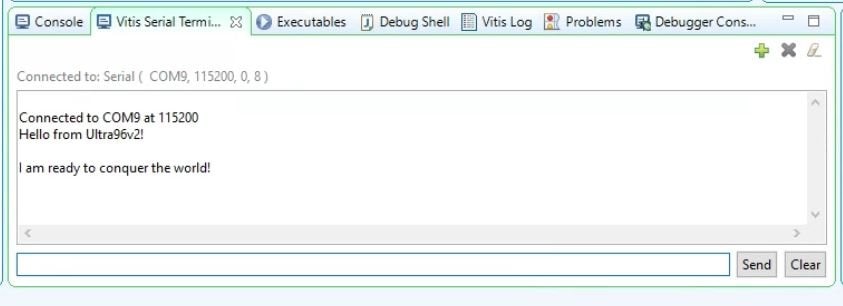
We see our message appear in the window.
Mission success!
Congratulations, you have now compiled your first application for the Ultra96v2. Next up...Conquer the world!