element14 Community
element14 Community
    Register Log In
  • Site
  • Search
  • Log In Register
  • Community Hub
    Community Hub
    • What's New on element14
    • Feedback and Support
    • Benefits of Membership
    • Personal Blogs
    • Members Area
    • Achievement Levels
  • Learn
    Learn
    • Ask an Expert
    • eBooks
    • element14 presents
    • Learning Center
    • Tech Spotlight
    • STEM Academy
    • Webinars, Training and Events
    • Learning Groups
  • Technologies
    Technologies
    • 3D Printing
    • FPGA
    • Industrial Automation
    • Internet of Things
    • Power & Energy
    • Sensors
    • Technology Groups
  • Challenges & Projects
    Challenges & Projects
    • Design Challenges
    • element14 presents Projects
    • Project14
    • Arduino Projects
    • Raspberry Pi Projects
    • Project Groups
  • Products
    Products
    • Arduino
    • Avnet & Tria Boards Community
    • Dev Tools
    • Manufacturers
    • Multicomp Pro
    • Product Groups
    • Raspberry Pi
    • RoadTests & Reviews
  • About Us
  • Store
    Store
    • Visit Your Store
    • Choose another store...
      • Europe
      •  Austria (German)
      •  Belgium (Dutch, French)
      •  Bulgaria (Bulgarian)
      •  Czech Republic (Czech)
      •  Denmark (Danish)
      •  Estonia (Estonian)
      •  Finland (Finnish)
      •  France (French)
      •  Germany (German)
      •  Hungary (Hungarian)
      •  Ireland
      •  Israel
      •  Italy (Italian)
      •  Latvia (Latvian)
      •  
      •  Lithuania (Lithuanian)
      •  Netherlands (Dutch)
      •  Norway (Norwegian)
      •  Poland (Polish)
      •  Portugal (Portuguese)
      •  Romania (Romanian)
      •  Russia (Russian)
      •  Slovakia (Slovak)
      •  Slovenia (Slovenian)
      •  Spain (Spanish)
      •  Sweden (Swedish)
      •  Switzerland(German, French)
      •  Turkey (Turkish)
      •  United Kingdom
      • Asia Pacific
      •  Australia
      •  China
      •  Hong Kong
      •  India
      • Japan
      •  Korea (Korean)
      •  Malaysia
      •  New Zealand
      •  Philippines
      •  Singapore
      •  Taiwan
      •  Thailand (Thai)
      • Vietnam
      • Americas
      •  Brazil (Portuguese)
      •  Canada
      •  Mexico (Spanish)
      •  United States
      Can't find the country/region you're looking for? Visit our export site or find a local distributor.
  • Translate
  • Profile
  • Settings
Path to Programmable
  • Challenges & Projects
  • Design Challenges
  • Path to Programmable
  • More
  • Cancel
Path to Programmable
Blog Lab 1 - starting the first Zynq project
  • Blog
  • Forum
  • Documents
  • Polls
  • Files
  • Events
  • Mentions
  • Sub-Groups
  • Tags
  • More
  • Cancel
  • New
  • Share
  • More
  • Cancel
Group Actions
  • Group RSS
  • More
  • Cancel
Engagement
  • Author Author: aspork42
  • Date Created: 20 Oct 2018 2:26 AM Date Created
  • Views 1658 views
  • Likes 8 likes
  • Comments 5 comments
  • tcl interface
  • path to programmable
  • xilinx
  • fpga
  • vivado
  • arduino
Related
Recommended

Lab 1 - starting the first Zynq project

aspork42
aspork42
20 Oct 2018

Path To Programmable - Lab 1


About:

Through Xilinx and Element14, a training program to learn about the Zynq 7000 platform which is System On Chip combining an FPGA with an ARM processor. This comes to the students as complete development board packed with goodies like a wireless chip from MuRata (BT/BTLE/WIFI), 8GB Flash memory, onboard RAM, USB to JTAG (JTAG programmable over USB), Arduino-style headers (3.3V compatible only), Microphone, Bi-Color LED, and two additional expansion ports.


See all blog posts for this training here.


Lab #1

In this post, I'll walk through the first setup of getting a project started. This roughly covers Lab #1 from the training.


We begin in the Vivado IDE - I'm using Vivado 2017.4. And like the others doing this training, it keeps bugging me to update to version 2018.

It quickly becomes clear through these lessons that working in this environment is much more advanced than someone who is only familiar with Arduino style or graphical style programming. Things like defining clock rates are now necessary and enabling input/output pins aren't necessarily as straight forward. Once familiar with the development environment however, things get much easier.


We start by creating a new project in Vivado.

One of the first parts of this process is targeting a Xilinx part (or board). This must be done as part of project creation because so much of the development depends on the specific chip. This is different from Arduino where one can [somewhat] freely change the target board at any time. In my experience with Arduino there are generally minimal issues with porting code to different boards; aside from the target chipset actually being able to work with the code - for example targeting an ESP-based program onto an Atmel 328 chipset which obviously doesn't support WIFI.


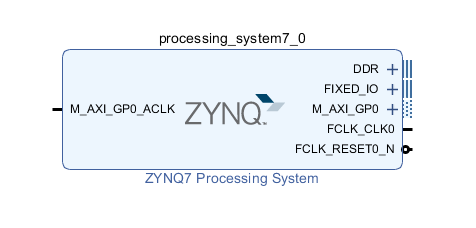
The training lessons walk the user through targeting the exact Zync 7007s chip itself; and not the MiniZed development board. The dev board /could/ be chosen, but as the instructions point out; this wouldn't teach as much. We add the chip; then in later lessons we add links the flash, SPI, RAM, and other GPIO peripherals; just as if we were doing stand-alone development with "any given" accessories. Although this approach makes sense, sometimes it is nice to get a "hello world" sketch up and running as fast as possible; then delve deeper into the guts a little later on. Or maybe that is just me...


Here is the first block diagram after targeting the chip and finishing creating the first diagram.
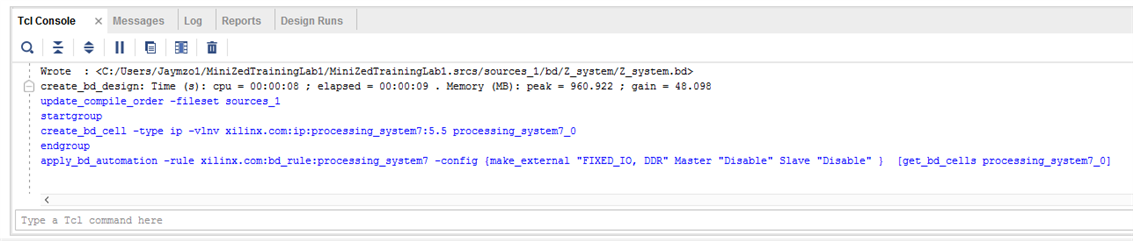
image


TCL interface

The IDE shows a "TCL" interface (Pronounced "tickle" by Josh Foster in the videos that accompany the lessons). It appears to be a command-line interface in which advanced users can manually punch stuff in to script the development a little. I'm looking forward to learning more about this later on. But in Lab #1, I could at least see commands and responses scrolling through this area at the bottom of the screen.


image


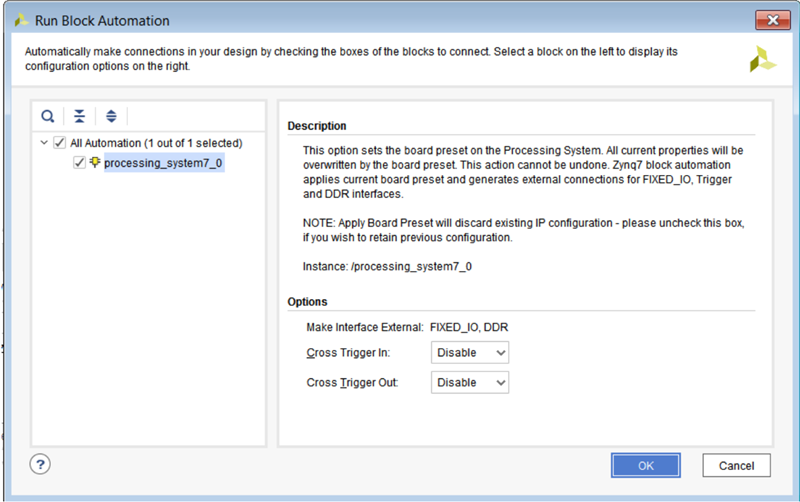
Run Block Automation

The Block Automation interface speeds up the act of enabling peripherals and configuring IO.

image


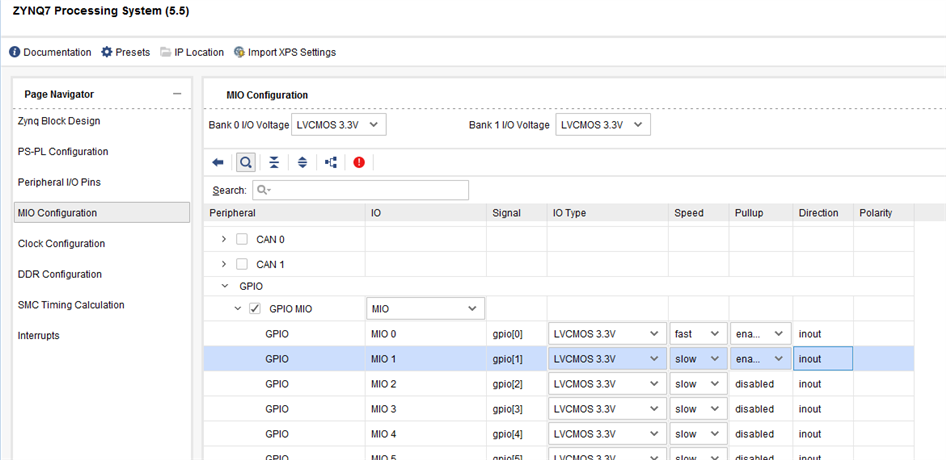
Configuring IO can be seen below:

image


There was also a reference in the lesson to reading through the Z7000 Technical Reference Manual. It linked to this PDF. Have a peek if you dare - it is over 1800 pages!


Lab #1 stops at this point. We have created a new project targeting the the Z7000 chip and done a basic configuration. We haven't yet configured the RAM or any other external chips required to make the board do cool stuff, but that will come soon enough...


Project update:

I have been thinking very seriously about updating my line follower robot using the MiniZed. The two biggest hurdles that I've found so far:

  1. Apparent lack of analog inputs on the Zynq
  2. Arduino-style headers are only 3.3V compatible.

The platform that I built the original line follower on (about 7 years ago) was this one. It uses a typical Arduino Atmel chipset and all the stuff runs at 5V logic levels. The line sensors are analog (LDRs).

I still want to do this; or something along those lines. Either rebuild my existing one or make a new one based on the same kit - desolder the Atmel chip and use the Zync via the expansion headers. This is starting to look like a little bit of a project though. I'm going through the schematic for the robot kit and would basically have to convert the signals going to the H-Bridge from 3.3 to 5V (probably just using simple transistors) or doing a more complicated conversion of the robot board to 3.3V with a different chips. Or even more complicated with making my own PCB... Or even leaving the board as-is and talking to the Atmel chip over SPI or Serial. So I'm going to dwell on this one over the next week or so before making my decision.

BUT I NEED YOUR HELP DECIDING!

If you can think of a cool or simple way of using the chassis and the MiniZed; please let me know in the comments.


That's all for this post. Keeping it short and to the point as I work through the backlog to get caught back up on this project.

  • Sign in to reply

Top Comments

  • 14rhb
    14rhb over 7 years ago +3
    Hi James, Thank you for your interesting blog. I've used Vivado for the Arty S7 Roadtest and there was much I didn't get to understand - I'm hoping to learn more reading the PathToProgrammable blogs like…
  • michaelkellett
    michaelkellett over 7 years ago +3
    You'll get the best result by doing a complete new board for the robot but that will involve you in work you may not want to take on. It will let you experiment using the FPGA to do all the low level control…
  • DAB
    DAB over 7 years ago +2
    Nice post, it looks like you are well on your way to exploiting the FPGA. DAB
  • aspork42
    aspork42 over 7 years ago

    I've used some of these before. And for less than $3.00; it'll save me like 20 hours researching parts and designing my own custom PCB. I just need to cut the appropriate traces and put this in between. I was thinking of essentially making my own with transistors but this works also.

    • Cancel
    • Vote Up 0 Vote Down
    • Sign in to reply
    • More
    • Cancel
  • rsc
    rsc over 7 years ago

    Hi Guys,

    Sparkfun has some nice inexpensive level shifting boards,

    https://www.sparkfun.com/products/12009

    Scott

    • Cancel
    • Vote Up +1 Vote Down
    • Sign in to reply
    • More
    • Cancel
  • DAB
    DAB over 7 years ago

    Nice post, it looks like you are well on your way to exploiting the FPGA.


    DAB

    • Cancel
    • Vote Up +2 Vote Down
    • Sign in to reply
    • More
    • Cancel
  • michaelkellett
    michaelkellett over 7 years ago

    You'll get the best result by doing a complete new board for the robot but that will involve you in work you may not want to take on.

    It will let you experiment using the FPGA to do all the low level control - which is good.


    To drive the robot board from the Zynq will mean spoiling it by quite a lot of hacking (remove processor, graft in level shifters)


    Just talking to the robot AVR via SPI is not really giving the Zynq anything to do - just using it with a bog standard peripheral to do some processing.


    The best work:benefit ratio seems to be the middle option, if you don't mind hacking the robot board.


    To add an ADC  - do just that - the Zynq can control an ADC standing on its head (ie easily)  and it's a good project to get going on FPGA.


    MK

    • Cancel
    • Vote Up +3 Vote Down
    • Sign in to reply
    • More
    • Cancel
  • 14rhb
    14rhb over 7 years ago

    Hi James,


    Thank you for your interesting blog. I've used Vivado for the Arty S7 Roadtest and there was much I didn't get to understand - I'm hoping to learn more reading the PathToProgrammable blogs like yours.


    Regarding your line following bot - I did a search looking for a shield that converts 5v/3.3v logic but couldn't find one. Personally I would try and make my own (using a bare UNO development PCB) and some bidirectional logic translators ( range of bi-directional logic translators from TI ). You could use your new board to interface your Zedboard to other 5v boards in the future.


    Good luck on your path(s)


    Rod

    • Cancel
    • Vote Up +3 Vote Down
    • Sign in to reply
    • More
    • Cancel
element14 Community

element14 is the first online community specifically for engineers. Connect with your peers and get expert answers to your questions.

  • Members
  • Learn
  • Technologies
  • Challenges & Projects
  • Products
  • Store
  • About Us
  • Feedback & Support
  • FAQs
  • Terms of Use
  • Privacy Policy
  • Legal and Copyright Notices
  • Sitemap
  • Cookies

An Avnet Company © 2025 Premier Farnell Limited. All Rights Reserved.

Premier Farnell Ltd, registered in England and Wales (no 00876412), registered office: Farnell House, Forge Lane, Leeds LS12 2NE.

ICP 备案号 10220084.

Follow element14

  • X
  • Facebook
  • linkedin
  • YouTube